Cheesy Roasted Cauliflower: Guaranteed Tender-Crisp!

For years, I’ve heard the same lament: “My cheesy cauliflower always turns out mushy!” It’s a common frustration with many recipes that boil florets first, leading to a watery, flavorless mess. But what if I told you that achieving perfectly tender-crisp Cheesy Roasted Cauliflower, enveloped in a rich, velvety cheese sauce, is not only possible but incredibly simple?
This recipe is your definitive guide to transforming a humble head of cauliflower into a show-stopping side dish, or even a comforting light meal, every single time. Get ready to experience the true potential of this versatile vegetable, perfectly roasted to golden perfection before meeting its creamy, cheesy destiny.
Why Our Cheesy Roasted Cauliflower Stands Apart
Say Goodbye to Mushy Cauliflower Forever
The cardinal sin in many cheesy cauliflower recipes is the pre-boil. Boiling waterlogged florets, stripping them of flavor and leaving them soggy, is a surefire way to culinary disappointment. We understand this universal frustration.
Our method entirely bypasses this pitfall. By skipping the boil, we retain the cauliflower’s natural integrity and flavor, ensuring a superior base for our decadent cheese sauce.
The Secret to Perfectly Tender-Crisp Bites
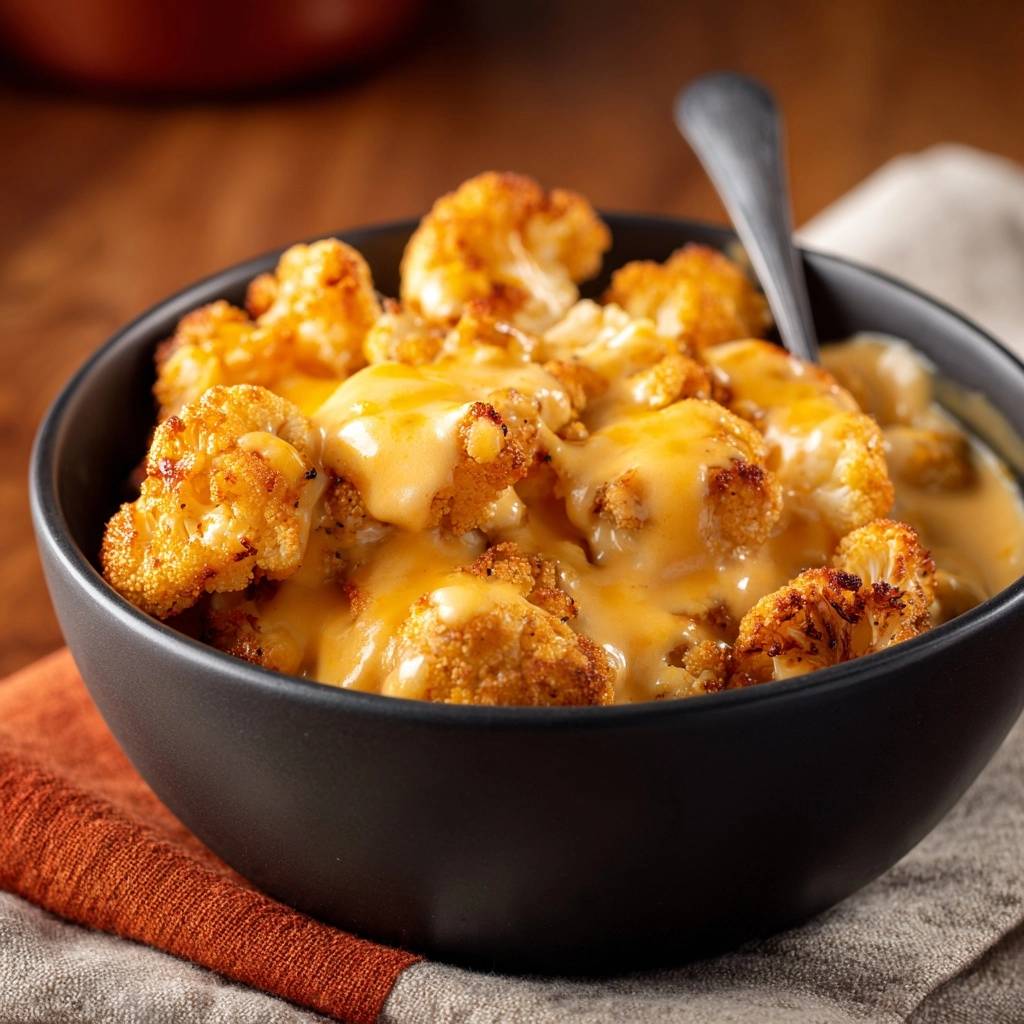
The magic truly happens in the oven first. Roasting the cauliflower at a high temperature before adding the sauce is the non-negotiable step for tender-crisp perfection. This direct, high-heat exposure encourages caramelization and browning on the florets.
This process not only locks in the cauliflower’s inherent flavor but also creates those desirable slightly charred, crispy edges. These roasted textures beautifully contrast with the smooth, creamy cheese sauce, delivering an unparalleled eating experience.
A Crowd-Pleasing Side Dish or Light Meal Solution
This particular Cheesy Roasted Cauliflower dish transcends the ordinary side. Its comforting, rich flavors make it a versatile addition to any meal, from a casual weeknight dinner to an elegant holiday spread.
It can easily stand alone as a satisfying vegetarian main course when paired with a simple salad, or elevate classic proteins like roasted chicken or baked fish. Its broad appeal and irresistible taste guarantee it will be a family favorite.
Gather Your Flavor Foundation: Ingredients for Success
- 1 large head cauliflower, cut into bite-sized florets
- 2 tablespoons olive oil
- 1/2 teaspoon salt
- 1/4 teaspoon black pepper
- 2 tablespoons unsalted butter
- 2 tablespoons all-purpose flour
- 1 1/2 cups milk (any fat percentage)
- 1 1/2 cups shredded sharp cheddar cheese
- Pinch of nutmeg (optional, for depth)
The Star: Fresh Cauliflower Florets
Choosing a good head of cauliflower is your first step to success. Look for a firm, dense head with creamy white florets and fresh, vibrant green leaves. Avoid any heads with brown spots or a soft texture, as these indicate it’s past its prime.
When cutting, aim for bite-sized florets that are roughly uniform in size. This ensures even roasting, so every piece cooks perfectly and no small bits burn while larger ones remain undercooked.
Crafting the Velvety Cheese Sauce
Each component of our rich cheese sauce plays a crucial role. Unsalted butter provides the foundational richness and fat necessary for a perfectly smooth roux, which is the thickening agent.
All-purpose flour combines with the butter to create this roux, ensuring a consistent and lump-free sauce base. Milk, added gradually, contributes creaminess and body, transforming the roux into a luscious sauce.
Sharp cheddar cheese is selected for its bold, tangy flavor and excellent melting properties, delivering that classic, comforting taste. The optional pinch of nutmeg is a subtle but powerful addition, enhancing the savory notes of the cheese and adding a sophisticated depth to the overall flavor profile.
Essential Seasonings and Roasting Aids
Olive oil is indispensable for our roasting technique. It coats the cauliflower, promoting even browning and helping to achieve that desirable crispy texture, rather than just steaming the vegetable.
Salt and black pepper are more than just seasonings here; they are foundational flavor enhancers. They draw out the natural sweetness of the cauliflower and create a balanced taste profile that shines through the rich cheese sauce.
Essential Tools for Your Cheesy Roasted Cauliflower Journey
- Large Baking Sheet (or two):
Absolutely essential for spreading cauliflower in a single layer, which is critical for roasting rather than steaming. Using parchment paper also aids in easy cleanup.
- Large Mixing Bowl:
For efficiently tossing the cauliflower with olive oil and seasonings, ensuring every floret is evenly coated.
- Medium Saucepan:
The ideal vessel for melting butter and carefully whisking your roux and cheese sauce to a perfect, lump-free consistency.
- Whisk:
Indispensable for creating a smooth roux and gradually incorporating milk into the cheese sauce, preventing lumps.
- Serving Bowl:
To elegantly combine the tender-crisp roasted cauliflower with the warm, velvety cheese sauce just before serving.
Your Step-by-Step Guide to Cheesy Roasted Cauliflower Perfection
- Prep for Perfection:
Preheat your oven to 400°F (200°C) and line a large baking sheet with parchment paper. This optimal temperature ensures efficient roasting and the parchment paper guarantees easy cleanup.
In a large bowl, toss the cauliflower florets with olive oil, salt, and pepper until evenly coated. Ensure each floret has a light film of oil but isn’t drenched, which promotes browning.
- The Tender-Crisp Secret:
Spread the seasoned cauliflower in a single layer on your prepared baking sheet. It is crucial not to overcrowd the pan; this allows the cauliflower to roast and caramelize, preventing it from steaming and becoming mushy. If necessary, use two baking sheets.
Roast for 20-25 minutes, flipping the florets halfway through. Look for tender cauliflower with delicious caramelized, slightly crispy edges – this direct, high-heat roasting locks in incredible flavor and texture.
- Whip Up the Creamy Cheese Sauce:
While the cauliflower roasts, begin preparing your velvety cheese sauce. In a medium saucepan, melt the 2 tablespoons of unsalted butter over medium heat.
Whisk in the 2 tablespoons of all-purpose flour and cook for 1 minute, stirring constantly, until a thick paste (a roux) forms. This step cooks out the raw flour taste and forms the base for thickening.
- Smooth Operator:
Gradually whisk in the 1½ cups of milk, adding only a small amount at a time, ensuring you whisk vigorously to prevent any lumps from forming. Consistency is key here for a smooth sauce.
Continue whisking constantly as the sauce heats until it thickens and comes to a gentle simmer. Reduce the heat to low once it reaches this consistency.
For a perfect pairing, try our Creamy Corn Casserole with Crisp Panko Topping.
- Cheesy Dream:
Remove the saucepan from the heat. Add the 1½ cups of shredded sharp cheddar cheese and the optional pinch of nutmeg (which enhances the cheese flavor beautifully).
Stir continuously until the cheese is completely melted and the sauce is smooth, creamy, and homogenous. If the sauce appears too thick, feel free to add a splash more milk until your desired velvety consistency is reached.
- Combine and Serve:
Once the perfectly roasted cauliflower is out of the oven, immediately transfer it to a warm serving bowl.
Pour the warm, smooth cheese sauce generously over the tender-crisp florets. Gently toss to coat, then serve immediately to enjoy the best texture and warmth!
Chef’s Secrets: Elevating Your Cheesy Roasted Cauliflower
- Don’t Overcrowd the Pan:
This is the golden rule for roasted vegetables! A single layer allows hot air to circulate, resulting in browning and crispy edges. Overcrowding traps steam, leading to mushy cauliflower. If needed, use two baking sheets.
- Roast Until Caramelized:
Don’t just roast until tender; aim for visible browning and even slightly charred edges. This caramelization adds immense depth of flavor that is essential to the dish.
- Grate Your Own Cheese:
Pre-shredded cheeses often contain anti-caking agents (like cellulose) that can make your cheese sauce grainy or prevent it from melting smoothly. Freshly grated cheese melts beautifully and results in a far superior texture.
- Experiment with Cheese Varieties:
While sharp cheddar is classic, don’t hesitate to try other good melting cheeses like Gruyere for nuttiness, Monterey Jack for mild creaminess, or a blend of your favorites. Just ensure they are varieties known for smooth melting.
- A Touch of Nutmeg Makes a Difference:
That optional pinch of nutmeg isn’t just for show! It subtly enhances the savory notes of cheese sauces, adding a layer of sophisticated flavor without making the dish taste “spiced.”
- Serving Hot is Key:
The best time to enjoy this Cheesy Roasted Cauliflower is immediately after combining the warm cauliflower with the hot cheese sauce. This ensures the sauce is at its creamiest and the cauliflower is at its tender-crispest.
Common Questions & Quick Fixes for Your Cauliflower
Why is my cauliflower still mushy or watery?
This is typically caused by overcrowding the baking sheet during the roasting phase, which steams the cauliflower instead of roasting it. Ensure florets are spread in a single layer with space between them. Also, ensure you roast until caramelized, not just tender, to eliminate excess moisture.
My cheese sauce is lumpy or too thin/thick. What went wrong?
Lumps usually occur if the milk isn’t added gradually enough or whisked vigorously. To fix, remove from heat and whisk vigorously. For a thin sauce, simmer gently to reduce; for a thick sauce, whisk in a splash more warm milk until desired consistency is achieved.
The cheese isn’t melting smoothly into the sauce. Any tips?
Ensure you remove the saucepan from the heat before adding the cheese, as high heat can cause cheese to seize and become oily. Always use freshly grated cheese, as pre-shredded often contains additives that prevent smooth melting. Stir patiently until fully incorporated.
Perfect Pairings and Creative Serving Ideas
- Classic Weeknight Side:
Serve this Cheesy Roasted Cauliflower alongside family favorites like roasted chicken, pan-seared lamb chops, or a simple baked fish. Its richness beautifully complements protein.
- Holiday Table Star:
Elevate your holiday spread by including this vibrant and comforting dish next to a festive ham, prime rib, or a Thanksgiving turkey. It’s a guaranteed crowd-pleaser.
- Vegetarian Main Course:
Transform it into a satisfying vegetarian meal by stirring in roasted chickpeas, white beans, or serving it over a bed of quinoa or wild rice for added protein and fiber.
- Add a Spicy Kick:
For those who love a bit of heat, sprinkle a pinch of cayenne pepper into the cheese sauce, or offer hot sauce at the table. A dash of red pepper flakes before serving also adds a nice zing.
- Fresh Herb Finish:
A simple garnish of fresh chopped parsley, chives, or even a sprig of thyme adds a burst of fresh flavor and vibrant color, enhancing the dish’s appeal.
Make Ahead & Storage: Enjoying Later
Storing Leftovers
Store any leftover Cheesy Roasted Cauliflower in an airtight container in the refrigerator for up to 3-4 days. While the cauliflower may lose some crispness, the flavor remains delicious.
Reheating for Best Results
For the best texture, reheat in the oven at 300°F (150°C) until warmed through, or gently on the stovetop over low heat, adding a splash of milk to loosen the sauce. Microwaving is fastest but may result in a softer texture.
Can You Make it Ahead?
You can roast the cauliflower ahead of time and store it in the fridge. The cheese sauce can also be made a day in advance and gently reheated. For optimal results, combine the warm sauce and freshly reheated cauliflower just before serving to maintain that perfect tender-crisp texture.
Your Top Cheesy Roasted Cauliflower Questions Answered
Is this recipe gluten-free?
As written, this recipe uses all-purpose flour for the roux, so it is not naturally gluten-free. However, you can easily adapt it by substituting a gluten-free all-purpose flour blend or using cornstarch (slurried with a little milk) to thicken the sauce.
Can I use frozen cauliflower for this recipe?
While fresh cauliflower yields the best tender-crisp results, you can use frozen. Do not thaw it. Roast directly from frozen, but increase the roasting time by 10-15 minutes, ensuring all excess moisture has evaporated and the florets achieve some browning.
What other cheeses can I use in the sauce?
Beyond sharp cheddar, excellent melting cheeses include Gruyere, Fontina, Monterey Jack, or even a good quality Colby. You can also use a blend of cheeses for a more complex flavor. Avoid fresh mozzarella, as it tends to be stringy, or extremely dry cheeses that don’t melt well.
Can I make a dairy-free version of this Cheesy Roasted Cauliflower?
Yes, you absolutely can! Substitute unsalted dairy-free butter, an unsweetened plant-based milk (such as almond or oat milk), and a high-quality dairy-free shredded cheddar or a blend that melts well. The cooking method remains the same.
Embrace the Tender-Crisp Difference: Your New Go-To Cauliflower
You’re now equipped to create the most irresistible Cheesy Roasted Cauliflower you’ve ever tasted – tender-crisp, bursting with flavor, and smothered in a velvety cheese sauce. Say goodbye to soggy cauliflower and hello to a side dish that consistently delivers on taste and texture.
We invite you to make this recipe your own and share your culinary journey with us. Did you try a different cheese? Add a unique spice? Let us know in the comments below! Don’t forget to share your delicious creations on social media; tag us so we can celebrate your Cheesy Roasted Cauliflower masterpiece!

Cheesy Cauliflower
Course: Side DishCuisine: AmericanDifficulty: easy4
servings15
minutes25
minutes450
kcal40
minutesTired of mushy cauliflower? This recipe guarantees tender-crisp florets, perfectly browned, and smothered in a rich, creamy sharp cheddar cheese sauce. It’s an easy side dish that might just steal the show!
Ingredients
1 large head cauliflower, cut into bite-sized florets
2 tablespoons olive oil
1/2 teaspoon salt
1/4 teaspoon black pepper
2 tablespoons unsalted butter
2 tablespoons all-purpose flour
1 1/2 cups milk (any fat percentage)
1 1/2 cups shredded sharp cheddar cheese
Pinch of nutmeg (optional, for depth)
Directions
- Prep for Perfection: Preheat your oven to 400°F (200°C). Line a large baking sheet with parchment paper for easy cleanup. The key to tender-crisp cauliflower is proper roasting. In a large bowl, toss the cauliflower florets with olive oil, salt, and pepper until evenly coated. Make sure to use enough oil to coat, but not drench.
- The Tender-Crisp Secret: Spread the seasoned cauliflower in a single layer on your prepared baking sheet. Do not overcrowd the pan! This is crucial for achieving that beautiful browning and preventing steaming. If your pan is too small, use two sheets. Roast for 20-25 minutes, flipping halfway through, until the cauliflower is tender and has delicious caramelized, slightly crispy edges. This direct, high-heat roasting locks in flavor and perfect texture.
- Whip Up the Creamy Cheese Sauce: While the cauliflower roasts, prepare your velvety cheese sauce. In a medium saucepan, melt the butter over medium heat. Whisk in the flour and cook for 1 minute, stirring constantly, until a thick paste (roux) forms.
- Smooth Operator: Gradually whisk in the milk, a little at a time, ensuring no lumps form. Continue whisking constantly until the sauce thickens and comes to a gentle simmer. Reduce heat to low.
- Cheesy Dream: Remove the saucepan from the heat. Add the shredded cheddar cheese and the optional pinch of nutmeg. Stir until the cheese is completely melted and the sauce is smooth and creamy. If the sauce feels too thick, add a splash more milk until desired consistency is reached.
- Combine and Serve: Once the roasted cauliflower is out of the oven, transfer it to a serving bowl. Pour the warm, smooth cheese sauce generously over the tender-crisp florets. Serve immediately and watch it disappear!
Notes
- Do not overcrowd the pan when roasting cauliflower for the best tender-crisp results.