Mastering Cinnamon Sugar Fried Donuts with the Reverse Creaming Method
There is something undeniably nostalgic about the scent of warm cinnamon and frying dough wafting through a kitchen. Most of us have tried to recreate that bakery-style donut at home, only to end up with something that feels more like a heavy, dry muffin shaped like a ring. It is a common frustration that usually stems from the way the dough is mixed, leading to a bready texture rather than a delicate crumb.
The secret to achieving that professional, melt-in-your-mouth interior lies in a technique called “Reverse Creaming.” Instead of the usual method of dumping wet ingredients into dry, we change the order of operations to control how the structure of the donut forms. This ensures your donuts stay light and airy while the outside develops a satisfying, golden-brown crunch.
I’ve found that the real trick to success is all about the butter. By rubbing softened butter directly into your flour mixture before any milk or eggs touch the bowl, you create a waterproof barrier around the flour particles. This simple move prevents the dough from getting tough, even if you have a slightly heavy hand when mixing. It is the single most important step for a tender result.
The Science of the Non-Dense Muffin Trick
When you mix flour with liquid, gluten starts to develop. While gluten is great for chewy sourdough, it is the enemy of a light, cake-style donut. If those gluten strands get too long and strong, your donut will fight back when you bite into it, resulting in that “dense muffin” texture we want to avoid.
The reverse creaming method acts as a physical disruptor. Because fat (the butter) is worked into the flour first, it coats the proteins. When you finally add the milk and eggs, the liquid cannot easily penetrate that fat barrier to form those long, rubbery gluten chains. Therefore, the crumb remains short, tender, and incredibly soft.
Why Traditional Mixing Fails Your Dough
Most amateur recipes follow the “muffin method,” where you whisk liquids and sugars and then fold in the flour. This often leads to over-mixing because you are trying to get rid of lumps. By the time the batter is smooth, the gluten is already over-developed, and the air bubbles are squeezed out.
In this recipe, we look for a “damp sand” texture during the first stage. This ensures every grain of flour is protected by fat. When you eventually add the liquids, the dough comes together almost instantly. This prevents that rubbery, bread-like consistency and gives you a donut that practically dissolves on your tongue.
Essential Components for Cinnamon Sugar Fried Donuts
Quality ingredients make a massive difference when the recipe is this simple. I always recommend using room temperature eggs and milk. Cold ingredients can cause the softened butter in your flour mixture to seize up into tiny hard clumps, which prevents a smooth emulsion and leads to uneven frying.
All-purpose flour is the hero here because it has just enough protein to hold the donut together without making it tough. While bread flour might seem like a good idea for “structure,” it will actually make these donuts far too chewy. Additionally, don’t skimp on the cinnamon in the dough; it provides a warm base layer of flavor that complements the sugary crust.
Selecting the Right Frying Oil
Choosing the right oil is about safety and flavor. You need an oil with a high smoke point, meaning it won’t burn or start smoking at 350°F. Vegetable oil, canola oil, or peanut oil are the best choices because they are neutral in flavor and can handle the heat.
Avoid using olive oil or butter for the frying process. Olive oil has a distinct flavor that clashes with cinnamon sugar, and butter will burn almost instantly at these temperatures. A neutral oil allows the taste of the vanilla and nutmeg-spiced dough to really shine through without any greasy aftertaste.
Step-by-Step: Preparing the Tender Donut Dough
Start by whisking your dry ingredients thoroughly to ensure the baking powder is evenly distributed. Once you add the softened butter, use your fingertips or a pastry cutter to work it in. You are looking for a texture that looks like fine, damp sand with no large chunks of butter remaining.
When you pour in the whisked milk, eggs, and vanilla, switch to a sturdy spoon or spatula. Stir gently and stop the very second the flour streaks disappear. The dough will be soft and slightly tacky, but that is exactly what you want for a light donut. If you keep stirring until it is perfectly smooth, you have likely gone too far.
Letting the dough rest for just five minutes before rolling can also help. This brief pause allows the flour to fully hydrate, making it much easier to handle on your floured workspace. It is a small step that pays off in the final texture.
Cutting and Shaping for Uniform Frying
When you turn the dough onto your counter, be generous with the flour on the surface but light with the flour on top of the dough. Pat it down gently to a 1/2-inch thickness. If you roll it too thin, the donuts will be crunchy all the way through; too thick, and the centers will stay raw while the outsides burn.
Use a sharp donut cutter to get clean edges. If you don’t have one, a large biscuit cutter and a small soda bottle cap work perfectly. When you gather the scraps to re-roll them, do it gently. Each time you work the dough, it gets a little tougher, so try to get as many donuts as possible out of the first press.
The Art of Shallow Frying at 350°F
Frying can feel intimidating, but a thermometer takes all the guesswork out of it. You only need about an inch of oil in a heavy skillet. Heat it slowly until it hits 350°F. This temperature is the “sweet spot” where the outside crisps up quickly enough to prevent the dough from soaking up too much oil.
Carefully slide the donuts into the oil using a slotted spoon. You should see immediate, vigorous bubbling around the edges. Fry for about two minutes per side. You are looking for a deep, mahogany golden-brown color. This ensures the heat has penetrated all the way to the center of the ring.
Managing Oil Temperature Fluctuations
Every time you add a piece of room-temperature dough to the hot oil, the temperature will drop. Therefore, you must keep a close eye on your thermometer. Don’t crowd the pan; frying only three or four at a time allows the oil to recover its heat quickly.
If the temperature drops below 325°F, your donuts will become greasy and heavy. If it climbs above 375°F, they will brown too fast on the outside while remaining raw and doughy in the middle. Adjust your burner dial in small increments to maintain that steady 350°F sizzle.
Achieving the Perfect Cinnamon Sugar Crust
The “window of opportunity” for coating your donuts is very small. You want to move them from the oil to a paper towel for only ten seconds to shed the excess grease. While they are still steaming hot, brush them with a little extra melted butter and drop them into the cinnamon-sugar mix.
The residual heat from the frying process helps the sugar crystals melt slightly and “grip” the surface of the donut. If you wait until they are cool, the sugar will just fall off. This creates that iconic, sparkling crust that crunches when you take your first bite.
Elevating the Presentation with Chocolate and Pecans
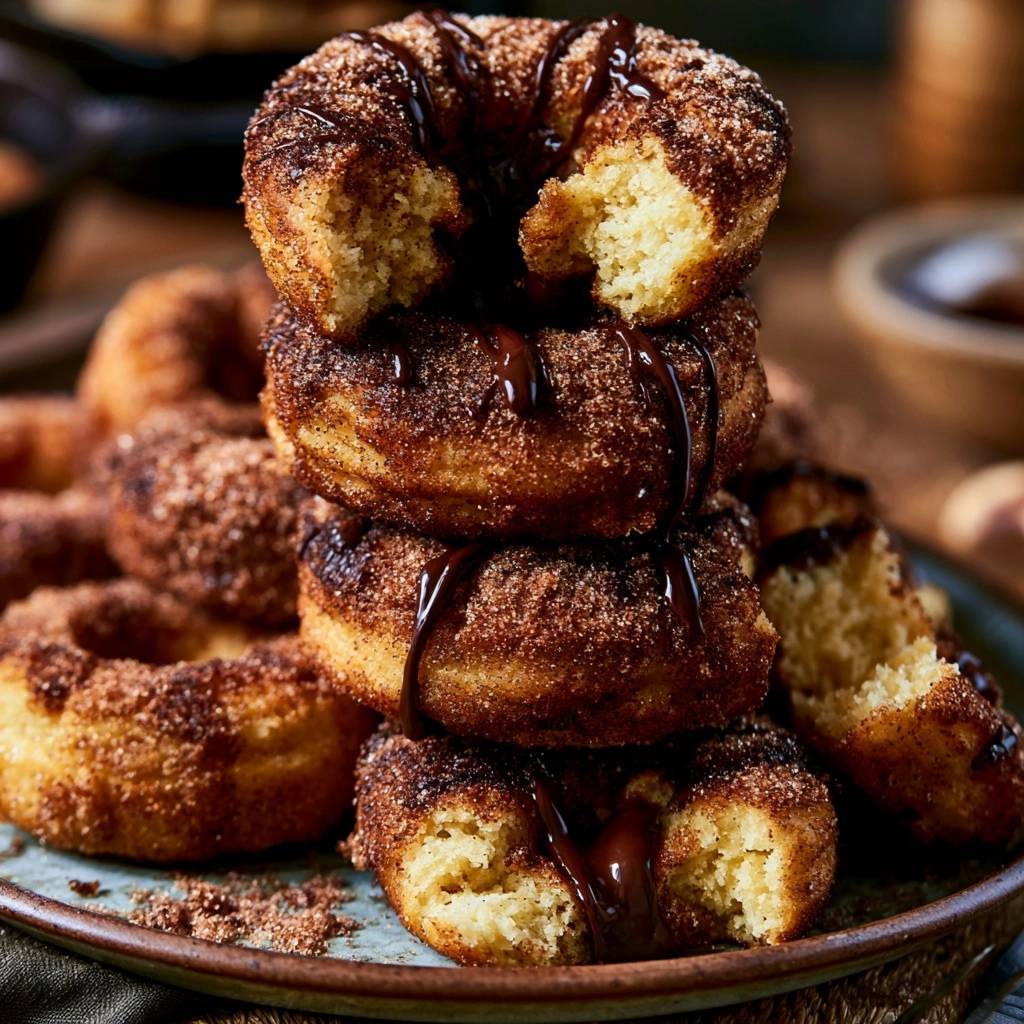
To make these look like they came from a high-end boutique, a chocolate drizzle is essential. Melt your dark chocolate chips in 20-second bursts in the microwave, stirring in between until smooth. Use a spoon to zig-zag the chocolate over a stack of warm donuts.
The toasted pecans add a fantastic earthy crunch that breaks up the sweetness of the sugar. I like to sprinkle them over the wet chocolate so they stick. It creates a beautiful contrast of textures—the soft dough, the crunchy sugar, the silky chocolate, and the crisp nuts.
Troubleshooting Common Donut Frying Issues
If your donuts come out looking like dark rocks but are raw inside, your oil is definitely too hot. Turn the heat down and wait for the temperature to stabilize. Conversely, if they look pale and feel heavy or oily, your oil wasn’t hot enough to seal the exterior quickly.
If the dough is too sticky to cut, don’t keep adding flour, which makes them tough. Instead, pop the dough into the fridge for 15 minutes. Chilling the butter back down makes the dough much firmer and easier to handle without ruining the delicate crumb we worked so hard to create.
Equipment: Tools for Professional Results
A heavy-bottomed skillet, like a cast-iron pan, is your best friend for frying. These pans hold heat much better than thin stainless steel, which means fewer temperature swings when you add the dough. It makes the whole process much more predictable and less stressful.
In addition to a thermometer, a wire cooling rack is helpful. While you want to sugar the donuts while they are hot, letting them sit on a rack for a minute after sugaring prevents the bottoms from getting soggy. It allows air to circulate, keeping that crust perfectly crisp.
Make Ahead and Storage Guidelines
Donuts are undoubtedly at their peak the moment they are made. However, you can prep the dough the night before. Just wrap it tightly in plastic wrap and keep it in the fridge. In the morning, let it sit on the counter for 20 minutes before rolling and cutting.
If you have leftovers, store them in a ventilated container rather than an airtight one. An airtight container will trap moisture and turn the sugar coating into a sticky syrup. To revive a day-old donut, a 5-second zap in the microwave or 2 minutes in a warm air fryer will bring back some of that original magic.
Expert Tips for Flavor Variations
Once you master the reverse creaming base, you can get creative. Try adding a pinch of freshly grated nutmeg or cardamom to the flour for a more complex, “old-fashioned” flavor profile. These spices pair beautifully with the dark chocolate drizzle.
You can also swap the cinnamon sugar for a simple glaze made of powdered sugar and milk. However, if you do this, wait for the donuts to cool slightly so the glaze doesn’t just run off. No matter what topping you choose, the reverse creaming method ensures the foundation is always perfect.
Frequently Asked Questions
Can I bake these instead of frying?
You can bake these at 350°F for about 12 to 15 minutes, but the texture will be different. Frying creates a specific “crust” and moisture level that baking cannot replicate. If you bake them, they will be more like a very high-quality muffin. Make sure to brush them generously with butter after baking so the cinnamon sugar still sticks.
Why is my donut dough so sticky?
Sticky dough usually happens because of high humidity or because the flour was measured by “scooping” rather than the “spoon and level” method. If you scoop the flour with the measuring cup, you often pack it down and get too much. If it is too sticky to handle, chill it for 20 minutes or lightly dust your hands with flour before shaping.
How do I keep the oil from smoking?
Oil starts to smoke when it breaks down from over-heating or when “debris” like loose flour burns in the pan. Use a thermometer to stay at 350°F and use a slotted spoon to fish out any little bits of dough that fall off between batches. If the oil starts to look very dark and smells acrid, it is time to carefully discard it and start with fresh oil.
What is the best way to toast pecans?
Toasting pecans brings out their natural oils and makes them much crunchier. Put the chopped pecans in a dry skillet over medium heat for about 3 to 5 minutes. Shake the pan constantly so they don’t burn. As soon as you can smell a nutty aroma, remove them from the heat and transfer them to a cool plate immediately.
Can I use a different type of sugar?
Granulated sugar is best for the coating because the large crystals provide a distinct crunch. Superfine sugar (caster sugar) will give you a much softer, more delicate coating that melts into the butter faster. Brown sugar is generally too moist for a coating and will turn into a sticky paste rather than a sparkling crust.
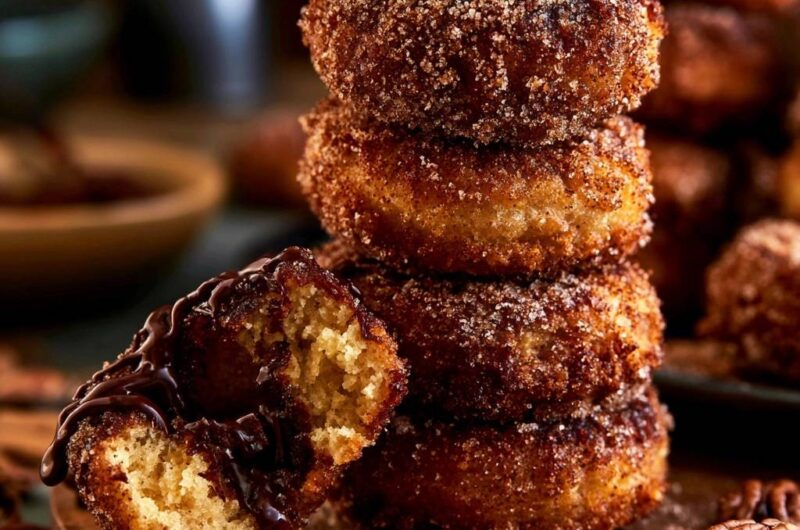
Cinnamon Sugar Fried Donuts
Course: DessertCuisine: AmericanDifficulty: easy12
donuts20
minutes15
minutes35
Minutes310
kcalAmerican
Ingredients
2 cups all-purpose flour
3/4 cup granulated sugar
2 teaspoons baking powder
1 teaspoon ground cinnamon
1/2 teaspoon salt
1/2 cup whole milk, room temperature
2 large eggs, room temperature
4 tablespoons unsalted butter, softened (not melted)
2 teaspoons vanilla extract
Vegetable oil (for frying)
For the coating and garnish:
1/2 cup unsalted butter, melted
1 cup granulated sugar mixed with 1 tablespoon cinnamon
1/2 cup dark chocolate chips, melted (for drizzling)
1/4 cup toasted pecans, chopped (optional garnish)
Directions
- In a large bowl, whisk together the flour, sugar, baking powder, cinnamon, and salt.
- To solve the density issue, add the 4 tablespoons of softened butter to the dry ingredients. Use a pastry cutter or your fingers to rub the butter into the flour until the mixture resembles fine, damp sand. This fat barrier ensures a tender crumb.
- In a separate bowl, whisk the milk, eggs, and vanilla.
- Pour the wet ingredients into the flour mixture. Stir gently by hand just until a soft dough forms. Do not over-mix.
- Turn the dough onto a floured surface and pat to 1/2-inch thickness. Use a donut cutter to stamp out rings.
- Heat 1 inch of vegetable oil in a heavy skillet to 350°F (175°C).
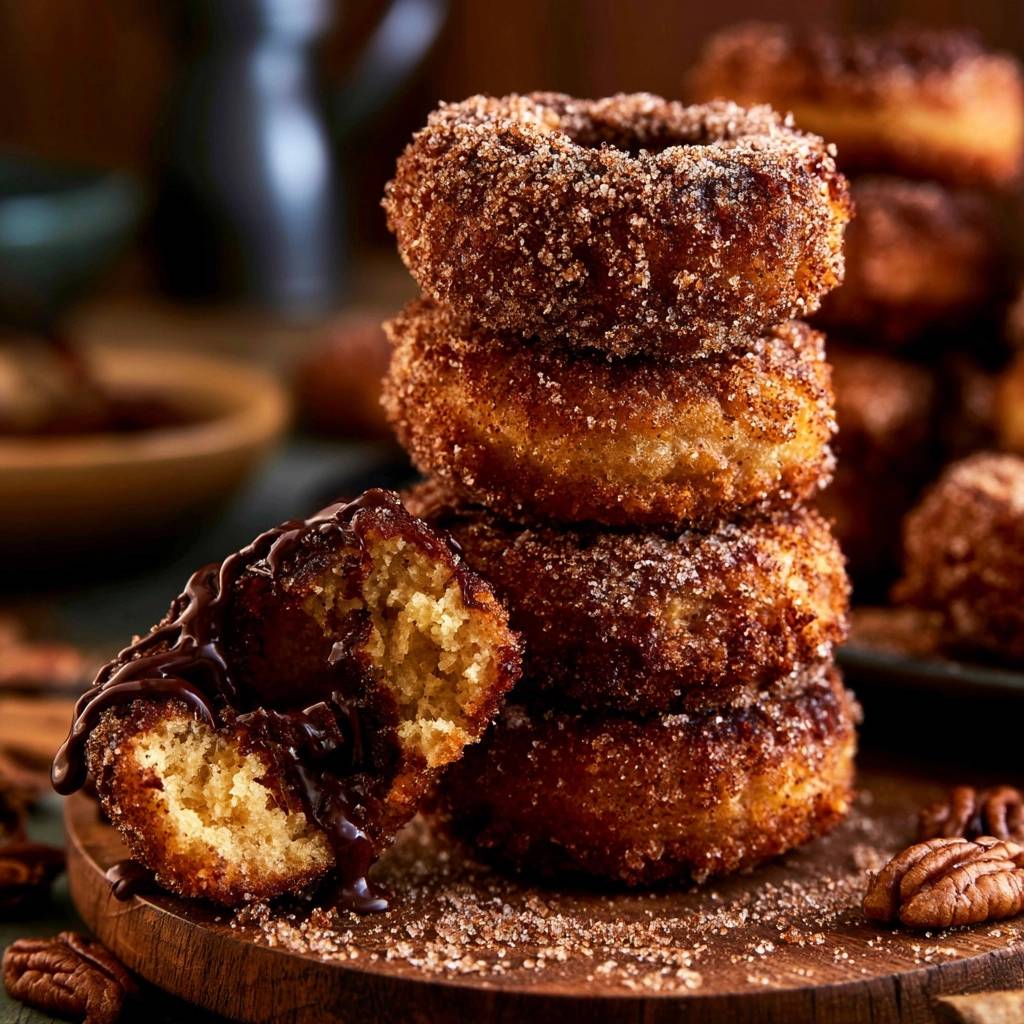
- Carefully fry the donuts for 2 minutes per side until they achieve the deep golden-brown, textured crust seen in the image. Drain briefly on paper towels.
- While hot, quickly brush each donut with melted butter and roll immediately in the cinnamon-sugar mixture. The heat from frying allows the sugar to adhere in a thick, sparkling layer.
- Arrange in a stack and drizzle generously with melted dark chocolate. Serve immediately with pecans on the side to match the visual presentation.
Notes
- The reverse creaming method prevents gluten over-development, which is the key to avoiding a dense, muffin-like texture.