Cheesy BBQ Chicken Roll: No More Soggy Bottoms!
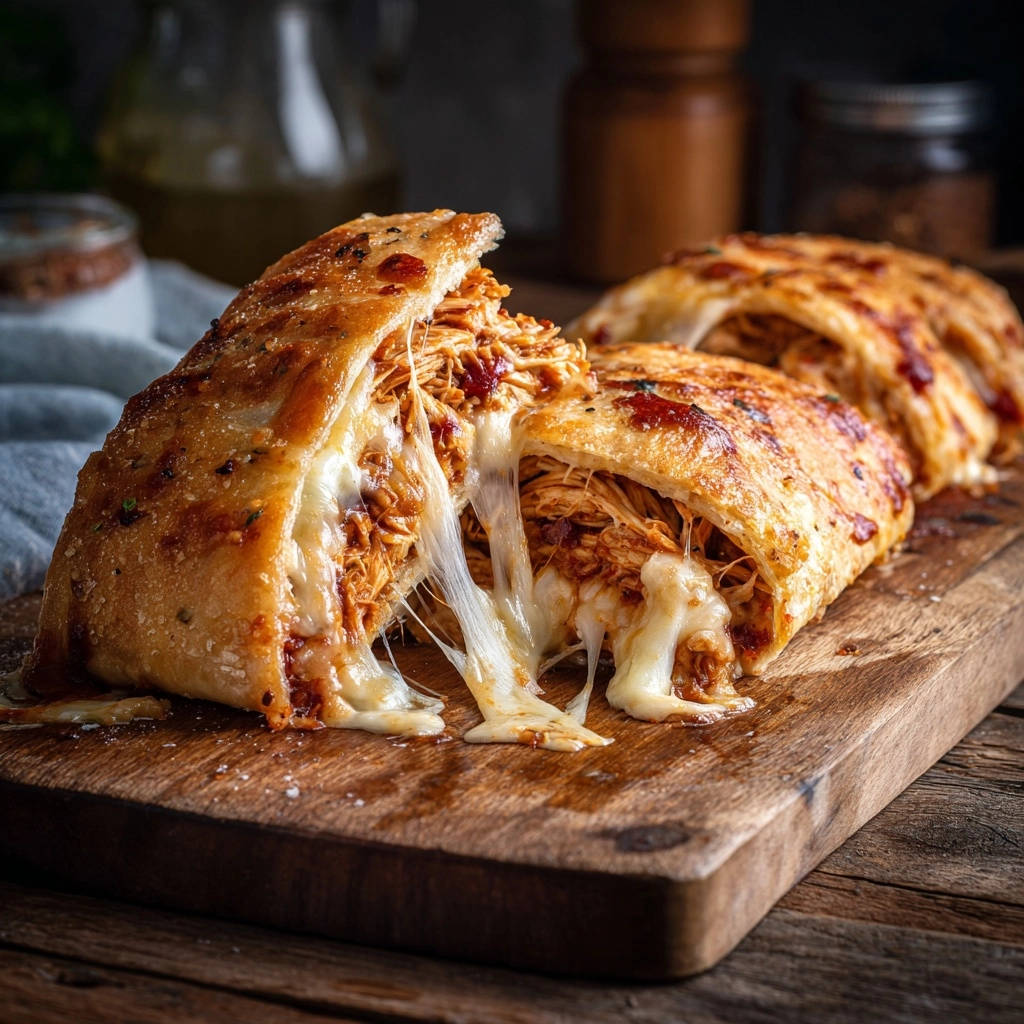
For years, I battled the dreaded “soggy bottom” when making a `Cheesy BBQ Chicken Roll`. It felt like no matter how delicious the filling, the crust would betray me. After countless experiments, I finally cracked the code, and I’m thrilled to share a reliable method that guarantees a perfectly golden, crispy crust every single time.
This recipe ensures your `Cheesy BBQ Chicken Roll` is an absolute showstopper, boasting a juicy, flavorful interior encased in a wonderfully firm and flaky exterior. Get ready for a weeknight dinner that will impress everyone.
Why This Cheesy BBQ Chicken Roll Will Change Your Dinner Game
The “soggy bottom” phenomenon is a common woe with stuffed dough recipes. It usually stems from a combination of excess moisture in the filling and insufficient heat transfer to the bottom of the crust during baking.
This specific `Cheesy BBQ Chicken Roll` recipe tackles these issues head-on. We strategically manage moisture in the filling and introduce a critical preheating step for the baking sheet.
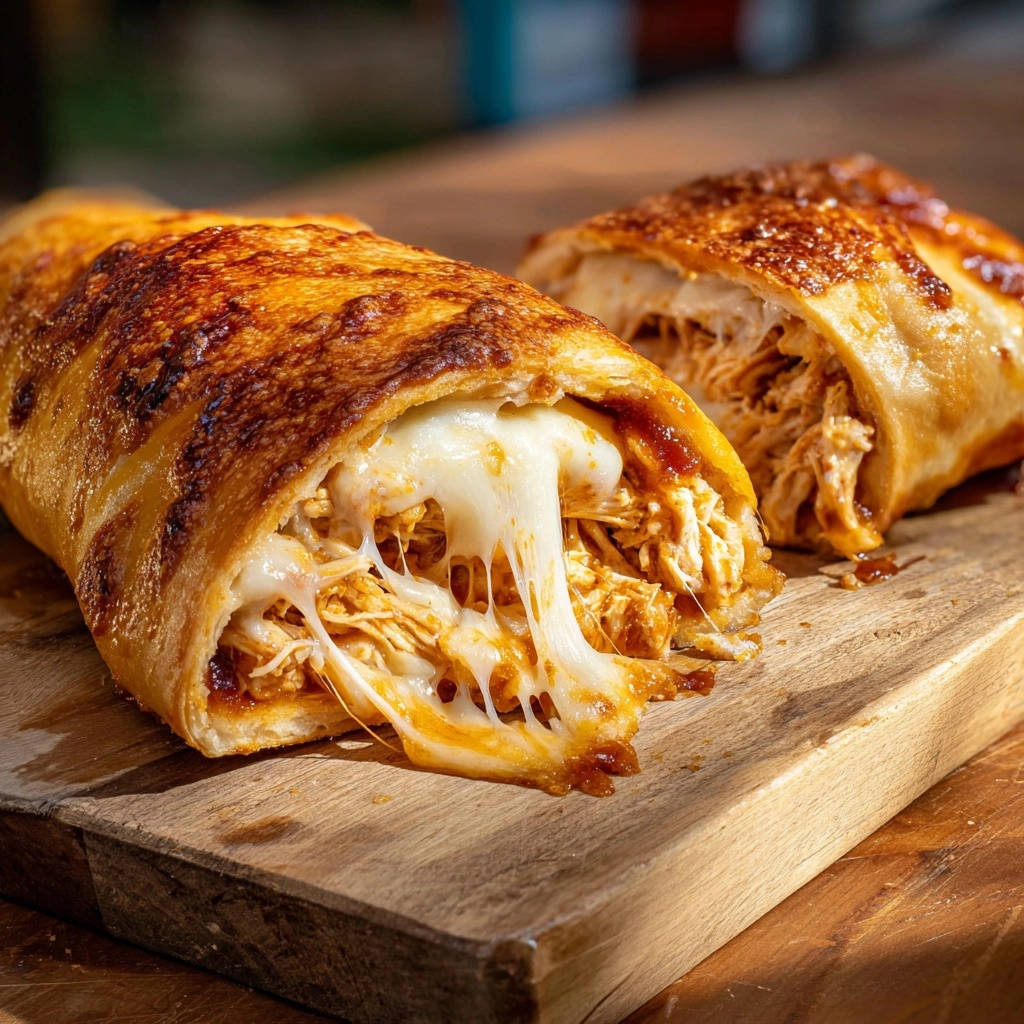
The result is a uniformly crisp crust that perfectly cradles the rich, cheesy BBQ chicken filling. It’s a game-changer for casual weeknight meals, impressive party appetizers, or a comforting family favorite.
The Building Blocks: Ingredients for Your Perfect Cheesy BBQ Chicken Roll
Savory Chicken & BBQ Sauce Foundation
Cooked, Shredded Chicken: Using pre-cooked chicken, like rotisserie or leftover chicken breast, saves significant time. The shredding ensures an even distribution of flavor and texture within each bite of your `Cheesy BBQ Chicken Roll`.
Barbecue Sauce: Your choice of BBQ sauce is paramount. Opt for a sweet and tangy variety that complements the chicken. For optimal results, ensure your sauce isn’t overly thin; a thick, robust sauce prevents the filling from becoming too watery and compromising the crust.
The Dough and Cheese Duo
Refrigerated Pizza Dough: This ingredient offers unparalleled convenience and consistent results. Its elasticity is ideal for rolling and sealing, making the assembly of your `Cheesy BBQ Chicken Roll` straightforward and forgiving.
Shredded Mozzarella Cheese: Mozzarella is the star for its incredible melt and stretch. It creates that desirable gooey texture that perfectly binds the chicken filling. You can experiment with adding a touch of sharp cheddar or smoked provolone for extra depth.
Flavor Finishers: Egg Wash & Seasoning
Large Egg (for Egg Wash): A simple beaten egg creates a beautiful golden-brown color and adds an extra layer of crispness to the crust. It gives your `Cheesy BBQ Chicken Roll` a professional, bakery-fresh appearance.
Italian Seasoning: This blend provides an aromatic and classic herbal note that beautifully complements the savory chicken and tangy BBQ. If you don’t have Italian seasoning, a mix of dried oregano, parsley, and a pinch of garlic powder works wonderfully.
Rolling Out Success: A Step-by-Step Guide to Your Cheesy BBQ Chicken Roll
- Prepare Your Flavor-Packed Filling:
In a medium bowl, combine your cooked, shredded chicken with the barbecue sauce. Mix them thoroughly until the chicken is evenly coated.
This step is critical: if your barbecue sauce is quite thin, transfer the mixture to a saucepan and gently simmer it over medium heat for 5-7 minutes. This allows excess liquid to evaporate, thickening the sauce and preventing a soggy crust.
Let the chicken mixture cool slightly before proceeding. A warm, not hot, filling is easier to handle and won’t prematurely cook the dough.
- Preheat for Perfection: The Hot Baking Sheet Secret:
Preheat your oven to a robust 400 degrees F (200 degrees C). The magic trick for a crispy bottom crust begins here: place a large, sturdy baking sheet directly into the oven while it preheats.
This preheated surface delivers an immediate burst of heat to the dough’s underside. It jump-starts the cooking process, ensuring the bottom crust crisps up just as beautifully as the top, preventing any hint of sogginess.
- Assemble with Care: Laying the Foundation:
On a lightly floured surface or a piece of parchment paper, carefully unroll the refrigerated pizza dough. Ensure it’s laid out smoothly without wrinkles.
Evenly spread the chicken and sauce mixture over the dough. Leave a clear 1-inch border around all the edges; this border is essential for sealing the roll later.
Generously sprinkle the shredded mozzarella cheese over the chicken mixture, spreading it out to cover the filling.
- Roll Tight, Seal Secure: Preventing Leaks:
Starting from one of the long sides of the dough, carefully and tightly roll the dough into a log. Aim for an even, firm roll to ensure a compact `Cheesy BBQ Chicken Roll`.
Once rolled, firmly pinch the seam along the bottom of the roll to seal it completely. Then, pinch and tuck in the ends securely to prevent any delicious filling from leaking out during baking.
- Bake to Golden Glory: The Final Touch:
Carefully transfer your assembled `Cheesy BBQ Chicken Roll` to the preheated baking sheet you placed in the oven earlier. Be gentle to maintain its shape.
In a small bowl, whisk the large egg to create your egg wash. Using a pastry brush, generously brush the top and sides of the roll with the egg wash. This promotes a beautiful golden color and a desirable sheen.
Finally, sprinkle the Italian seasoning evenly over the top of the egg-washed roll, adding a fragrant and savory finish.
- Achieving the Golden-Brown Crisp:
Bake the `Cheesy BBQ Chicken Roll` for 20-25 minutes. Look for visual cues: the crust should be wonderfully golden brown and puffed, indicating it’s cooked through and beautifully crisp.
The preheated baking sheet is working its magic here, ensuring that coveted crispy bottom and overall perfect texture for your roll.
- Rest for Easy Slicing: The Patience Pays Off:
Once baked, carefully remove the `Cheesy BBQ Chicken Roll` from the oven. This next step is crucial for perfect slices: let the roll rest on the baking sheet for at least 5 minutes before cutting.
This resting period allows the hot cheese to set slightly, making the roll much easier to slice cleanly without the filling oozing out. It results in beautifully defined portions for serving.
Chef’s Secrets for an Unbeatable Cheesy BBQ Chicken Roll
Optimize Your BBQ Sauce: If your favorite BBQ sauce is on the thinner side, simmering it with the chicken is key. For an extra safeguard, you can whisk in a teaspoon of cornstarch mixed with a tablespoon of cold water (a slurry) into the simmering sauce. This creates a slightly thicker consistency, ensuring a contained filling and a crisp crust for your `Cheesy BBQ Chicken Roll`.
Mastering the Dough Roll: When rolling the dough, apply even, gentle pressure. If you encounter any small tears, simply pinch them together. For a truly tight roll, start with a slight fold on the long edge before commencing the full roll, ensuring a sturdy log and preventing unraveling.
The Art of Seasoning: While Italian seasoning is fantastic, feel free to get creative. A sprinkle of smoked paprika and a touch of onion powder can enhance the BBQ notes, or a dash of red pepper flakes could add a subtle kick. You can even make your own Italian seasoning by combining dried oregano, basil, thyme, rosemary, and marjoram.
Preheating Your Sheet Matters: The concept behind preheating the baking sheet is heat transfer. The immediate, intense heat from the hot sheet caramelizes the sugars in the dough and quickly sets its structure. This rapid process prevents the bottom from becoming saturated by the filling’s moisture, ensuring a superior, golden-brown crispness that’s impossible to achieve on a cold pan.
Don’t Overfill: While tempting to pack in as much filling as possible, overfilling is a common pitfall. Too much filling makes it difficult to roll the dough tightly and seal the ends properly, increasing the risk of leaks and a messy outcome. Aim for an even, manageable layer that leaves that essential 1-inch border.
Troubleshooting Your Cheesy BBQ Chicken Roll: Solutions for Common Hurdles
Help! My Roll is Soggy on the Bottom!
This is usually due to a watery filling or insufficient heat transfer. Ensure your BBQ chicken mixture is thickened by simmering it down before assembly. Crucially, always preheat your baking sheet in the oven; this direct high heat is essential for a crisp bottom.
My Filling Leaked Out While Baking!
Leakage often happens from inadequate sealing or overfilling. Make sure you firmly pinch the dough seam and both ends completely shut. If the dough rips, pinch the tears closed. Also, ensure you haven’t overloaded the roll with too much filling, which can strain the seams.
The Crust is Dry or Too Hard!
A dry or hard crust is typically a sign of overbaking or an oven that runs too hot. Check your oven’s temperature with an external thermometer to ensure accuracy. Remove the `Cheesy BBQ Chicken Roll` as soon as it’s golden brown and puffed, avoiding excessively long baking times.
My Roll Didn’t Brown Evenly!
Uneven browning can be caused by hot spots in your oven. If you notice one side browning faster, rotate the baking sheet halfway through the baking time. Ensure your egg wash is applied evenly across the entire surface of the roll, as this contributes significantly to uniform browning.
Essential Tools for Your Cheesy BBQ Chicken Roll Adventure
Heavy-Duty Baking Sheet: A thick, heavy-gauge baking sheet is vital. It retains and distributes heat more effectively, which is key for getting that perfectly crisp bottom crust when preheated.
Parchment Paper or Silicone Mat: These are indispensable for preventing the dough from sticking to your work surface and for easy transfer of the delicate roll to the hot baking sheet. They also make cleanup a breeze.
Pastry Brush: A good pastry brush ensures you can apply an even, thin layer of egg wash over the entire surface of your `Cheesy BBQ Chicken Roll`, leading to a consistent golden-brown finish.
Large Mixing Bowl: You’ll need a spacious bowl to comfortably combine the shredded chicken and barbecue sauce without making a mess, allowing for thorough mixing of your delicious filling.
Sharp Serrated Knife: Once your `Cheesy BBQ Chicken Roll` has rested, a sharp serrated knife is best for slicing. It cuts through the crisp crust and the gooey filling cleanly, without squishing the roll or dragging the cheese.
Beyond the Bake: Serving & Storing Your Cheesy BBQ Chicken Roll
Creative Serving Ideas for Your Cheesy BBQ Chicken Roll
This versatile roll is fantastic on its own, but it truly shines with a few thoughtful additions. Serve slices with extra barbecue sauce for dipping, or offer creamy ranch dressing or a zesty sriracha mayo for a different flavor profile.
For a complete meal, pair your `Cheesy BBQ Chicken Roll` with a fresh green salad, a vibrant coleslaw, or a comforting vegetable side like crispy baked asparagus or skillet street style corn. It’s also a perfect addition to a game day spread alongside other crowd-pleasers like Game Day Buffalo Chicken Nachos.
Storing Leftovers: Keeping it Fresh
To store leftover `Cheesy BBQ Chicken Roll`, allow it to cool completely. Wrap individual slices tightly in plastic wrap or aluminum foil, then place them in an airtight container. Store in the refrigerator for up to 3-4 days.
Make-Ahead & Freezing Options
You can prepare the BBQ chicken filling a day in advance and store it in the refrigerator. This speeds up assembly on the day of baking.
For freezing, you have two options: freeze the unbaked roll or the baked roll. To freeze unbaked, assemble the roll, wrap it tightly in plastic wrap, then foil, and freeze for up to 1 month. Thaw in the refrigerator overnight before baking as directed.
To freeze baked, cool completely, wrap tightly, and freeze for up to 1 month. Reheat in a preheated oven (350°F/175°C) until warmed through and crisp again, about 15-20 minutes for slices, longer for a whole roll.
Your Cheesy BBQ Chicken Roll Questions, Answered (FAQs)
Can I use homemade pizza dough instead of refrigerated?
Absolutely! Homemade pizza dough will give your `Cheesy BBQ Chicken Roll` an even fresher, more artisanal feel. Just ensure your dough is at room temperature before rolling to prevent it from snapping back too much, making it easier to work with.
What if I don’t have cooked chicken on hand?
No problem at all! You can quickly cook chicken breasts by boiling, baking, or pan-frying until cooked through, then shredding. A rotisserie chicken is also a fantastic shortcut for this `Cheesy BBQ Chicken Roll` recipe, offering great flavor and convenience.
Can I customize the filling with other ingredients?
Yes, creativity is encouraged! You can add finely diced bell peppers, sautéed onions, or even some crispy bacon bits for extra flavor and texture. Just be mindful of adding too many wet ingredients, as this could increase the risk of a soggy crust. Sauté any vegetables beforehand to remove excess moisture.
Is this Cheesy BBQ Chicken Roll spicy? How can I make it spicier or milder?
The spice level largely depends on your chosen BBQ sauce. If you prefer more heat, select a spicy BBQ sauce, or add a pinch of red pepper flakes or a few dashes of your favorite hot sauce to the chicken mixture. For a milder roll, stick to a sweet, mild BBQ sauce and avoid any additional spicy seasonings.
How long does the Cheesy BBQ Chicken Roll last after baking?
Once baked, your `Cheesy BBQ Chicken Roll` is best enjoyed fresh for optimal crispness. Leftovers, when properly stored in an airtight container in the refrigerator, will remain delicious for 3-4 days. Reheating in a toaster oven or oven can help revive some of its crisp texture.
Ready to Impress? Share Your Cheesy BBQ Chicken Roll Masterpiece!
You now have all the tools and expertise to create the ultimate `Cheesy BBQ Chicken Roll` – one that’s guaranteed to be a hit, without a soggy bottom in sight! This recipe isn’t just about food; it’s about confidence in the kitchen and the joy of sharing something truly delicious.
I encourage you to give this recipe a try this week. When you do, snap a picture and share your golden, crispy masterpiece on social media, tagging us with #NailedItRecipes. We can’t wait to see your creations and hear how much you loved this perfectly balanced, incredibly satisfying roll. Happy baking!
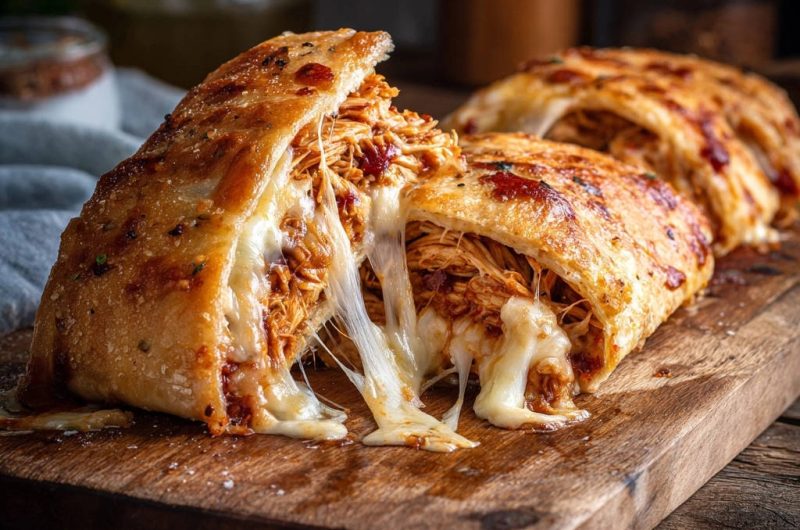
Cheesy BBQ Chicken
Course: Main CourseCuisine: AmericanDifficulty: easy1
large roll (serves 4-6)15
minutes20
minutes450
kcal45
minutesDiscover the secret to perfectly crisp, golden-crusted Cheesy BBQ Chicken Rolls. This recipe guarantees no more soggy bottoms, ensuring a delicious and satisfying meal every time. Enjoy a juicy chicken and cheese filling wrapped in perfectly baked dough.
Ingredients
1 tablespoon olive oil
2 cups cooked, shredded chicken (from about 1 pound chicken breast)
1 cup barbecue sauce (or your favorite sweet and tangy sauce)
2 cups shredded mozzarella cheese
1 sheet refrigerated pizza dough
1 large egg, beaten (for egg wash)
1/2 teaspoon Italian seasoning (or dried oregano, parsley, garlic powder mix)
Directions
- Prepare the filling: In a medium bowl, combine the shredded chicken and barbecue sauce. Mix well. It’s important that this mixture is not excessively watery; if your sauce is very thin, gently simmer it with the chicken in a saucepan over medium heat for 5-7 minutes until slightly thickened and most excess liquid has evaporated. This is key to preventing a soggy crust. Let cool slightly.
- Preheat and prep: Preheat your oven to 400 degrees F (200 degrees C). Place a large baking sheet in the oven while it preheats. This will help get a head start on crisping the bottom of the dough.
- Assemble the roll: On a lightly floured surface or a piece of parchment paper, unroll the pizza dough. Spread the chicken and sauce mixture evenly over the dough, leaving about a 1-inch border around the edges. Sprinkle the mozzarella cheese over the chicken mixture.
- Roll and seal: Starting from one long side, carefully roll up the dough tightly into a log. Pinch the seams and ends firmly to seal the filling inside. This tight seal is crucial to prevent leaks and keep the crust intact.
- Bake: Carefully transfer the roll to the preheated baking sheet. Brush the top and sides of the roll with the beaten egg wash. Sprinkle with Italian seasoning.
- Bake for 20-25 minutes, or until the crust is golden brown and puffed. The preheated baking sheet will work wonders for a crisp bottom.
- Rest and serve: Remove from the oven and let rest for 5 minutes before slicing and serving. This allows the cheese to set slightly and makes slicing easier.
Notes
- Preheat baking sheet for a perfectly crisp bottom crust.