Crispy Golden Salmon Cakes: The Secret to Unbeatable Crunch!
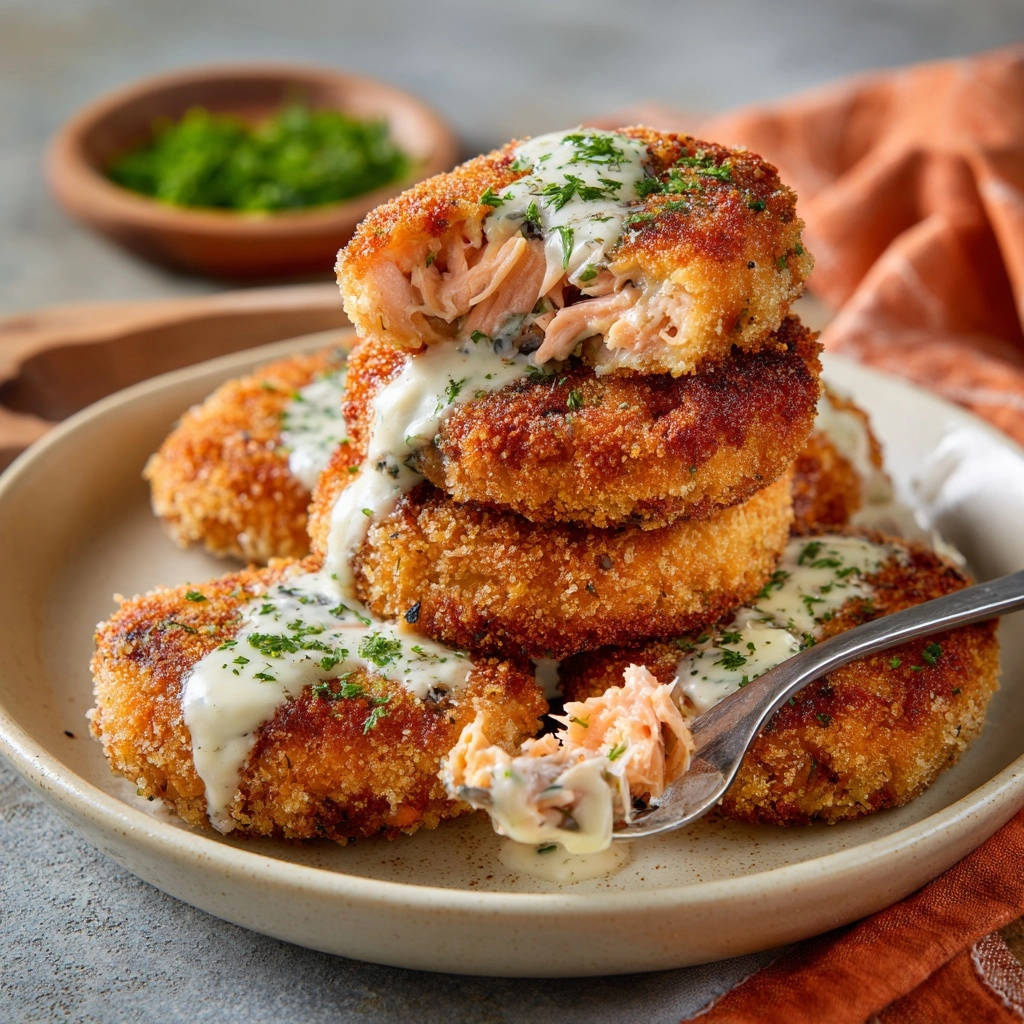
If you’ve ever battled soggy salmon cakes, hoping for that perfect crisp, you’re not alone. I’ve refined this recipe for Crispy Golden Salmon Cakes to guarantee an irresistible crunch every single time.
Forget disappointment; this method simplifies the process, ensuring your salmon cakes are golden, flaky, and truly unforgettable. Prepare to nail that perfect texture and flavor!
Beyond Soggy: Why This Crispy Golden Salmon Cakes Recipe Works
The Crispy Coating Conundrum, Solved!
The secret to our unbeatable crispiness lies in a meticulously designed breading station and a precise frying technique.
Each step, from chilling the patties to the specific double-dredging method, builds a robust crust that fries up perfectly golden and crunchy, resisting sogginess.
Quick & Easy Weeknight Appeal
This recipe cleverly uses pre-cooked salmon, whether canned or leftover, making it incredibly fast to assemble.
It transforms a simple pantry staple into a gourmet-level meal with minimal fuss, perfect for busy weeknights.
Flavorful & Family-Friendly Every Time
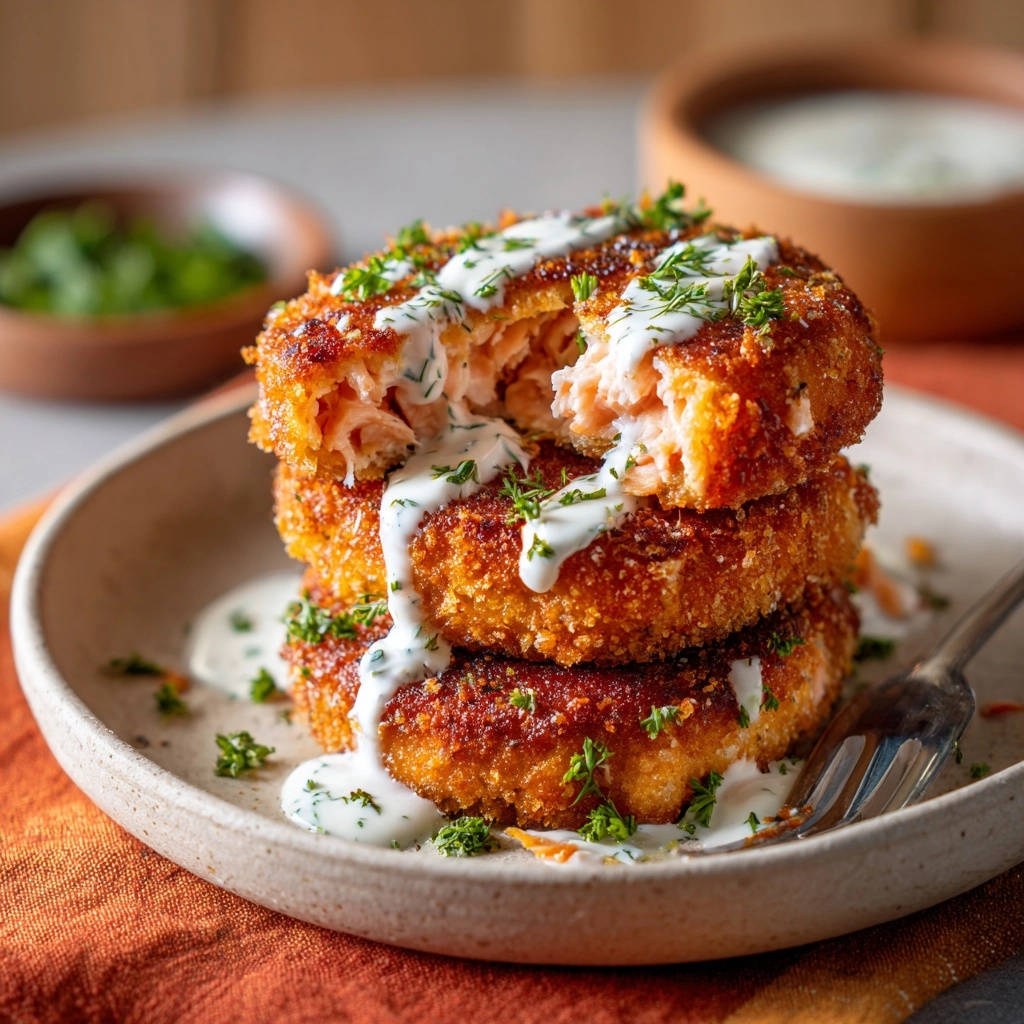
The interior of these salmon cakes is seasoned to perfection, offering a balanced, savory profile that appeals to all ages.
Coupled with the creamy dill sauce, it’s a harmonious blend of textures and tastes that becomes an instant family favorite.
Essential Ingredients: Building Your Golden Salmon Cakes
The Heart of the Cake: Salmon Selection (Canned vs. Leftover)
Use high-quality cooked salmon, whether fresh leftovers or good canned salmon (like wild-caught Alaskan pink or red salmon).
Gently flake the salmon, taking care to remove any skin or small bones, which ensures a smooth and pleasant texture in your cakes.
Flavor Foundations: What Makes Them Irresistible
Mayonnaise & Egg: These act as essential binders, holding the cakes together while contributing to a tender interior. Don’t overdo it, or the cakes can be too wet.
Fresh Herbs (Dill/Parsley): Fresh dill brings a classic, bright complement to salmon. Parsley offers a milder, earthy note if dill isn’t your preference. Use fresh for best flavor.
Dijon Mustard: A small amount adds a subtle tang and depth, enhancing the salmon’s natural flavor without overpowering it.
Garlic Powder & Onion Powder: These pantry staples provide a foundational layer of savory aromatic flavor, seamlessly blending into the mix.
The Golden Shield: Flour, Egg, and Panko Secrets
All-Purpose Flour: The first layer creates a dry surface for the egg to adhere to, ensuring a consistent base for the final breading.
Whisked Egg: This liquid layer acts as the “glue,” allowing the Panko crumbs to stick firmly to the salmon cake.
Panko Breadcrumbs: Panko is paramount for crispiness. Unlike traditional breadcrumbs, Panko is coarser and absorbs less oil, resulting in a lighter, airier, and significantly crunchier coating.
Crafting the Perfect Accompaniment: Creamy Dill Sauce
No Crispy Golden Salmon Cake is complete without its perfect partner: a vibrant, creamy dill sauce.
Key Ingredients for a Zesty Finish
The base is a rich mayonnaise, balanced with sour cream or Greek yogurt for tang and lightness. Fresh dill is non-negotiable here, providing that signature herbaceous flavor.
A splash of fresh lemon juice brightens everything up, while garlic powder ties the flavors together with a subtle savory note.
Whip Up Your Sauce in Minutes: A Simple Method
Simply combine all sauce ingredients in a small bowl and whisk until it’s perfectly smooth and creamy.
This can be prepared in advance, allowing the flavors to meld beautifully while you focus on frying your salmon cakes.
Your Step-by-Step Guide to Crispy Golden Salmon Cakes
Preparing the Flavorful Salmon Base
Begin by gently flaking your cooked salmon in a medium bowl, ensuring all skin and bones are removed for a pleasant texture.
Add the mayonnaise, lightly beaten egg, fresh herbs, Dijon mustard, garlic powder, onion powder, salt, and pepper.
Gently mix these ingredients until just combined. Overmixing can lead to tough, dense salmon cakes, so a light hand is key here.
Forming & Chilling: The Shape and Structure Secret
Divide the mixture into 6-8 equal portions and carefully form them into round, flat patties, about one inch thick.
Place these patties on a plate and refrigerate for at least 30 minutes. This chilling step is absolutely critical.
It helps the cakes firm up, making them easier to handle during breading and preventing them from falling apart in the hot oil. Chilling also contributes significantly to a crispier final product.
The Triple-Layered Breading Station: Your Crunch Blueprint
Set up three shallow dishes in an assembly line: one with all-purpose flour, one with the whisked second egg, and one with Panko breadcrumbs.
This organized station ensures efficient and even coating, which is fundamental to achieving that desirable golden crispiness.
Dredging for Dominant Crispiness: The Art of Adhesion
Take one chilled salmon cake at a time. First, dredge it thoroughly in the flour, shaking off any excess.
Next, dip it into the whisked egg, ensuring it’s completely coated. Finally, generously press the cake into the Panko breadcrumbs.
Make sure every surface is entirely covered, pressing firmly to adhere the crumbs. This deliberate double layer of coating is the absolute key to the ultimate golden crispiness.
Frying for Perfection: Heat, Space, and Golden Hue
Heat the vegetable or other neutral oil in a large, heavy-bottomed skillet over medium-high heat. The oil is ready when a sprinkle of Panko sizzles immediately upon contact.
Carefully place 3-4 salmon cakes into the hot oil, ensuring you do not overcrowd the pan. Overcrowding dramatically drops the oil temperature, leading to soggy instead of crispy cakes.
Fry for 4-5 minutes per side, or until they achieve a deep golden brown and are incredibly crispy. Adjust the heat as needed to prevent burning while ensuring uniform browning.
The Finishing Touch: Draining and Serving
Once your Crispy Golden Salmon Cakes are perfectly golden, remove them from the skillet.
Place them on a wire rack set over a paper towel-lined baking sheet to drain any excess oil, maintaining their crispiness.
Serve the hot, crispy salmon cakes immediately, drizzled generously with the freshly made creamy dill sauce and garnished with extra chopped fresh dill or parsley.
Chef’s Tips for Unrivaled Crispy Golden Salmon Cakes
The Chilling Advantage: Why It Matters
Don’t skip the chilling step! Refrigerating the formed patties for at least 30 minutes helps them firm up.
This firmness is essential for them to hold their shape during frying and ensures the breading adheres properly, leading to a truly crispy exterior.
Oil Temperature Triumphs: Avoid the Soggy Fate
Maintaining the correct oil temperature (medium-high heat) is crucial for crispiness. Too low, and the cakes absorb oil and become greasy; too high, and they burn before cooking through.
Test with a crumb: it should sizzle immediately but not smoke. Adjust heat as you fry batches.
Don’t Overcrowd the Pan: Space is Your Friend
Frying in batches is non-negotiable for consistent results. Overcrowding drops the oil temperature quickly, leading to uneven cooking and a less crispy finish.
Give each salmon cake enough space to fry undisturbed for optimal browning and crunch.
Achieving That Deep Golden Hue
Look for a rich, uniform golden-brown color on both sides. This indicates maximum crispiness and delicious caramelization of the Panko.
Don’t rush the process; let them develop that beautiful deep color before flipping or removing.
Batch Cooking and Freezing for Later Enjoyment
These salmon cakes are fantastic for meal prep! Fry them as directed, let them cool completely, then flash freeze them on a baking sheet until solid.
Transfer to an airtight freezer bag for up to 2 months. Reheat in an oven or air fryer for renewed crispiness.
Troubleshooting Common Crispy Golden Salmon Cakes Challenges
Why Are My Salmon Cakes Falling Apart?
This usually indicates one of a few issues: either the mixture was overmixed, making it too soft, or there wasn’t enough binder (mayonnaise/egg).
Most commonly, it’s insufficient chilling. Ensure you chill the patties for the recommended 30 minutes to firm them up before breading and frying.
My Cakes Aren’t Crispy Enough!
Lack of crispiness often stems from the oil not being hot enough when the cakes are added, or overcrowding the pan, which drops the oil temperature.
Ensure your oil is shimmering and a test crumb sizzles immediately. Also, double-check that you’ve used Panko breadcrumbs and pressed them firmly onto the patties for maximum adhesion.
How Do I Prevent Overcooked or Dry Salmon Cakes?
The key is moderate heat and careful timing. Since you’re using cooked salmon, you’re primarily aiming for a golden, crispy crust and heating through.
Fry for the suggested 4-5 minutes per side, adjusting heat if browning too quickly. Resist the urge to overcook, as this will dry out the delicate salmon.
Frequently Asked Questions About Crispy Golden Salmon Cakes
Can I Use Fresh Salmon Instead of Cooked?
Absolutely! If using fresh salmon, simply bake, poach, or pan-sear it until cooked through before flaking. Ensure it’s cooled completely before mixing.
What’s the Best Oil for Frying?
A neutral oil with a high smoke point is ideal. Vegetable oil, canola oil, grapeseed oil, or sunflower oil are all excellent choices for achieving that perfect golden crisp.
Can I Bake or Air Fry These Instead of Frying?
Yes, for a healthier option, you can bake or air fry. Bake at 400°F (200°C) for 15-20 minutes, flipping halfway, until golden and crisp. Air fry at 375°F (190°C) for 12-15 minutes, flipping once, until deeply golden. A light spritz of oil before cooking helps with browning.
How Long Do Cooked Salmon Cakes Last?
Cooked Crispy Golden Salmon Cakes can be stored in an airtight container in the refrigerator for up to 3-4 days. For best crispiness, reheat in an oven or air fryer.
What Are Good Side Dishes to Serve With Salmon Cakes?
These cakes pair beautifully with light, fresh sides. Consider a vibrant green salad, roasted asparagus, lemon-herb quinoa, or a fresh coleslaw.
For an extra pop of flavor and crunch, try them alongside our Crispy Baked Asparagus or a refreshing Classic Ham and Pea Pasta Salad.
Serving Suggestions & Perfect Pairings
Beyond the Dill Sauce: Other Topping Ideas
While the creamy dill sauce is a classic, don’t hesitate to experiment! A squeeze of fresh lemon wedge always brightens the flavor.
Other excellent options include a dollop of sriracha mayo for a spicy kick, a classic tartar sauce, or even a vibrant avocado crema.
Complementary Sides for a Complete Meal
For a light and balanced meal, serve your Crispy Golden Salmon Cakes with a simple mixed greens salad drizzled with a vinaigrette.
Other great pairings include fluffy rice pilaf, sweet potato fries, or even some Skillet Street-Style Corn for a festive touch.
Conclusion & Your Crispy Golden Salmon Cakes Journey
Mastering these Crispy Golden Salmon Cakes means unlocking a world of delicious, easy, and impressive meals.
Armed with these expert tips and a foolproof recipe, you’re now ready to create salmon cakes that are crispy on the outside, tender within, and bursting with flavor.
Go forth and create culinary magic! We’d love to see your golden creations and hear your thoughts on this recipe in the comments below.
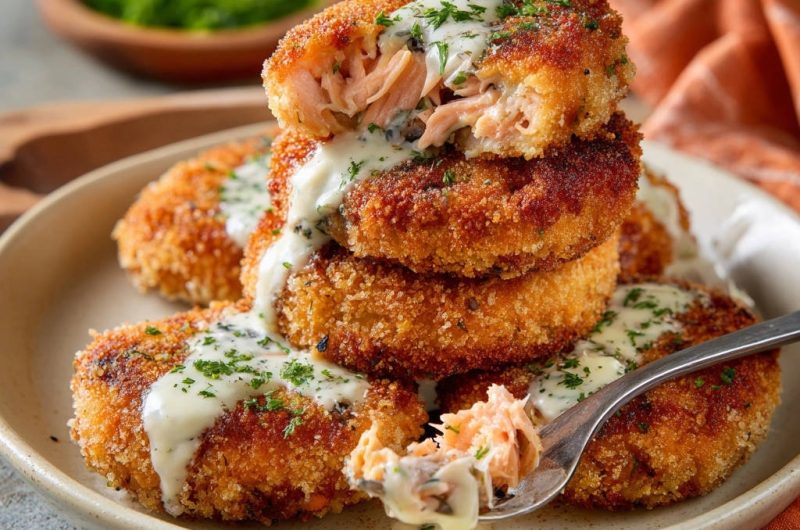
Salmon Cakes
Course: Main CourseCuisine: AmericanDifficulty: medium6
cakes45
minutes20
minutes450
kcal60
minutesTired of soggy salmon cakes? This recipe reveals the secret to achieving an irresistible, golden crispy exterior every single time. It’s simpler than you think to get that satisfying crunch, complete with a delicious creamy dill sauce.
Ingredients
12 ounces cooked salmon, flaked (canned or leftover)
1/4 cup mayonnaise
1 large egg, lightly beaten
1 tablespoon fresh dill or parsley, chopped
1 teaspoon Dijon mustard
1/2 teaspoon garlic powder
1/2 teaspoon onion powder
Salt and black pepper to taste
1/2 cup all-purpose flour
1 large egg, whisked (for dredging)
1 1/2 cups Panko breadcrumbs
1/2 cup vegetable oil or other neutral oil, for frying
For the Creamy Dill Sauce:
1/2 cup mayonnaise
2 tablespoons sour cream or plain Greek yogurt
1 tablespoon fresh dill or parsley, chopped
1 teaspoon lemon juice
1/4 teaspoon garlic powder
Salt and black pepper to taste
Directions
- Prepare the Salmon Mix: In a medium bowl, gently flake the cooked salmon, making sure to remove any skin or bones. Add 1/4 cup mayonnaise, the first lightly beaten egg, 1 tablespoon chopped dill or parsley, Dijon mustard, garlic powder, onion powder, salt, and pepper. Gently mix everything until just combined. Be careful not to overmix, which can make the cakes tough.
- Form the Cakes: Divide the mixture into 6-8 equal portions and gently form them into round, flat patties, about 1-inch thick. Place them on a plate and refrigerate for at least 30 minutes. This chilling step helps them hold their shape and contributes to crispiness.
- Set Up Breading Station (CRITICAL FOR CRISPY COATING): Prepare three shallow dishes. In the first, place the all-purpose flour. In the second, whisk the second large egg. In the third, place the Panko breadcrumbs. This organized station is key for efficient and even coating.
- Dredge the Cakes (CRITICAL FOR CRISPY COATING): One by one, dredge each chilled salmon cake first in the flour, shaking off any excess. Then, dip it into the whisked egg, ensuring it’s fully coated. Finally, generously press each cake into the Panko breadcrumbs, making sure every surface is completely covered. Press firmly to adhere the crumbs. This deliberate double layer of coating is absolutely key to the ultimate golden crispiness.
- Fry the Cakes (CRITICAL FOR CRISPY COATING): Heat the vegetable oil in a large, heavy-bottomed skillet over medium-high heat. The oil should be hot enough that a sprinkle of Panko immediately sizzles. Carefully place 3-4 salmon cakes into the hot oil, ensuring not to overcrowd the pan. Overcrowding dramatically drops the oil temperature and leads to soggy cakes instead of crisp ones.
- Achieve Golden Crispiness (CRITICAL FOR CRISPY COATING): Fry for 4-5 minutes per side, or until deeply golden brown and very crispy. Adjust heat as needed to prevent burning while ensuring even browning. You want that rich, uniform color.
- Drain and Serve: Once crispy, remove the salmon cakes from the skillet and place them on a wire rack set over a paper towel-lined baking sheet to drain any excess oil.
- Make the Creamy Dill Sauce: While the cakes fry, combine all sauce ingredients in a small bowl and whisk until smooth.
- Serve the hot, crispy salmon cakes immediately, drizzled generously with the creamy dill sauce and garnished with extra chopped fresh dill or parsley.
Notes
- Chilling the patties, proper breading, and careful frying are critical steps for achieving the ultimate crispy coating.