Fluffy Turtle Buns: Unlock Their Soft & Pillowy Secret
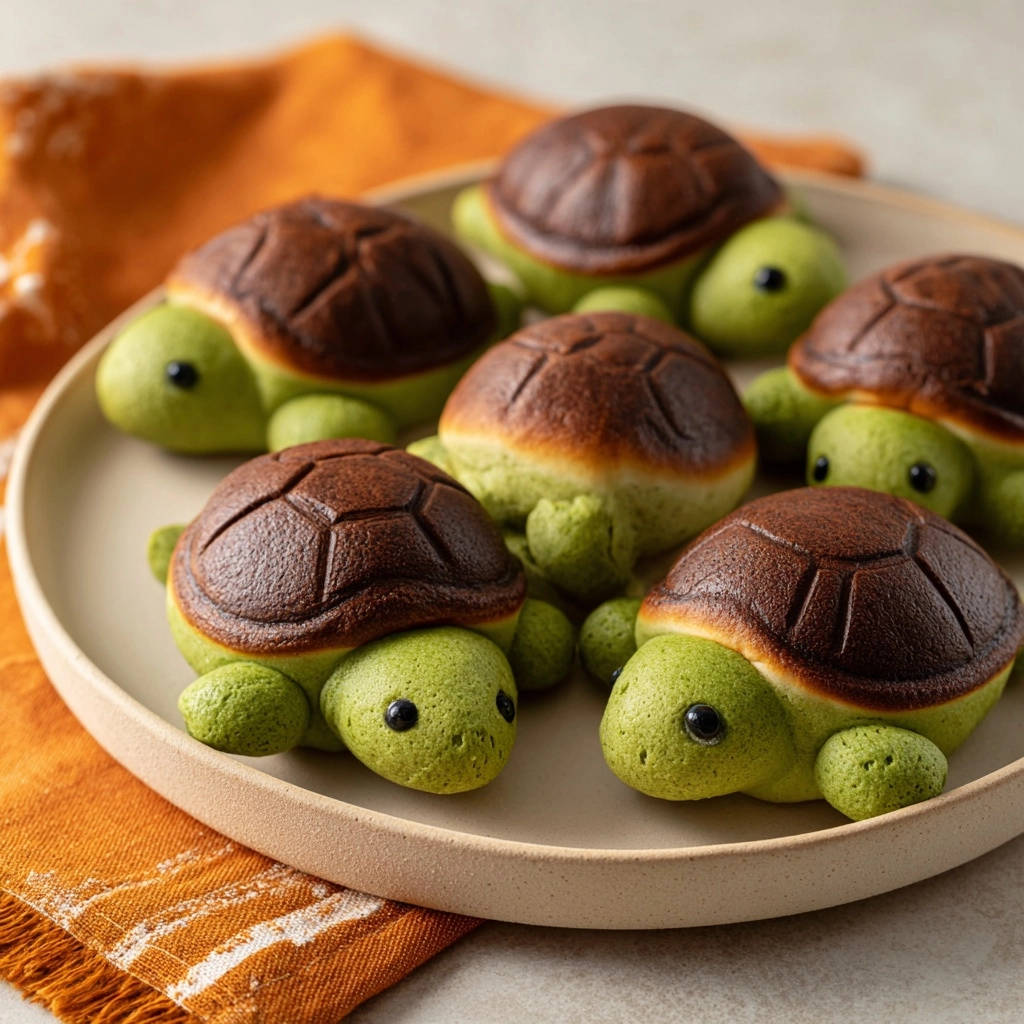
There’s nothing quite like baking a batch of adorable buns, but I remember the frustration of them turning out heavy or dense instead of soft and pillowy. It took me a while to crack the code on achieving that perfect light texture, especially with fun shaped breads like these cute Fluffy Turtle Buns!
This recipe is my perfected method, ensuring your buns are consistently airy and delightful, marrying cuteness with incredible flavor and texture. Get ready to bake some charm that’s as satisfying to eat as it is to look at!
Why This Fluffy Turtle Buns Recipe Will Steal Your Heart
Beyond their undeniable cuteness, these Fluffy Turtle Buns offer an unparalleled baking experience and a truly delicious result. They are perfect for surprising loved ones or simply adding a touch of whimsy to your day.
The Secret to Consistently Light & Airy Buns
The magic in these buns lies in a few key dough techniques. Proper kneading ensures a strong gluten structure, vital for trapping air and creating an elastic dough.
Equally critical are the two distinct proofing stages. Each rise allows the yeast to work its magic, developing both flavor and the characteristic light, open crumb.
Gentle handling throughout the process also preserves those delicate air pockets, guaranteeing a pillowy texture rather than a dense one.
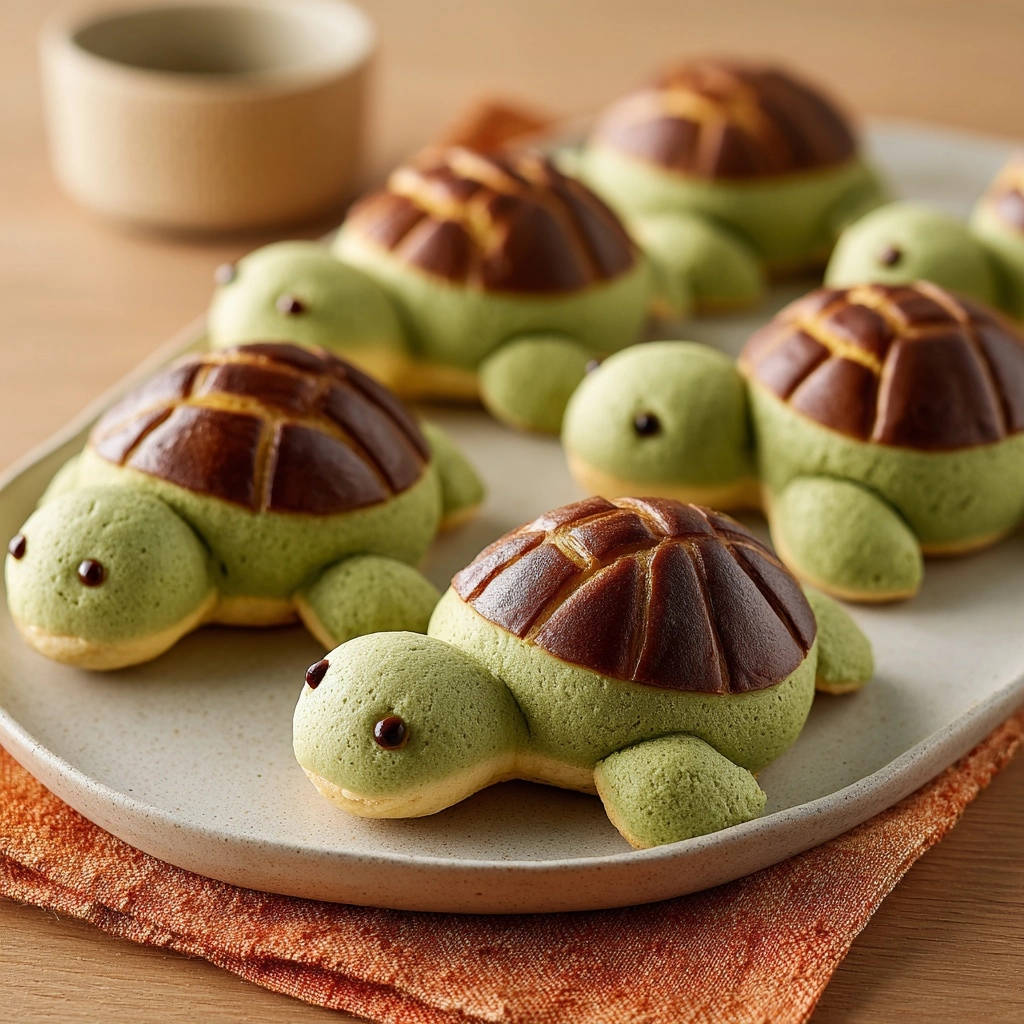
Beyond Just Baking: Edible Art for All Ages
This recipe transforms baking into a fun, artistic endeavor, perfect for involving the whole family. The shaping process is surprisingly straightforward, turning simple dough into enchanting edible turtles.
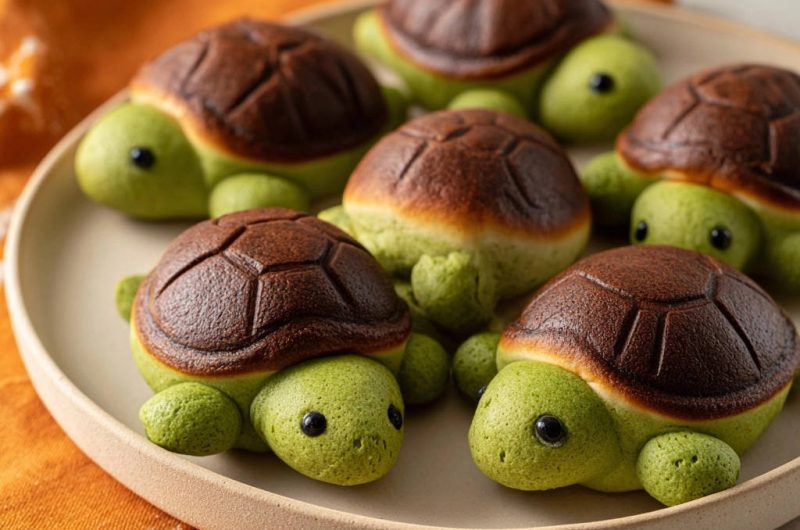
The vibrant green and rich brown doughs, coupled with the adorable sesame seed eyes, make these buns a visual treat. They’re guaranteed to bring smiles, making them ideal for parties, picnics, or a delightful weekend project.
Ingredients for Irresistibly Adorable Turtle Buns
Creating these charming treats starts with understanding the role each ingredient plays. High-quality ingredients are always a good starting point for any successful bake.
Pantry Staples for Dough Perfection
Your dough begins with warm milk, the perfect environment for activating the active dry yeast, which is crucial for leavening. Granulated sugar not only sweetens but also feeds the yeast, promoting a vigorous rise.
All-purpose flour provides the necessary structure, while salt balances the flavors and regulates yeast activity. A large egg adds richness and helps create a tender crumb, and softened unsalted butter contributes to the dough’s softness and flavor.
The Hue & Flavor Creators: Matcha and Cocoa
Matcha powder lends a beautiful, natural green hue to the turtle bodies, along with a subtle, earthy flavor. Cocoa powder creates the deep brown for the shells, adding a gentle chocolatey note that complements the sweet dough.
Finishing Touches: Sesame Seeds & Egg Wash
Black sesame seeds are perfectly sized for the turtles’ eyes, adding that final adorable detail. An egg yolk mixed with water creates an egg wash, which is brushed onto the shells to give them a beautiful golden sheen and a slightly crisp crust during baking.
Crafting Your Fluffy Turtle Buns: A Detailed Guide
Activating Your Yeast: The Foaming Test
Start by combining warm milk, yeast, and a pinch of sugar in a large bowl. The milk should be warm, not hot, ideally between 105-115°F (40-46°C), to awaken the yeast without killing it.
Let this mixture sit for 5-10 minutes. When it becomes foamy, you know your yeast is active and ready to make your buns beautifully fluffy.
Mixing & Kneading: The Foundation of Fluffiness
Add the remaining sugar, salt, egg, and softened butter to the foamy yeast mixture, stirring until well combined. Gradually incorporate the flour, mixing until a shaggy dough forms.
Turn the dough onto a lightly floured surface and knead for 8-10 minutes. This kneading develops the gluten, making the dough smooth, elastic, and capable of holding air. A good test is the “windowpane test,” where a small piece of dough can be stretched thin enough to see light through without tearing, indicating excellent gluten development for an airy bun.
Crafting Vibrant Hues: Dividing and Coloring Dough
Divide your well-kneaded dough into two portions: one slightly larger (about 60 percent) for the green bodies and one smaller (40 percent) for the brown shells.
To the larger portion, add the matcha powder and knead until the vibrant green color is uniformly distributed. For the smaller portion, add cocoa powder and knead until it’s a consistent brown. Ensure the powders are fully incorporated without overworking the dough.
The Magic of the First Rise: Patience Pays Off
Lightly grease two separate bowls, one for each colored dough, and turn the dough to coat. Cover each bowl tightly with plastic wrap.
Let them rise in a warm, draft-free place for 1 to 1.5 hours, or until doubled in size. This first rise is crucial for developing the dough’s flavor and achieving a light, airy texture. Do not rush this step.
Shaping Your Turtle Crew: Bodies, Heads & Legs
Once the dough has doubled, gently punch it down to release the air. This gentle action helps maintain the dough’s internal structure for a light texture.
Divide the green dough into 6 equal portions for the turtle bodies. From each portion, separate a larger piece for the head and four smaller pieces for the legs. Roll all these smaller pieces into smooth spheres, and shape the larger green portion into an oval for the body.
Designing the Shells: Brown Dough & Scoring
Divide the brown dough into 6 equal portions for the shells. Roll each brown portion into a smooth ball, then gently flatten it slightly into a disc. These will sit on top of the green bodies.
Use a knife or dough scraper to gently score a turtle shell pattern onto the brown tops. This adds to the visual appeal and ensures a charming look.
Assembling Your Adorable Creations
On a parchment-lined baking sheet, place the green oval body for each turtle. Arrange four small green leg spheres around the body and one larger green sphere at one end for the head, gently pressing them to attach.
Finally, place the flattened brown dough disc on top of the green body as the shell.
The Crucial Second Rise: Puffing Up for Perfection
Loosely cover the formed turtle buns with plastic wrap or a light kitchen towel. Let them rise again in a warm place for 30-45 minutes, or until visibly puffy and almost doubled in size.
This second rise is absolutely critical for achieving their final fluffy texture. Rushing or skipping this step will result in denser buns, so allow them ample time to puff up beautifully.
Baking for Golden-Brown Cuteness
Preheat your oven to 350°F (175°C). Gently brush the brown shells of the buns with the egg wash for a golden, appealing finish.
Bake for 12-15 minutes, or until the brown shells are golden and the buns are cooked through. Keep a close eye on them to prevent overbaking.
Cooling for Optimal Texture
Once baked, immediately transfer the Fluffy Turtle Buns to a wire rack. Allowing them to cool completely on the rack prevents the bottoms from becoming soggy due to trapped steam, maintaining their optimal soft texture.
Baker’s Secrets: Elevate Your Fluffy Turtle Buns Game
Mastering Dough Handling: Gentle is Key After the first rise, handle the dough as gently as possible. Aggressive punching down or overworking can deflate the precious air pockets that contribute to a fluffy texture.
Temperature Matters: Optimal Rising Conditions Yeast thrives in warmth, ideally around 75-85°F (24-30°C). If your kitchen is cool, create a warm environment by placing the covered bowls in a slightly warm (turned off) oven with the light on, or near a warm water bath.
Don’t Rush the Rises: Patience for Peak Fluffiness Both rises are non-negotiable for tender, airy buns. If the dough hasn’t doubled, it’s not ready. Rushing results in a denser crumb and less developed flavor. Let the dough dictate the time, not the clock.
Achieving Even Color: Kneading in Powders When incorporating matcha and cocoa, knead until the color is completely uniform. Small streaks will bake unevenly. Avoid over-kneading at this stage; just enough to distribute the color.
Oven Watch: Preventing Overbaking While time is a guide, ovens vary. Look for a beautiful golden-brown on the shells. If you have a thermometer, an internal temperature of around 200°F (93°C) confirms doneness. Overbaking leads to dry buns.
Solving Your Fluffy Turtle Buns Quandaries
Why Your Dough Isn’t Rising
If your dough isn’t rising, the most common culprits are inactive or dead yeast, or a too-cold environment. Ensure your warm milk is the correct temperature, and your yeast is fresh.
Check the expiration date on your yeast, and ensure your proofing area is genuinely warm and free from drafts.
Buns Turning Out Dense or Dry
Dense buns often result from insufficient kneading during the initial stage, which prevents gluten development. It can also happen from rushing the rises, or overworking the dough after the first proof, deflating air.
Dry buns are typically a sign of overbaking. Ensure you’re not baking them longer than necessary; look for visual cues like golden tops rather than solely relying on time.
Uneven Turtle Shapes or Cracks
Uneven shapes usually come from inconsistent portioning or shaping. Using a kitchen scale to divide dough portions can ensure uniformity. For cracks, it might be that your dough was too dry, or the second rise was too short, leading to rapid expansion in the oven.
Ensure your dough is adequately hydrated and cover the buns loosely during the second rise to prevent a dry surface from forming.
Your Fluffy Turtle Buns Questions Answered
Can I Use Different Colors or Flavors?
Absolutely! You can experiment with natural food colorings or other powders like spirulina for blue or pink pitaya for a vibrant pink. For flavors, consider a tiny pinch of cinnamon with the cocoa or a hint of citrus zest in the green dough.
How Long Do Fluffy Turtle Buns Stay Fresh?
These Fluffy Turtle Buns are best enjoyed on the day they are baked for peak freshness and softness. Stored in an airtight container at room temperature, they will remain soft for 2-3 days.
Can I Prepare the Dough Ahead of Time?
Yes, you can! After the first rise and coloring, you can refrigerate the dough overnight in a lightly oiled, covered bowl. Just be aware that the second rise will take longer once the dough comes to room temperature.
For more flexible planning, consider trying stuffed French toast rolls, which also utilize overnight dough preparation for convenience.
What If I Don’t Have Black Sesame Seeds?
No black sesame seeds? No problem! You can use tiny pieces of chocolate chips, edible food markers, or even small dots of melted chocolate applied with a toothpick for the eyes. Get creative with what you have!
Enjoying & Preserving Your Fluffy Turtle Buns
Creative Ways to Enjoy Your Turtle Buns
These adorable Fluffy Turtle Buns are fantastic on their own as a sweet snack or a delightful breakfast treat. They make perfect additions to lunchboxes, sparking joy in kids and adults alike.
If you enjoyed shaping these buns, you’ll find the same gentle handling creates beautifully soft golden sesame dinner rolls.
Serve them at a themed party, a tea party, or simply as a special homemade surprise for your family. They’re also wonderful alongside a light fruit salad.
Keeping Your Fluffy Buns Fresh
To maintain their pillowy texture, store leftover Fluffy Turtle Buns in an airtight container or a large zip-top bag at room temperature. For longer storage, you can freeze cooled buns for up to one month.
Thaw frozen buns at room temperature, and for extra warmth, briefly warm them in the microwave or a low oven before serving.
Ready to Share Your Fluffy Turtle Buns Delight?
Now that you’re equipped with all the secrets, it’s time to bring these enchanting Fluffy Turtle Buns to life in your kitchen. This recipe promises not just a delicious outcome, but a truly rewarding baking experience.
What Goes With Sweet Buns?
Fluffy turtle buns are lightly sweet and soft, so they pair well with hearty, creamy savories. Try these two options for a balanced meal.
- A side of Creamy Mushroom Gratin brings earthy richness that contrasts the buns
Share your creations with friends and family, and watch their faces light up with delight! Happy baking!
Turtle Buns
Course: BreadCuisine: InternationalDifficulty: mediumServings6
turtle bunsPrep time45
minutesCooking time15
minutesCalories160
kcalTotal time180
minutesMaster the art of baking perfectly soft and pillowy buns with this delightful recipe for adorable turtle-shaped treats. Say goodbye to dense bread and hello to light, airy textures achieved with simple techniques. Get ready to impress with these charming and delicious Fluffy Turtle Buns!
Ingredients
1 cup warm milk (about 105-115 degrees F)
2 and 1/4 teaspoons active dry yeast
1/4 cup granulated sugar
1/2 teaspoon salt
1 large egg
1/4 cup unsalted butter, softened
3 and 1/2 cups all-purpose flour, plus more for dusting
1 tablespoon matcha powder
1 tablespoon cocoa powder
Black sesame seeds for eyes
1 egg yolk mixed with 1 tablespoon water for egg wash
Directions
- In a large bowl, combine the warm milk, yeast, and a pinch of the sugar. Let it sit for 5-10 minutes until foamy. This confirms your yeast is active.
- Add the remaining sugar, salt, egg, and softened butter to the yeast mixture. Stir until well combined. Gradually add the flour, mixing until a shaggy dough forms.
- Turn the dough out onto a lightly floured surface. Knead the dough for 8-10 minutes until it is smooth, elastic, and passes the windowpane test (a small piece can be stretched thin enough to see light through it without tearing). This proper kneading is key for a light texture.
- Divide the dough into two portions: one slightly larger (about 60 percent of the dough) and one smaller (40 percent).
- To the larger portion, add the matcha powder and knead until the color is evenly distributed and the dough is a vibrant green. To the smaller portion, add the cocoa powder and knead until it’s a uniform brown.
- Lightly grease two separate bowls. Place each colored dough into its own bowl, turning to coat. Cover with plastic wrap and let rise in a warm place for 1 to 1 and a half hours, or until doubled in size. This first rise is critical for developing flavor and lightness.
- Once the dough has doubled, gently punch it down to release the air. This gentle handling ensures the texture remains light.
- Divide the green dough into 6 equal portions for the bodies. Divide each of these portions into a larger piece for the head and four smaller pieces for the legs. Roll the head and leg pieces into smooth spheres. Shape the larger green portion into an oval for the body.
- Divide the brown dough into 6 equal portions for the shells. Roll each brown portion into a smooth ball.
- To assemble, place the green oval body on a parchment-lined baking sheet. Arrange four small green leg spheres around the body and one larger green sphere at one end for the head. Gently press them to attach.
- Flatten each brown dough ball slightly into a disc and place it on top of the green body as the shell. Use a knife or dough scraper to gently score a turtle shell pattern onto the brown tops.
- Gently press two black sesame seeds into each green head for the eyes.
- Cover the formed turtle buns loosely with plastic wrap or a light kitchen towel and let them rise again in a warm place for 30-45 minutes, or until visibly puffy and almost doubled. This second rise is crucial for their final fluffy texture; do not skip or rush this step.
- Preheat your oven to 350 degrees F (175 degrees C).
- Brush the brown shells of the buns with the egg wash.
- Bake for 12-15 minutes, or until the brown shells are golden and the buns are cooked through.
- Let cool on a wire rack. Enjoy these adorable and incredibly light, airy turtle buns!
Notes
- Proper kneading and two distinct rise times are crucial for achieving the signature light and airy texture of these buns.