Mastering Golden Sesame Dinner Rolls with the Fail-Safe Rise Technique
Most home bakers have experienced the crushing disappointment of pulling a tray of Golden Sesame Dinner Rolls from the oven only to find they’ve baked up like heavy, dense bricks. It’s frustrating when you follow a recipe exactly, yet the results feel more like a doorstop than a bakery-style treat. This happens because bread isn’t just a list of ingredients; it’s a series of biological reactions that require specific conditions to thrive.
The “Fail-Safe Rise” philosophy focuses on mastering the environment where your yeast lives. By controlling the hydration of the dough and the temperature of your liquids, you bridge the gap between amateur mistakes and professional results. We aren’t just mixing flour and water here; we’re cultivating a living dough that will reward you with an airy, cloud-like pull-apart texture every single time.
The secret to this success lies in the double-rise method and precise temperature control. If your milk is too hot, you kill the yeast; if it’s too cold, the dough stays dormant. I’ve found that using a digital thermometer to hit that 105 to 110 degree Fahrenheit sweet spot is the single most important step you can take to ensure your rolls actually grow. Once you master this thermal baseline, the rest of the process becomes predictable and fun.
The Anatomy of an Airy Sesame Roll
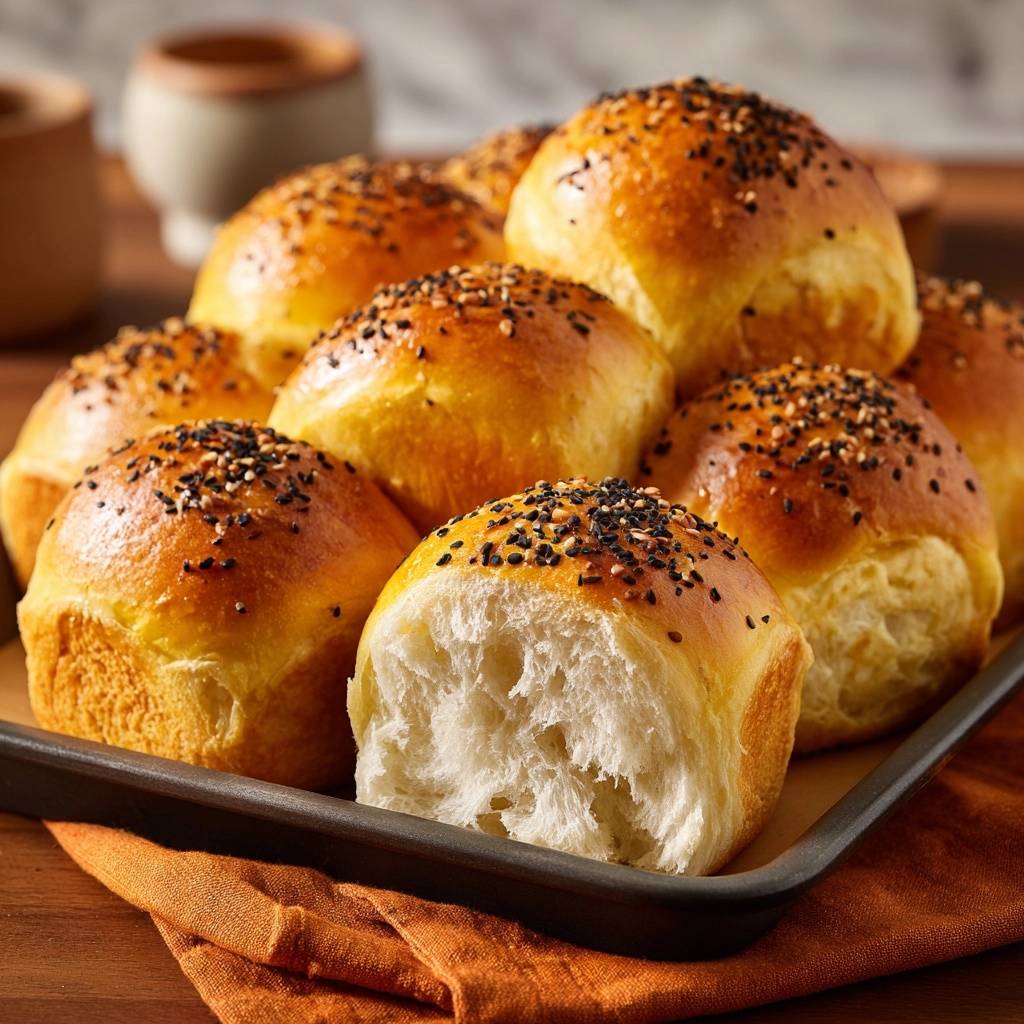
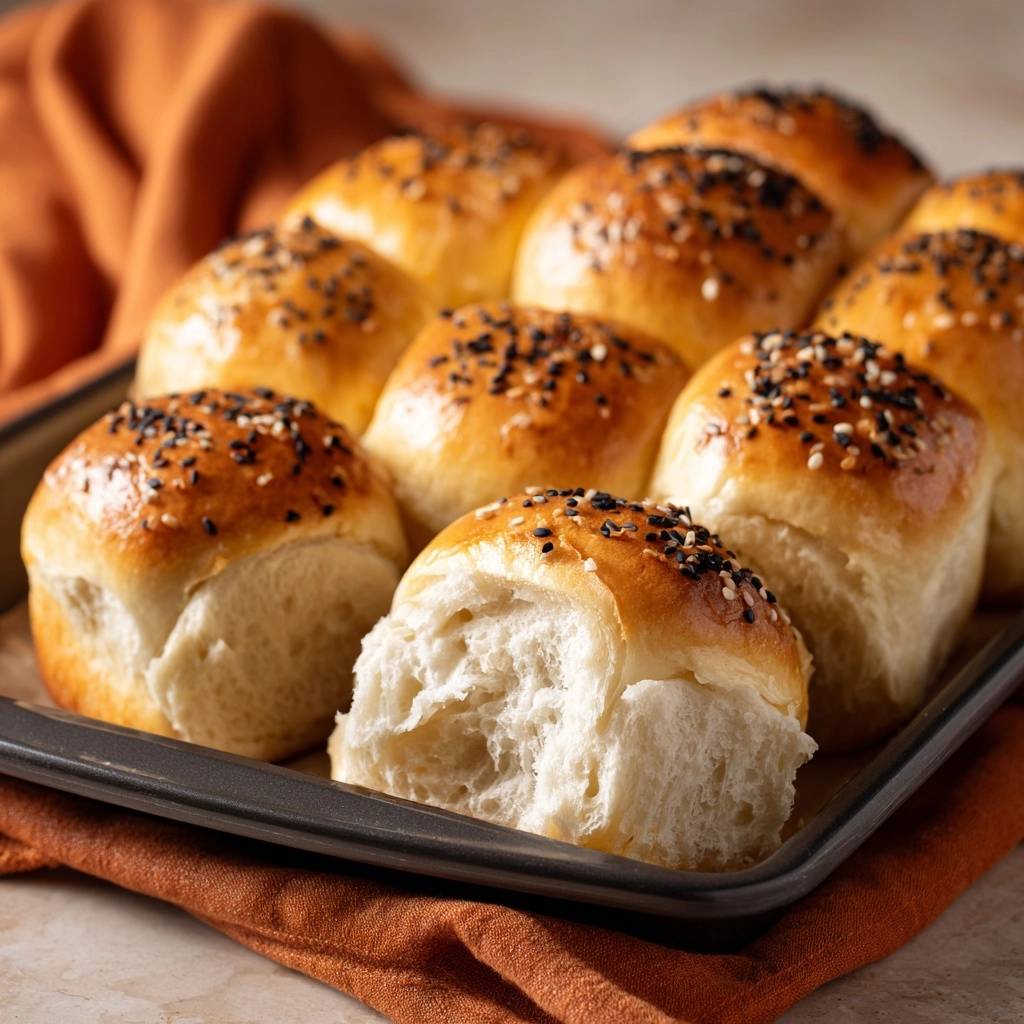
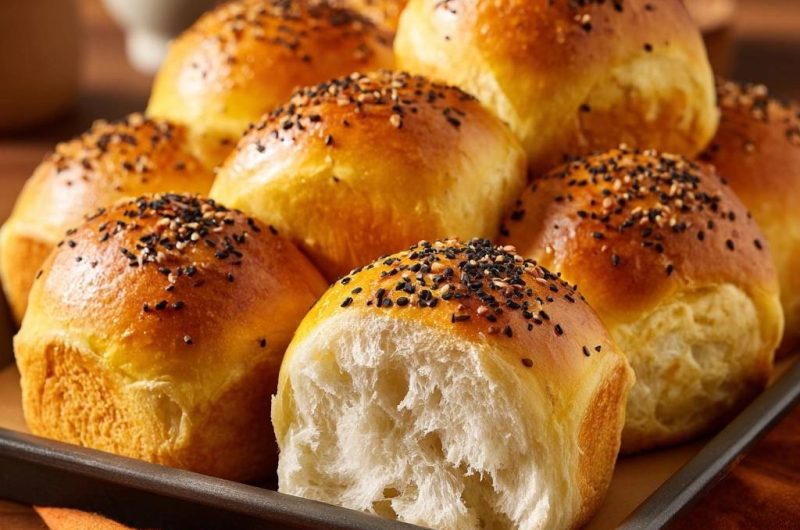
When you pull these rolls apart, you should hear a faint, soft crackle from the toasted sesame crust followed by the sight of long, wispy strands of dough stretching away from the center. That interior should be incredibly soft, almost like a savory marshmallow, while the exterior boasts a deep, glossy sheen. This contrast is what makes a truly great dinner roll stand out on a crowded holiday table.
Success in baking is found in the tiny details of gluten development. You aren’t just stirring; you’re building a microscopic net that traps carbon dioxide. Without a strong gluten network, those air bubbles escape, leaving you with a flat, sad bun. By focusing on the “texture lock-in” phase during kneading, we ensure the dough has the structural integrity to hold its shape and rise high during the final bake.
Essential Components for Golden Sesame Dinner Rolls
Your choice of flour dictates the entire structure of the roll. While all-purpose flour works in a pinch, I highly recommend using bread flour because its higher protein content (usually 12-14%) creates a much stronger gluten web. This extra strength allows the dough to expand further without collapsing, resulting in that sought-after height and chew.
Whole milk is another non-negotiable for a rich, tender crumb. The fats in the milk coat the flour proteins, which prevents them from bonding too tightly, keeping the bread soft for days. Additionally, ensure your egg is at room temperature before you start. A cold egg can shock the yeast or cause the softened butter to seize up, ruining the smooth emulsion we need for a consistent dough.
The Role of Fat: Butter and Heavy Cream
We use unsalted butter in this recipe to give us total control over the flavor profile. Different brands of salted butter have varying sodium levels, which can sometimes inhibit yeast activity if the salt concentration is too high. By adding fine sea salt separately, we ensure the yeast can ferment at its optimal pace while still achieving a perfectly seasoned roll.
The deep golden hue you see in professional bakeries comes from the Maillard reaction, a chemical dance between amino acids and reducing sugars. By mixing an egg yolk with a splash of heavy cream for the wash, we provide the perfect “fuel” for this reaction. The cream adds extra fat and sugar, which caramelizes in the oven to create a lacquered, mahogany finish that looks stunning under the sesame seeds.
Sesame Seed Varieties: Black vs. White
Using a blend of both black and white sesame seeds isn’t just about the striking visual contrast. White sesame seeds have a mild, nutty sweetness that intensifies as they toast in the oven. Black sesame seeds, however, offer a slightly more earthy, bitter depth that balances the richness of the brioche-style dough.
Always check your seeds for freshness before sprinkling. Because sesame seeds have a high oil content, they can turn rancid if they’ve been sitting in the pantry for too long. Give them a quick sniff; they should smell clean and toasted, not like old oil or cardboard. Fresh seeds are the key to that signature nutty aroma that fills the kitchen while these bake.
The Science of the Fail-Safe Rise Method
Baking is essentially a biological experiment. When you combine yeast with sugar and warm milk, the yeast begins to consume the sugar, releasing carbon dioxide gas as a byproduct. In a well-kneaded dough, the gluten acts like a balloon, trapping that gas and causing the dough to expand. This is why the kneading process is so vital; if the “balloon” has holes, the gas leaks out.
To know if you’ve kneaded enough, use the “Windowpane Test.” Take a small piece of dough and gently stretch it out between your fingers. If you can stretch it thin enough to see light through it without the dough tearing, your gluten network is fully developed. If it snaps or tears quickly, you need to keep kneading for another minute or two to lock in that texture.
Temperature Control: The 110-Degree Threshold
Yeast is a living organism, and it is very picky about its environment. The “Goldilocks zone” for activating active dry yeast is between 105°F and 110°F. If your liquid is much colder, the yeast will stay sluggish and your rise will take hours. However, if the liquid hits 140°F, you will effectively kill the yeast, and no amount of waiting will make that dough rise.
I always suggest using a probe thermometer rather than guessing with your wrist. What feels “warm” to one person might be “scalding” to yeast. If you don’t have a thermometer, the milk should feel like lukewarm bathwater. If it’s hot enough to make you pull your finger away, it is definitely too hot for the bread.
Phase One: Activating Yeast and Initial Mixing
The blooming process is your first insurance policy. When you stir the yeast and sugar into the warm milk, you should see a transformation within about 10 minutes. The mixture will start to look foamy, creamy, or bubbly on the surface. This is the yeast “waking up” and signaling that it is ready to work.
If your mixture remains flat and watery after 10 minutes, stop right there. Do not add your expensive flour and butter to dead yeast. This usually means the yeast was expired or the milk was too hot. It’s much better to dump out a cup of milk and start over now than to spend three hours waiting for a dough that will never rise.
Phase Two: The Texture Lock-In Kneading Process
When using a stand mixer, the order in which you add ingredients matters. We add the softened butter one tablespoon at a time after the initial flour and yeast have combined. This technique ensures the butter is fully incorporated into the gluten structure rather than just coating the flour, which can actually prevent gluten from forming if added too early.
As the mixer runs, watch the dough change from a shaggy, messy clump into a cohesive ball. By the end of the 8 to 10 minutes, the dough should pull away cleanly from the sides of the bowl. It should feel tacky to the touch—meaning it sticks slightly but pulls away without leaving a residue on your finger—rather than sticky or wet.
Phase Three: Managing the First Fermentation
Finding a “warm, draft-free spot” can be tricky in a cold kitchen. A great hack is to place your covered bowl inside a turned-off oven with the oven light turned on. The heat from that tiny bulb is often enough to keep the dough at a perfect 75-80 degrees. Alternatively, you can place a cup of steaming water in a microwave alongside the dough to create a makeshift proofing box.
Don’t live strictly by the timer during this phase. Humidity and ambient temperature will change how fast your dough grows. Instead, look for the visual cue: the dough should be roughly double its original size. You can test this by gently poking the dough with one finger; if the indentation stays and doesn’t spring back immediately, it’s ready for shaping.
Phase Four: Shaping for Maximum Tension
To get those perfectly round, professional-looking rolls, you need to create surface tension. Place a dough ball on an un-floured surface and cup your hand over it like a claw. Move your hand in a tight circular motion, keeping the pinky side of your hand in contact with the counter. This pulls the “skin” of the dough tight across the top.
For the best results, use a kitchen scale to weigh your dough pieces. Aiming for about 75 grams per roll ensures they all bake at the same rate. If you have some rolls that are 50 grams and others that are 100 grams, the small ones will be dry and overcooked by the time the large ones are finished in the center.
Phase Five: The Critical Second Proof
The second rise is where the magic happens for that pull-apart effect. As the rolls rise in the pan, they will eventually begin to “kiss” or touch their neighbors. This is exactly what you want. When they bake together, the sides stay soft and protected from the direct heat, which creates that tender, shreddable texture when you pull them apart later.
Be careful not to let them rise for too long during this stage. If the rolls become over-proofed, the gluten structure becomes too weak to support the weight of the dough. When you go to brush them with egg wash or put them in the oven, they might deflate like a popped balloon. They should look puffy and light, but still feel slightly firm to the touch.
Baking to a Deep Glossy Finish
When you apply the egg wash, use a very light hand. You want a thin, even coating that covers the entire top and sides. If the egg wash pools at the bottom of the rolls, it can create a “scrambled egg” effect around the base. Once the wash is on, sprinkle your sesame seeds immediately so they stick to the wet surface before it dries.
During the first 10 minutes in the oven, the rolls will undergo “oven spring,” where the heat causes the yeast to give one final burst of activity before dying. This is when the rolls get their final lift. If you aren’t sure if they are done, you can use a thermometer to check the internal temperature; you are looking for 190°F to 200°F for a perfectly baked center.
Troubleshooting Common Bread Baking Obstacles
If your rolls turn out tough or dry, you likely added too much flour during the kneading process. It is tempting to keep adding flour when the dough feels tacky, but resist the urge! Too much flour makes the dough heavy. Always measure by weight or use the “spoon and level” method to avoid packing the flour into the measuring cup.
If your rolls are pale despite baking for the full time, your oven temperature might be running low, or your egg wash was too thin. On the other hand, if they smell strongly of yeast or sparkling water, they likely proofed for too long or in a spot that was too hot. Next time, move them to a slightly cooler area and keep a closer eye on the “doubled in size” visual cue.
Optimal Pairings for Savory Sesame Rolls
These Golden Sesame Dinner Rolls are incredibly versatile, but they truly shine when paired with earthy, savory dishes. The nuttiness of the sesame seeds complements a thick lentil stew or a creamy roasted butternut squash soup perfectly. The rolls act as the perfect vessel for soaking up every last drop of broth or sauce.
For a perfect pairing, try our Zucchini Bread with Caramel Drizzle: Perfectly Moist & Flavorful.
They also make fantastic vegetarian sliders. Try splitting them open and filling them with a crispy halloumi slice or a roasted portobello mushroom. The richness of the dough and the crunch of the seeds provide a sophisticated base for almost any savory filling. Even a simple smear of salted butter while they are still warm is enough to make them the star of the meal.
Preservation: Make-Ahead and Freezing Strategies
You can easily make these ahead of time to save stress on a big dinner day. After shaping the rolls (Phase Four), you can place the pan in the refrigerator overnight. The cold temperature slows down the yeast, allowing for a “cold ferment” that actually improves the flavor. Just let them sit at room temperature for about 90 minutes the next day to finish their second rise before baking.
To freeze baked rolls, let them cool completely first. Wrap the entire tray or individual rolls tightly in plastic wrap and then foil to prevent freezer burn. They will stay fresh for up to a month. When you’re ready to serve, thaw them at room temperature and then warm them in a 300°F oven for 5-10 minutes. Wrapping them in foil during reheating prevents the crust from getting too hard.
Expert Baking FAQ
Can I substitute active dry yeast with instant yeast?
Yes, you can substitute them at a 1:1 ratio. However, instant yeast does not technically need to be “bloomed” in warm milk and sugar first; you can mix it directly into the dry ingredients. That said, blooming it anyway is a great way to ensure your yeast is still alive. Keep in mind that instant yeast usually works faster, so your rise times might be 15-20 minutes shorter than what is listed in the recipe.
Why did my rolls deflate after I brushed them with egg wash?
This usually happens for two reasons: over-proofing or being too heavy-handed. If the rolls rise for too long, the air bubbles inside become very fragile. When you press down with a pastry brush, you pop those bubbles. To fix this, make sure you only let the rolls rise until they are puffy and just touching, and use a soft-bristled brush or even a clean feather to apply the wash with the lightest touch possible.
Can I make this dough by hand without a stand mixer?
Absolutely! You can achieve the same results by hand, though it will take a bit more elbow grease. Instead of 8-10 minutes in a mixer, you will likely need to knead the dough for 15-20 minutes on a clean surface. It is a great workout! Focus on the same “Windowpane Test” to know when you’re done. If your arms get tired, you can let the dough rest for 5 minutes to relax the gluten, then resume kneading.
How do I achieve a softer crust?
The secret to a soft, buttery crust is the post-bake treatment. As soon as the rolls come out of the oven, brush the tops and sides with melted butter. Then, immediately cover the pan with a clean, dry kitchen towel. This traps the steam escaping from the hot bread, which softens the crust as it cools. This prevents that hard, crusty exterior often found on sourdough or rustic loaves.
What is the best way to measure flour accurately?
The most accurate way is to use a digital kitchen scale. If you don’t have one, use the “spoon and level” method. Use a spoon to fluff up the flour in the bag, then gently spoon it into your measuring cup until it overflows. Use the back of a knife to level it off. Never scoop the flour directly with the measuring cup, as this packs the flour down and can result in adding up to 25% more flour than the recipe intends.
Dinner Rolls
Course: Bread and RollsCuisine: AmericanDifficulty: medium12
rolls20
minutes25
minutes210
kcal45
MinutesThese Golden Sesame Dinner Rolls use a specific hydration technique and temperature control to ensure a professional bakery result. The recipe features a rich dough enriched with butter and eggs, finished with a glossy egg wash and a blend of black and white sesame seeds.
Ingredients
3.5 cups bread flour (preferred for better structure) or all-purpose flour
1 cup warm whole milk (105 to 110 degrees F)
2.25 teaspoons (1 packet) active dry yeast
3 tablespoons granulated sugar
1.5 teaspoons fine sea salt
6 tablespoons unsalted butter, softened to room temperature
1 large egg, room temperature
1 egg yolk mixed with 1 tablespoon heavy cream (for a deep golden egg wash)
2 tablespoons black and white sesame seeds
1 tablespoon melted butter (for brushing after baking)
Directions
- To solve the common problem of a failed rise, start by blooming your yeast in the warm milk with the sugar in the bowl of a stand mixer. If it does not foam within 10 minutes, your milk was too hot or your yeast is old. This step ensures your rolls will actually grow.
- Add the egg and 2 cups of the flour to the yeast mixture. Using the dough hook, mix on low until combined. Add the salt and the softened butter one tablespoon at a time, allowing it to incorporate into the dough.
- Gradually add the remaining flour. Knead on medium-low speed for 8 to 10 minutes. This is the texture lock-in phase. You must knead until the dough is smooth, elastic, and passes the “windowpane test” to build the gluten structure that holds air.
- Place the dough in a greased bowl, cover with a damp cloth, and let it rise in a warm, draft-free spot for 1 to 1.5 hours or until doubled in size.
- Punch the dough down and divide into 12 equal pieces (approx. 75g each). Roll each into a tight, smooth ball by tensioning the dough against the counter.
- Arrange the balls in a greased 9×13 inch baking pan or a high-sided rimmed baking sheet. Cover and let them rise a second time for 45 to 60 minutes. This second rise is the secret to the airy, pull-apart texture seen in the image.
- Preheat your oven to 375 degrees F. Gently brush the tops with the egg and cream wash. Sprinkle generously with a mix of black and white sesame seeds.
- Bake for 20 to 25 minutes until the tops are a deep, glossy golden brown.
- Immediately upon removing from the oven, lightly brush the sides of the rolls with melted butter for a soft crust. Let them cool slightly in the pan before pulling them apart to serve.
Notes
- Ensure the milk is between 105 and 110 degrees F to avoid killing the yeast. The windowpane test is essential for confirming proper gluten development during the kneading phase.