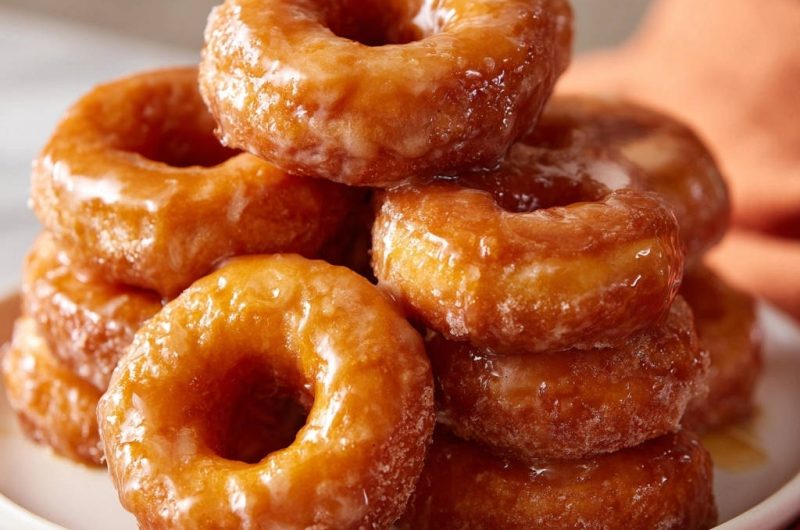
Homemade Glazed Donuts: The Secret to Never-Greasy Fluff!

Craving the warm, pillowy softness of freshly made donuts but dreading the heavy, oily aftermath? I’ve been there too! My journey to truly light, fluffy, and never-greasy homemade glazed donuts led to a game-changing discovery that ensures perfect results every time.
This isn’t just another donut recipe; it’s a guide to unlocking the ultimate homemade experience, where each bite melts in your mouth without a hint of greasiness. Get ready to impress yourself and everyone lucky enough to try these incredible sweet treats.
Why THIS Homemade Glazed Donuts Recipe? Say Goodbye to Greasy!
Many homemade donut recipes promise perfection but deliver dense, oil-laden results. Our method tackles these common pitfalls head-on, ensuring you achieve the airy texture and golden finish you dream of.
The Game-Changing Trick for Light & Fluffy Donuts
The true secret to unbelievably light and fluffy donuts lies in meticulous temperature control during frying. Maintaining the exact oil temperature is paramount, preventing the dough from absorbing too much oil and becoming heavy.
This precise heat ensures rapid cooking and a beautiful golden crust, while the inside cooks through to a tender, airy consistency. It’s the critical difference between a good donut and a truly exceptional one.
Unveiling the “Never-Oily Mess” Promise
No one wants a donut that feels like a sponge full of oil. Our recipe combats this by focusing on two key elements: the optimal oil temperature for frying and proper post-frying drainage.

By frying at 350-360°F (175-182°C) and immediately transferring the fried donuts to a wire rack over paper towels, we minimize oil absorption. This combination ensures your homemade glazed donuts are consistently light, delicate, and free from any unpleasant greasiness.
Gathering Your Sweet Donut Arsenal: Ingredients & Tools
Crafting perfect homemade glazed donuts starts with understanding the role of each ingredient and having the right tools at your fingertips. Quality makes a difference, so choose fresh ingredients.
The Sweet Science of Donut Ingredients
For the Dough:
Warm Milk (105-115°F): This specific temperature is crucial for activating the active dry yeast without killing it. Too hot, and the yeast dies; too cool, and it won’t activate properly, resulting in a dense donut.
Active Dry Yeast: The leavening agent that gives your donuts their signature rise and airy texture. Ensure it’s fresh and active for best results.
Granulated Sugar: Feeds the yeast, aiding in its activation and contributing to the donut’s overall sweetness. It also helps with browning during frying.
Large Egg: Adds richness, moisture, and helps bind the dough, contributing to a tender crumb. Ensure it’s at room temperature for better incorporation.
Unsalted Butter, Melted and Cooled: Provides flavor, richness, and keeps the donuts tender. Cooling it slightly prevents it from ‘scrambling’ the egg or harming the yeast.
Vanilla Extract: Infuses a classic, warm flavor into the dough, complementing the sweetness. Choose a good quality extract for the best taste.
Salt: Balances the sweetness, enhances flavor, and strengthens the gluten structure in the dough, which is essential for a good rise and chew.
All-Purpose Flour: The foundation of the dough, providing structure. Having extra on hand for dusting is helpful during kneading and shaping.
Vegetable Oil (for frying): A neutral-flavored oil like canola, sunflower, or vegetable oil is ideal for frying, as it won’t impart unwanted flavors. Ensure you have enough for proper deep-frying.
For the Glaze:
Powdered Sugar: The base of our simple, classic glaze. Its fine texture dissolves smoothly for a silky finish.
Milk: Thins the glaze to the perfect dipping consistency. Adjust amounts slightly to achieve your desired thickness.
Vanilla Extract: Adds a warm, aromatic depth to the glaze, making it irresistible. A little goes a long way here.
Essential Kitchen Tools for Donut Success
Large Mixing Bowls: Essential for combining ingredients and allowing the dough to rise without constraint.
Whisk: For smoothly combining wet ingredients and preparing the glaze.
Dough Scraper or Spatula: Helpful for mixing the initial shaggy dough and for handling it on a floured surface.
Clean Kitchen Towel or Plastic Wrap: For covering the dough during its rises, preventing it from drying out.
Rolling Pin: To achieve an even thickness for your donut dough, ensuring uniform cooking.
Donut Cutter (or two round cutters): A dedicated donut cutter makes shaping easy, but a 3-inch biscuit cutter and a 1-inch round cutter for the center work perfectly well.
Parchment Paper: For lining baking sheets to prevent cut donuts from sticking during their second rise and making transfer to oil easier.
Large, Heavy-Bottomed Pot or Dutch Oven: Crucial for even heat distribution during frying, minimizing temperature fluctuations. Its depth also reduces oil splatters.
Deep-Fry Thermometer: Absolutely critical for maintaining the precise oil temperature. This is your key to non-greasy, perfectly cooked homemade glazed donuts.
Slotted Spoon or Spider: For safely lowering and removing donuts from the hot oil. A spider is especially effective for draining oil quickly.
Wire Rack Set Over a Baking Sheet: Essential for draining excess oil and allowing the glaze to set without pooling. The paper towels underneath catch drips.
Shallow Bowl: Ideal for easy dipping and coating of the donuts in the glaze.
Your Journey to Donut Perfection: A Step-by-Step Guide
Activating the Yeast: The Foundation of Fluffiness
In a large bowl, combine the warm milk (ensure it’s within the 105-115°F range), the active dry yeast, and one tablespoon of granulated sugar. This mixture provides the perfect environment for the yeast to wake up.
Let this sit for 5-10 minutes. You’ll know your yeast is active and ready when a foamy layer appears on the surface, indicating it’s alive and thriving. If it doesn’t foam, your yeast might be old or the milk temperature was off, and you should start fresh.
Mixing and Kneading: Building the Dough’s Structure
Once your yeast is bubbly, add the remaining granulated sugar, a large egg, the slightly cooled melted butter, vanilla extract, and salt to the mixture. Whisk everything until it’s well combined and smooth, integrating all the wet ingredients.
Gradually add the all-purpose flour, mixing until a soft, shaggy dough begins to form. At this stage, it won’t look smooth, but rather like a loose collection of ingredients coming together.
Turn the dough out onto a lightly floured surface. Knead it for 5-7 minutes. This develops the gluten, creating a smooth and elastic dough that is soft to the touch but no longer overly sticky, ready for its first rise.
The First Rise: Patience Pays Off
Lightly oil a clean bowl, then place your kneaded dough inside, turning it once to ensure it’s coated. This prevents it from sticking and drying out during the rise.
Cover the bowl with a clean kitchen towel or plastic wrap. Find a warm spot in your kitchen (like a slightly warm oven, or near a sunny window) and let the dough rise for 1 to 1.5 hours, or until it has visibly doubled in size. This primary fermentation is essential for flavor development and a light texture.
Shaping Your Donuts: Cut, Re-Roll, & Repeat
Once risen, gently punch down the dough to release the accumulated air. Turn it out onto a lightly floured surface to prevent sticking.
Using a rolling pin, roll the dough evenly to about a 1/2-inch thickness. This uniform thickness is important for consistent frying. Use a 3-inch donut cutter to stamp out your donut shapes, along with their centers.
Gather any dough scraps, gently re-roll them, and cut out additional donuts and holes. Handle the dough minimally to maintain its tenderness, preventing it from becoming tough.
The Critical Second Rise: Puffy Perfection Awaits
Carefully transfer your cut donuts and donut holes to baking sheets lined with parchment paper, ensuring there’s ample space between each one. This prevents them from sticking together as they expand.
Loosely cover the donuts with a clean towel and let them rise again for 30-45 minutes. This second proofing is incredibly important; the donuts should look visibly puffy and airy, which guarantees a light, soft texture after frying.
The Secret to Non-Greasy Frying: Temperature Control is King
This step is where we ensure your homemade glazed donuts are never greasy. Pour 6-8 cups of vegetable oil into a large, heavy-bottomed pot or Dutch oven, aiming for a depth of at least 3 inches.
Crucially, attach a deep-fry thermometer to the side of the pot. Heat the oil over medium heat until it reaches a consistent 350-360°F (175-182°C). This precise temperature window is absolutely critical.
If the oil is too cool, the donuts will absorb too much oil, becoming heavy and greasy. If it’s too hot, they’ll burn rapidly on the outside, leaving the inside raw and doughy. Monitor the temperature diligently throughout the frying process.
Frying Your Homemade Glazed Donuts to Golden Perfection
Carefully lower 2-3 donuts into the hot oil at a time using a slotted spoon or spider. It’s important not to overcrowd the pot, as this will significantly drop the oil temperature and lead to uneven cooking and greasy donuts.
Fry each donut for 1-2 minutes per side, or until they achieve a beautiful golden-brown color. They should puff up nicely and develop a lovely crust.
Draining Excess Oil for a Cleaner Bite
Once fried to perfection, use a slotted spoon or spider to immediately transfer the donuts to a wire rack. This rack should be set over a baking sheet lined with paper towels.
The wire rack allows air to circulate, and the paper towels effectively absorb any excess surface oil. This vital step further prevents greasiness, ensuring a clean, enjoyable bite every time.
Whipping Up the Classic Glaze
While your freshly fried donuts cool slightly on the rack, prepare the irresistible glaze. In a shallow bowl, whisk together the powdered sugar, milk, and vanilla extract until the mixture is completely smooth and free of lumps.
The consistency should be thin enough to coat the donuts without being watery, but thick enough to cling. Adjust the milk by a tiny increment if needed to reach your desired texture.
Glazing & Serving: The Grand Finale
Once the donuts are cool enough to handle comfortably but still warm, dip each one into the prepared glaze. Turn them gently to ensure both sides are thoroughly coated in the sweet, vanilla-scented goodness.
Place the glazed donuts back onto the wire rack. This allows any excess glaze to drip off cleanly and gives the glaze a moment to set, forming that iconic sugary shell. Serve these delightful sweet treats immediately for the absolute best experience, when they are at their peak of warmth and tenderness.
Mastering Your Donut Game: Chef’s Tips & Quick Fixes
Achieving perfect homemade glazed donuts is within reach with these expert insights. A few small adjustments can make a world of difference in your results.
Expert Tips for Flawless Homemade Glazed Donuts
Use Fresh Yeast: Always ensure your active dry yeast is fresh. An active yeast is the foundation of light, airy donuts. Test it first if unsure.
Don’t Over-Flour: While flour is necessary for kneading, adding too much will result in a tough, dense donut. The dough should be soft, not stiff.
Proper Kneading Time: Kneading for 5-7 minutes develops gluten, which gives structure, but don’t over-knead. Overworked dough becomes rubbery.
Maintain Oil Temperature: This cannot be stressed enough. Invest in a reliable deep-fry thermometer and monitor the oil continuously. Slight fluctuations can ruin your donuts.
Don’t Overcrowd the Pot: Frying too many donuts at once drastically lowers the oil temperature, leading to greasy, poorly cooked results. Fry in small batches.
Glaze While Warm: Dipping the donuts while they are still warm (but not hot) allows the glaze to adhere beautifully and set into a thin, even coating.
Common Donut Woes & How to Fix Them
Even seasoned bakers encounter challenges. Here’s how to troubleshoot common issues when making your own homemade glazed donuts.
Donuts are Dense and Heavy
This usually points to inactive yeast or insufficient rising time. Ensure your milk temperature is perfect for yeast activation and allow both rises to complete fully until the dough is visibly puffy. Over-kneading can also lead to a dense texture, so be mindful of the suggested kneading time.
Donuts are Greasy
The most common culprit here is incorrect oil temperature during frying. If the oil is too cool, the donuts soak it up like a sponge. Always use a deep-fry thermometer to maintain the ideal 350-360°F (175-182°C). Also, ensure you’re draining them immediately on a wire rack over paper towels.
Glaze is Too Thin or Too Thick
The glaze consistency is easily adjustable. If your glaze is too thin, whisk in a tablespoon more of powdered sugar at a time until it reaches your desired thickness. If it’s too thick, add a quarter teaspoon of milk (or water) until it’s perfectly dippable.
Donuts Burn Outside, Raw Inside
This is a clear sign the oil is too hot. The high temperature rapidly browns the exterior before the interior has a chance to cook through. Adjust your heat down, let the oil cool slightly, and ensure it’s within the 350-360°F range before frying more.
Serving, Storing, & Savouring Your Delicious Creation
You’ve put in the effort to make these glorious homemade glazed donuts, now let’s make sure you enjoy them to the fullest!
Best Ways to Enjoy Your Freshly Fried Delights
There’s nothing quite like a warm, freshly glazed donut, and these are no exception. Enjoy them simply, perhaps with a cup of coffee or a glass of cold milk.
For an extra treat, consider a dusting of cinnamon sugar or a sprinkle of colorful sprinkles on top of the glaze before it sets. These donuts are also fantastic alongside a fruit salad or a simple bowl of cinnamon sugar apples for a brunch spread.
Storing Leftovers: Keeping Them Fresh
While best enjoyed fresh, you can store leftover homemade glazed donuts for a short period. Place them in an airtight container at room temperature for up to 2 days.
To refresh them slightly, you can microwave them for 10-15 seconds; this will soften them up, but the glaze may melt a bit. Freezing is not recommended for glazed donuts as the texture can suffer significantly.
Make-Ahead Magic: Prepping for Future Donut Cravings
You can prepare the donut dough the night before! After the first rise, punch down the dough, cover the bowl tightly with plastic wrap, and refrigerate it overnight. The next morning, simply take it out, let it come to room temperature for about 30-60 minutes, then proceed with rolling, cutting, and the second rise.
This make-ahead option means you can enjoy fresh, warm homemade glazed donuts for breakfast or brunch with much less morning effort.
Your Top Homemade Glazed Donuts Questions, Answered!
Let’s address some of the most common inquiries about making these delicious homemade glazed donuts.
Can I use a stand mixer for the dough?
Absolutely! A stand mixer fitted with a dough hook is excellent for kneading. Mix on low speed for 5-7 minutes, until the dough is smooth, elastic, and pulls away from the sides of the bowl. This can make the kneading process even easier.
What if my yeast doesn’t foam?
If your yeast mixture doesn’t become foamy after 5-10 minutes, it indicates the yeast is no longer active or the milk temperature was incorrect. Do not proceed with that mixture; it will not rise. Discard it and start over with fresh yeast and carefully measured warm milk to ensure success.
How do I know if my oil is the right temperature without a thermometer?
While a thermometer is highly recommended for precise results, a quick test is to drop a small piece of dough (about 1-inch) into the oil. If it immediately sizzles and turns golden brown in about 30-45 seconds, the oil is ready. If it browns too quickly, it’s too hot; if it just sits there without sizzling, it’s too cool.
Can I bake these donuts instead of frying?
This specific recipe is optimized for frying to achieve that classic light, airy, and fluffy texture. While you can technically bake donut dough, the results will be denser and more cake-like, similar to a baked biscuit. If you prefer baked donuts, it’s best to find a recipe specifically formulated for baking, as the ingredient ratios often differ.
Can I make different glaze flavors?
Yes, absolutely! The basic glaze recipe is a fantastic canvas for creativity. Instead of vanilla, try almond extract for an almond glaze, or a squeeze of fresh lemon juice for a zesty lemon glaze. You could also stir in a tablespoon of cocoa powder for a chocolate glaze or a dash of cinnamon for a spiced variation.
Ready to Create Your Own Donut Magic?
You now have all the knowledge and expert tips to create truly unforgettable homemade glazed donuts. Forget dense, oily disappointments – this recipe delivers on its promise of light, fluffy perfection with every bite.
Don’t wait any longer to fill your kitchen with the irresistible aroma of fresh-fried dough. Dive in, follow these steps, and prepare to be amazed by your own donut-making prowess. Share your stunning creations with us!
Donuts
Course: PastryCuisine: AmericanDifficulty: medium12
donuts and holes45
minutes25
minutes150
kcal180
minutesDiscover the secret to making incredibly light, fluffy, and never-greasy homemade glazed donuts. This recipe guides you through achieving perfect texture and flavor, just like your favorite bakery. Enjoy fresh, warm donuts right from your kitchen!
Ingredients
For the Donuts:
1 cup warm milk (around 105-115°F)
2 and 1/4 teaspoons active dry yeast (one standard packet)
1/4 cup granulated sugar
1 large egg
1/4 cup unsalted butter, melted and cooled slightly
1 teaspoon vanilla extract
1/2 teaspoon salt
3 cups all-purpose flour, plus more for dusting
6-8 cups vegetable oil, for frying
For the Glaze:
2 cups powdered sugar
1/4 cup milk
1 teaspoon vanilla extract
Directions
- In a large bowl, combine the warm milk, yeast, and 1 tablespoon of the granulated sugar. Let it sit for 5-10 minutes until foamy, indicating the yeast is active.
- Add the remaining granulated sugar, egg, melted butter, vanilla extract, and salt to the yeast mixture. Whisk until well combined.
- Gradually add the all-purpose flour, mixing until a soft, shaggy dough forms.
- Turn the dough out onto a lightly floured surface and knead for 5-7 minutes until it’s smooth and elastic. The dough should be soft but not overly sticky.
- Place the dough in a lightly oiled bowl, turning once to coat. Cover with a clean kitchen towel or plastic wrap and let rise in a warm place for 1-1.5 hours, or until doubled in size.
- Once risen, gently punch down the dough to release air. Turn it out onto a lightly floured surface. Roll the dough to about 1/2 inch thickness. Using a 3-inch donut cutter or two different sized round cutters, cut out donut shapes and their centers. Gather any scraps, re-roll, and cut more donuts.
- Place the cut donuts and donut holes on parchment-lined baking sheets, leaving some space between each. Cover loosely with a clean towel and let rise again for 30-45 minutes, or until visibly puffy. This second rise is important for a light texture.
- To avoid greasy donuts, proper oil temperature is key. Pour the vegetable oil into a large, heavy-bottomed pot or Dutch oven, ensuring it’s at least 3 inches deep. Attach a deep-fry thermometer to the side of the pot. Heat the oil over medium heat until it reaches a consistent 350-360°F (175-182°C). It is critical to maintain this temperature throughout frying. If the oil is too cool, the donuts will absorb too much oil and be greasy. If it’s too hot, they will burn on the outside and be raw in the middle.
- Carefully lower 2-3 donuts into the hot oil at a time, being careful not to overcrowd the pot, which would lower the oil temperature. Fry for 1-2 minutes per side, or until golden brown.
- Using a slotted spoon or spider, transfer the fried donuts immediately to a wire rack set over a baking sheet lined with paper towels. The paper towels will help absorb any excess surface oil, further preventing greasiness.
- While the donuts cool slightly, whisk together the powdered sugar, milk, and vanilla extract in a shallow bowl until smooth for the glaze.
- Once the donuts are cool enough to handle but still warm, dip each donut into the glaze, turning to coat both sides. Place them back on the wire rack to allow excess glaze to drip off and set. Serve immediately for the best experience.
Notes
- Maintaining proper oil temperature (350-360°F) is crucial for non-greasy donuts. The second rise ensures a light, fluffy texture.