Mastering Glazed Lemon Poppy Seed Scones with the Double-Chill Method
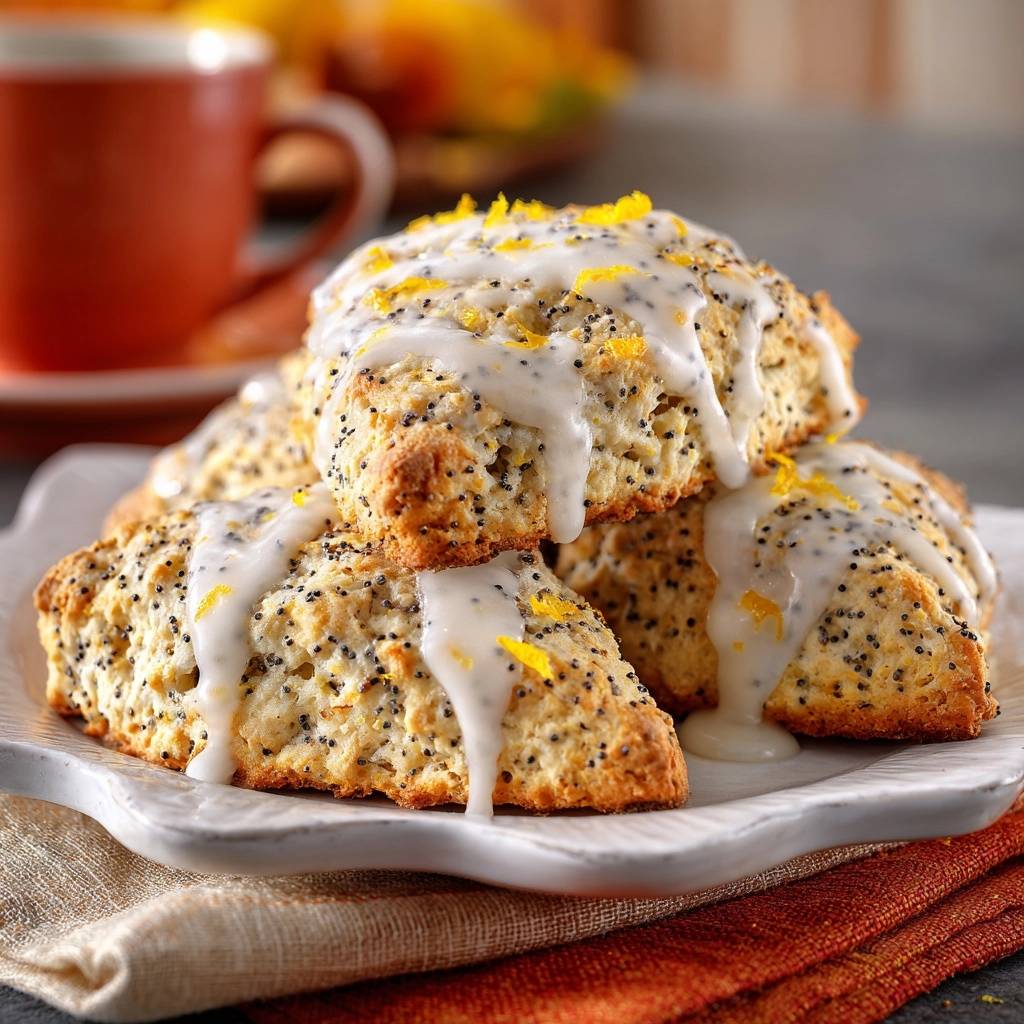
There is nothing quite like the first bite of a bakery-style scone that actually gets the texture right. You know the one—a shatteringly crisp exterior that gives way to a tender, buttery center that melts on your tongue. Most homemade versions, however, end up as sad, dense triangles or, even worse, mushy messes that turn into a “soggy bottom” the moment you drizzle on the glaze.
The frustration of a flat, greasy scone usually comes down to one thing: heat. When butter softens before it hits the oven, you lose the structural integrity that makes a scone feel light and flaky. Instead of a proud, tall pastry, you get a cakey biscuit that lacks that signature crunch. We’re going to fix that today by focusing on the physics of the dough.
The secret to this professional-grade crumb is my “Double-Chill” philosophy. By freezing the butter twice—once after grating and once after shaping—we ensure the fat stays in solid, distinct pockets. When those frozen bits hit the 400-degree oven, they burst into steam, creating the lift and layers that define a world-class Glazed Lemon Poppy Seed Scone. It’s a game-changer for your morning coffee routine.
The Anatomy of a Non-Soggy Lemon Scone
To achieve the perfect scone, we have to look at it as a structural project. A successful scone needs a sturdy base that can support a thick layer of icing without absorbing the moisture and becoming gummy. This “Anti-Soggy Bottom” approach relies on creating a barrier of well-browned crust that acts as a shield for the tender interior.
Technically speaking, we are preventing “butter leakage.” If your butter is too warm, it leaks out of the dough during baking, frying the bottom of the scone in a pool of grease rather than lifting the layers. By keeping everything ice-cold, we ensure the moisture stays trapped within the flour’s protein structure until the very last second.
Why Temperature Control Dictates Scone Success
Think of your oven as a launchpad. When you slide a tray of chilled dough into a hot environment, the temperature differential causes a rapid expansion. The frozen butter shreds don’t just melt; they evaporate, leaving behind tiny air caverns that result in a flaky, honeycomb-like crumb.

If you use room-temperature butter, the fat simply coats the flour particles. This leads to a “slumping” effect where the scones spread horizontally like cookies rather than rising vertically. Cold-shocking the dough is the only way to get that dramatic, craggy height you see in high-end pastry shops.
Essential Components for Glazed Lemon Poppy Seed Scones
The ingredient list for these scones is deceptively simple, but the quality of each item carries a lot of weight. I always recommend using all-purpose flour here. While cake flour might seem like it would make things lighter, it actually lacks the protein needed to hold up the heavy lemon glaze and the weight of the poppy seeds.
Granulated sugar provides just enough sweetness to balance the tart lemon, but it also plays a role in the browning of the crust. Because we are using a high baking temperature, the sugar caramelizes on the edges, giving you that satisfying snap when you take a bite. Don’t skip the salt, either; it’s the only thing that makes the citrus flavors truly pop.
Selecting the Right Citrus and Poppy Seeds
When it comes to lemon flavor, the zest is your best friend. The yellow skin of the lemon contains volatile oils that provide a deep, floral aroma without the acidity that can sometimes curdle your dairy. I always zest the lemon directly over the sugar to capture every drop of those oils as they spray from the fruit.
If you’re enjoying this citrusy treat, try the same bright lemon poppy seed flavor in a lemon poppy seed cheesecake.
Poppy seeds are more than just a decorative speckle. They provide a subtle, nutty crunch that contrasts beautifully with the soft dough. Because they are tiny and dense, they can sometimes sink, but our thick, shaggy dough keeps them perfectly suspended throughout the pastry so every bite has that classic texture.
The Case for Heavy Cream and High-Fat Dairy
I strongly advocate for heavy cream over milk or buttermilk in this specific recipe. Heavy cream has a higher fat-to-water ratio, which is essential for the “Anti-Soggy” goal. Less water means less gluten development, which translates to a more tender scone that won’t get tough or chewy.
Furthermore, the fat in the cream helps stabilize the dough during the freezing phases. It creates a rich, velvety mouthfeel that mimics the decadence of a shortbread but with the airy lift of a biscuit. It also helps the scones achieve a beautiful, burnished gold color during their 20-minute stint in the oven.
The Science of the Double-Chill Technique
This is the “Skyscraper” secret that separates amateur bakers from the pros. Most recipes tell you to work quickly, but they don’t tell you to use your freezer as a tool. The Double-Chill technique involves two distinct freezing phases that guarantee success regardless of how warm your kitchen might be.
By treating temperature as an ingredient, you take the guesswork out of the process. You aren’t just chilling the dough; you are “cold-shocking” it. This ensures that the exterior sets immediately upon hitting the heat, locking in the shape and preventing the dreaded scone spread.
Phase One: Grating and Freezing the Butter
Instead of using a pastry cutter to hack at cold butter, I want you to use a box grater. Grating frozen butter creates uniform “shreds” that have a massive amount of surface area. This allows the butter to be distributed evenly through the flour without you having to overwork the dough with your warm hands.
However, the friction of grating can slightly warm the butter. That’s why putting those shreds back into the freezer for 10 minutes is a non-negotiable step. You want those butter bits to be as hard as pebbles when they meet the dry ingredients. This ensures they stay as individual pockets of fat rather than smearing into the flour.
Phase Two: The Pre-Bake Flash Freeze
Once you’ve shaped your dough into wedges, the temptation is to throw them straight into the oven. Resist that urge! A 15-minute flash freeze on the baking sheet is the final insurance policy for a perfect rise. This “sets” the gluten and ensures the butter is at its absolute coldest point before the heat hits.
This phase prevents the “slumping” effect. If the dough is even slightly room temperature, the weight of the cream and sugar will cause the scone to flatten out before the structure has time to bake. The flash freeze ensures the scone only goes one way: up.
Step-by-Step: Crafting the Perfect Scone Base
When you start mixing, your goal is a “shaggy dough.” This means the mixture should look a bit messy and clumpy, with some dry flour still visible at the bottom of the bowl. If you mix until it’s a smooth, cohesive ball, you’ve gone too far and developed too much gluten.
Use a fork or a sturdy spatula to fold the wet ingredients into the dry. Stop the moment the dough starts to pull away from the sides of the bowl. It might feel like it’s not coming together, but once you turn it out onto the counter and pat it into a disc, the residual moisture will hydrate those last bits of flour.
Incorporating the Frozen Butter Shreds
When you add the frozen butter to the flour, don’t rub it in with your fingers. Instead, use a light “tossing” motion, almost like you’re tossing a salad. You want every single shred of butter to be coated in a thin layer of flour. This creates a physical barrier that prevents the butter from melting into the dough prematurely.
You should be able to see the individual pieces of butter in the final dough. Those little white flecks are exactly what you’re looking for. They are the “steam engines” that will power the rise of your scones in the oven.
Shaping and Cutting for Maximum Rise
Gently pat the dough into an 8-inch disc that is about an inch thick. Don’t use a rolling pin; the heat and pressure can crush those air pockets we’ve worked so hard to preserve. Use your hands to keep the edges straight and the top level.
When it’s time to cut the wedges, use a very sharp knife or a bench scraper. Press straight down in one firm motion. Do not saw back and forth! A clean, vertical cut leaves the “pores” of the dough open, allowing them to expand. A dull blade or a sawing motion “seals” the edges, which can trap the steam and prevent the scone from rising fully.
Achieving the Golden Bake and Firm Base
Oven calibration is key here. You want a true 400°F environment. If your oven runs cool, the scones will dry out before they brown. If it’s too hot, the outside will burn while the middle stays raw. I always recommend using an oven thermometer to be sure.
The high heat is what creates the “Anti-Soggy” crust. It sears the bottom of the scone against the parchment paper, creating a firm, resonant base. This structural foundation is what allows the scone to hold its shape even after it’s been loaded with lemon glaze.
Visual Cues for Doneness
Don’t just rely on the timer. Look for a “deeply golden” color on the edges and the tops. The scones should feel firm to the touch and shouldn’t wobble if you gently nudge them. If you lift one up with a spatula, the bottom should be a uniform, toasted brown.
If the tops are pale, they aren’t done. That golden color is a sign of the Maillard reaction, which provides the toasted, nutty flavor that balances the bright lemon. Once they reach that perfect shade, move them immediately to a wire rack so the bottoms don’t steam on the hot pan.
The Opaque Lemon Glaze: Texture and Application
A professional glaze should be thick, white, and opaque—not a watery, translucent syrup that disappears into the pastry. By adding a tablespoon of heavy cream to the powdered sugar and lemon juice, you create a stable icing that sits proudly on top of the scone.
The cream provides fat, which prevents the sugar from drying into a brittle, clear shell. Instead, you get a soft, creamy bite that carries a punch of citrus. It should be thick enough to hold its shape when drizzled but thin enough to slowly drip down the sides in beautiful ribbons.
The Cooling Rule: Preventing Glaze Absorption
This is the hardest part: you must wait for the scones to be completely cool before glazing. If the scone is even slightly warm, the sugar in the glaze will melt and liquefy. This liquid then seeps into the crumb, creating the very sogginess we’ve spent all this time avoiding.
Wait at least 30 to 45 minutes. Once the scone is at room temperature, the glaze will set on the surface, creating a beautiful contrast between the crunchy exterior and the sweet, zesty topping. Top with extra lemon zest immediately while the glaze is still wet so it sticks.
Troubleshooting Common Scone Failures
If your scones “slumped” or spread out, your butter was likely too warm. Next time, try freezing your flour and bowl for 15 minutes before you start. If the crumb feels dry or sandy, you might have measured your flour by scooping the cup into the bag, which packs it down. Always spoon the flour into the measuring cup and level it off with a knife.
A metallic aftertaste is usually a sign of using too much baking powder or using a brand that contains aluminum. Look for “aluminum-free” baking powder for the cleanest flavor. If the scones didn’t rise, check the expiration date on your leavening agents; baking powder loses its potency quickly in a humid pantry.
Make-Ahead Strategies and Storage Solutions
Scones are best the day they are made, but you can absolutely prep them in advance. You can freeze the unbaked wedges on a tray and then transfer them to a freezer bag. When you’re ready for a fresh treat, just bake them straight from frozen, adding 2-3 minutes to the total bake time. It’s the ultimate “bake-on-demand” luxury.
To store leftover glazed scones, keep them in an airtight container at room temperature for up to two days. If they lose their crunch, pop them into a 350°F oven for 5 minutes. This will refresh the exterior without melting the glaze too much. Avoid the microwave, as it will turn the pastry rubbery and melt the icing into a sticky mess.
Expert Tips for Flavor Variations
Once you master this base, you can play with the flavors. Try adding a half-teaspoon of ground cardamom to the dry ingredients for a sophisticated, herbal twist that pairs beautifully with lemon. You can also swap the lemon for lime zest and juice for a “Key Lime” style scone that is incredibly refreshing in the summer.
Another great option is to add a handful of fresh blueberries. If you do this, toss the berries in a little flour first to prevent them from bleeding into the dough. The “Double-Chill” method works perfectly with fruit additions because it keeps the dough firm enough to hold the extra moisture from the berries.
Frequently Asked Questions
Can I use a food processor instead of grating the butter?
You can, but you have to be extremely careful. Pulse the butter and flour only a few times until you see pea-sized lumps. The danger with a food processor is that the blades move so fast they can generate heat, which might melt the butter. Grating by hand is safer for ensuring those distinct, frozen shards that create the best flakes.
Why did my scones turn out more like biscuits?
Scones and biscuits are cousins, but scones are richer due to the egg and higher sugar content. If yours feel too much like a dinner biscuit, you might have forgotten the egg or used buttermilk instead of heavy cream. The egg provides a tighter, more “pastry-like” crumb that distinguishes a scone from a fluffy breakfast biscuit.
Can I use a sugar substitute in the glaze?
You can use a powdered erythritol or monk fruit sweetener for the glaze, but keep in mind that these can sometimes have a “cooling” aftertaste. Because the glaze relies on the volume of the powdered sugar for its opacity, make sure your substitute is finely powdered. You may need to adjust the liquid slightly to get the right drizzling consistency.
How do I keep the poppy seeds from settling at the bottom?
In a thin batter, seeds sink, but in this thick, shaggy scone dough, they should stay right where you put them. The key is to whisk them into the dry flour thoroughly before adding the wet ingredients. This ensures they are “trapped” in the flour matrix before the dough even forms.
Is it possible to make these dairy-free while keeping the crunch?
Yes, but you need to use a high-quality plant-based butter stick that is formulated for baking (not a tub spread). Freeze the plant-based butter just like the dairy version. For the cream, use a full-fat canned coconut milk or a heavy plant-based cream. The high fat content is non-negotiable if you want to maintain that crisp, non-soggy base.

Lemon Poppy Seed Scones
Course: Breakfast and DessertCuisine: AmericanDifficulty: easy8
servings15
minutes20
minutes310
kcal35
MinutesThese lemon poppy seed scones use a specific temperature control technique to ensure a flaky, sturdy base that avoids the common soggy bottom. Featuring frozen butter and a cold-shock freeze before baking, they are finished with a thick, opaque lemon glaze.
Ingredients
2 cups all-purpose flour
1/3 cup granulated sugar
1 tablespoon baking powder
1/2 teaspoon salt
2 tablespoons poppy seeds
1/2 cup unsalted butter, frozen
1/2 cup heavy cream, cold (plus 1 tablespoon for brushing)
1 large egg
1 tablespoon lemon zest
1 teaspoon vanilla extract
For the Glaze & Topping:
1 cup powdered sugar
2 tablespoons fresh lemon juice
1 tablespoon heavy cream (for opacity)
Extra lemon zest for garnish
Directions
- To prevent a soggy bottom, start by grating your frozen butter into a bowl and placing it back in the freezer for 10 minutes. Keeping the butter at a freezing temperature is the only way to create the steam pockets needed for a flaky, sturdy base.
- In a large bowl, whisk together flour, sugar, baking powder, salt, and poppy seeds.
- Toss the frozen butter shreds into the flour mixture until evenly coated. In a separate small bowl, whisk the 1/2 cup heavy cream, egg, lemon zest, and vanilla.
- Pour the wet ingredients into the dry and stir just until a shaggy dough forms. Do not overwork the dough; the goal is to keep the butter bits intact.
- Turn the dough onto a lightly floured surface and pat into an 8-inch disc. Cut into 8 wedges.
- Place the wedges on a baking sheet lined with parchment paper. Brush the tops lightly with the extra tablespoon of heavy cream. Freeze the entire tray for 15 minutes before baking. This “cold-shock” technique ensures the scones rise upward rather than spreading out and becoming greasy.
- Bake at 400 degrees F for 18 to 22 minutes until the edges are deeply golden and the bottoms are firm and browned.
- Let the scones cool completely on a wire rack. Whisk the powdered sugar, lemon juice, and 1 tablespoon of heavy cream together to create a thick, white, opaque glaze. Drizzle generously over the cooled scones and immediately top with fresh lemon zest. Cooling them fully before glazing is the final step to ensuring that crisp bottom stays perfect.
Notes
- The secret to the anti-soggy bottom is grating the butter while frozen and chilling the shaped dough in the freezer for 15 minutes before it hits the oven.