Homemade Potato Chips: Your Secret to Perfect Crunch!
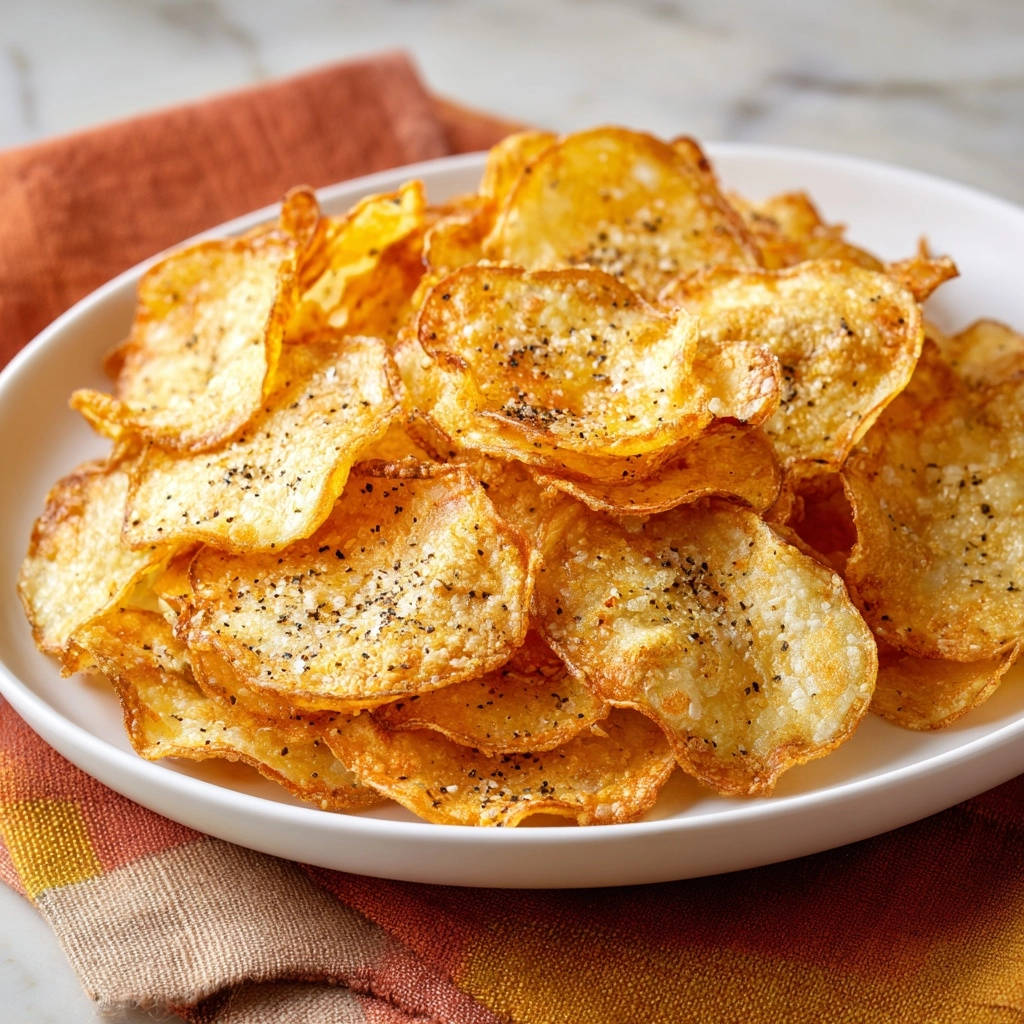
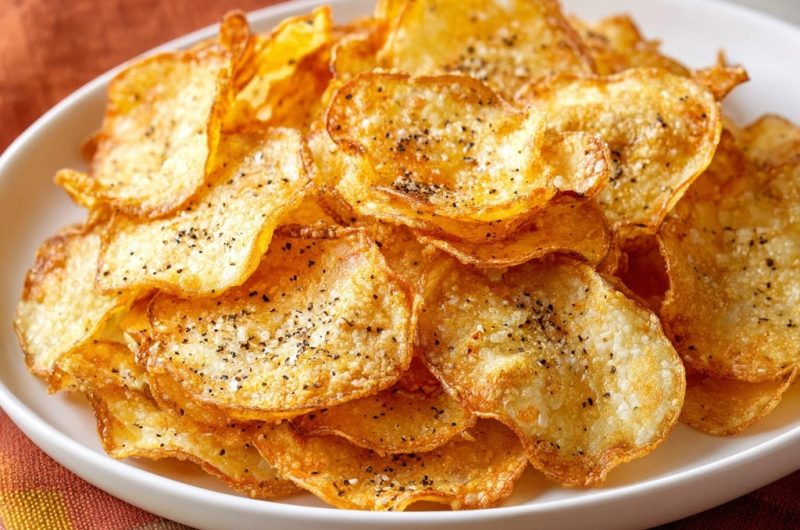
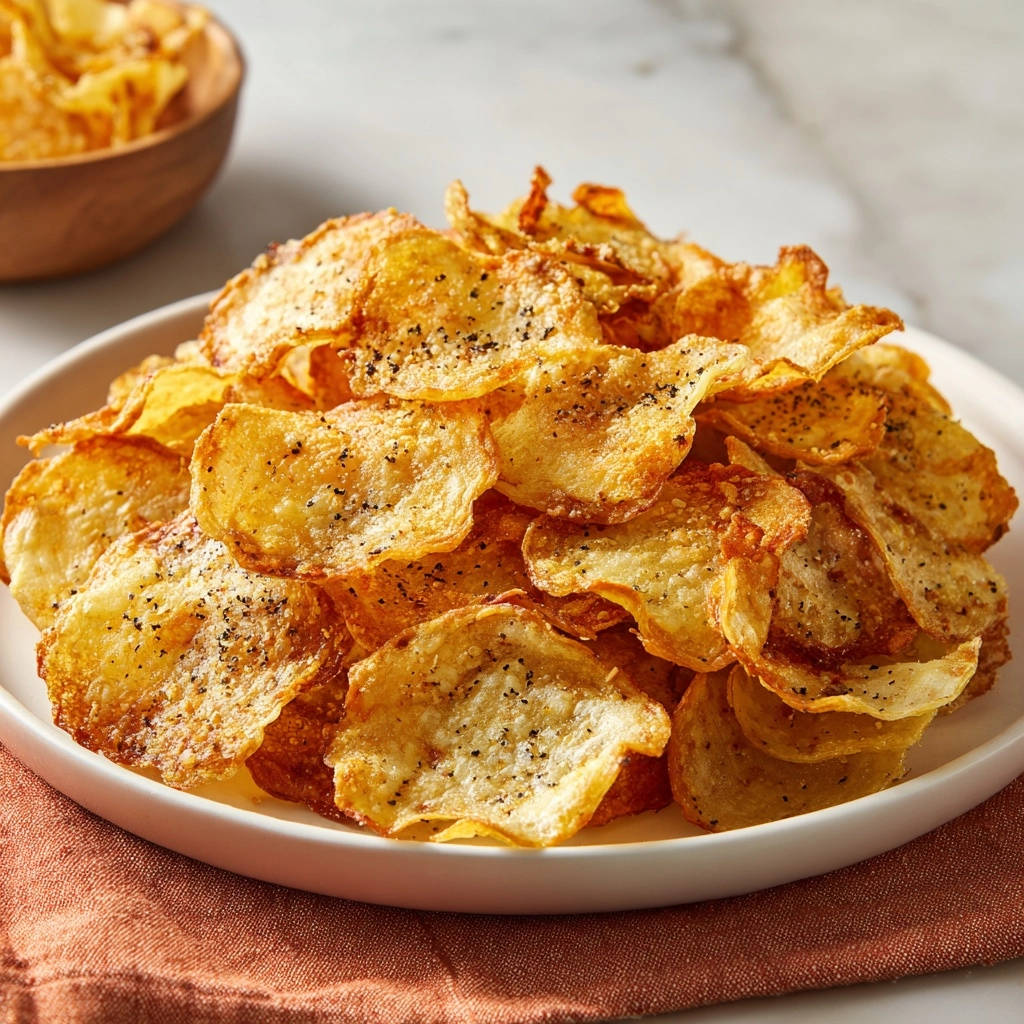
There’s nothing quite like the satisfying crunch of truly great potato chips, but let’s be honest: achieving that perfect crispiness at home can feel like a culinary quest. For years, my homemade potato chips often veered into soggy territory, leaving me frustrated. I’ve finally cracked the code, and this recipe delivers perfectly crispy, golden homemade potato chips every single time.
Get ready to transform simple spuds into an irresistible snack that’s far superior to anything from a bag. This method focuses on a few critical steps that guarantee success, making you a chip-making master. Say goodbye to floppy disappointments and hello to the ultimate crispy treat!
Unlocking the Crispy Code: Why This Homemade Potato Chips Recipe Shines
Many homemade chip recipes fall short, resulting in oily or limp results. This specific approach stands out by meticulously addressing the root causes of sogginess.
Our secret lies in a critical moisture-removal step, ensuring your potato slices hit the hot oil completely dry. This simple yet powerful technique guarantees an unparalleled crisp texture, making every bite satisfyingly crunchy.
Beyond crispness, this recipe uses minimal, high-quality ingredients, allowing the pure, savory potato flavor to shine. You’ll taste the difference, experiencing a cleaner, fresher flavor profile compared to store-bought options.
If you love letting pure potato flavor shine, try these loaded sheet pan fries for a heartier twist.
The satisfaction of creating such a beloved snack from scratch is immense. This reliable method empowers you to consistently produce extraordinary homemade potato chips, impressing everyone who tries them.
Your Essential Kitchen Toolkit for Homemade Potato Chip Success
Having the right tools is paramount for consistent, perfectly crispy chips. A few key pieces of equipment will make all the difference in your chip-making journey.
The Mandoline Advantage
A mandoline slicer is highly recommended for achieving uniform 1/16-inch thick potato rounds. Consistency in thickness is absolutely crucial for even cooking, ensuring every chip cooks through and crisps at the same rate.
Always use the safety guard when operating a mandoline. Work slowly and deliberately to prevent accidents, as the blades are incredibly sharp.
Beyond the Slicer: Other Must-Have Items
A large, heavy-bottomed pot or Dutch oven is essential for safely deep-frying, maintaining stable oil temperatures. Its thick construction helps prevent hot spots and scorching.
A kitchen thermometer is a non-negotiable tool to accurately monitor oil temperature. Maintaining 325°F (160°C) is key to preventing greasy or burnt chips.
A slotted spoon is perfect for carefully adding and removing potato slices from hot oil, allowing excess oil to drain. You’ll also need a wire rack set over a baking sheet for draining the freshly fried chips.
Plenty of clean kitchen towels or several layers of paper towels are vital for thoroughly drying the potato slices before frying. This step is a cornerstone of achieving maximum crispness.
Simple Ingredients, Extraordinary Taste: What You’ll Need
Great homemade potato chips start with just a few basic ingredients. The quality and preparation of each element contribute significantly to the final taste and texture.
Choosing the Perfect Potato
Large russet potatoes are ideal for making crispy chips due to their high starch content. This starch contributes to their desirable airy, crunchy texture when fried.
While russets are preferred, you can experiment with starchy Yukon Golds or even red potatoes. Be aware that non-russet varieties may yield a slightly different texture and require minor adjustments to frying time.
The Right Oil for Frying
Vegetable oil, canola oil, or peanut oil are excellent choices for frying chips. They all have high smoke points, meaning they can reach the necessary frying temperature without breaking down or imparting off-flavors.
Ensure your pot contains at least 3 inches of oil for proper submersion and even cooking. Sufficient oil depth also helps maintain a more stable frying temperature.
Seasoning for Superior Flavor
Fine sea salt is perfect for seasoning, as its delicate crystals adhere beautifully to the hot chips. Freshly ground black pepper adds a subtle, aromatic warmth that complements the potato.
Consider enhancing your chips with a sprinkle of garlic powder, onion powder, or a dash of smoked paprika for an extra layer of savory flavor. The options are limitless once you master the basic technique.
From Spud to Snack: Your Step-by-Step Journey to Perfect Chips
-
Prepare the Potatoes:
Start by washing and peeling your russet potatoes. Using a mandoline slicer, carefully slice the potatoes into uniform 1/16-inch thick rounds.
This consistent thickness is paramount for ensuring that every single chip cooks evenly and achieves that desirable crispy texture without some burning before others are done.
-
Remove Excess Starch: The Soaking Method
Place the sliced potatoes in a large bowl and cover them generously with cold water. Swirl the slices around vigorously to release as much starch as possible; you’ll see the water become cloudy.
Drain the starchy water and repeat this process 3 to 4 times until the water runs mostly clear. Then, soak the slices in fresh cold water for at least 30 minutes, or up to 2 hours. This crucial soaking step helps achieve maximum crispness by drawing out even more starch.
-
The Secret to Crispy Chips: Thorough Drying
This is arguably the most crucial step for guaranteed crispiness! Thoroughly drain the potato slices from the soaking water, then spread them out in a single layer on clean kitchen towels or several layers of paper towels.
Pat them completely dry, pressing firmly to absorb every last bit of moisture. Any remaining water on the potato slices will lead to soggy chips and aggressive splattering oil, so take your time here.
-
Heat the Oil to Perfection:
Pour your chosen vegetable oil into a large, heavy-bottomed pot or Dutch oven, ensuring the oil is at least 3 inches deep. This depth allows the chips to fry properly.
Heat the oil over medium-high heat until it reaches precisely 325°F (160°C). A kitchen thermometer is incredibly helpful here to maintain the correct temperature, which is vital for perfect results.
-
Fry the Chips in Small Batches:
Once the oil is at temperature, carefully add a small handful of potato slices to the hot oil, ensuring you do not overcrowd the pot. Overcrowding dramatically lowers the oil temperature.
Frying in small batches is essential for even cooking and consistent crispness. Stir occasionally with a slotted spoon to prevent the chips from sticking together and to ensure they brown evenly.
-
Cook Until Golden and Bubbling Subsides:
Fry the chips for 5 to 7 minutes, or until they turn a beautiful golden brown and the vigorous bubbling subsides. The reduced bubbling is a key visual cue indicating they are becoming crispy.
Be vigilant and careful not to let them get too dark, as this can lead to a slightly bitter taste. Pull them from the oil just as they reach that perfect golden hue.
-
Drain and Season Immediately:
Using a slotted spoon, quickly transfer the fried chips to a wire rack set over a baking sheet to drain any excess oil. This allows air circulation around them.
Immediately sprinkle them generously with fine sea salt and freshly ground black pepper while they are still hot and glistening. The heat ensures the seasonings adhere perfectly.
-
Repeat and Cool for Maximum Crispness:
Continue frying the remaining potato slices in small batches, always monitoring the oil temperature to ensure it stays consistent between batches. Adjust heat as needed.
Let the chips cool completely on the wire rack for maximum crispness before serving. As they cool, their texture will continue to firm up, achieving the ultimate crunch.
The Crispy Chip Masterclass: Advanced Tips & Tricks
Achieving truly exceptional homemade potato chips goes beyond just following the steps. Incorporate these expert tips for consistent, superior results every time.
Mandoline Magic for Uniformity: The single most impactful tip is ensuring absolutely consistent slice thickness. Uneven slices will inevitably lead to a mix of burnt, raw, or soggy chips because they cook at different rates. Invest in and properly use a mandoline for precision.
The Dryness Imperative: I cannot stress this enough: your potato slices must be bone-dry before they touch the oil. Any lingering moisture will prevent crisping and cause dangerous oil splattering. Pat, press, and double-check!
Temperature is Your Best Friend: Maintaining the precise oil temperature of 325°F (160°C) is non-negotiable. Oil that’s too cool results in greasy, limp chips that absorb excess fat. Oil that’s too hot will burn the exterior before the interior crisps, leading to a bitter taste and soft center.
Don’t Crowd the Pot: Frying in small batches is essential for success. Overcrowding drops the oil temperature too quickly, causing the chips to steam rather than fry. Give your chips space to swim and crisp up beautifully.
Seasoning at the Right Moment: Seasoning immediately after frying, while the chips are still hot and have a thin film of oil, is crucial. This ensures the salt and pepper (or any other seasonings) stick properly, distributing flavor evenly.
Cooling for Crunch: Resist the urge to dive in too soon! Allowing the freshly fried chips to cool completely on a wire rack is vital. As they cool, residual heat dissipates, and their structure sets, transforming them into their ultimate crispy form.
Beyond the Fryer: Common Homemade Potato Chip Hurdles Solved
Even with the best instructions, minor issues can arise. Here are solutions to common problems when making homemade potato chips.
Problem: My Chips Are Soggy, Not Crispy!
Solution 1: The most common culprit is insufficient drying. Ensure your potatoes are completely dry before frying. Even a tiny bit of moisture will prevent crisping.
Solution 2: Check your oil temperature. If it’s too low, the chips will slowly absorb oil and become greasy instead of achieving a crisp texture. Use a thermometer!
Solution 3: Avoid overcrowding the pot. Too many chips in one batch will lower the oil temperature rapidly and cause the potatoes to steam rather than fry, leading to limp results.
Problem: My Chips Are Burning or Unevenly Cooked!
Solution 1: Your oil might be too hot. Monitor the temperature closely with a kitchen thermometer and adjust the heat down as needed to maintain 325°F (160°C).
Solution 2: Ensure your potato slices are uniform in thickness. Using a mandoline for consistency is key to prevent some chips from burning while others are still soft.
Solution 3: Stir the chips occasionally during frying to ensure even exposure to the hot oil, promoting uniform browning and crisping.
Problem: My Chips Don’t Have Much Flavor!
Solution 1: Season immediately after frying while the chips are still hot and wet with oil. This helps the salt and other seasonings adhere best.
Solution 2: Don’t be shy with seasoning! A generous sprinkle is needed to properly coat each chip. Consider using fine-grain salt for better, more even coverage.
Your Homemade Potato Chip Questions, Answered
Can I make these Homemade Potato Chips in an air fryer or oven?
While this recipe is specifically designed for deep-frying to achieve maximum crispness and that classic chip texture, you can explore oven-baked or air-fried methods for a lighter alternative. However, be aware the texture will differ significantly; they won’t have the same deep-fried crunch.
What’s the best way to store leftover Homemade Potato Chips?
Once completely cooled, store your homemade potato chips in an airtight container at room temperature for up to 3-5 days. Avoid refrigeration, as it can introduce moisture and make them soft. For optimal crispness and flavor, consume them on the same day they are made.
Can I reuse the frying oil?
Yes, you can reuse the frying oil. Allow the oil to cool completely, then strain it through a fine-mesh sieve or cheesecloth to remove any potato bits and impurities. Store it in an airtight container in a cool, dark place for future frying. The oil can typically be reused 2-3 times for frying potatoes, depending on its condition.
Can I use different types of potatoes for this recipe?
While russet potatoes are highly recommended for their high starch content and ideal texture, you can experiment with varieties like Yukon Golds or red potatoes for slightly different results. You might find some useful ideas for other potato-based delights in our Loaded Fiesta Potatoes recipe.
What are some creative seasoning variations?
Beyond salt and pepper, the possibilities for creative seasoning are endless! Try adding garlic powder, onion powder, paprika, chili powder, or even a sprinkle of nutritional yeast for a cheesy flavor. For game day, you could even dust them with the seasonings used for our Game Day Buffalo Chicken Nachos to echo that spicy kick.
Customizing Your Crunch: Serving, Storage & Flavor Adventures
Your homemade potato chips are a blank canvas for culinary creativity. Here’s how to make them truly your own.
Serving Suggestions to Elevate Your Snack
Homemade potato chips are fantastic on their own, but they also make an incredible accompaniment to sandwiches and burgers. Serve them alongside a classic deli sandwich or use them to add a textural contrast to creamy soups.
This creamy dip pairs beautifully with those chips, and if you love cool cucumber flavors, try this cucumber dill crunch dip.
They’re also perfect with your favorite dips, from a classic French onion dip to a vibrant salsa or creamy guacamole. For a delightful twist, crush them over casseroles or as a crunchy topping for salads, adding unexpected texture.
Flavorful Twists and Creative Seasoning Ideas
Elevate your chip game with adventurous seasoning blends. Try a smoky BBQ blend with paprika, brown sugar, and a hint of cayenne. For a sour cream and onion vibe, mix onion powder, garlic powder, and a touch of dried dill.
Consider spicy chili-lime with chili powder, cumin, and dried lime zest. Don’t be afraid to experiment with your favorite spice combinations to create unique, signature chip flavors that everyone will rave about.
Making Ahead and Storage Tips
While homemade potato chips are best enjoyed fresh, they can be made a few hours in advance. Always allow them to cool completely on the wire rack before storing.
Store cooled chips in an airtight container at room temperature. To maintain maximum crispness, you can place a paper towel at the bottom and top of the container to absorb any residual moisture. Avoid humid environments, which are the enemy of crunch.
Enjoying Your Homemade Crunch: A Culinary Triumph!
Mastering homemade potato chips is a truly rewarding culinary achievement. You’ve gone from fearing soggy spuds to consistently creating perfectly crispy, flavorful chips that are leagues above store-bought varieties. This recipe, with its focus on precise steps and crucial drying techniques, ensures your success.
What’s Next?
If you loved the crunch of these homemade potato chips, here are two recipes that double down on potato goodness or pair it with a bright, fresh main.
- For another crispy potato treat, try these Crispy Potato Latkes — same starchy base, completely different texture, and they
So go ahead, fry up a batch (or two!) and savor the incredible taste and texture. Share them with friends and family, or keep them all to yourself – we won’t tell! We’d love to hear about your crispy chip adventures in the comments below.
Potato Chips
Course: SnacksCuisine: AmericanDifficulty: mediumServings4
servingsPrep time1
hourCooking time40
minutesCalories550
kcalTotal time100
minutesDiscover the simple trick to making perfectly crispy homemade potato chips from scratch. This recipe ensures a satisfying crunch every time by focusing on proper preparation and frying techniques. Say goodbye to floppy chips forever!
Ingredients
2 large russet potatoes
4 cups vegetable oil, plus more as needed for frying
1 teaspoon fine sea salt, or to taste
1/2 teaspoon freshly ground black pepper, or to taste
Directions
- Prepare the potatoes: Wash and peel the potatoes. Using a mandoline slicer (highly recommended for evenness), carefully slice the potatoes into uniform 1/16-inch thick rounds. Consistency in thickness is key for even cooking.
- Remove excess starch: Place the sliced potatoes in a large bowl and cover them with cold water. Swirl the slices around to release starch. You will see the water turn cloudy. Drain the starchy water and repeat this process 3 to 4 times until the water runs mostly clear. Then, soak the slices in fresh cold water for at least 30 minutes, or up to 2 hours. This step helps achieve maximum crispness.
- The Secret to Crispy Chips: Thoroughly drain the potato slices from the soaking water. This is the most crucial step for guaranteed crispiness! Spread them out in a single layer on clean kitchen towels or several layers of paper towels. Pat them completely dry, pressing firmly to absorb every bit of moisture. Any remaining water will lead to soggy chips and splattering oil.
- Heat the oil: Pour the vegetable oil into a large heavy-bottomed pot or Dutch oven, ensuring it is at least 3 inches deep. Heat the oil over medium-high heat until it reaches 325°F (160°C). A kitchen thermometer is very helpful here to maintain the correct temperature.
- Fry the chips: Carefully add a small handful of potato slices to the hot oil, ensuring you do not overcrowd the pot. Frying in small batches is essential for even cooking and crispness. Stir occasionally with a slotted spoon to prevent sticking and ensure even browning.
- Cook until golden: Fry the chips for 5 to 7 minutes, or until they are golden brown and bubbling subsides, indicating they are crispy. Be careful not to let them get too dark.
- Drain and season: Using a slotted spoon, transfer the fried chips to a wire rack set over a baking sheet to drain excess oil. Immediately sprinkle them generously with fine sea salt and freshly ground black pepper while they are still hot.
- Repeat: Continue frying the remaining potato slices in small batches, monitoring the oil temperature to ensure it stays consistent.
- Serve: Let the chips cool completely on the wire rack for maximum crispness before serving. Enjoy your perfectly crispy homemade potato chips!
Notes
- Ensuring potatoes are completely dry before frying is the key to crispiness.