Mastering Mediterranean Ground Chicken Kofta: The Secret to Skewer Stability
Few things in the kitchen are as frustrating as watching a beautiful meal fall apart right before your eyes. You spend time seasoning the meat and threading it onto skewers, only to have it crumble and slip through the grill grates the moment it hits the heat. It’s a common headache that turns a relaxing dinner into a rescue mission.
The secret to a perfect, restaurant-style Mediterranean Ground Chicken Kofta isn’t just in the spices; it’s all about the protein bind and moisture control. While a standard meatball is loose and tender, a true kofta needs a specific, tacky texture that locks onto the skewer. This ensures the meat stays juicy on the inside while developing a gorgeous, charred crust on the outside.
I’ve found that the real “aha!” moment comes from treating the meat more like dough than a burger patty. By using a specific kneading technique to develop myosin proteins, you create a natural glue that keeps everything together. Once you master this simple structural trick, you’ll never have to worry about your dinner taking a dive into the coals again.
Essential Components for Juicy Chicken Kofta
When you’re making kofta, the type of meat you choose is the foundation of your success. I always recommend using ground chicken thigh meat rather than breast meat. Thigh meat has a higher fat content, which is vital because it keeps the skewers moist during the high-heat searing process. If you use lean breast meat, you’ll likely end up with a dry, rubbery texture that lacks that signature Mediterranean richness.
The flavor profile relies on a trio of warm, earthy spices: cumin, coriander, and turmeric. Cumin provides a smoky depth, while coriander adds a slightly citrusy, floral note that brightens the chicken. Turmeric is the secret ingredient for that beautiful golden hue you see in professional kitchens. Together, these spices create a complex aroma that will make your kitchen smell like a bustling street market.
To hold everything together, you need a binder that doesn’t overwhelm the meat. Fine breadcrumbs, like panko or plain dried crumbs, work best here. They act like tiny sponges, soaking up the juices and preventing them from leaking out. This keeps the moisture inside the kofta where it belongs, ensuring every bite is tender and flavorful.
The Critical Role of Bone-Dry Aromatics
Moisture is the enemy of a stable skewer. When you grate an onion, it releases a surprising amount of liquid. If you toss that watery pulp straight into your meat, it creates steam pockets during cooking. That steam pushes the meat away from the skewer, causing it to slide right off the stick.
For a lighter take on grilled skewers, try these perfectly juicy chicken souvlaki skewers with the same bright lemon and herb flavors.
To prevent this, you must get your aromatics bone-dry. After grating the onion, place the pulp into a piece of cheesecloth or a heavy-duty paper towel. Squeeze it with all your might until every last drop of juice is gone. You’ll be left with a concentrated onion paste that adds incredible flavor without compromising the structural integrity of your kofta.
The Science of the Protein Bind
Most people make the mistake of gently folding their meat mixture, but for kofta, you need to be much more aggressive. You should knead the mixture vigorously with your hands for a full 3 to 5 minutes. This process isn’t just about mixing ingredients; it’s about developing myosin, a protein that becomes sticky when agitated.
As you knead, you’ll notice the meat changing right before your eyes. It will start to look paler and feel significantly “tackier” to the touch. This is exactly what you want! That stickiness is the natural glue that will bond the meat to the skewer. If the meat feels loose or falls apart in your hands, keep kneading until it holds its shape firmly.
Why Chilling the Meat is Non-Negotiable
Patience is a key ingredient in this recipe. After you’ve developed that protein bind, the meat needs to rest in the refrigerator for at least 30 minutes. Cold temperatures help the fats solidify and allow those protein strands you just worked so hard on to “set” around the skewer.
If you try to shape and cook the meat while it’s at room temperature, it will be too soft to maintain its grip. Cold meat is much easier to mold and has the structural integrity to withstand the initial shock of the hot pan. Think of this chilling time as the final insurance policy for your dinner.
Step-by-Step: Shaping and Securing the Skewers
Before you start shaping, make sure you’ve soaked your wooden skewers in water for at least 20 minutes. This prevents them from charring or catching fire in the pan. Take a handful of the chilled meat—about the size of a large egg—and press it firmly onto the top half of the skewer.
Use a firm “hand-grip” motion to mold the meat into an elongated cylinder. You want to squeeze tightly as you go to eliminate any air pockets trapped between the meat and the wood. These air pockets can expand during cooking and cause the meat to crack. Aim for a uniform thickness so the entire skewer cooks at the same rate.
Pro Tip: Don’t make the koftas too heavy. If you put too much meat on one stick, the weight might cause it to sag or break. A sleek, even cylinder about 5 inches long is the sweet spot for both stability and presentation.
Achieving the Golden-Brown Sear in the Skillet
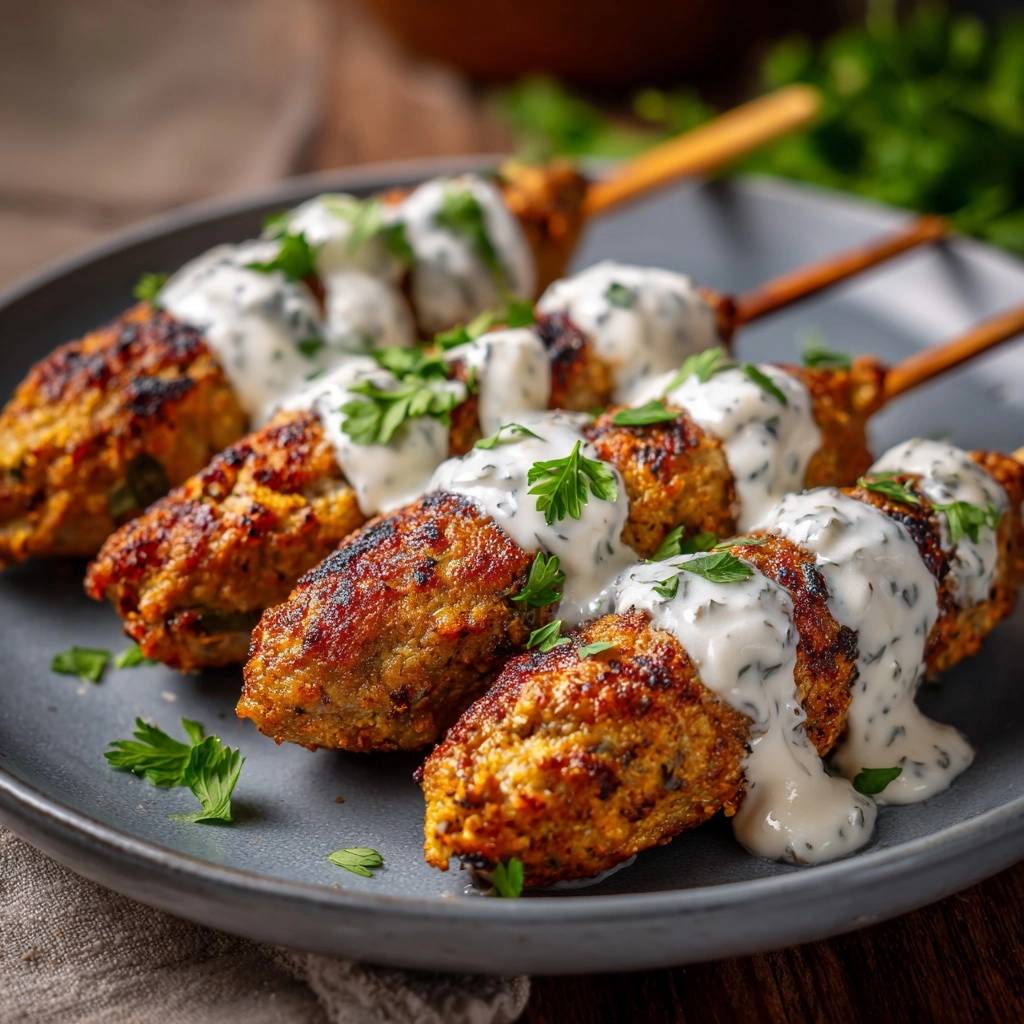
To get that restaurant-quality crust, you need to manage your heat carefully. Heat your olive oil in a large skillet over medium-high heat until it shimmers. This high heat triggers the Maillard reaction, which is the chemical process that creates that savory, golden-brown exterior and deepens the flavor of the spices.
Once you place the skewers in the pan, follow the “no-touch” rule. Let them sear undisturbed for at least 3 or 4 minutes. If you try to move them too early, the meat might stick to the pan and tear. When a proper crust has formed, the meat will naturally release from the surface, making it easy to rotate.
Monitoring Internal Temperatures for Food Safety
Because we are using ground chicken, precision is vital for both safety and texture. You want to cook the kofta until they reach an internal temperature of 165°F. Unlike beef, which can be served medium-rare, chicken must be fully cooked to be safe, but overcooking it by even a few degrees can lead to dryness.
Use an instant-read thermometer to check the thickest part of the meat. Insert it horizontally from the end to avoid hitting the skewer, which can give an inaccurate reading. Once they hit 165°F, pull them off the heat immediately. They will continue to cook slightly as they rest, staying perfectly juicy.
Crafting the Creamy Tahini and Yogurt Sauce
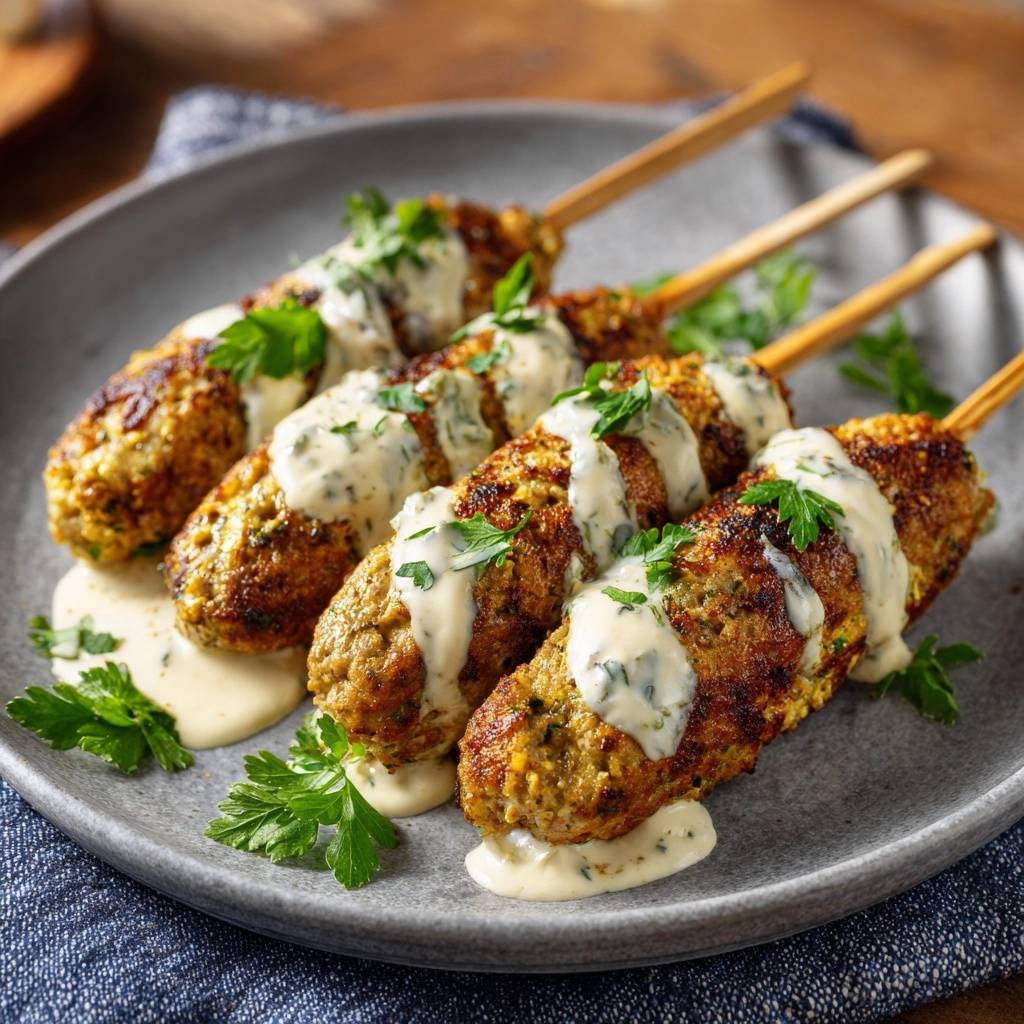
A great kofta needs a sauce that can stand up to its bold spices. This creamy herb sauce uses Greek yogurt as a tangy base, but the real star is the tahini. The tahini adds a nutty richness and a velvety texture that balances the acidity of the lemon juice. It also gives the sauce a beautiful, off-white color that looks stunning drizzled over the golden meat.
Whisk the ingredients together until smooth, adding a touch of honey to round out the sharp garlic and lemon. If the sauce feels too thick to drizzle, add a teaspoon of water at a time until it reaches the right consistency. Always use fresh garlic here; the bite of fresh cloves provides a much better contrast to the warm meat than powdered garlic ever could.
Troubleshooting Common Kofta Structural Failures
If your meat still feels “mushy” after mixing, you likely didn’t squeeze enough juice out of the onions. You can try to save it by adding an extra tablespoon of breadcrumbs to absorb the excess liquid. If the meat feels dry or crumbly, you might have used chicken breast that was too lean; adding a teaspoon of olive oil to the mix can help add back some necessary fat.
Cracking during cooking usually means the meat wasn’t kneaded long enough or there were air pockets left during the shaping phase. If you see a crack forming in the pan, don’t panic. Use your tongs to gently press the meat back together. Next time, spend an extra minute kneading to ensure those proteins are fully activated.
If you want to keep your chicken moist during grilling, check out these juicy chicken kofta skewers for more tips.
Mediterranean Sides and Serving Suggestions
These skewers are incredibly versatile. For a classic meal, serve them over a bed of fluffy saffron rice or alongside warm, toasted pita bread. The soft texture of the bread is the perfect vessel for a kofta wrap topped with plenty of sauce.
I love pairing these with a crisp cucumber and tomato salad. The cool, crunchy vegetables and the acidity of a simple lemon-olive oil dressing cut right through the richness of the tahini sauce. It refreshes your palate between bites and keeps the meal feeling light and vibrant.
What to Serve with Mediterranean Kofta
These ground chicken kofta skewers pair well with bright, earthy sides that balance the spices. Here are two recipes that fit the meal naturally.
- Add a crunchy, aromatic contrast with this Crispy Turmeric Roasted Cauliflower – the warm turmeric and cumin notes echo the kofta seasoning while the roasted edges offer texture.
- A cool, creamy counterpoint comes from this Sun-Dried Tomato White Bean Salad, where the tangy tomatoes and tender beans round out the meal without stealing focus from the chicken.
Make-Ahead Strategies and Storage Instructions
This is a fantastic recipe for meal prep. You can shape the raw skewers, place them on a parchment-lined tray, and freeze them until solid. Once frozen, transfer them to a freezer bag for up to two months. When you’re ready to eat, let them thaw completely in the refrigerator before cooking to ensure the protein bind remains intact.
If you have leftovers, store them in an airtight container in the fridge for up to three days. To reheat, I recommend using a toaster oven or a skillet over low heat. Avoid the microwave if possible, as it can make the chicken rubbery. A quick warm-up in a pan will help revive that crispy exterior.
Expert Tips for Professional Results
1. To check if your meat is “tacky” enough, take a small ball and press it against your palm. If it sticks for a second before falling when you turn your hand over, it’s ready.
2. If you want authentic grill marks without firing up the outdoor grill, use a cast-iron grill pan. The heavy metal holds heat beautifully and creates those deep, charred lines.
3. Make sure your fresh parsley is bone-dry before chopping. If the herbs are wet, they will turn into a green paste rather than distinct flecks of flavor.
4. When doubling the recipe for a crowd, work in batches. Overcrowding the skillet will drop the temperature and cause the meat to steam rather than sear, ruining that golden crust.
How do I keep the chicken from sticking to my hands while shaping?
Ground chicken is naturally stickier than beef. To make shaping easier, keep a small bowl of cold water or olive oil nearby. Lightly dampening your hands before grabbing the meat will prevent it from clinging to your skin, allowing you to create a much smoother surface on the kofta.
Can I use gluten-free breadcrumbs for this recipe?
Yes, you can easily swap the standard breadcrumbs for your favorite gluten-free version. Since the breadcrumbs are there to absorb moisture and provide structure, gluten-free crumbs or even almond meal will work well. Just ensure they are finely ground so the texture of the kofta remains consistent.
Why did my kofta turn out dry even though I used chicken thighs?
The most common culprit for dry chicken is overcooking. Because these are relatively thin, they cook faster than you might expect. Always use a meat thermometer and pull them at 165°F. Additionally, make sure you didn’t skip the breadcrumbs, as they are essential for trapping the natural juices inside the meat.
How should I store and reheat leftovers?
Store any leftover skewers in an airtight container in the refrigerator for up to 3 days. For the best results, reheat them in a skillet over medium-low heat with a tiny splash of water and a lid. This creates a gentle steam that warms the meat through without drying it out. Avoid the microwave, which often makes ground poultry tough.
Can I bake these in the oven instead of pan-searing?
You can bake them at 400°F for about 15-20 minutes, but you will miss out on the deep golden crust that comes from pan-searing. If you choose to bake them, I recommend brushing them with a little extra olive oil and finishing them under the broiler for 2 minutes to get some color on the outside.
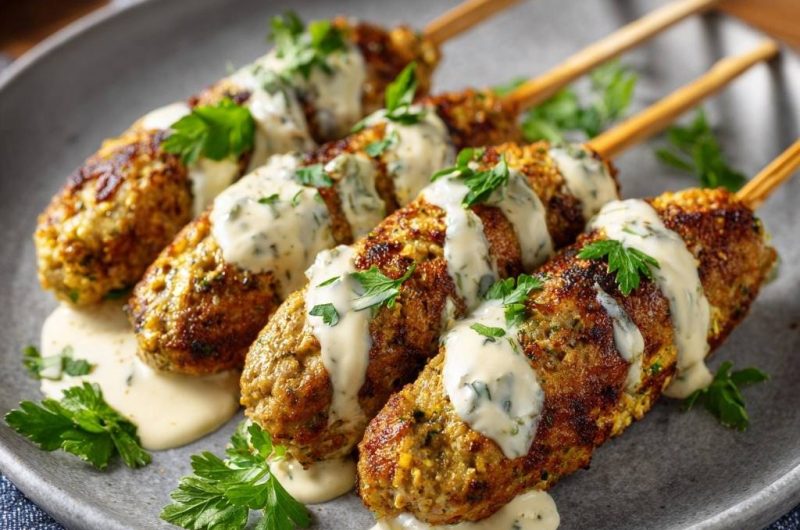
Ground Chicken Kofta
Course: Main CourseCuisine: MediterraneanDifficulty: medium4
servings50
minutes15
minutes340
kcal65
MinutesA juicy and flavorful chicken kofta recipe featuring a blend of warm spices and a creamy tahini yogurt sauce. The method focuses on moisture control and protein binding to ensure the meat never falls off the skewers during grilling or searing.
Ingredients
1.5 lbs ground chicken (thigh meat preferred for moisture)
1/2 cup fine breadcrumbs (panko or plain)
1 small onion, grated and squeezed bone-dry
3 cloves garlic, minced
1/4 cup fresh parsley, finely chopped
1 teaspoon ground cumin
1 teaspoon ground coriander
1/2 teaspoon turmeric
1 teaspoon salt
1/2 teaspoon black pepper
3 tablespoons olive oil (for searing)
For the Creamy Herb Sauce:
1/2 cup Greek yogurt
1 tablespoon tahini (for the richness and color shown in the image)
1 tablespoon lemon juice
1 tablespoon fresh parsley, finely chopped
1 clove garlic, grated
1 teaspoon honey or maple syrup (to balance acidity)
Salt and pepper to taste
Directions
- The most important step to prevent falling meat is to remove excess moisture. Grate your onion and use a paper towel or cheesecloth to squeeze out every drop of liquid before adding it to the bowl.
- In a large mixing bowl, combine the ground chicken, dried onion, breadcrumbs, garlic, parsley, and all spices.
- Use your hands to knead the mixture vigorously for 3 to 5 minutes. You are looking for the meat to become “tacky” and pale; this develops the myosin proteins which act as a natural glue to keep the meat on the skewer.
- Cover the mixture and refrigerate for at least 30 minutes. Cold meat proteins bond more effectively than room-temperature meat.
- Soak wooden skewers in water for 20 minutes. Take a handful of the chilled meat and mold it firmly around the top half of the skewer into an elongated cylinder, squeezing tightly to eliminate air pockets.
- Heat 3 tablespoons of olive oil in a large non-stick skillet or grill pan over medium-high heat. The oil is essential for the deep golden-brown crust seen in the image.
- Place skewers in the pan. Do not crowd the pan. Sear for 3-4 minutes without moving them to allow a crust to form.
- Carefully rotate the skewers every 3 minutes to ensure an even, golden-brown sear on all sides. Cook until the internal temperature reaches 165°F (about 12-15 minutes total).
- While the meat cooks, whisk the yogurt, tahini, lemon juice, garlic, honey, and parsley together. If the sauce is too thick, add a teaspoon of water until it reaches a “drizzling” consistency.
- Plate the skewers and generously drizzle the sauce over the center of the meat as pictured. Garnish with fresh parsley leaves and serve immediately.
Notes
- Using ground chicken thigh meat is highly recommended for the best moisture and flavor. Ensure the onion is bone-dry to prevent the meat from becoming too loose.