Mastering Raspberry Jam Filled Brownies with Structural Integrity
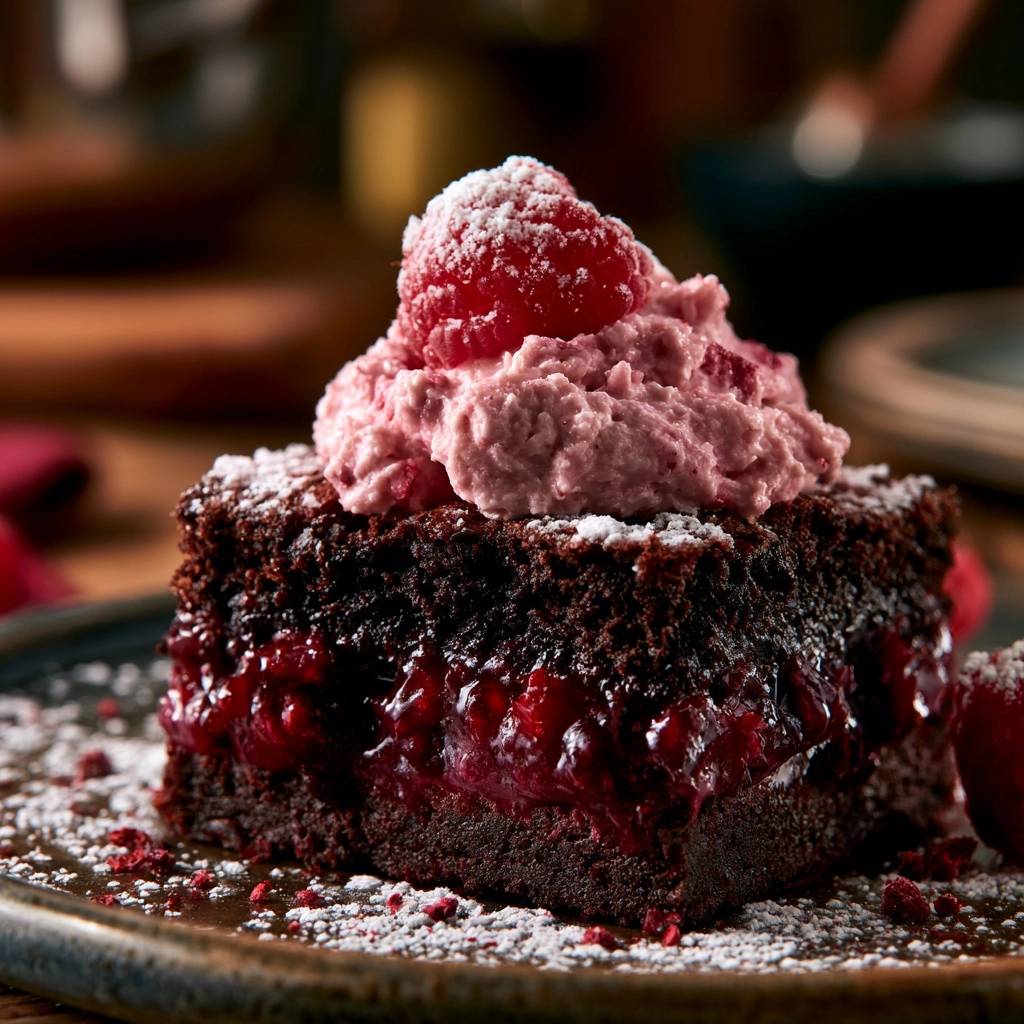
Imagine biting through a crackly, paper-thin crust into a dense, fudgy chocolate center, only to be met by a bright, tart explosion of real raspberry. The contrast between the deep, earthy cocoa and the acidic zing of the fruit is a flavor profile that most home bakers crave but rarely master. Usually, the fruit moisture turns the bottom of the brownie into a purple, gummy mess that never quite sets up.
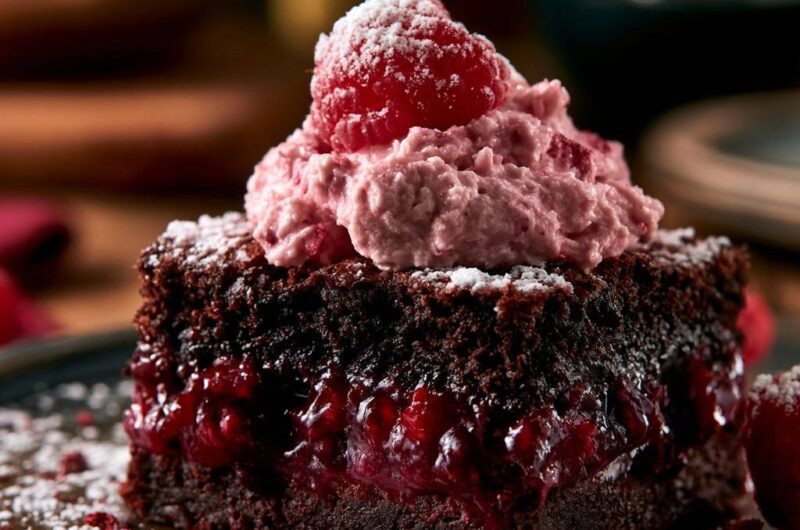
This recipe solves that structural heartbreak by treating the brownie like an architectural project. We aren’t just throwing jam into a bowl; we’re building layers that respect the physics of moisture and heat. By the time you pull these out of the oven, you’ll have a distinct ribbon of fruit sandwiched between two perfectly baked layers of chocolate.
The secret to this success lies in the par-baking technique. Most people try to bake the whole tray at once, but the jam acts as a heat sink, preventing the bottom batter from ever reaching the right temperature. By pre-baking the base for just twelve minutes, we create a sturdy “floor” that can support the heavy fruit without collapsing into a soggy puddle.
The Science of Preventing Soggy Brownie Bottoms
When you add fruit or jam to a standard brownie batter, you’re introducing a massive amount of water into a high-fat environment. As the oven heats up, that water turns to steam and migrates downward. Without a barrier, the bottom layer of batter stays raw and wet, no matter how long you leave it in the oven.
Par-baking the bottom half of the batter for twelve minutes initiates the protein coagulation in the eggs and flour. This creates a moisture-resistant shield. Therefore, when you finally add the jam, it sits on top of a semi-solid surface rather than sinking to the bottom of the pan where it would cause a structural failure.
Why Cornstarch is Non-Negotiable for Fruit Fillings
Fresh raspberries are nearly 85% water. When they hit the 350°F heat of your oven, they essentially “weep,” releasing all that liquid into your dessert. By tossing the berries and jam with a teaspoon of cornstarch, you create a thickening agent that captures that moisture the moment it’s released.
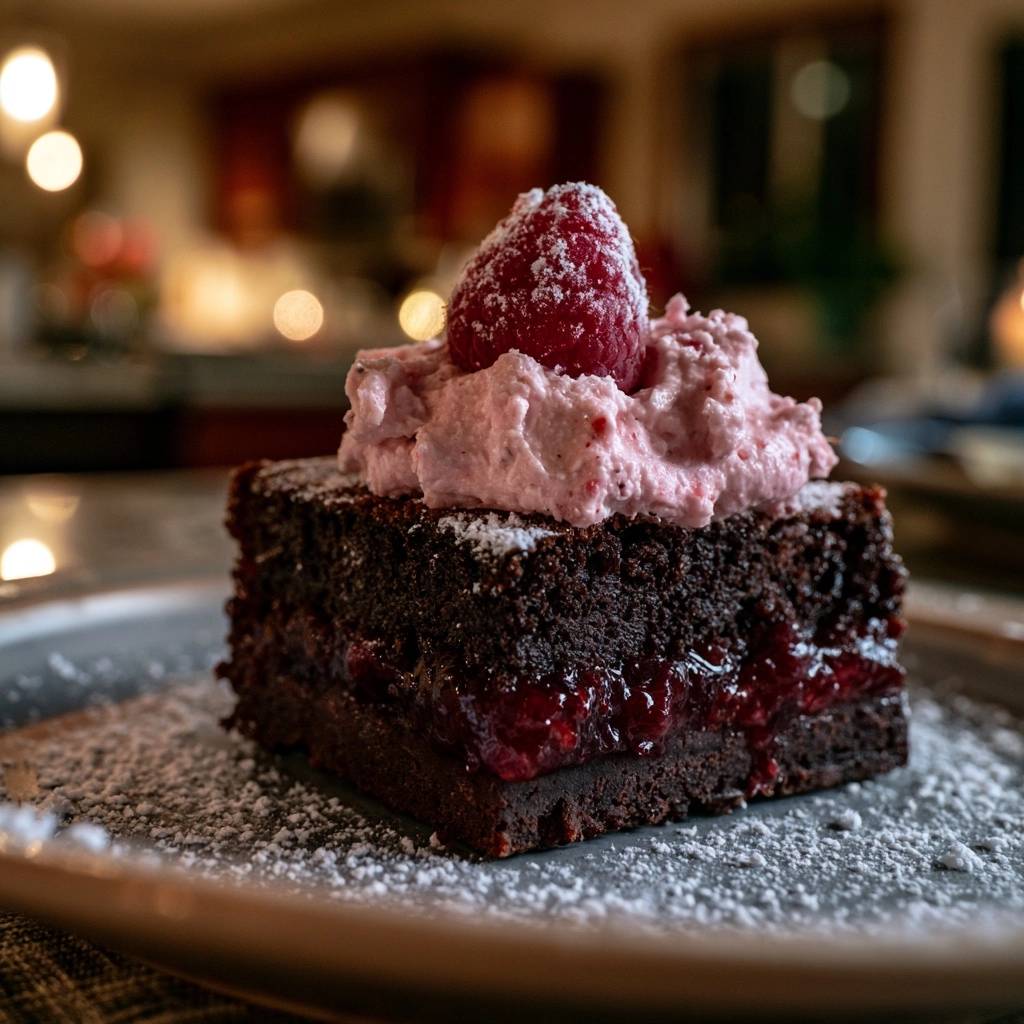
The cornstarch turns the fruit juices into a stable, jammy gel rather than a runny syrup. This ensures that when you cut into the cooled brownies, the filling stays exactly where you put it. Without this small but mighty addition, the fruit layer would likely bleed into the chocolate, ruining the clean lines of your slice.
The Physics of the Par-Baked Base
During those first twelve minutes in the oven, the heat causes the flour’s gluten to stretch and the egg proteins to set. This creates a firm foundation. However, you must leave a 1/4-inch border when spreading your jam over this base. If the jam touches the hot metal of the pan, the high sugar content will caramelize and burn before the rest of the brownie is finished.
This border acts as a “gasket,” allowing the top layer of raw batter to meet the par-baked bottom layer. They fuse together at the edges, effectively sealing the raspberry filling inside a chocolate envelope. This prevents the jam from bubbling over and sticking to your parchment paper.
Essential Components for Raspberry Jam Filled Brownies
Quality ingredients are the backbone of a great brownie, especially when you’re dealing with complex textures. We use melted unsalted butter here because it provides a richer mouthfeel and a more tender crumb than vegetable oil. Since we’re adding salt separately, using unsalted butter allows you to control the exact seasoning of the chocolate.
Granulated sugar is the preferred sweetener for this specific structure. While brown sugar adds moisture and chew, granulated sugar helps create that iconic, meringue-like crackly top. In addition, the crystalline structure of granulated sugar provides the “snap” needed to balance the soft, jammy interior.
Selecting the Right Cocoa Powder and Flour
For this recipe, a standard unsweetened cocoa powder works beautifully. It provides a sharp, chocolatey punch that cuts through the sweetness of the raspberry jam. If you use Dutch-processed cocoa, you’ll get a darker color and a smoother flavor, but you might lose some of that pleasant acidic contrast with the fruit.
All-purpose flour is the workhorse here. You need the gluten content it provides to hold up the weight of the raspberries. Cake flour would be too delicate, resulting in a brownie that falls apart when you try to lift it out of the pan. Always sift your cocoa and flour together to ensure there are no bitter clumps of powder in your finished bake.
Fresh vs. Preserved: The Raspberry Ratio
Using only jam can result in a filling that feels one-dimensional and overly sweet. By mixing fresh raspberries into the jam, you introduce natural pectin and a bright, tart flavor that store-bought preserves often lack. This combination creates a sophisticated texture with actual chunks of fruit hidden inside the chocolate.
The fresh berries also provide a visual pop when you cut the squares. However, don’t skip the jam entirely. The jam acts as the “glue” that holds the fresh berries together, ensuring the filling doesn’t become too airy or hollow during the baking process.
Step-by-Step: Constructing the Perfect Fruit Layer
The mixing process is where you build the brownie’s character. Start by whisking your melted butter and sugar vigorously. You want to see the mixture turn a slightly lighter shade of yellow. This aeration is what leads to a light, crackly crust rather than a dull, heavy top.
Once you add the eggs, keep whisking for another minute or two. You’re looking for a smooth, glossy emulsion. When it’s time to add the dry ingredients, put the whisk away and grab a spatula. Fold the flour and cocoa in gently until you see no more streaks of white. Overmixing at this stage will lead to a tough, bread-like texture.
Phase One: Preparing the Foundation
Pour exactly half of your batter into the lined pan. It might look like a very thin layer, but don’t worry. As it bakes for those first twelve minutes, it will puff up slightly. You’ll know it’s ready when the surface looks dull and the edges are just starting to pull away from the parchment paper.
Don’t let it bake until it’s completely dry. It should still have a slight wobble in the very center. This ensures that the base remains fudgy even after it goes back into the oven for the second round of baking with the toppings.
Phase Two: Sealing the Raspberry Center
After spreading your jam and berry mixture over the par-baked base, you need to apply the top layer of batter. Do not try to pour it all in one spot and spread it, as this will drag the jam around and ruin your layers. Instead, drop small spoonfuls of batter all over the surface.
Use the back of a spoon or an offset spatula to gently connect those dollops. You’re essentially “tiling” the top of the brownie. This technique ensures a clean, even layer of chocolate that completely seals in the fruit, preventing any steam from escaping and drying out the filling.
Troubleshooting Common Baking Failures
The biggest mistake bakers make with this recipe is cutting the brownies too soon. When these come out of the oven, the jam layer is essentially molten lava. If you slice them while they’re warm, the filling will run out, and the layers will separate. Patience is your best friend here.
Allow the pan to sit on a wire rack for at least two hours. This cooling period allows the starches in the jam to fully set and the fats in the brownie to firm up. For the cleanest, most professional-looking squares, you can even pop the pan into the fridge for thirty minutes before slicing.
Identifying Underbaked vs. Fudgy Textures
Testing for doneness in a filled brownie is trickier than a standard one. If you stick a toothpick into the center, it will inevitably come out wet because of the jam layer. Instead, look at the top crust. It should be set, shiny, and have fine cracks across the surface.
Gently shake the pan; the center should have a very slight, heavy jiggle but shouldn’t look liquid. Remember that “carry-over cooking” continues for several minutes after the pan leaves the oven. If the edges are firm and the top is crackly, they are ready to come out.
Fixing a Broken or Greasy Batter
If you notice oil pooling on top of your batter while mixing, your butter was likely too hot when you added the eggs. This “breaks” the emulsion. To fix this, you can try adding a teaspoon of room-temperature milk and whisking vigorously to bring the fats back together.
To avoid this entirely, let your melted butter cool for about five minutes before whisking in the sugar and eggs. The mixture should be warm to the touch, not scalding. This ensures the eggs incorporate smoothly without scrambling or causing the fat to separate.
Elevating the Presentation: Raspberry Infused Cream
While these brownies are incredible on their own, a dollop of raspberry-infused whipped cream takes them to a bakery-quality level. Start with very cold heavy whipping cream. Cold fat globules join together much more easily, creating a stable foam that won’t wilt immediately.
Crush two or three fresh raspberries through a fine-mesh sieve to get just the juice. Fold this juice and the powdered sugar into the cream once it reaches soft peaks. Continue whipping until you have stiff peaks that hold their shape. The acidity in the raspberry juice actually helps stabilize the cream, making it thicker and more luxurious.
Make-Ahead Strategies and Storage Solutions
These brownies are actually better on the second day. Overnight, the moisture from the jam layer migrates slightly into the chocolate layers, making the entire treat incredibly fudgy and cohesive. If you’re planning a party, make these a day in advance and store them at room temperature.
Once you add the whipped cream topping, however, they must be refrigerated. The cream will only stay stable for about four to six hours at room temperature. If you have leftovers with the cream already on them, keep them in an airtight container in the fridge for up to three days.
Freezing Fruit-Filled Brownies for Longevity
You can freeze the base brownies (without the cream) for up to three months. Wrap the entire block or individual squares tightly in plastic wrap, then place them in a heavy-duty freezer bag. This prevents freezer burn and keeps the chocolate from absorbing other odors.
To thaw, place them in the refrigerator overnight. Don’t microwave them to defrost, as this will cause the jam layer to become runny and might make the brownie base greasy. Once they reach room temperature, you can add the fresh whipped cream and serve.
Expert Tips for Professional Results
For those perfectly straight edges you see in food photography, use a “parchment sling.” Line your pan with two strips of parchment paper that hang over the sides. Once the brownies are completely cool, you can simply lift the entire block out of the pan and place it on a cutting board.
Another pro tip is the “hot knife” method. Run a sharp chef’s knife under hot water, wipe it dry, and make one clean slice. Wipe the knife clean and reheat it between every single cut. This prevents the jam from smearing onto the chocolate layers and keeps your squares looking sharp.
Optimizing Your Oven for Even Heat Distribution
Always bake these on the middle rack of your oven. If the pan is too high, the top will burn before the center sets. If it’s too low, the bottom might overcook. Also, keep in mind that dark metal pans absorb heat faster than glass or ceramic dishes. If you’re using a dark pan, check your brownies five minutes early.
If you find your oven has “hot spots,” rotate the pan 180 degrees halfway through the second bake. This ensures that the jam layer thickens evenly across the entire tray and prevents one side from becoming too chewy or dry.
Customizing the Tartness Profile
Not all raspberries are created equal. If your fresh berries are particularly tart, you can add an extra tablespoon of powdered sugar to the jam mixture. Conversely, if your jam is very sweet, a teaspoon of lemon juice or a bit of fresh lemon zest can brighten the flavor and balance the sugar.
You can also experiment with the chocolate. Adding a handful of dark chocolate chips to the batter provides little pockets of intense cocoa that contrast beautifully with the sweet fruit. Just be sure not to overdo the mix-ins, as you want the raspberry layer to remain the star of the show.
How should I store these brownies and do they freeze well?
Store your Raspberry Jam Filled Brownies in an airtight container at room temperature for up to 3 days. If you have already topped them with the raspberry whipped cream, they must be kept in the refrigerator. These brownies freeze exceptionally well without the cream topping. Wrap individual squares in plastic wrap and store in a freezer bag for up to 3 months. Thaw them in the fridge or at room temperature before serving.
Why did my jam layer disappear or mix into the brownie?
This usually happens if you skip the par-baking step or if you swirl the jam into the batter with a knife. To keep the layers distinct, you must bake the bottom layer for 12 minutes first to create a solid base. Additionally, when adding the top layer of batter, drop it in small spoonfuls and gently spread it rather than pouring it all at once, which can displace the jam.
Can I use frozen raspberries instead of fresh?
Yes, you can use frozen raspberries, but do not thaw them first. Thawing frozen berries releases a significant amount of liquid that can make the filling too watery. Toss the frozen berries directly with the jam and cornstarch. You may need to add an extra 2-3 minutes to the final baking time to account for the cold temperature of the fruit.
What can I use if I don’t have cornstarch?
If you are out of cornstarch, you can substitute it with two teaspoons of all-purpose flour or one teaspoon of tapioca starch. The goal is to provide a thickening agent that binds the moisture from the berries. Without a thickener, the fruit layer will likely be too runny and could cause the brownie base to become soggy.
Why is my brownie top dull instead of crackly?
The signature crackly brownie top comes from properly dissolving the sugar into the eggs and butter. If your top is dull, you likely didn’t whisk the sugar, melted butter, and eggs long enough. Ensure you whisk the mixture vigorously for at least 2 minutes until it looks pale and smooth before folding in your dry ingredients.
Can I use a different type of fruit jam?
Absolutely. This structural technique works perfectly with blackberry, strawberry, or even apricot jam. Just ensure you pair the jam with the corresponding fresh fruit and maintain the cornstarch ratio. Darker fruits like blackberries pair especially well with the deep cocoa notes in this recipe.
Raspberry Jam Filled Brownies
Course: DessertCuisine: AmericanDifficulty: easy9
servings25
minutes40
minutes65
Minutes380
kcalAmerican
Ingredients
1/2 cup unsalted butter, melted
1 cup granulated sugar
2 large eggs
1 teaspoon vanilla extract
1/2 cup cocoa powder
1/2 cup all-purpose flour
1/4 teaspoon salt
3/4 cup thick raspberry jam
1 cup fresh raspberries (divided: 1/2 cup for filling, 1/2 cup for topping)
1 teaspoon cornstarch
1/2 cup heavy whipping cream
2 tablespoons powdered sugar
Extra powdered sugar for dusting
Directions
- Preheat your oven to 350°F (175°C) and grease an 8×8 inch baking pan, lining it with parchment paper for easy removal.
- In a medium bowl, toss 1/2 cup of fresh raspberries with the raspberry jam and 1 teaspoon of cornstarch. The cornstarch is vital to prevent the fruit from releasing too much moisture into the brownie. Set aside.
- In a large bowl, whisk the melted butter and granulated sugar until well combined. Add the eggs and vanilla, whisking vigorously for 1-2 minutes until the mixture is light and smooth.
- Sift in the cocoa powder, flour, and salt. Fold gently with a spatula until just combined. Do not overmix.
- To prevent a soggy bottom, pour exactly half of the batter into the prepared pan and bake for 12 minutes. This creates a set base that supports the heavy fruit layer.
- Remove the pan from the oven. Spread the raspberry jam and berry mixture evenly over the par-baked base, leaving a 1/4-inch border around the edges to prevent the jam from burning against the pan.
- Carefully drop small spoonfuls of the remaining raw batter over the jam. Use a spatula to gently spread the batter to the edges, sealing the fruit layer completely.
- Bake for an additional 25 to 28 minutes. The top should be set and slightly crackly. Let the brownies cool completely in the pan (at least 2 hours) to allow the jam layer to firm up before slicing.
- While cooling, whip the heavy cream with 2 tablespoons of powdered sugar and 2-3 crushed raspberries until stiff peaks form.
- Cut into squares. Top each square with a generous dollop of the raspberry cream, a fresh raspberry, and a heavy dusting of powdered sugar to match the visual finish.
Notes
- The par-baking step and the addition of cornstarch to the jam are essential to prevent the fruit from making the brownie base soggy.