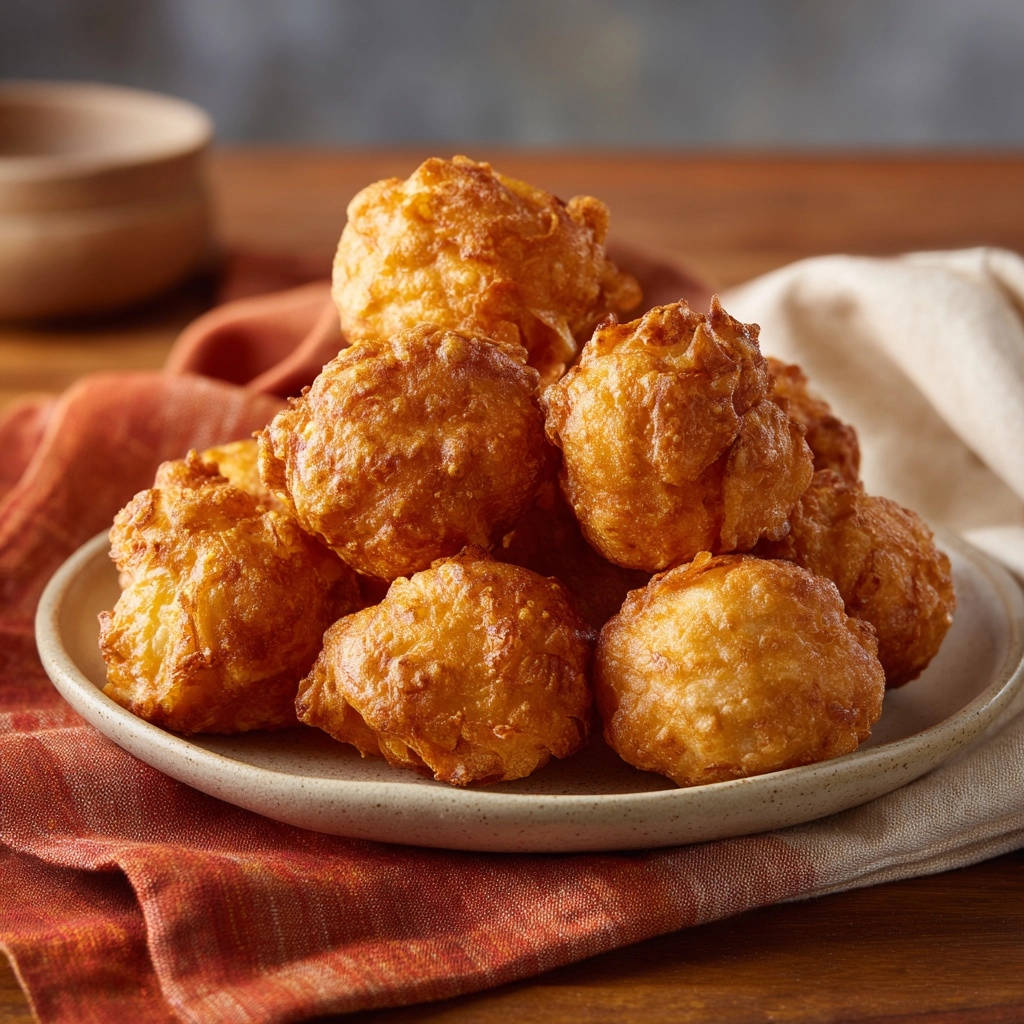
Puffed Cheese Bites: Light, Fluffy & Irresistible
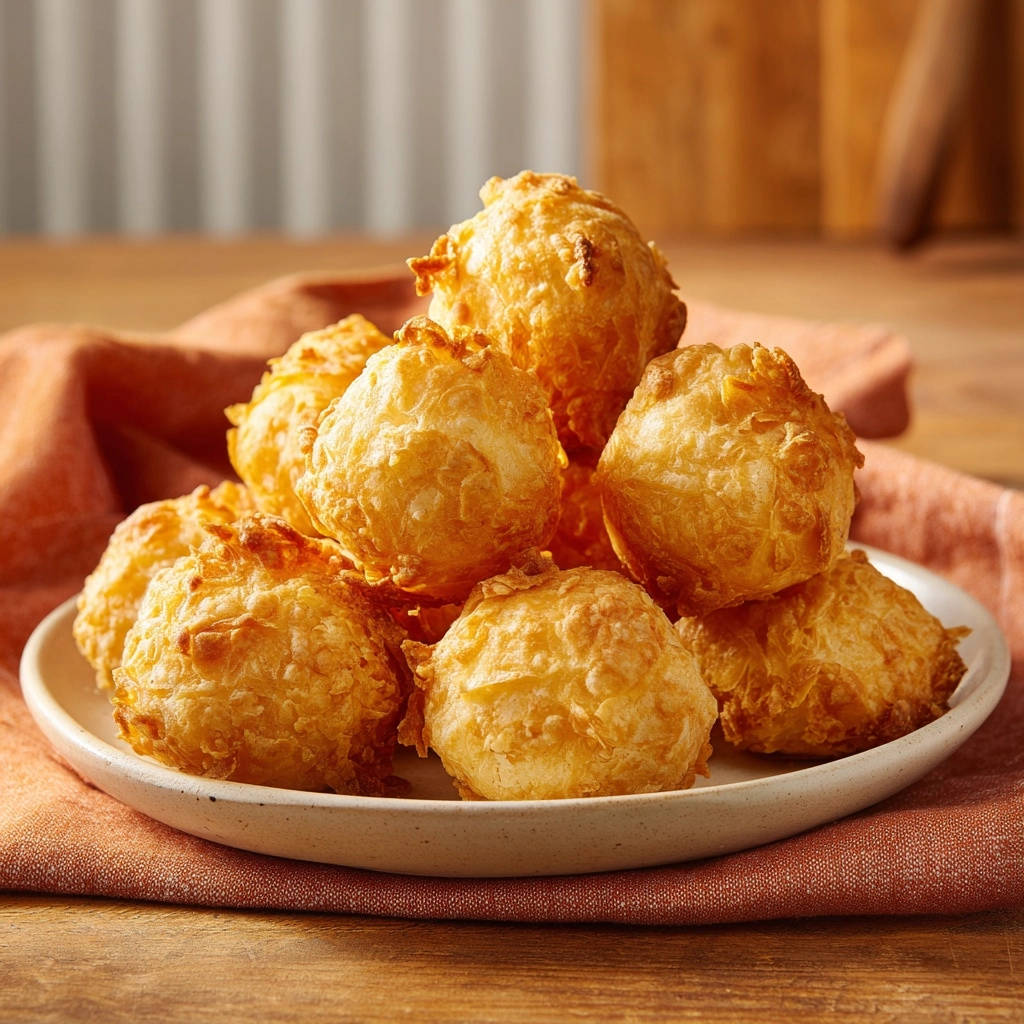
For years, I struggled to achieve that perfectly light, airy interior in my homemade cheese puffs, often ending up with dense, heavy results. Mastering these incredible Puffed Cheese Bites has been a game-changer, yielding a cloud-like texture every single time.
This foolproof recipe delivers an irresistible savory bite, making it my go-to for effortless entertaining or a delightful family snack. You’re about to discover the secret to truly melt-in-your-mouth cheesy perfection.
Beyond Dense: The Puffed Cheese Bites Recipe You’ll Love
This recipe isn’t just another cheese puff; it’s a meticulously crafted method designed for consistency and unparalleled results. We focus on specific techniques that guarantee a light and fluffy interior, avoiding common pitfalls like denseness or rubberiness.
The Magic of Tapioca Flour: Our Secret to Lightness
The core of our success lies in tapioca flour. When combined with hot liquid, it undergoes a unique gelatinization process, creating the distinct, airy structure that sets these Puffed Cheese Bites apart.
Achieving that Cloud-Like Texture Every Time
Forget frustratingly dense or heavy attempts. By following precise temperature cues and mixing techniques, this recipe reliably produces a beautifully puffed, hollow, and incredibly light texture, making every bite a delight.
Quick & Easy: Perfect for Any Occasion
Despite their sophisticated texture, these savory bites are surprisingly simple and quick to prepare. They are ideal for last-minute appetizers, a delightful addition to brunch, or a satisfying snack for game day.
Gather Your Goodies: The Simple Ingredients for Puffed Cheese Bites
The beauty of this recipe lies in its simplicity, utilizing basic ingredients to achieve extraordinary results. Each component plays a crucial role in creating the perfect texture and flavor.
Dairy Duo: Milk & Cheese Choices
Whole milk provides richness and helps create a smooth dough base. For the cheese, a good quality shredded cheddar or Monterey Jack works wonderfully, offering a classic mild, cheesy flavor.
Feel free to experiment with a blend of cheeses like Gruyère for nuttiness, a touch of Parmesan for sharp saltiness, or even a spicy pepper jack to add some kick. The key is using a cheese that melts smoothly.
The Essential Binders: Oil & Eggs
Vegetable oil contributes to the tender texture and helps the bites crisp up on the outside during baking. Large eggs are vital for leavening, binding the dough, and creating that signature airy puff.
The Power of Tapioca Flour
Tapioca flour (also known as tapioca starch) is irreplaceable in this specific recipe. It’s responsible for the unique gelatinization that creates the hollow, chewy, and airy interior.
Do not substitute with all-purpose flour or other starches if you want to achieve the exact light, puffed texture this recipe is famous for. This is where the magic truly happens.
Salt: The Flavor Enhancer
A small amount of salt is crucial. It balances the richness of the cheese and milk, enhancing the overall savory profile of the Puffed Cheese Bites.
Essential Tools for Your Puffed Cheese Bites Adventure
Having the right tools ready makes the process smooth and enjoyable. You likely have most of these kitchen essentials already.
Must-Have Equipment
Medium Saucepan: Essential for heating the liquid mixture to a rolling boil, a critical step for activating the tapioca flour.
Large Mixing Bowl: You’ll need this for combining the dough and eggs once the tapioca flour has been incorporated.
Wooden Spoon or Sturdy Spatula: Vital for vigorously stirring the tapioca flour into the hot liquid to form a uniform dough.
Baking Sheet: A standard baking sheet is needed for arranging your cheese bites, ensuring they have enough space to puff up.
Optional Gadgets for Ease
Electric Mixer: While not strictly necessary (hand mixing works), an electric mixer on low speed can make incorporating the eggs much easier and faster.
Parchment Paper: Lining your baking sheet with parchment paper ensures no sticking and makes cleanup a breeze.
Small Scoop: A small cookie scoop or disher (about 1.5 tablespoons) helps create uniformly sized Puffed Cheese Bites, promoting even baking.
Crafting Cloud-Like Perfection: Your Step-by-Step Guide
- Preparation Pointers: Oven & Pan Ready
Before you begin, preheat your oven to 375°F (190°C). This ensures the oven is at the correct temperature when your dough is ready, promoting an immediate and proper rise.
Lightly grease a baking sheet or, for easiest cleanup, line it with parchment paper. This prevents sticking and helps the cheese bites release cleanly after baking.
- The Boiling Point: Liquid Foundation
In a medium saucepan, combine 1 cup of milk, 1/2 cup of vegetable oil, and 1/2 teaspoon of salt. Place the saucepan over medium-high heat and bring the mixture to a true rolling boil.
A rolling boil means the liquid is bubbling vigorously and continuously, not just simmering. This temperature is crucial for the next step.
- The Tapioca Flour Transformation: Dough Magic
Immediately remove the saucepan from the heat once the rolling boil is reached. Add the entire 2 cups of tapioca flour all at once. This quick addition and vigorous stirring are key.
Stir vigorously with a sturdy wooden spoon or spatula until a sticky, uniform dough forms. This is the secret step: the hot liquid instantly gelatinizes the tapioca flour, creating the unique structure that gives these bites their signature airiness and prevents them from becoming dense.
- Cooling & Combining: Eggs In!
Transfer the hot dough to a large mixing bowl. Allow it to cool for about 5 to 10 minutes, or until it is warm but not hot to the touch.
Patience here prevents scrambled eggs in your dough – the dough should be warm enough to work with but cool enough that the eggs don’t cook upon contact. Add one large egg to the dough and mix well, by hand or with an electric mixer on low speed, until it is completely incorporated. The dough will look lumpy at first, but keep mixing until it smooths out.
Repeat this process with the second egg until fully blended and the dough is smooth and cohesive. Proper mixing here ensures a uniform texture in your finished bites.
- Cheesy Infusion: Mixing It Up
Once the eggs are fully incorporated, add 1 1/2 cups of shredded cheese (such as cheddar or Monterey Jack) to the dough. Mix until the cheese is evenly distributed throughout the dough.
This ensures every bite of your delicious cheesy snack has the perfect amount of cheesy flavor. You can also explore other cheese-forward recipes like these.
- Shaping Your Puffed Bites
Using a small scoop, two spoons, or even your hands, form the dough into 1 to 1 1/2 inch balls. Place them on the prepared baking sheet, leaving some space between each puff.
Giving them adequate space allows for proper air circulation, which helps them puff up beautifully and brown evenly.
- Golden Bake: Watch Them Puff!
Bake for 20 to 25 minutes, or until the puffs are golden brown and beautifully puffed up. Avoid opening the oven door too early, as this can cause the puffs to deflate.
They should feel light when gently touched, indicating their airy interior. The golden color signals crispiness on the outside.
- Serve Warm & Savor
Remove the Puffed Cheese Bites from the oven and serve them warm. They are at their absolute best fresh from the oven, when their texture is perfectly light and airy.
Enjoy these irresistible cheesy creations as a snack, appetizer, or side dish.
For a sweet alternative, try these orange crumble cream cheese muffins.
Chef’s Secrets: Elevate Your Puffed Cheese Bites Game
Small details can make a big difference in the world of baking. These expert tips will help ensure your Puffed Cheese Bites are consistently perfect.
Achieving the Perfect Puff: Don’t Rush the Boil
The “rolling boil” in step 2 is non-negotiable. If the liquid isn’t hot enough, the tapioca flour won’t gelatinize properly, leading to dense bites. Add the flour immediately once it reaches this stage.
Cooling the Dough: Patience is Key
Resist the urge to add the eggs while the dough is still piping hot. If the dough is too warm, the eggs will scramble, resulting in a lumpy, unworkable mixture.
Cooling it to a warm-to-the-touch temperature ensures the eggs incorporate smoothly, contributing to the airy texture.
Mixing Matters: Smoothness for Success
When adding the eggs, the dough will initially look separated or lumpy. Keep mixing until it transforms into a smooth, cohesive, and slightly sticky consistency.
This thorough mixing is crucial for developing the dough’s structure and ensuring a uniform puff.
Cheese Variations for Endless Flavor
While cheddar and Monterey Jack are classics, don’t hesitate to experiment! Try a sharp Parmesan or Pecorino for a bolder flavor. For a gourmet touch, blend in some shredded Gruyere or Comte.
A little smoked Gouda can add wonderful depth, or for a kick, use pepper jack. Ensure your chosen cheese melts well for the best results.
Freezing for Future Feasts
You can prepare the dough in advance and freeze it. Form the balls and freeze them solid on a parchment-lined baking sheet.
Once frozen, transfer them to a freezer-safe bag. Bake from frozen, adding a few extra minutes to the baking time, for fresh-baked Puffed Cheese Bites whenever you crave them.
Common Puffed Cheese Bites Hiccups (and How to Fix Them)
Why Are My Puffs Dense or Heavy?
This is often due to the liquid not reaching a true rolling boil before adding the tapioca flour, preventing proper gelatinization. Ensure vigorous boiling and immediate flour addition.
Overmixing after the eggs are incorporated can also develop too much gluten (if using other flours, but less likely with tapioca), or simply knock too much air out. Mix until just combined and smooth.
My Dough is Too Sticky/Runny!
If your dough is too runny after adding eggs, it might be that your eggs were extra-large, or the liquid measurements were slightly off. Try adding a tablespoon or two of extra tapioca flour, mixing well, until the desired consistency is reached.
If it’s too sticky to handle, try chilling it in the fridge for 15-20 minutes, which can make it firmer and easier to shape.
Puffs Didn’t Puff Up Enough!
Common culprits include an oven that’s not hot enough (check calibration with an oven thermometer!), or opening the oven door too frequently during baking.
The sudden drop in temperature can cause the delicate internal structure to collapse. Resist peeking until the last few minutes of baking.
Puffs Are Brown on the Outside, Raw on the Inside
This suggests your oven might be too hot, causing the exterior to cook too quickly before the inside has a chance to fully bake through. Try reducing the oven temperature by 25°F (about 15°C) and baking for a longer duration.
Alternatively, the puffs might be too large; ensure they are no more than 1.5 inches in diameter for even cooking.
Serving Inspiration: Pairings & Dips for Your Puffed Cheese Bites
These versatile cheesy delights are fantastic on their own, but they also shine when paired with complementary flavors.
What to Serve with Puffed Cheese Bites
These light, cheesy puffs are great on their own, but a few extra dishes turn them into a full spread.
- Balance the cheese with a cool, creamy side like Loaded Creamy Potato Salad, which adds texture and a tangy contrast.
- Double down on the cheese theme with Cheesy Cheddar Biscuits with Flaky Layers for a buttery, flaky counterpart to the airy puffs.
Classic Dips & Salsas
Serve warm Puffed Cheese Bites with a side of classic marinara sauce for a pizza-like experience. Ranch dressing, a tangy spicy aioli, or a fresh chunky salsa also make excellent dipping companions.
For a vibrant touch, consider a simple homemade tomato relish or a creamy avocado dip.
Creative Toppings & Fillings
Before baking, sprinkle the tops with everything bagel seasoning, a pinch of smoked paprika, or finely chopped fresh chives for an extra burst of flavor and visual appeal.
For a fun twist, you can even press a tiny piece of cooked, crispy bacon or a sliver of jalapeño into the center of each ball before baking.
Beyond the Snack: Mealtime Enhancements
Puffed Cheese Bites make a fantastic alternative to dinner rolls or bread with a hearty soup or chili. They are also a wonderful addition to a brunch spread, alongside scrambled eggs and fresh fruit.
For a perfect pairing, try our Crustless Spinach Feta Quiche: Fluffy Texture Mastery.
Consider them as a unique component on a charcuterie board or as a fun appetizer for your next game day spread, complementing other savory bites.
Keep Them Fresh: Storage and Make-Ahead Tips
Proper storage ensures your Puffed Cheese Bites remain delicious, and make-ahead options offer incredible convenience.
Storing Leftover Puffed Bites
Once completely cooled, store leftover Puffed Cheese Bites in an airtight container at room temperature for up to 2 days. For longer storage, refrigerate them for up to 5 days.
The texture will soften slightly, but they will still be delicious.
Make-Ahead Dough Options
The prepared dough can be refrigerated for up to 24 hours before baking. Keep it tightly covered with plastic wrap.
Allow the dough to come closer to room temperature for about 15-20 minutes before shaping and baking, as cold dough will be stiffer.
Reheating for Optimal Enjoyment
To restore their crisp exterior and airy interior, reheat baked Puffed Cheese Bites in a preheated oven at 350°F (175°C) for 5-7 minutes, or until warmed through and slightly crisped.
Avoid microwaving, as it can make them chewy and dense. An air fryer also works wonderfully for reheating, at 325°F (160°C) for 3-5 minutes.
Your Puffed Cheese Bites Questions Answered
Can I use other types of flour?
For this specific recipe and to achieve the signature light and airy “puffed” texture, tapioca flour is absolutely essential. All-purpose flour or most gluten-free blends will not yield the same unique result and are not recommended for substitution in this recipe.
Are Puffed Cheese Bites gluten-free?
Yes, since this recipe exclusively uses tapioca flour (which is naturally gluten-free) and no wheat-based ingredients, these Puffed Cheese Bites are inherently gluten-free, making them a safe and delicious option for those with gluten sensitivities.
Can I make them dairy-free?
While the recipe relies on dairy for its traditional flavor and texture, you can experiment with dairy-free milk alternatives (like unsweetened almond or soy milk) and your favorite dairy-free shredded cheese. Be aware that the texture might vary slightly, but they can still be quite enjoyable.
How do I know when the dough is cool enough for eggs?
The dough is cool enough when it is still warm to the touch, but you can comfortably handle it without it feeling hot. If you can hold your finger in the dough for several seconds without discomfort, it’s generally ready for the eggs. This typically takes 5-10 minutes of cooling.
Can I fry these instead of baking?
While some traditional cheese puff recipes (like Brazilian Pão de Queijo) can be fried, this specific recipe is optimized for baking to achieve its characteristic light, airy, and relatively non-greasy puff. Frying would result in a different texture, likely denser and more oil-absorbed. For the best “Puffed Cheese Bites” experience, stick to baking.
Ready to Impress? Share Your Puffed Cheese Bites Masterpiece!
You’ve mastered the secret to perfectly light and fluffy Puffed Cheese Bites, a delightful treat that’s sure to impress everyone who tries them. Don’t keep this deliciousness to yourself!
We’d love to see your creations! Share your Puffed Cheese Bites photos on social media and tag us, or leave a comment below to tell us how they turned out. Happy baking!

Puffed Cheese Bites
Course: AppetizerCuisine: InternationalDifficulty: easy8
servings30
minutes20
minutes370
kcal50
minutesUnlock the secret to perfectly light and fluffy cheese puffs every time with this incredible recipe. Say goodbye to dense textures and hello to cloud-like savory bites that are airy on the inside. This method will change your cheese puff game forever!
Ingredients
1 cup milk
1/2 cup vegetable oil
1/2 teaspoon salt
2 cups tapioca flour
2 large eggs
1 1/2 cups shredded cheese (such as cheddar or Monterey Jack)
Directions
- Preheat your oven to 375°F (190°C). Lightly grease a baking sheet or line with parchment paper.
- In a medium saucepan, combine the milk, vegetable oil, and salt. Heat over medium-high heat until the mixture comes to a rolling boil.
- Immediately remove the saucepan from the heat and add the tapioca flour all at once. Stir vigorously with a wooden spoon or spatula until a sticky, uniform dough forms. This crucial step gelatinizes the flour, which is key to creating that signature light and airy internal structure that prevents denseness.
- Transfer the hot dough to a large mixing bowl. Allow it to cool for about 5 to 10 minutes, or until it is warm but not hot to the touch. This cooling period is important to ensure the eggs do not scramble when added.
- Add one egg to the dough and mix well, either by hand or with an electric mixer on low speed, until it is completely incorporated. The dough will look lumpy at first, but keep mixing until it smooths out. Repeat with the second egg until fully blended.
- Add the shredded cheese to the dough and mix until evenly distributed throughout.
- Using a small scoop or two spoons, form the dough into 1 to 1 1/2 inch balls and place them on the prepared baking sheet, leaving some space between each puff.
- Bake for 20 to 25 minutes, or until the puffs are golden brown and beautifully puffed up.
- Serve warm and enjoy your perfectly light and fluffy cheese bites!
Notes
- Gelatinizing the flour and cooling the dough before adding eggs are crucial for light, airy puffs.