Caramel Crumble Bars: The Trick to Perfect Slices
For years, crafting beautiful dessert bars seemed like a frustrating endeavor. My attempts at raspberry crumb bars or even the simpler kinds would often result in crumbly messes or smeared layers when sliced, leaving me wishing for that perfect, photo-ready square.
That all changed when I discovered one simple, yet absolutely crucial technique for making Caramel Crumble Bars that come out beautifully defined every single time.
This recipe isn’t just about delicious flavors; it’s about mastering the art of the perfect cut, ensuring your bars are as appealing to the eye as they are to the palate.
Beyond Basic: Why These Caramel Crumble Bars Stand Out
These Caramel Crumble Bars are more than just a sweet treat; they’re a testament to precision and taste. What truly sets this recipe apart is the infallible method for achieving impeccably clean, distinct layers with every slice.
Gone are the days of crumbly edges or smeared fillings. This recipe ensures each bar maintains its structural integrity, showcasing its delightful layers.
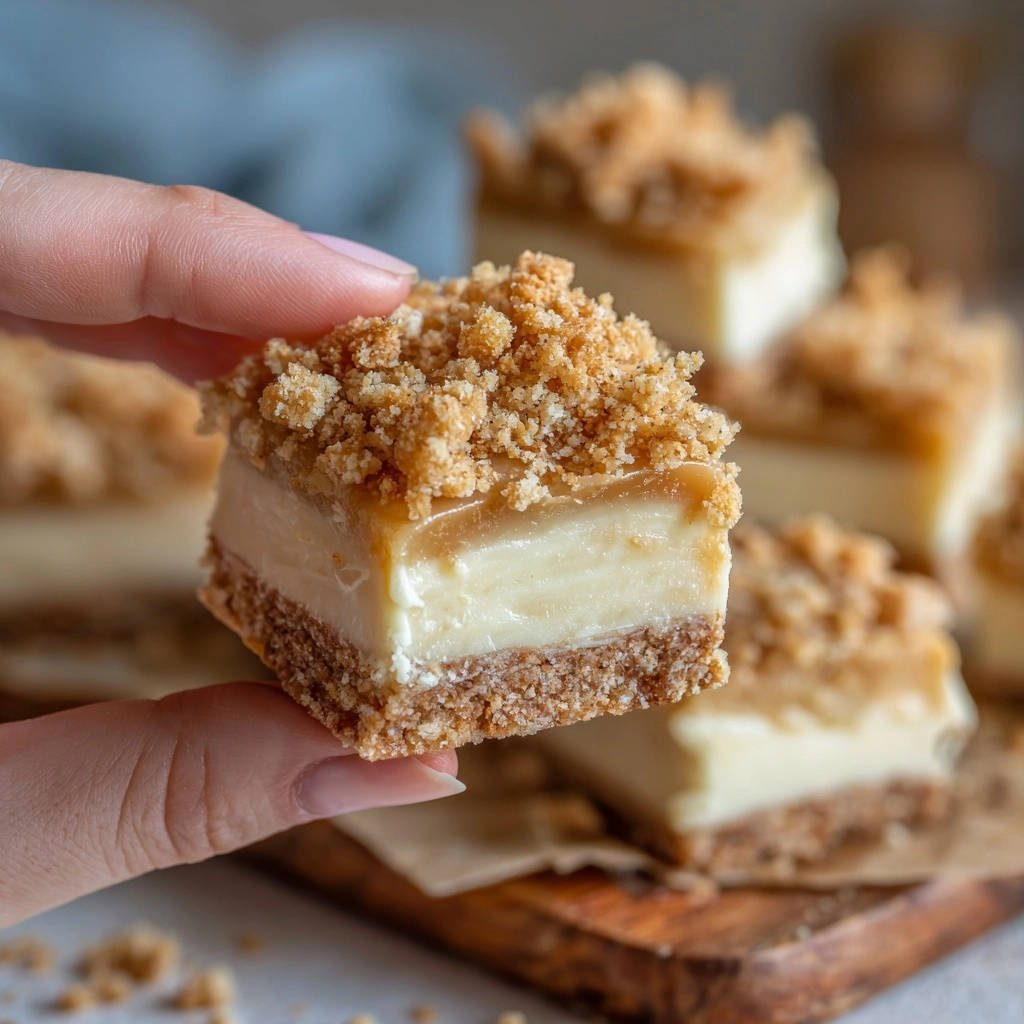
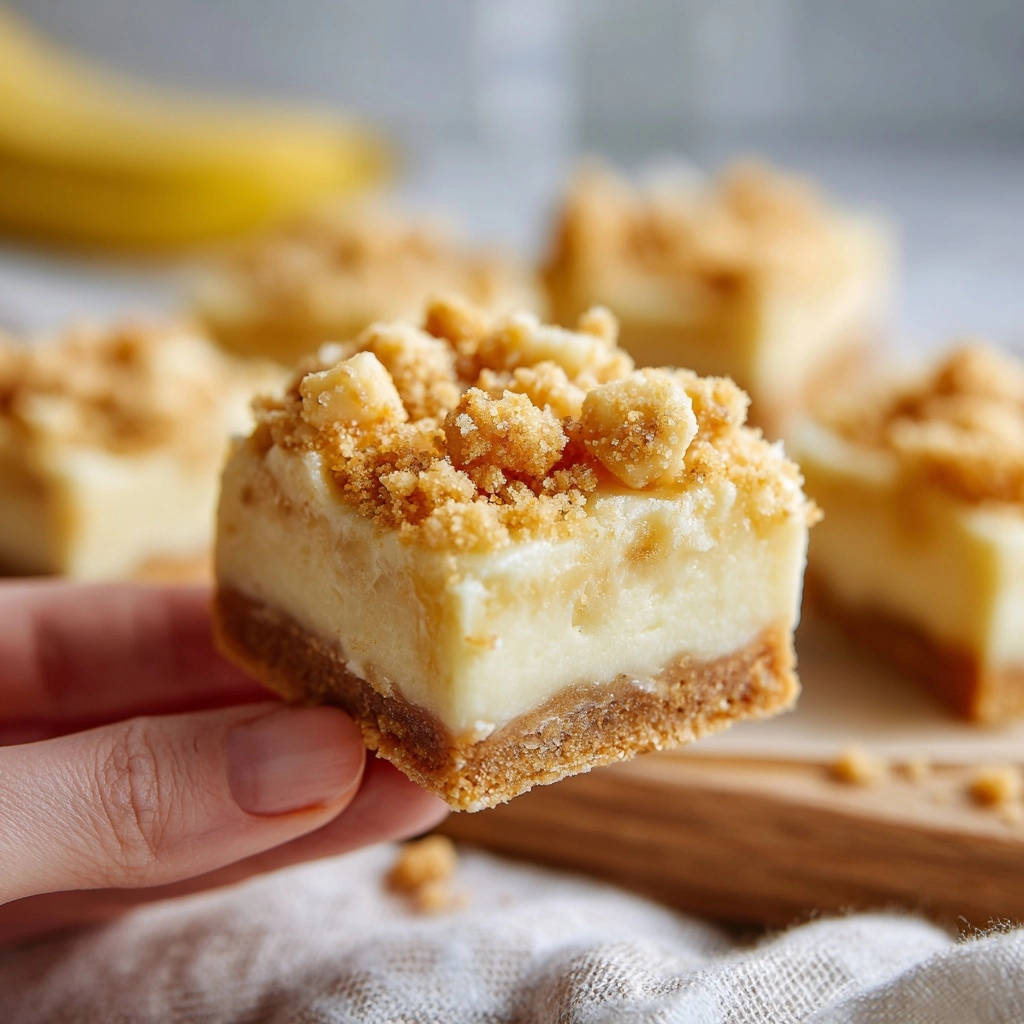
You’ll experience the ideal harmony of textures: a buttery, crisp graham cracker crust, a velvety smooth cream cheese filling, a luscious gooey caramel core, and a delightfully crunchy streusel topping. This balance elevates them far beyond ordinary dessert bars.
The Perfect Blend: Key Ingredients for Irresistible Bars
Each component of these Caramel Crumble Bars plays a vital role in their ultimate texture and flavor. Understanding the purpose of each ingredient helps ensure perfect execution.
The Golden Graham Cracker Base
The crust uses classic graham cracker crumbs, providing a sturdy, sweet foundation for your bars. They offer a delightful crunch that contrasts beautifully with the softer layers above.
Melted unsalted butter binds the crumbs and sugar together, creating a rich, cohesive base. Granulated sugar adds just the right amount of sweetness, enhancing the graham cracker flavor.
The Creamy Dream Filling
Softened cream cheese is the star here, delivering that signature tangy creaminess. It needs to be at room temperature to ensure a silky-smooth batter without lumps.
Granulated sugar provides sweetness, balancing the tang of the cream cheese. A large egg acts as a binder, helping the filling set beautifully, while vanilla extract infuses it with a warm, inviting aroma.
The Gooey Caramel Core
Using a good quality prepared caramel sauce simplifies this layer immensely. Look for a thicker caramel, not a thin, runny syrup, for the best consistency.
A little trick is to warm the caramel slightly before spooning. This makes it much easier to spread evenly over the creamy filling, ensuring a consistent layer of gooey deliciousness.
The Crunchy Crumble Topping
All-purpose flour forms the base of this classic streusel. Packed light brown sugar contributes a deeper, molasses-rich sweetness and a delightful chewiness to the crumble.
Cold unsalted butter, cut into small pieces, is critical. When cut into the dry ingredients, it creates pockets that prevent the butter from fully integrating, resulting in that wonderfully coarse, crumbly texture after baking.
Essential Tools for Your Baking Adventure
Having the right tools makes the baking process smooth and enjoyable. Here’s what you’ll need for these Caramel Crumble Bars:
8×8 inch baking pan: This size ensures the correct thickness for all the layers, allowing them to set properly.
Parchment paper: Essential for easy removal of the entire baked slab, making cutting effortless.
Medium and large mixing bowls: For preparing the separate components cleanly.
Electric mixer: Ideal for achieving a perfectly smooth and creamy cream cheese filling.
Pastry blender or your fingertips: For efficiently cutting cold butter into the crumble ingredients.
Wire rack: Crucial for allowing the bars to cool completely and evenly after baking.
Sharp knife: A must-have for making clean, precise cuts once the bars are fully chilled.
Your Step-by-Step Journey to Caramel Crumble Bars Perfection
Follow these detailed steps to create perfectly layered and delicious Caramel Crumble Bars that everyone will rave about.
- Pan Preparation and Oven Preheat:
Start by preheating your oven to 350 degrees Fahrenheit. This ensures your oven is at the correct temperature when the bars go in, promoting even baking.
Line an 8×8 inch baking pan with parchment paper. Be sure to leave a generous overhang on two sides; this creates “handles” that will be incredibly useful for lifting the entire slab of bars out of the pan later, ensuring an easy and clean removal.
- Crafting the Crust:
In a medium bowl, combine the graham cracker crumbs, 1/4 cup granulated sugar, and melted butter. Mix these ingredients thoroughly until the crumbs are evenly moistened and resemble wet sand.
Press this mixture firmly and evenly into the bottom of your prepared pan. Use the back of a spoon or your fingers to compact it well, creating a solid base. Bake this crust for 10 minutes to set it, then remove from the oven and set it aside to cool slightly.
- Preparing the Crumble Topping:
While the crust is baking, prepare your crumble topping. In a small bowl, combine the all-purpose flour and packed light brown sugar.
Add the cold, small pieces of butter. Using a pastry blender or your fingertips, quickly cut the butter into the flour and sugar mixture. Continue until the mixture resembles coarse, pea-sized crumbs, avoiding overworking the butter which could make it doughy.
Set this mixture aside; it will be sprinkled on last.
- Mixing the Creamy Filling:
In a large bowl, use an electric mixer to beat the softened cream cheese and 1/2 cup granulated sugar until the mixture is completely smooth and creamy, usually taking about 2 minutes. This ensures a lump-free, airy filling.
Add the large egg and vanilla extract, beating only until they are just combined. It’s crucial to not overmix at this stage, as overbeating the egg can introduce too much air, leading to cracks in the finished cheesecake layer.
- Assembling the Layers: Cream Cheese:
Carefully pour the smooth cream cheese mixture evenly over the partially baked graham cracker crust in the pan. Gently spread it to the edges, ensuring a uniform layer.
- Adding the Caramel Layer:
Spoon the 1/2 cup of prepared caramel sauce evenly over the cream cheese layer. For easier spreading, warm the caramel slightly in the microwave for a few seconds until it’s pourable but not hot.
You can gently swirl the caramel into the cream cheese layer with a knife if you desire a marbled effect, or leave it as a distinct layer.
- Sprinkling the Crumble:
Take your reserved crumble topping and sprinkle it evenly over the caramel layer. Ensure good coverage to create that delightful crunchy contrast in every bite.
- Baking to Golden Perfection:
Bake the bars for 30 to 35 minutes. You’ll know they’re done when the edges are lightly golden brown, and the center of the creamy layer is mostly set but still has a slight jiggle when the pan is gently nudged.
This slight jiggle indicates it’s cooked through but will firm up perfectly upon cooling.
- The Golden Rule: Mastering the Chill for Clean Cuts:
This step is the absolute key to achieving perfectly neat, non-crumbly Caramel Crumble Bars. Do not skip or shorten this vital chilling time.
Once baked, immediately transfer the pan to a wire rack at room temperature. Let the bars cool completely for at least 1 hour. This initial cooling allows the ingredients to begin setting and prevents condensation that can occur if moved directly to the fridge.
After cooling at room temperature, transfer the pan to the refrigerator and chill for a minimum of 4 hours, or preferably overnight. This extended chilling time is crucial for the layers to fully set, firm up, and solidify.
Proper chilling ensures that when you cut the bars, the creamy filling and gooey caramel are firm enough to hold their shape, preventing any crumbling of the crust or smearing of the distinct layers. Patience here truly pays off!
- Slicing for Presentation:
Once the bars are thoroughly chilled, use the parchment paper overhang to carefully lift the entire slab out of the pan and place it on a cutting board.
For the cleanest cuts, use a sharp knife. Run the knife under hot water and wipe it dry between each cut. This warming helps the blade glide smoothly through the caramel and cream cheese layers without sticking or dragging. Slice into neat squares or rectangles of your desired size.
Now, enjoy your perfectly structured and incredibly delicious Caramel Crumble Bars!
If you love the buttery graham cracker crust here, you will also enjoy the crispy topping on this golden cherry cobbler.
Chef’s Secrets: Elevating Your Caramel Crumble Bars
Beyond the recipe basics, these pro tips can help you customize and perfect your Caramel Crumble Bars even further.
Ingredient Swaps for Dietary Needs
Gluten-Free Crust: Easily substitute gluten-free graham cracker crumbs for a delicious alternative. Ensure all other ingredients are certified gluten-free if catering to strict dietary needs.
Dairy-Free Options: For a dairy-free version, use plant-based butter alternatives and dairy-free cream cheese. Keep in mind that textures may vary slightly, but the flavor will still be wonderful.
Flavor Variations to Inspire You
Sea Salt Sparkle: A sprinkle of flaky sea salt over the caramel layer before baking provides a delightful sweet-and-salty contrast, enhancing the caramel’s richness.
Spice it Up: Add 1/4 teaspoon of cinnamon or a pinch of nutmeg to the crumble topping for a warm, spiced note that complements the caramel beautifully.
Nutty Crunch: Fold in 1/4 cup of finely chopped pecans or walnuts into the crumble mixture for an added layer of texture and nutty flavor.
Perfect Presentation Tips
Dust with Powdered Sugar: A light dusting of powdered sugar just before serving adds a touch of elegance and visual appeal.
If you enjoy the buttery crust in these bars, you’ll love the crisp base of these creamy lemon coconut bars.
Whipped Cream Dollop: Serve each bar with a small dollop of freshly whipped cream. It adds a luxurious texture and balances the richness of the bars.
Fruit Garnish: A few fresh berries, like raspberries or blackberries, can add a pop of color and a fresh, tart counterpoint.
Baking Blunders Busted: Common Caramel Crumble Bar Fixes
Even experienced bakers encounter challenges. Here’s how to troubleshoot common issues when making Caramel Crumble Bars.
Problem: My Bars are Crumbly or Smear When Sliced
Solution: This is almost always due to insufficient chilling time. The extended refrigeration is absolutely critical for the layers to fully solidify. Ensure your bars chill for at least 4 hours, or ideally overnight, before attempting to slice them. A warm, sharp knife also aids in clean cuts.
Problem: The Crumble Topping is Too Soft/Hard
Solution: If the crumble is too soft, ensure your butter was very cold when cut in; warmer butter leads to a less crumbly texture. If it’s too hard, you might have over-baked the bars slightly, or overworked the crumble mixture, developing too much gluten. Stick to coarse crumbs and the recommended baking time.
Problem: The Cream Cheese Layer is Not Fully Set
Solution: This issue usually points to underbaking or, again, insufficient chilling. Make sure the center of the bars has that slight jiggle but isn’t liquid when pulled from the oven. If it feels too soft, bake for an additional 5-10 minutes. Then, always allow for the full, crucial chilling period in the refrigerator.
Serving & Storing Your Masterpiece: Tips for Freshness
Once your Caramel Crumble Bars are perfectly baked and chilled, you’ll want to enjoy them at their best and store them properly.
Presentation Pointers for Crowd-Pleasing Appeal
Arrange your neatly sliced Caramel Crumble Bars on a serving platter for an elegant display. For individual servings at a party, consider placing them in small paper liners or wrapping them in clear cellophane bags tied with a ribbon, making them perfect edible gifts.
What to Serve With Caramel Crumble Bars
These bars are sweet and rich, so pair them with something light and fruity for contrast or another breakfast-style treat for a full spread.
- For a brunch-style pairing, these Golden Cinnamon French Toast Rolls share the same warm cinnamon notes and make a satisfying companion.
- If you want a fruitier contrast to the caramel, the Fluffy Blueberry Pancakes offer a soft, tangy counterpoint that balances the sweetness.
A simple dusting of powdered sugar or a drizzle of extra caramel sauce can elevate their appearance further, hinting at the delightful flavors within.
Storing for Optimal Enjoyment
To keep your Caramel Crumble Bars fresh and delicious, store them in an airtight container in the refrigerator. This prevents them from drying out and helps maintain their distinct layers and creamy texture.
They will stay fresh and tasting wonderful for up to 5-7 days when properly stored. Always allow them to come to room temperature for about 10-15 minutes before serving for the best texture.
Can You Make Them Ahead?
Absolutely! These Caramel Crumble Bars are an excellent make-ahead dessert. In fact, making them a day in advance allows for that essential overnight chilling, which guarantees the best possible slices and overall set.
Prepare them fully, chill overnight, then slice and serve when ready. This makes them ideal for entertaining or busy schedules.
Your Top Questions About Caramel Crumble Bars, Answered
Here are answers to some common questions about making these irresistible bars.
Can I use store-bought graham cracker crust?
While you technically could use a pre-made crust, I highly recommend making your own. The fresh, buttery flavor and customizable thickness of a homemade crust significantly elevate the overall taste and texture of these Caramel Crumble Bars. Store-bought crusts can sometimes be too thin or lack the rich flavor needed for this recipe.
What kind of caramel sauce works best?
For the best results, use a thick, high-quality prepared caramel sauce. Avoid thin dessert toppings or ice cream syrups, as they may not set properly and could make your bars too runny. Brands like Smucker’s Simple Delights or any gourmet caramel sauce found in the baking aisle are excellent choices.
Can I freeze Caramel Crumble Bars?
Yes, these bars freeze beautifully! Once completely chilled and sliced, wrap individual bars tightly in plastic wrap, then place them in a freezer-safe airtight container or freezer bag. They can be stored for up to 2-3 months. Thaw them overnight in the refrigerator before serving for optimal enjoyment.
How do I know when the bars are perfectly baked?
Look for lightly golden edges on the crust and crumble topping. The center of the cream cheese layer should appear mostly set but still have a slight, gentle jiggle when you carefully move the pan. This indicates it’s cooked through without being over-baked, ensuring a creamy, not dry, filling once cooled.
Ready to Share Your Caramel Crumble Bars Success?
Now that you’re armed with the secrets to crafting the most perfect Caramel Crumble Bars, it’s time to get baking! Experience the satisfaction of serving a dessert that not only tastes incredible but looks absolutely stunning too.
I encourage you to try this recipe, trust the chilling process, and share your delightful results with friends and family. If you enjoyed mastering these sweet delights, you might also love our perfect apple crumble bars, a delightful fruity variation of this beloved dessert type!
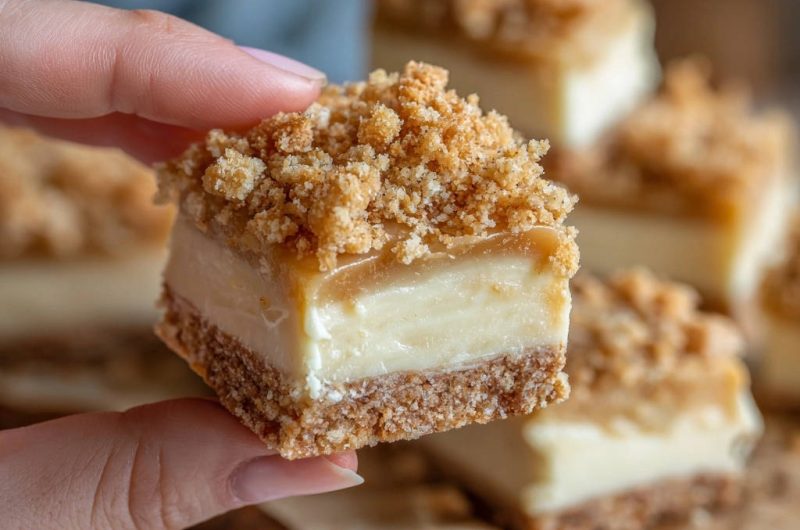
Caramel Crumble Bars
Course: DessertCuisine: AmericanDifficulty: medium16
bars20
minutes45
minutes280
kcal65
minutesDiscover the secret to perfectly neat Caramel Crumble Bars every time! This recipe ensures distinct layers and clean, beautiful slices with a simple chilling trick. Enjoy these satisfying dessert bars with a buttery graham cracker crust, creamy filling, rich caramel, and a delightful crumble topping.
Ingredients
For the Crust:
1 and 1/2 cups graham cracker crumbs
1/4 cup granulated sugar
1/2 cup unsalted butter, melted
For the Creamy Filling:
8 ounces cream cheese, softened
1/2 cup granulated sugar
1 large egg
1 teaspoon vanilla extract
For the Caramel Layer:
1/2 cup prepared caramel sauce
For the Crumble Topping:
1/2 cup all-purpose flour
1/4 cup packed light brown sugar
1/4 cup unsalted butter, cold and cut into small pieces
Directions
- Preheat your oven to 350 degrees Fahrenheit. Line an 8×8 inch baking pan with parchment paper, leaving an overhang on two sides to easily lift the bars out later.
- Prepare the crust: In a medium bowl, combine the graham cracker crumbs, 1/4 cup granulated sugar, and melted butter. Press the mixture evenly into the bottom of the prepared pan. Bake for 10 minutes. Remove from oven and set aside.
- Prepare the crumble topping: While the crust bakes, in a small bowl, combine the flour and brown sugar. Cut in the cold butter with a pastry blender or your fingertips until the mixture resembles coarse crumbs. Set aside.
- Prepare the creamy filling: In a large bowl, using an electric mixer, beat the softened cream cheese and 1/2 cup granulated sugar until smooth and creamy. Beat in the egg and vanilla extract until just combined. Do not overmix.
- Pour the cream cheese mixture over the partially baked crust in the pan.
- Spoon the caramel sauce evenly over the cream cheese layer. A trick here is to warm the caramel slightly so it spreads easier. You can gently swirl it with a knife if desired.
- Sprinkle the reserved crumble topping evenly over the caramel layer.
- Bake for 30 to 35 minutes, or until the edges are lightly golden and the center of the creamy layer is mostly set but still has a slight jiggle.
- This is the key for perfect cuts: Once baked, let the bars cool completely on a wire rack at room temperature for at least 1 hour. Then, transfer the pan to the refrigerator and chill for at least 4 hours, or preferably overnight. This extended chilling time is crucial for the layers to fully set and solidify, ensuring clean, sharp cuts without any crumbling or smearing.
- Once thoroughly chilled, use the parchment paper overhang to lift the entire slab of bars out of the pan. Place on a cutting board. Use a sharp, warm knife (run under hot water and wipe dry between cuts) to slice into neat squares or rectangles. Enjoy your perfectly structured bars!
Notes
- Chilling for at least 4 hours, preferably overnight, is crucial for clean, sharp cuts.