Chocolate-Filled Doughnuts: Irresistibly Fluffy & Gooey
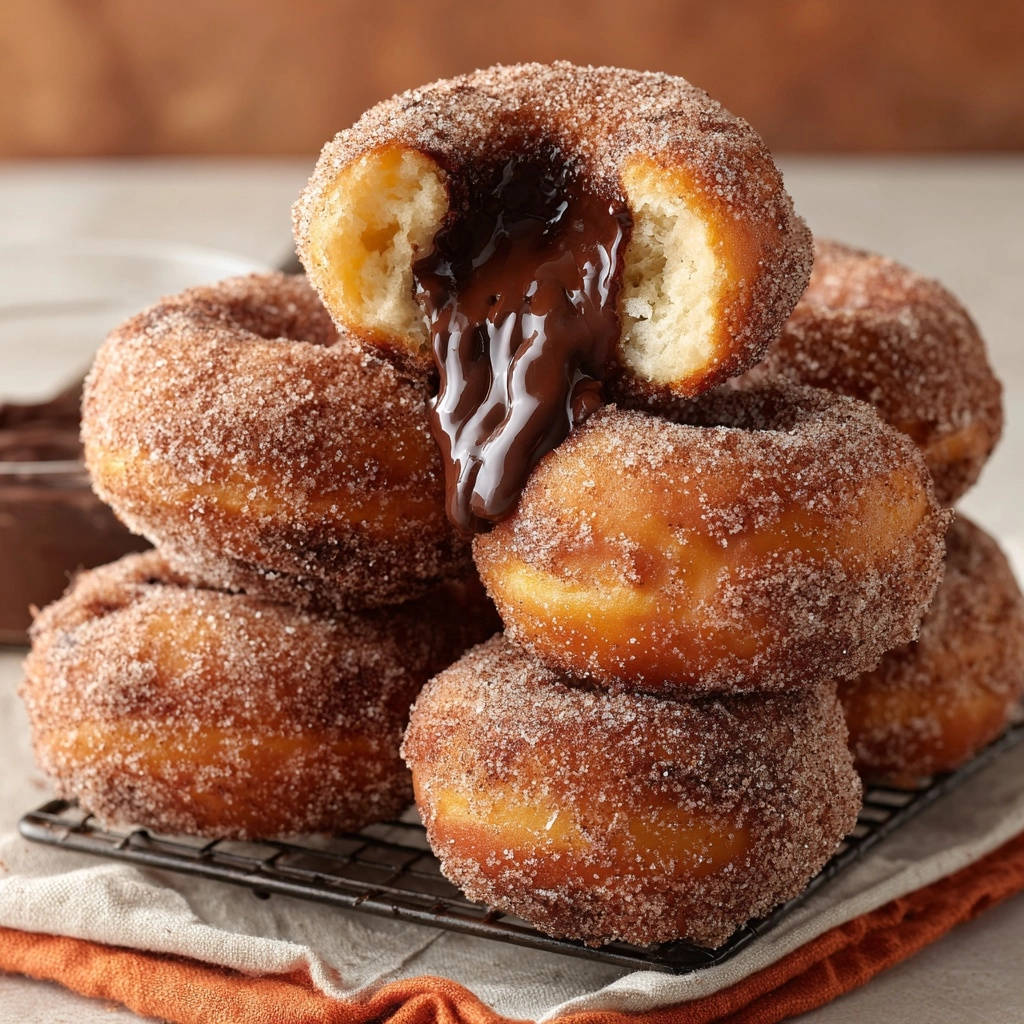
There was a time when achieving that perfectly molten, luscious chocolate center in homemade doughnuts felt like an impossible dream. My early attempts at chocolate-filled doughnuts often resulted in a firm, uninspiring filling, or worse, none at all. But through dedicated experimentation, I’ve perfected a method that guarantees every bite delivers that irresistible, flowing chocolate lava, encased in the fluffiest yeast doughnut.
This recipe isn’t just about making doughnuts; it’s about crafting a delightful experience. Get ready to transform simple ingredients into bakery-quality treats, complete with an utterly decadent, gooey chocolate filling that will have everyone asking for more.
Why This Chocolate-Filled Doughnuts Recipe Belongs in Your Kitchen
The Secret to That Irresistible Molten Center
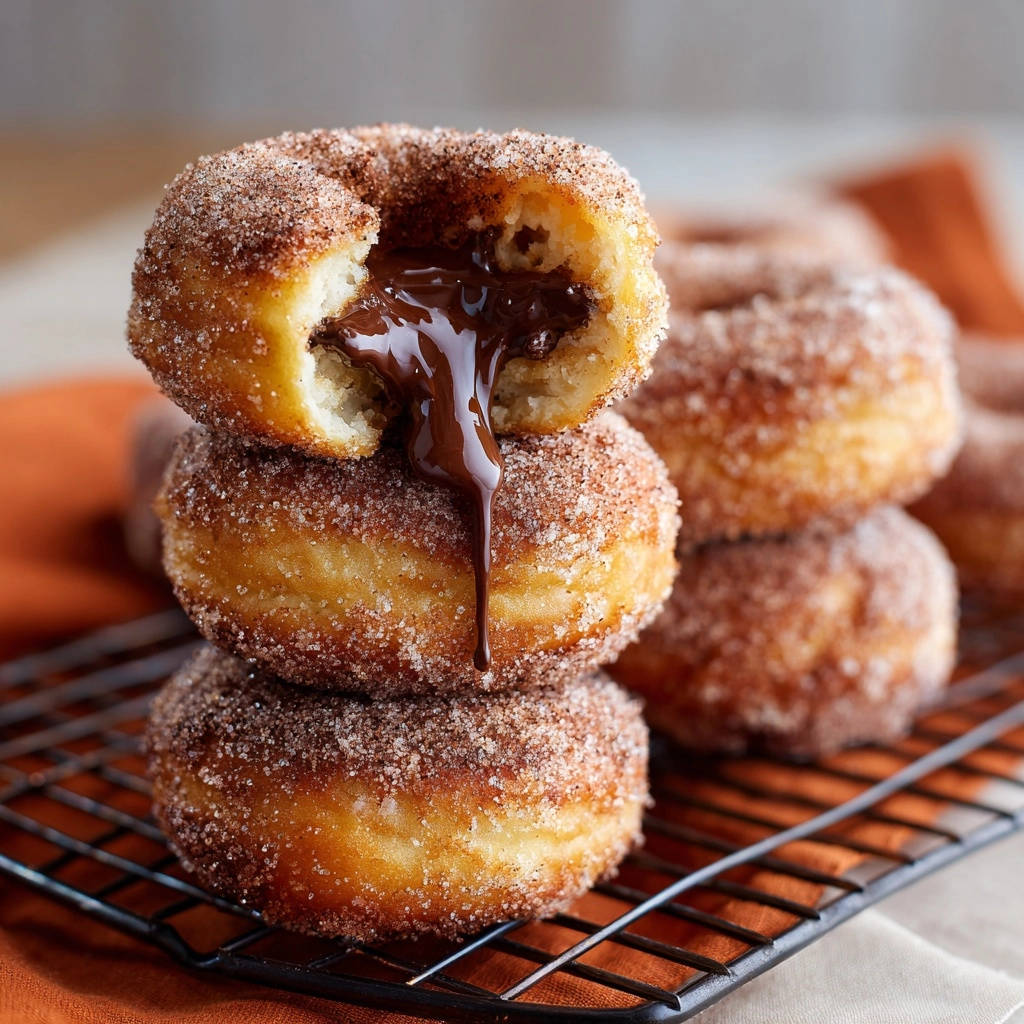
The magic truly happens with our unique chocolate ganache. We focus on specific chocolate and cream ratios, meticulously cooled to ensure it remains wonderfully gooey and pipeable, even at room temperature. This isn’t just a chocolate blob; it’s a luscious “chocolate lava” that oozes with every bite.
Achieving Bakery-Quality Fluffiness at Home
Forget dense, heavy doughnuts. This recipe guides you through dough preparation and proofing, yielding doughnuts that are incredibly light and airy. You’ll master the art of the perfect yeast doughnut, ready to cradle its sweet filling.
Simple Ingredients, Spectacular Results
You don’t need exotic ingredients to create something extraordinary. With pantry staples like flour, sugar, and good quality chocolate, you’re set to produce impressive homemade doughnuts that taste like they came from a gourmet bakery.
Setting Up Your Sweet Kitchen: Essential Doughnut Tools
Large Mixing Bowls: You’ll need at least two – one for the dough and another for ingredients, ensuring enough space for the dough to rise properly.
Stand Mixer (Optional but Recommended): While not strictly necessary, a stand mixer with a dough hook attachment simplifies the kneading process significantly, making the dough creation effortless.
Rolling Pin: Essential for uniformly flattening your doughnut dough to the ideal thickness, ensuring even cooking.
3-inch Round Cutter: This creates perfectly symmetrical doughnuts, leading to a professional appearance and consistent size for filling.
Parchment Paper & Baking Sheets: Crucial for the second proofing, preventing the delicate dough from sticking and making transfer to the hot oil much easier.
Heavy-Bottomed Pot or Dutch Oven: A sturdy vessel maintains consistent oil temperature, which is key for perfectly cooked, non-greasy fried doughnuts.
Deep-Fry Thermometer: Absolutely critical for monitoring and maintaining the precise oil temperature. This prevents oily doughnuts and ensures even browning.
Slotted Spoon or Spider Skimmer: For safely lowering and removing doughnuts from hot oil, allowing excess oil to drain quickly.
Wire Rack & Paper Towels: Allows air circulation around the fried doughnuts, promoting even cooling and further draining of any residual oil.
Piping Bag & Long, Thin Pastry Tip (e.g., Wilton 2A or 1A): This is the secret weapon for injecting the generous, gooey chocolate filling. A long, thin tip ensures the filling reaches the center without tearing the doughnut.
The Building Blocks of Bliss: Decoding Your Doughnut Ingredients
Dough Essentials: From Flour to Rise
All-purpose flour provides the essential structure for your doughnuts. It creates a tender crumb when combined with precise kneading.
Active dry yeast is the leavening agent, responsible for the incredible fluffiness and signature texture of these fried doughnuts. Warm milk activates it.
Warm milk provides the ideal temperature for the yeast to bloom, ensuring a strong rise. It also adds richness and tenderness to the dough.
Melted unsalted butter contributes to the dough’s softness and flavor. It enriches the texture, making the doughnuts truly irresistible.
A large egg adds richness, color, and helps bind the dough, contributing to its elasticity and structure. This leads to a more robust and satisfying bite.
Granulated sugar feeds the yeast, aids in browning, and sweetens the dough itself. It balances the flavors perfectly.
Salt enhances all the other flavors in the dough, providing balance against the sweetness. Don’t skip it; it’s crucial for taste development.
Chocolate Filling: Crafting the Dreamy Center
Semi-sweet chocolate chips or chopped chocolate form the base of our ganache. High-quality chocolate melts smoothly and provides the rich, deep flavor we’re after.
Heavy cream is heated and poured over the chocolate, creating a silky-smooth, pourable ganache. Its fat content is key for that luscious, gooey consistency.
An optional tablespoon of unsalted butter adds extra richness and a beautiful shine to your chocolate ganache. It makes the filling even more decadent.
Cinnamon Sugar Coating: The Perfect Sweet Embrace
Granulated sugar and ground cinnamon combine to create a simple yet incredibly aromatic coating. This classic pairing adds a delightful textural and flavor contrast to the rich chocolate filling.
Your Journey to Perfect Chocolate-Filled Doughnuts: A Step-by-Step Culinary Map
Act I: Awakening the Dough (Mixing & First Rise)
Begin by gently warming your milk to a comfortable temperature, between 105-115 degrees F (40-46 degrees C). This ensures optimal yeast activation without killing it. In a large mixing bowl, combine the warm milk with the active dry yeast.
Allow this mixture to sit undisturbed for about 5 minutes. You’ll know the yeast is active when a light, foamy layer forms on the surface, indicating it’s ready to work its magic. If no foam appears, your yeast might be old or the milk too hot/cold; start again.
Next, whisk in the melted butter, large egg, granulated sugar, and salt until well combined. This liquid mixture creates the foundation for a tender dough. Gradually add the all-purpose flour, mixing until a soft, shaggy dough forms.
Turn the dough out onto a lightly floured surface. Knead for 5-7 minutes until it becomes smooth, elastic, and bounces back when gently poked. Proper kneading develops the gluten, which is essential for fluffy doughnuts.
Lightly oil a clean bowl, place the dough inside, and turn it once to coat. Cover the bowl tightly with plastic wrap. Let it rise in a warm, draft-free place for 1 to 1.5 hours, or until it has visibly doubled in size. This first rise builds flavor and texture.
Act II: Shaping Sweetness (Rolling, Cutting & Second Rise)
Once your dough has risen beautifully, gently punch it down to release the air. Transfer the dough to a lightly floured surface. Using a rolling pin, roll the dough evenly to about 1/2 inch thickness. Consistency here ensures even frying.
Using a 3-inch round cutter, cut out your doughnut shapes. Arrange the cut doughnuts on parchment-lined baking sheets, leaving some space between each. You can gently re-roll any dough scraps once to cut additional doughnuts, but avoid overworking the dough.
Lightly cover the cut doughnuts with plastic wrap or a clean kitchen towel. Allow them to rise again for 30-45 minutes, or until they look noticeably puffy and light. This second proof is critical for achieving that signature fluffy texture; don’t rush it.
Act III: The Liquid Gold (Preparing Your Gooey Chocolate Ganache)
While the doughnuts undergo their second rise, prepare your decadent chocolate filling. Place the semi-sweet chocolate chips or chopped chocolate in a heatproof bowl. Choose good quality chocolate for the best flavor and melting consistency.
In a small saucepan, heat the heavy cream over medium heat until it just begins to simmer, showing small bubbles around the edges. Crucially, do not let it boil; this can cause the ganache to separate. If using, add the optional tablespoon of unsalted butter for extra richness.
Immediately pour the hot cream over the chocolate chips. Let it sit undisturbed for 5 minutes; this allows the chocolate to soften and begin melting evenly. After 5 minutes, gently whisk the mixture until it’s completely smooth and glossy, with no lumps remaining.
Allow the chocolate filling to cool completely at room temperature. Stir it occasionally as it cools. It should thicken to a creamy, spreadable, yet still soft and gooey consistency, perfect for piping. Avoid refrigerating it, as it might become too firm.
Act IV: The Hot Oil Dance (Frying to Golden Perfection)
In a large heavy-bottomed pot or Dutch oven, pour in enough vegetable oil to reach at least 2-3 inches deep. Heat the oil over medium heat to a precise 350 degrees F (175 degrees C). A deep-fry thermometer is essential here to maintain a consistent temperature.
Carefully lower 2-3 doughnuts into the hot oil using a slotted spoon or spider skimmer. Do not overcrowd the pot, as this will drop the oil temperature and result in greasy doughnuts. Overcrowding also makes them cook unevenly.
Fry each side for 1-2 minutes, or until they are beautifully golden brown. The precise temperature ensures a crispy exterior and a fully cooked interior. Once golden, use the slotted spoon to remove the doughnuts.
Immediately transfer the fried doughnuts to a wire rack set over paper towels. This allows excess oil to drain away, preventing them from becoming greasy as they cool slightly.
Act V: The Cinnamon Hug (Coating for Extra Flavor)
While the doughnuts are still warm to the touch (but not scorching hot), prepare your cinnamon sugar coating. In a shallow dish, combine the granulated sugar and ground cinnamon, mixing well.
Gently roll each warm doughnut in the cinnamon sugar mixture until it’s evenly coated on all sides. The warmth helps the sugar adhere beautifully, creating a delightful crunchy exterior. This step adds an irresistible aromatic sweetness.
If you enjoy working with yeast dough and cinnamon, you might also love making cinnamon sugar pull-apart rolls for another comforting treat.
If you love working with chocolate dough, you’ll enjoy these chocolate glazed donuts too.
The Grand Finale: Expert Filling for Guaranteed Gooeyness
This step is where your Chocolate-Filled Doughnuts truly shine! Ensure your doughnuts have cooled completely to room temperature before filling. This prevents the chocolate ganache from melting out.
Transfer the cooled, thickened chocolate filling into a piping bag fitted with a long, thin pastry tip (like Wilton 2A or 1A). This specific tip is crucial for precise filling.
Gently insert the tip into the side of each doughnut. Wiggle the tip slightly to create a small pocket inside the doughnut for the filling. This ensures the chocolate spreads evenly within.
Pipe in about 1-2 tablespoons of chocolate filling, or until you feel the doughnut become slightly heavy and see a tiny bit of filling just appear at the insertion point. This indicates a generous, gooey center without overfilling or bursting the doughnut.
Repeat this process for all your doughnuts. Serve immediately for the absolute best gooey results, or store them as directed below for later enjoyment.
Beyond the Recipe: Chef’s Secrets for Doughnut Mastery
Mastering Your Dough: Feel and Consistency
The texture of your dough is paramount. After kneading, your dough should be smooth and elastic, springing back slowly when gently poked. If it feels too sticky, add a tiny bit more flour; if too stiff, a drop of water.
For the first rise, visual cues are key: the dough should double in size, looking light and airy. For the second rise, the doughnuts should feel significantly lighter and appear puffy, almost cloud-like. This indicates sufficient aeration for a fluffy end product.
Frying Without Fear: Temperature & Technique
Consistent oil temperature is the single most important factor for perfect frying. Too cold, and doughnuts become greasy; too hot, and they burn outside while remaining raw inside. Use a thermometer and adjust heat frequently.
Never overcrowd the pot. Frying only 2-3 doughnuts at a time ensures the oil temperature remains stable and allows for even cooking. This also gives you space to safely flip and remove them.
Achieving the Perfect Fill Every Time
The success of your gooey center hinges on the ganache cooling to the right consistency. It should be thick enough to hold its shape when piped, but still soft and flowing, not firm or crumbly. If it’s too warm, it will simply run out.
When piping, avoid forcing the tip too far or too vigorously, which can tear the doughnut. A gentle wiggle and consistent pressure will create that ideal chocolate-filled core without any mess.
When Doughnuts Go Wrong: Common Issues & Quick Fixes
My Dough Didn’t Rise!
This is usually due to inactive yeast. Ensure your milk is at the correct temperature (105-115°F); too hot kills the yeast, too cold doesn’t activate it. Your yeast might also be old or expired. Always check the expiration date and test a small amount in warm water with a pinch of sugar first.
Another culprit could be a cold environment. Dough needs warmth to rise efficiently. Find a warm spot in your kitchen, or create one using a slightly warmed oven (turned off!) or proofing box.
My Doughnuts Are Oily/Greasy!
The most common reason for greasy doughnuts is oil that isn’t hot enough. When the oil is too cool, the doughnuts absorb more fat rather than cooking quickly and sealing their exterior. Always use a thermometer and maintain the 350°F temperature.
Overcrowding the pot also drastically drops the oil temperature. Fry in small batches to ensure consistent heat. Additionally, ensure you’re draining them well on a wire rack set over paper towels immediately after frying.
My Chocolate Filling Isn’t Gooey/Is Too Runny!
If your ganache is too firm, it likely cooled too much or contains too much chocolate relative to cream. Gently rewarm it over a double boiler or in short bursts in the microwave, stirring until it reaches the desired gooey consistency.
If it’s too runny, it might not have cooled enough, or there might be too much cream. Try refrigerating it for a short period (15-30 minutes), stirring every 10 minutes, until it thickens sufficiently. A tiny pinch of cornstarch whisked in while warm can also help, but use sparingly.
Enjoying Your Creation: Serving, Storage & Make-Ahead Tips
The Golden Moment: Serving Suggestions
These homemade Chocolate-Filled Doughnuts are best enjoyed fresh and slightly warm, letting that glorious chocolate filling ooze. They are absolutely sublime with a strong cup of coffee or a cold glass of milk for a perfect morning treat or decadent dessert.
Keeping Them Fresh: Storage Guidelines
For optimal freshness and gooiness, consume your Chocolate-Filled Doughnuts on the day they are made. If you have leftovers, store them in an airtight container at room temperature for up to 2 days. The dough will start to stiffen slightly over time.
Planning Ahead: Doughnut Prep for Busy Schedules
You can prepare the dough in advance! After the first rise, punch down the dough, then place it in a lightly oiled bowl, cover tightly with plastic wrap, and refrigerate overnight (up to 24 hours). The next day, let it come to room temperature for about 30-60 minutes before rolling and cutting. This slow rise can even enhance the flavor.
The chocolate ganache can also be made a day in advance. Store it covered in the refrigerator. Before filling, let it come to room temperature, then whisk well until it’s smooth and pliable. You may need to gently warm it very slightly to reach the perfect piping consistency.
Your Top Chocolate-Filled Doughnut Questions, Answered!
Can I substitute ingredients for the dough or filling?
For the dough, substituting milk can change the texture. Whole milk is recommended for richness. You can use plant-based milk, but the result may be slightly less tender. For the chocolate filling, using dark chocolate will result in a less sweet, more intense flavor, while milk chocolate will be sweeter and softer. Stick to heavy cream for the ganache; lighter creams won’t provide the necessary richness or stability.
For a seasonal twist on these filled doughnuts, try this chocolate glazed pumpkin donuts recipe instead.
Is baking an option instead of frying?
While technically possible to bake yeast doughnuts, the texture will be significantly different. Baked doughnuts typically have a more cake-like consistency and lack the classic crispy-chewy fried doughnut exterior. For true fluffy, bakery-style Chocolate-Filled Doughnuts with that authentic experience, frying is highly recommended.
How do I know the oil is ready without a thermometer?
While a thermometer is strongly advised for consistency, you can do a simple test. Drop a small piece of dough into the hot oil. If it immediately sizzles and floats to the surface, bubbling gently, the oil is likely ready. If it sinks or doesn’t bubble, the oil is too cold. If it instantly browns or smokes, it’s too hot.
Can I prepare the dough in advance?
Yes, absolutely! After the first rise, punch down your dough, place it in a lightly oiled bowl, cover it tightly with plastic wrap, and refrigerate it overnight (for up to 24 hours). This slow, cold proof actually develops a deeper flavor. The next day, take it out, let it warm up for 30-60 minutes before rolling and cutting, and then proceed with the second rise and frying steps.
Ready to Delight? Share Your Chocolate-Filled Doughnut Journey!
There’s nothing quite like the joy of biting into a warm, fluffy homemade doughnut, especially one generously filled with luscious, gooey chocolate. This recipe for Chocolate-Filled Doughnuts brings that bakery magic right into your home, proving that these seemingly complex treats are truly achievable for any home baker.
More Sweet Treats to Try
If those chocolate-filled doughnuts have you craving more rich, gooey desserts, these two recipes share that same indulgent spirit.
- For another dose of chocolate and cinnamon in pillowy soft form, try these Ultra-Gooey Chocolate Cinnamon Rolls – the filling is just as luscious.
- When you want a fruitier option that still delivers fluffy texture, these Apple Pie Pancakes bring warm spice and tender apples without any sogginess.
I hope you savor every delicious moment of making and devouring these delightful creations. Don’t forget to share your triumphs with me in the comments below, or tag your photos on social media! Happy baking!

Chocolate Doughnuts
Course: DessertCuisine: AmericanDifficulty: medium12
doughnuts45
minutes30
minutes180
kcal300
minutesIndulge in these warm, fluffy doughnuts bursting with a rich, gooey chocolate center. This recipe guides you through achieving bakery-quality results, ensuring every bite delivers that irresistible chocolate lava filling. Perfect for a special treat or sharing with loved ones.
Ingredients
For the Doughnuts:
3 cups all-purpose flour
1/4 cup granulated sugar
1 packet (2 1/4 teaspoons) active dry yeast
1 cup warm milk (about 105-115 degrees F)
1/4 cup unsalted butter, melted
1 large egg
1/2 teaspoon salt
6 cups vegetable oil, for frying
For the Chocolate Filling:
1 cup semi-sweet chocolate chips or chopped chocolate
1/2 cup heavy cream
1 tablespoon unsalted butter (optional, for richness and shine)
For the Cinnamon Sugar Coating:
1 cup granulated sugar
2 teaspoons ground cinnamon
Directions
- In a large bowl, combine warm milk and yeast. Let stand for 5 minutes until foamy.
- Stir in melted butter, egg, sugar, and salt.
- Gradually add flour, mixing until a soft dough forms.
- Turn dough out onto a lightly floured surface and knead for 5-7 minutes until smooth and elastic.
- Place dough in a lightly oiled bowl, turning once to coat. Cover with plastic wrap and let rise in a warm place for 1 to 1.5 hours, or until doubled in size.
- Punch down dough. On a lightly floured surface, roll dough to about 1/2 inch thickness. Using a 3-inch round cutter, cut out doughnuts. You can re-roll scraps once.
- Place cut doughnuts on parchment-lined baking sheets. Cover lightly and let rise again for 30-45 minutes, or until puffy.
- Prepare the chocolate filling: Place chocolate chips in a heatproof bowl. In a small saucepan, heat heavy cream (and optional butter) over medium heat until simmering, but do not boil. Pour hot cream over the chocolate chips. Let sit for 5 minutes, then whisk until smooth and well combined. Allow the chocolate filling to cool completely at room temperature, stirring occasionally. It should thicken to a consistency that can be piped smoothly and remains soft and gooey.
- In a large heavy-bottomed pot or Dutch oven, heat vegetable oil over medium heat to 350 degrees F (175 degrees C). Use a thermometer to maintain this temperature consistently.
- Carefully lower 2-3 doughnuts into the hot oil, ensuring not to overcrowd the pot. Fry for 1-2 minutes per side, or until golden brown.
- Using a slotted spoon, remove doughnuts and place on a wire rack set over paper towels to drain excess oil.
- While doughnuts are still warm (but not hot to touch), combine granulated sugar and ground cinnamon in a shallow dish. Roll each doughnut in the cinnamon sugar mixture until evenly coated.
- Fill the doughnuts for guaranteed gooeyness: Once the doughnuts have cooled completely to room temperature, transfer the cooled chocolate filling into a piping bag fitted with a long, thin pastry tip (or a round tip like Wilton 2A or 1A). Gently insert the tip into the side of each doughnut, wiggling it slightly to create space inside. Pipe in about 1-2 tablespoons of chocolate filling, or until the doughnut feels slightly heavy and puffed, and you see a tiny bit of filling appear at the insertion point. This ensures a generous, gooey center without overfilling.
- Repeat for all doughnuts. Serve immediately for the best gooey results.
Notes
- Ensure chocolate filling cools completely for best piping and gooey results.