Crispy Breakfast Wraps: The Ultimate Never-Soggy Recipe
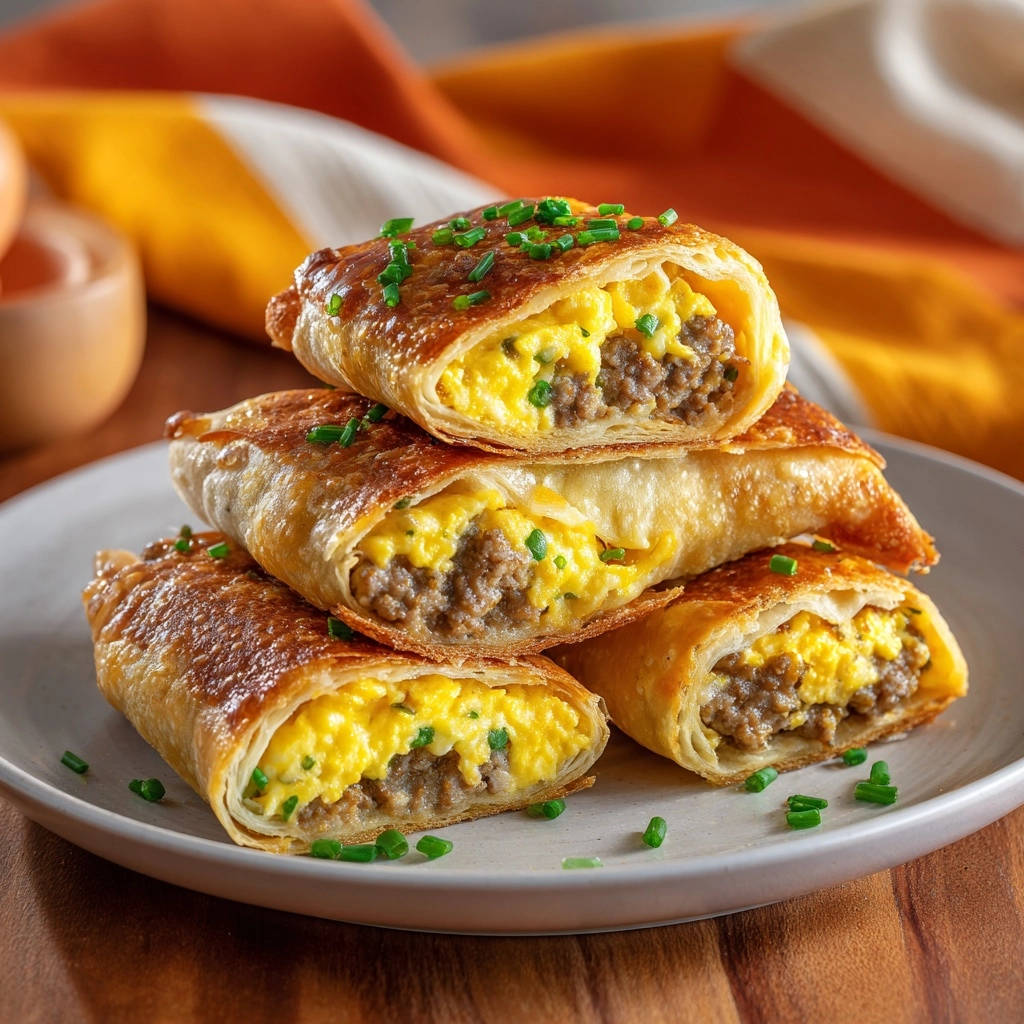
I know the disappointment of biting into what should be a perfectly crispy breakfast wrap, only to find it soft and greasy. For years, I perfected methods to achieve that ideal golden crunch without a soggy mess.
This recipe for Crispy Breakfast Wraps finally delivers flawless crispiness on the outside, paired with a delicious, never-watery filling inside. It’s a simple approach that truly makes all the difference, transforming your breakfast experience.
Why This Crispy Breakfast Wraps Recipe Stands Out
Our approach tackles common breakfast wrap challenges head-on, ensuring a superior result every time.
The Secret to Achieving a Flawless Crunch
Many wraps turn out soft, but our method guarantees a consistently crispy exterior. It relies on specific preparation steps that eliminate moisture, the enemy of crispiness.
This recipe utilizes the right wrapper and frying technique, ensuring a deeply golden and satisfyingly crunchy shell.
A Delicious, Never-Watery Interior Every Time
Soggy fillings can ruin a wrap. This recipe expertly prevents that by carefully managing moisture within the savory interior.
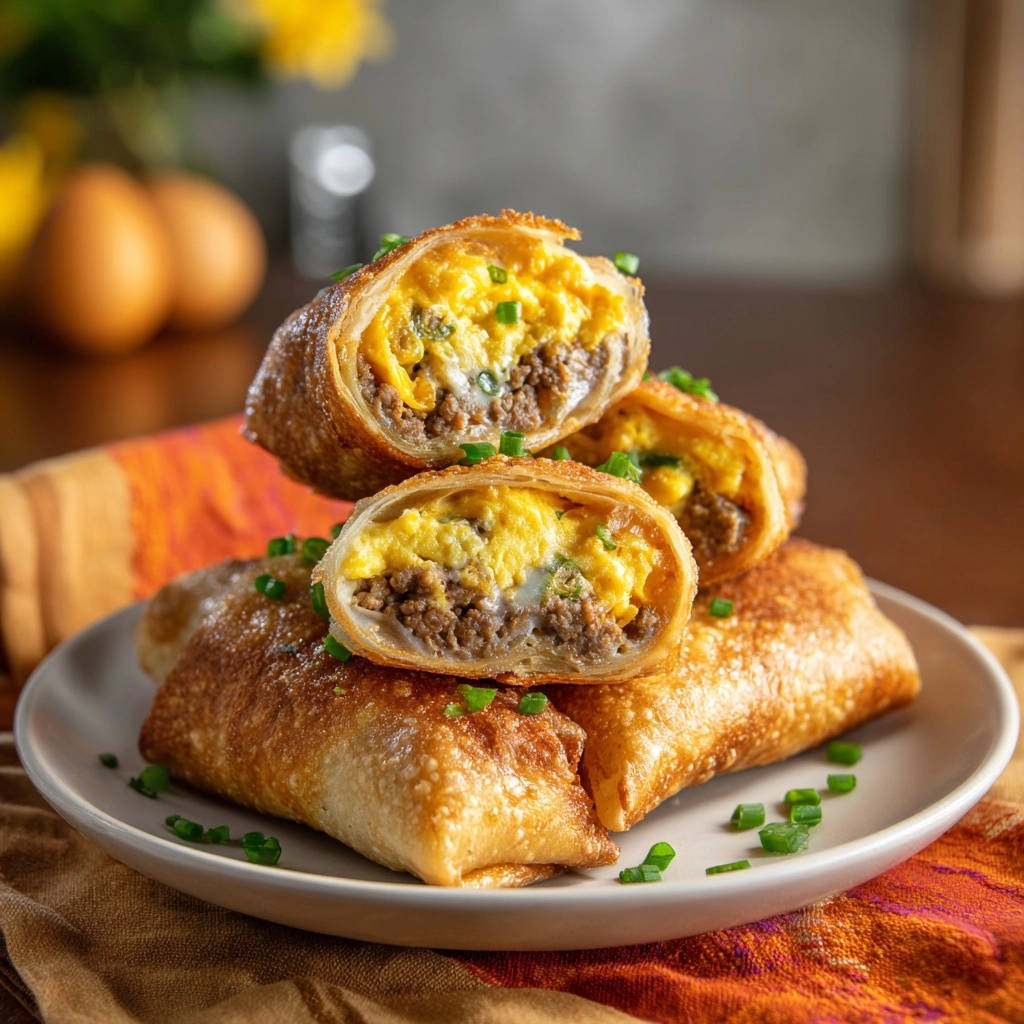
Specific cooling and draining steps keep the filling perfectly moist and flavorful without becoming watery or bland.
Quick Prep, Impressive Results
Despite the exceptional outcome, these wraps are surprisingly easy to prepare. They are perfect for elevating busy mornings or impressing guests at a weekend brunch.
The straightforward steps and common ingredients make this an accessible yet incredibly rewarding recipe for any home cook.
Gather Your Essentials: What You’ll Need
Quality ingredients are the foundation of truly exceptional Crispy Breakfast Wraps.
For the Savory Filling: Protein & Eggs
Ground Turkey Breakfast Sausage (1 pound): Opt for a lean variety to minimize excess grease. Its savory flavor forms the backbone of the filling.
Large Eggs (6): Fresh, large eggs provide the fluffy texture essential for a satisfying breakfast filling.
Milk or Water (2 tablespoons): A small amount adds tenderness and helps create lighter, fluffier scrambled eggs.
Salt and Black Pepper (to taste): Essential seasonings to enhance the overall flavor profile of the eggs and sausage.
Fresh Chives (2 tablespoons, finely chopped): These provide a mild oniony freshness and a vibrant color, elevating the dish’s taste.
The Crispy Foundation: Wrappers & Oil
Egg Roll Wrappers (8): These are crucial for the signature crispiness. Unlike tortillas, they fry up incredibly golden and shatteringly crisp.
Vegetable Oil (2 tablespoons): A neutral cooking oil like vegetable, canola, or grapeseed is best for frying, allowing the wrapper’s flavor to shine.
Flavor Boosters & Seasonings
Butter or Oil (1 teaspoon, optional): For cooking the eggs, a touch of fat ensures they don’t stick and develop a richer flavor.
Fresh Chives (for garnish): A final sprinkle adds an appealing visual touch and a fresh burst of flavor just before serving.
Tools for Crispy Wrap Perfection
Large Skillet: Essential for cooking the sausage and frying the wraps evenly.
Non-Stick Skillet: Ideal for perfectly fluffy eggs, preventing them from sticking and overcooking.
Mixing Bowls & Whisk: For preparing the egg mixture and combining all the filling ingredients smoothly.
Spatula & Tongs: A spatula is needed for stirring eggs, and tongs are perfect for safely flipping and handling the hot wraps.
Paper Towel-Lined Plate: Crucial for draining excess grease from the sausage and oil from the fried wraps, ensuring a truly crispy finish.
Crafting Your Crispy Breakfast Wraps: A Step-by-Step Guide
Follow these detailed steps to achieve perfectly crispy, flavorful Crispy Breakfast Wraps every time.
- Prepare the Sausage:
In a large skillet over medium heat, cook the ground turkey breakfast sausage, breaking it up with a spoon, until fully browned and cooked through.
This ensures the sausage is thoroughly cooked before mixing with other ingredients, contributing to overall flavor and safety.
Drain any excess grease thoroughly by transferring the cooked sausage to a paper towel-lined plate. This step is crucial for preventing a soggy wrap and achieving ultimate crispiness.
- Whisk the Eggs:
While the sausage cools slightly, crack the eggs into a bowl. Add the milk or water, salt, and pepper.
Whisk well until combined and slightly frothy. Proper whisking introduces air for fluffier, more tender eggs.
- Cook the Eggs:
In a separate non-stick skillet over medium-low heat, melt 1 teaspoon of butter or oil (optional). This adds flavor and prevents sticking.
Pour in the egg mixture. Cook, stirring gently with a spatula, until the eggs are just set and fluffy but still slightly moist. Do not overcook them; they will continue to cook slightly when wrapped.
Under-cooked eggs are preferable to overcooked for this recipe, as overcooked eggs can become rubbery and dry out the filling.
- Combine Filling & Cool:
Remove the eggs from the heat and stir in 1 tablespoon of the chopped chives and the drained, cooked turkey sausage.
Allow the filling to cool for about 5 minutes. This cooling step helps prevent steam from making the wrappers soggy immediately, a key to achieving crispiness.
- Prepare Wrappers for Rolling:
Lay an egg roll wrapper on a clean, flat surface with one corner pointing towards you (diamond shape).
Positioning it this way makes the rolling process intuitive and ensures a compact, secure wrap.
- Fill and Fold:
Place about 1/4 cup of the egg and sausage mixture slightly below the center of the wrapper.
Fold the bottom corner over the filling, then fold in the left and right corners towards the center. Roll the wrapper tightly from the bottom towards the top corner.
Lightly moisten the top corner with a little water to seal the wrap securely. A tight seal prevents filling from escaping during frying and helps maintain the wrap’s shape.
Repeat with the remaining wrappers and filling, ensuring even distribution.
- Heat the Oil:
Heat the 2 tablespoons of vegetable oil in a large non-stick skillet over medium heat.
Ensure the oil is hot but not smoking. A good test is to flick a tiny drop of water into the pan; it should sizzle immediately, indicating optimal frying temperature.
- Fry the Wraps:
Carefully place the wraps seam-side down in the hot oil. Do not overcrowd the pan; cook in batches if necessary to maintain oil temperature.
Cook for 3 to 4 minutes on each side, or until deeply golden brown and crispy all over. Adjust heat as needed to prevent burning while ensuring thorough cooking.
The key here is consistent, medium heat to thoroughly crisp the wrapper without burning the exterior before the interior is heated through.
- Drain and Serve:
Remove the cooked wraps from the skillet and place them on a paper towel-lined plate to drain any excess oil.
Serve immediately, garnished with the remaining fresh chives for a fresh burst of flavor and appealing presentation.
Chef’s Secrets for Unbeatable Crispy Wraps
Unlocking the perfect Crispy Breakfast Wraps involves a few critical techniques, mastered through experience.
Draining the Sausage: The Anti-Soggy Foundation
Completely draining the sausage grease is paramount for crispiness. Excess fat releases moisture during frying, which directly leads to a soggy exterior.
Skipping this step guarantees a greasy, soft wrap, undermining all efforts for that coveted crunch. Ensure every bit of fat is removed.
Perfectly Scrambled: Avoiding Dry or Overcooked Eggs
The eggs should be cooked until just set and still slightly moist. Overcooked eggs become rubbery and can make the entire filling dry and less appealing.
A gentle, medium-low heat and constant stirring ensure a fluffy texture that retains moisture, contributing to a delicious interior.
The Cooling Trick: Preventing Steam from Ruining Your Wraps
Allowing the filling to cool slightly before wrapping is a non-negotiable step. Hot filling generates steam, which immediately softens the delicate wrappers from the inside out.
A slightly cooled filling prevents this internal steaming, giving the wrappers a fighting chance to achieve maximum crispiness during frying.
Mastering the Roll: Secure & Even Wraps
A tight, secure roll is essential for both structural integrity and even cooking. Begin with the diamond shape, fold the corners snugly, and roll firmly.
Lightly moistening the final corner with water creates a strong seal, preventing the filling from bursting out and ensuring the wrap holds its elegant shape.
Frying with Finesse: The Golden Brown Principle
Achieving deep golden crispiness without burning requires precise oil temperature and consistent medium heat. The oil should be hot enough to sizzle immediately, but not smoking.
Overcrowding the pan lowers the oil temperature, leading to greasy, less crispy wraps. Fry in batches, allowing each wrap ample space for even browning and a superior crunch.
Beyond the Basic: Variations & Serving Ideas
These Crispy Breakfast Wraps are fantastic on their own, but also serve as a versatile base for culinary creativity.
For a perfect pairing, try our Classic Egg Salad Sandwiches: Luscious & Never Watery.
Delicious Filling Alternatives
Experiment with different proteins: try crispy, crumbled bacon, finely diced ham, or even spicy beef chorizo for a kick. For a vegetarian option, sauté mushrooms, spinach, and bell peppers with a sprinkle of cheese.
You could also consider a delightful alternative like Cheesy Ham Spinach Breakfast Bites if you’re looking for another quick, savory breakfast.
For a perfect pairing, try our Cheesy Pigs in a Blanket: The Secret to a Golden Crust.
Creative Dipping Sauces & Garnishes
Elevate your wraps with an array of dipping sauces. Sriracha mayo, a zesty salsa, a dollop of sour cream, or your favorite hot sauce all make excellent companions.
What to Pair with Your Breakfast Wraps
If you’re making those crispy wraps for a brunch spread, these two baked goods fit right in without stealing the show.
- For a sweet contrast that uses similar no-sink techniques, this Powdered Sugar Fruit Bread keeps berries evenly distributed through every slice.
- A bright citrus option like this Glazed Blueberry Lemon Bundt Cake adds a tart finish that cuts through the richness of a hearty breakfast wrap.
Beyond chives, consider a sprinkle of shredded cheddar cheese, a dash of smoked paprika, or a dollop of fresh guacamole as garnishes.
Make-Ahead & Storage Tips
The filling can be prepared a day in advance and stored in the refrigerator. Uncooked wraps can be assembled, covered, and refrigerated for up to 4 hours before frying.
Cooked wraps store well in an airtight container in the fridge for 2-3 days. Reheating instructions are crucial for maintaining crispiness.
Troubleshooting Common Crispy Wrap Challenges
Don’t fret if your first batch isn’t perfect. Here are solutions to common issues.
Why Are My Wraps Soggy?
Sogginess is usually due to excess moisture. Ensure the cooked sausage is thoroughly drained of all grease.
Critically, allow the filling to cool for at least 5 minutes before wrapping to prevent steam buildup, which makes wrappers soft.
Not Crispy Enough?
The oil might not be hot enough, or the wraps were cooked on too low a heat. Ensure the oil is at a consistent medium heat before adding the wraps.
Avoid overcrowding the pan; this drops the oil temperature and prevents proper crisping. Cook in batches if necessary, allowing each side to develop a deep golden-brown crust.
Filling Too Dry or Bland?
Overcooked eggs are a common culprit for dry filling. Cook them until just set and still moist. Adding a touch more milk to the eggs can also help.
Taste the filling before wrapping and adjust salt and pepper. A pinch of garlic powder or a dash of hot sauce can also boost flavor.
Your Top Crispy Breakfast Wraps Questions Answered
Let’s address some of the most frequently asked questions about these delicious wraps.
Can I Use Different Meats or Vegetarian Fillings?
Absolutely! Feel free to substitute the ground turkey with crispy bacon bits, finely diced ham, or even plant-based sausage crumbles for the meat component.
For vegetarian options, sautéed mushrooms, spinach, or roasted bell peppers make excellent additions, especially with a bit of shredded cheese.
Are These Freezer-Friendly?
Yes, both cooked and uncooked Crispy Breakfast Wraps can be frozen. For uncooked, freeze them on a baking sheet until solid, then transfer to a freezer-safe bag for up to 1 month.
Cooked wraps can be frozen similarly. To reheat, thaw slightly then bake or air fry until crispy again. For another great freezer-friendly breakfast option, consider making Stuffed French Toast Rolls.
How Do I Reheat for Best Results?
To restore their crispiness, avoid the microwave! Reheat cooked wraps in an oven preheated to 350°F (175°C) for 10-15 minutes, or in an air fryer at 325°F (160°C) for 5-7 minutes.
Both methods will bring back that delightful crunch, making them taste almost as good as fresh.
What Sauces Pair Well with These Wraps?
These wraps are incredibly versatile. Classic options include ketchup, hot sauce, or a simple salsa for a zesty kick.
For a creamy option, try sriracha mayo, a dollop of plain Greek yogurt, or even a homemade avocado crema.
Ready to Enjoy? Share Your Crispy Creation!
You’ve mastered the art of the perfect crispy breakfast wrap – a truly satisfying and impressive dish that will elevate any morning. No more disappointment, just golden, crunchy perfection with every bite.
We’d love to see your culinary creations! Share your Crispy Breakfast Wraps on social media and tag us, or leave a comment below with your favorite filling variations or serving tips. Your feedback inspires our next delicious adventure!

Breakfast Wraps
Course: BreakfastCuisine: AmericanDifficulty: easy8
wraps30
minutes15
minutes350
kcal45
minutesMaster the secret to perfectly crispy breakfast wraps! This recipe combines savory turkey sausage and fluffy eggs, all wrapped in a golden, crunchy shell. No more soggy disappointments – just delicious, satisfying breakfast every time.
Ingredients
1 pound ground turkey breakfast sausage
6 large eggs
2 tablespoons milk or water
Salt, to taste
Black pepper, to taste
8 egg roll wrappers
2 tablespoons fresh chives, finely chopped (plus more for garnish)
2 tablespoons vegetable oil (or other neutral cooking oil)
Directions
- In a large skillet over medium heat, cook the ground turkey breakfast sausage, breaking it up with a spoon, until fully browned and cooked through. Drain any excess grease thoroughly by transferring the cooked sausage to a paper towel-lined plate. This step is crucial for preventing a soggy wrap.
- While the sausage cools slightly, crack the eggs into a bowl. Add the milk or water, salt, and pepper. Whisk well until combined.
- In a separate non-stick skillet over medium-low heat, melt 1 teaspoon of butter or oil (optional). Pour in the egg mixture. Cook, stirring gently with a spatula, until the eggs are just set and fluffy but still slightly moist. Do not overcook them; they will continue to cook slightly when wrapped.
- Remove the eggs from the heat and stir in 1 tablespoon of the chopped chives and the drained, cooked turkey sausage. Allow the filling to cool for about 5 minutes. This cooling step helps prevent steam from making the wrappers soggy immediately.
- Lay an egg roll wrapper on a clean, flat surface with one corner pointing towards you (diamond shape). Place about 1/4 cup of the egg and sausage mixture slightly below the center of the wrapper.
- Fold the bottom corner over the filling, then fold in the left and right corners towards the center. Roll the wrapper tightly from the bottom towards the top corner. Lightly moisten the top corner with a little water to seal the wrap securely. Repeat with the remaining wrappers and filling.
- Heat the 2 tablespoons of vegetable oil in a large non-stick skillet over medium heat. Ensure the oil is hot but not smoking.
- Carefully place the wraps seam-side down in the hot oil. Do not overcrowd the pan; cook in batches if necessary.
- Cook for 3 to 4 minutes on each side, or until deeply golden brown and crispy all over. Adjust heat as needed to prevent burning. The key here is consistent, medium heat to thoroughly crisp the wrapper without burning.
- Remove the cooked wraps from the skillet and place them on a paper towel-lined plate to drain any excess oil.
- Serve immediately, garnished with the remaining fresh chives.
Notes
- Ensure sausage is thoroughly drained and filling is slightly cooled to prevent soggy wraps. Cook at consistent medium heat for best crispiness.