Crispy Homestyle Chicken Bites: Juicy & Golden Perfection
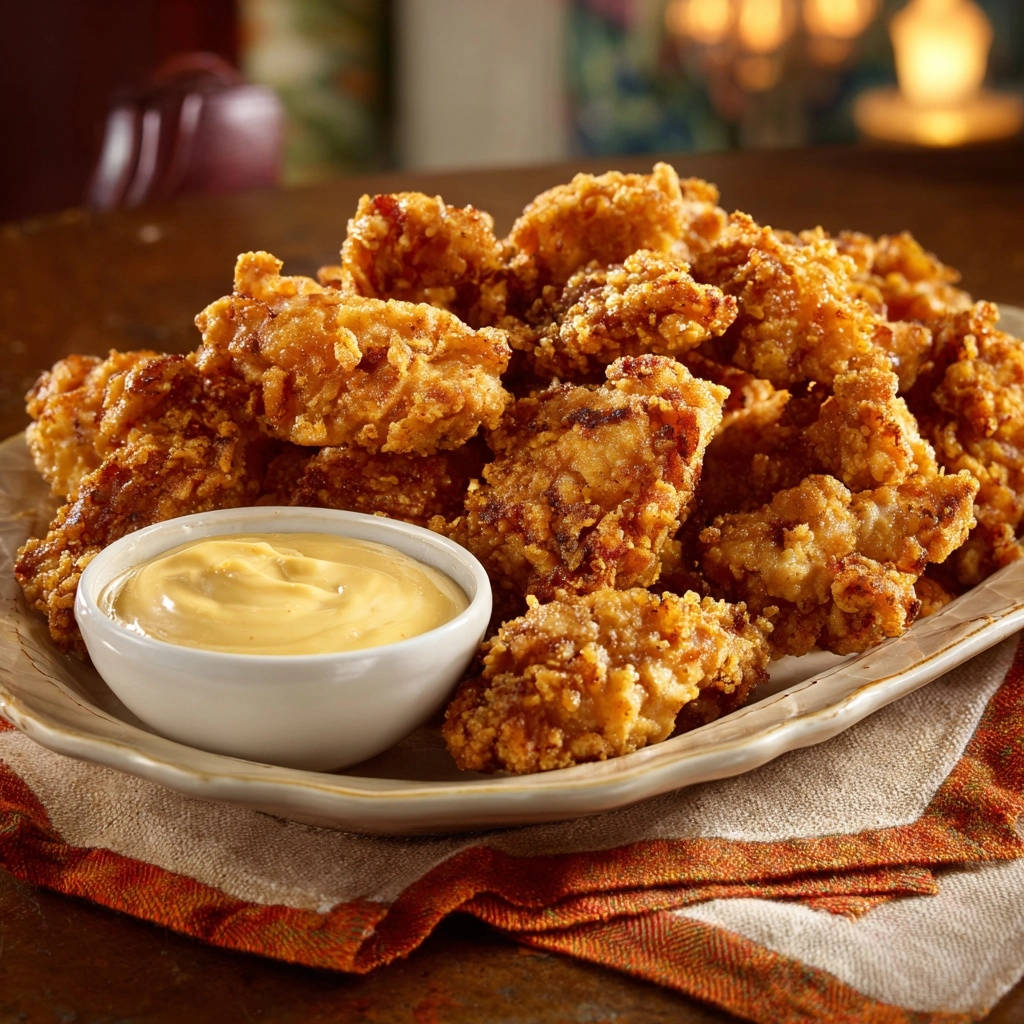
I remember countless kitchen experiments, chasing that elusive perfect crunch for homestyle chicken, often ending up with dry interiors or a less-than-crispy coating. It was a true quest! After refining every step, I discovered the simple techniques that guarantee truly succulent and Crispy Homestyle Chicken Bites every time. This recipe delivers that irresistible contrast: gloriously golden and crunchy on the outside, incredibly juicy and tender within.
Beyond Basic: Why Our Crispy Homestyle Chicken Bites Stand Out
The Buttermilk Magic for Unrivaled Tenderness
Buttermilk acts as a tenderizing powerhouse for chicken. Its mild acidity gently breaks down tough protein fibers, ensuring each bite remains incredibly juicy and never dry.
This critical step locks in moisture, making a noticeable difference in the final texture of your homestyle chicken.
The Double-Dredge Advantage: Craggy Coating & Extra Crunch
Our unique double-dredging method is the secret to an incredibly craggy, extra-crispy exterior. Two layers of seasoned flour, separated by an egg wash, create a thick, textured crust.
This technique provides exceptional adhesion and maximizes the surface area for that satisfying, golden crunch.
Achieving Golden Perfection Without the Guesswork
Precise temperature control during frying is paramount for perfectly cooked chicken. We emphasize using a kitchen thermometer to maintain optimal oil heat.
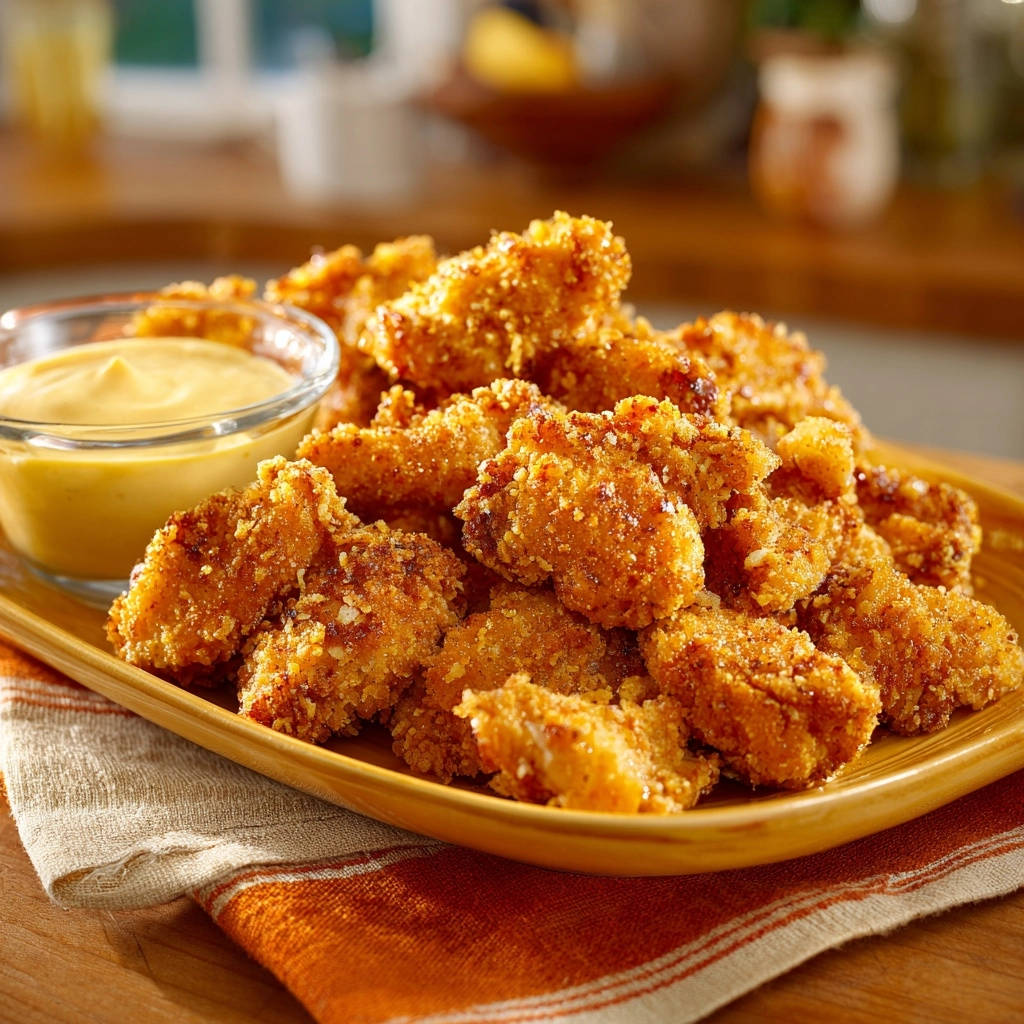
This prevents common issues like greasy chicken or burnt exteriors with raw centers, ensuring a consistently golden, crisp finish.
Effortless Enjoyment: A Recipe Designed for Success
This recipe is crafted for home cooks seeking reliable, restaurant-quality results. Every step is clearly explained, with insights into the “why” behind each action.
You’ll build confidence while creating delicious, dependable Crispy Homestyle Chicken Bites that impress every time.
Your Kitchen Arsenal for Crispy Homestyle Chicken Bites Success
The Right Pot for Even Frying
A heavy-bottomed pot or Dutch oven is essential for frying. Its sturdy construction ensures even heat distribution, preventing hot spots that can burn your chicken.
This stability also helps maintain a consistent oil temperature throughout the frying process.
Precision with a Kitchen Thermometer
A reliable kitchen thermometer is your best friend for deep frying. It allows you to accurately monitor oil temperature, which is critical for crispness without greasiness.
Maintaining the ideal 350-375°F range ensures your chicken cooks perfectly and consistently.
The Crispy Chicken’s Best Friend: A Wire Rack
After frying, transferring your chicken bites to a wire rack is non-negotiable. This simple tool allows air to circulate around each piece.
Proper air flow prevents steam from accumulating underneath, which would otherwise turn your perfectly crispy coating soggy.
Slotted Spoon or Spider for Safe Handling
These specialized tools are invaluable for safely retrieving fried chicken from hot oil. Their design allows excess oil to drip away efficiently.
Using a slotted spoon or spider minimizes oil transfer, keeping your Crispy Homestyle Chicken Bites lighter and less greasy.
Gather Your Flavor Foundation: Ingredients for Irresistible Chicken Bites
The Star: Chicken – Breast or Thighs?
For these bites, boneless, skinless chicken breast offers a lean, tender option. Boneless, skinless thighs provide an even juicier, richer flavor.
Whichever you choose, cutting the chicken into uniform 1-inch pieces ensures even cooking and consistent texture.
The Tenderizing Secret: Buttermilk Power
Buttermilk is key to making chicken incredibly tender and moist. Its lactic acid naturally breaks down proteins without making the chicken tough.
If you don’t have buttermilk, simply mix regular milk with 1 teaspoon of lemon juice or white vinegar and let it sit for 5 minutes before using.
Crafting the Crispy Coating: Flour & Seasonings
All-purpose flour forms the robust, craggy structure of our crispy coating. It provides the perfect canvas for flavor.
A thoughtful blend of salt, black pepper, garlic powder, onion powder, and paprika infuses every bite with savory depth. A touch of cayenne pepper is optional for a subtle kick, elevating the overall taste.
The Honey Mustard Dip Essentials
Mayonnaise: Forms the creamy, rich base of the sauce, providing a luxurious mouthfeel.
Honey: Adds natural sweetness that beautifully balances the savory chicken and tangy mustard.
Dijon Mustard: Provides a sharp, sophisticated kick, bringing a vibrant tang to the sauce.
Apple Cider Vinegar: Brightens the flavors with a gentle acidity, cutting through the richness and enhancing the overall zest.
Your Path to Golden Perfection: Making Crispy Homestyle Chicken Bites
Step 1: The Buttermilk Tenderize
In a medium bowl, combine your 1-inch chicken pieces with buttermilk, half of the specified salt, pepper, garlic powder, and onion powder.
Toss everything well to ensure each piece is coated. Cover the bowl and refrigerate the chicken for at least 30 minutes, or up to 2 hours.
This vital marination step infuses flavor, tenderizes the chicken, and locks in moisture, guaranteeing juicy results.
Step 2: Setting Up Your Breading Station
Prepare two shallow dishes for your breading station. In the first dish, whisk together the all-purpose flour with the remaining salt, pepper, garlic powder, onion powder, paprika, and optional cayenne pepper.
In the second shallow dish, lightly beat the two large eggs until well combined. An organized station makes the breading process smooth and efficient.
Step 3: The Double-Dredge for Maximum Crunch
Remove the chicken from the buttermilk mixture, allowing any excess to drip off. First, dredge each chicken piece thoroughly in the seasoned flour, ensuring full coverage.
Next, dip the floured chicken into the beaten egg, letting excess egg drip away. Finally, return the chicken piece to the seasoned flour for a second dredge, pressing gently to create a thick, craggy coating.
This double-dredge technique is the cornerstone of achieving that exceptional, extra-crispy texture. Place the breaded chicken on a plate or wire rack while you complete the rest.
Step 4: Achieving Optimal Frying Temperature
Pour vegetable oil into a large, heavy-bottomed pot or Dutch oven, ensuring it’s about 2 to 3 inches deep. Heat the oil over medium-high heat.
Monitor the oil temperature with a kitchen thermometer; aim for a range between 350 to 375 degrees Fahrenheit. Maintaining the correct heat is crucial for achieving crispiness without greasiness.
Step 5: Frying for Golden & Juicy Results
Carefully add a batch of breaded chicken pieces to the hot oil. Avoid overcrowding the pot, as this will drop the oil temperature and lead to soggy chicken.
Fry the Crispy Homestyle Chicken Bites for 5 to 7 minutes, turning occasionally, until they are beautifully golden brown and cooked through.
An internal temperature of 165 degrees Fahrenheit confirms they are perfectly done, ensuring juicy results.
Step 6: Drain, Rest, and Maintain Crispness
Using a slotted spoon or spider, transfer the cooked chicken bites to a wire rack set over a baking sheet. This setup allows any excess oil to drain away effectively.
More importantly, it permits air to circulate around the chicken, preventing steam buildup and ensuring your bites remain wonderfully crispy as they cool slightly. Repeat this process with the remaining chicken batches.
Step 7: Whisk Up the Honey Mustard Dip
While the chicken cools, prepare your irresistible dipping sauce. In a small bowl, combine the mayonnaise, honey, Dijon mustard, apple cider vinegar, and a pinch of salt.
Whisk all the ingredients together until the sauce is perfectly smooth and creamy. This quick step yields a vibrant, tangy, and sweet accompaniment.
Step 8: Serve & Savor!
Serve your perfectly crunchy coating chicken bites immediately. They are best enjoyed hot and fresh.
If you enjoy the crispy, juicy coating on these chicken bites, you’ll want to try this fried chicken and waffles recipe next.
Pair these golden, juicy chicken pieces with the creamy, zesty honey mustard dipping sauce for an unforgettable meal or snack. Enjoy your truly Crispy Homestyle Chicken Bites!
Unlock Pro-Level Crispy Homestyle Chicken Bites: Expert Tips
Temperature Control is Key
Always use a kitchen thermometer to monitor your oil. Maintaining a consistent temperature between 350-375°F prevents greasy chicken and ensures even browning.
Fluctuating temperatures can lead to absorption of oil or undercooked interiors.
Don’t Overcrowd the Pot
Frying too many chicken pieces at once significantly drops the oil temperature. This results in soggy, pale chicken that takes longer to cook.
Fry in small batches to maintain optimal heat and achieve superior crispness.
The Power of a Wire Rack
Always drain fried chicken on a wire rack set over a baking sheet, not on paper towels. This allows air circulation on all sides.
The rack prevents steam from collecting underneath, which can make the coating soggy and diminish crispness.
Seasoning Beyond the Coating
For an even deeper flavor, lightly season your chicken pieces with a pinch of salt and pepper before adding them to the buttermilk marinade.
This pre-seasoning ensures the chicken itself is flavorful, not just the coating, making for truly irresistible Crispy Homestyle Chicken Bites.
Spice It Up (or Down)
Adjust the amount of cayenne pepper in the flour mixture to suit your preference. For more heat, add an extra pinch or a dash of chili powder.
If you prefer milder flavors, you can omit the cayenne entirely without compromising taste.
Flour Power: Sifting for Lighter Bites
Sifting your seasoned flour mixture before dredging can make a subtle difference. It removes any lumps and aerates the flour.
This results in a finer, more even coating that adheres beautifully and can feel slightly lighter on the finished fried chicken pieces.
Troubleshooting Common Crispy Homestyle Chicken Bites Challenges
Problem: My Chicken Bites Aren’t Crispy Enough
This often happens if the oil temperature is too low. Ensure your oil stays between 350-375°F using a thermometer.
Overcrowding the pot can also drop the temperature, so fry in smaller batches. Confirm you are double-dredging for a thicker coating, and always drain on a wire rack.
Problem: The Chicken Bites Are Greasy
Greasy chicken is a common sign that your oil wasn’t hot enough. When the oil is too cool, the chicken absorbs it instead of cooking quickly.
Always heat oil to the specified temperature and maintain it. Draining on a wire rack after frying allows excess oil to drip off, preventing sogginess.
Problem: The Chicken is Dry Inside
Dry chicken typically means it’s been overcooked. Monitor frying time carefully, usually 5-7 minutes per batch, and check for an internal temperature of 165°F.
Ensure your chicken has marinated in buttermilk for at least 30 minutes, as this step is crucial for moisture retention.
Problem: The Coating Falls Off
If your coating isn’t adhering, the chicken might have been too wet before the first dredge, or you didn’t press the flour on firmly enough.
Make sure to let excess buttermilk drip off before flouring, and press the flour gently but thoroughly. The double-dredge method helps create a very secure coating.
Serving Suggestions & Smart Storage for Your Crispy Bites
Creative Ways to Serve Your Chicken Bites
While amazing with honey mustard, these homestyle chicken bites are incredibly versatile. Serve them as a fun appetizer for parties with various dipping sauces.
If you enjoy the crunchy coating on these bites, try these crispy fried chicken thighs for another golden, satisfying meal.
They make a fantastic main course alongside creamy mashed potatoes, fresh coleslaw, or a crisp green salad. Consider adding them to wraps or turning them into a delicious chicken and waffle dish.
Make-Ahead & Meal Prep Tips
To save time, you can marinate the chicken in buttermilk overnight in the refrigerator. Prepare your dry seasoned flour mixture a day in advance and store it in an airtight container.
The honey mustard dipping sauce can also be made up to 3-4 days ahead and stored in the fridge, allowing flavors to meld beautifully.
Storing Leftovers for Best Results
Store any leftover Crispy Homestyle Chicken Bites in an airtight container in the refrigerator. They will remain fresh and delicious for up to 3-4 days.
Proper storage is key to maintaining quality, though the crispness will diminish over time.
Reheating to Restore Crispness
Avoid the microwave for reheating, as it will make your chicken soggy. For best results, reheat your chicken bites in a preheated oven at 375°F (190°C) for 10-15 minutes.
Alternatively, an air fryer at 350°F (175°C) for 5-8 minutes works wonderfully to restore that satisfying crispness. Reheat until heated through and golden.
Your Crispy Homestyle Chicken Bites Questions, Answered
Can I use gluten-free flour for the coating?
Yes, you can absolutely substitute gluten-free all-purpose flour for traditional wheat flour in the coating. The texture might vary slightly, but many gluten-free blends yield excellent crispy results.
Ensure your chosen blend is suitable for frying for the best outcome.
What if I don’t have buttermilk?
No buttermilk? No problem! Simply create your own by adding 1 teaspoon of lemon juice or white vinegar to 1/2 cup of regular milk. Stir gently and let it sit for 5-10 minutes until it slightly curdles.
This quick substitute works perfectly for tenderizing your chicken tenders.
Can I bake these instead of fry them?
While frying delivers the ultimate crispness, you can bake these for a lighter option. Preheat your oven to 400°F (200°C).
Place the breaded chicken bites on a wire rack set over a baking sheet and bake for 20-25 minutes, flipping halfway, until golden and cooked through. The texture will be crisp, but less intensely crunchy than fried.
How can I make these spicier?
To amp up the heat, increase the amount of cayenne pepper in the flour mixture to your taste. You could also add a pinch of smoked paprika or a dash of your favorite hot sauce to the egg wash for an extra kick.
For an even more intense flavor, consider a sprinkle of chili flakes in the flour blend.
What other sauces pair well with these Crispy Homestyle Chicken Bites?
Beyond the amazing honey mustard, these versatile Crispy Homestyle Chicken Bites pair wonderfully with a variety of dips. Classic ranch dressing, tangy BBQ sauce, or a sweet chili sauce are all excellent choices.
What to Serve with Your Chicken Bites
These crispy chicken bites pair well with something cheesy or something crunchy on the side. Here are two recipes that work alongside them without competing for attention.
- Bake a batch of Garlic Herb Cheddar Biscuits to soak up any dipping sauce or jus from the chicken.
- For a lighter contrast with the same golden crunch, try these Crispy Zucchini Fritters — they share that satisfying crisp exterior without being heavy.
Garlic aioli or even a simple squeeze of fresh lemon juice can also elevate their flavor beautifully.
Your Culinary Journey to Perfect Crispy Homestyle Chicken Bites Begins Now!
You now possess all the secrets and expert guidance to create truly exceptional Crispy Homestyle Chicken Bites right in your own kitchen. This isn’t just a recipe; it’s a guaranteed path to tender, juicy chicken encased in an unbelievably crunchy, golden crust.
Trust in these steps, embrace the simple techniques, and prepare to delight yourself and your loved ones. Get cooking, savor every irresistible bite, and let your culinary success story begin!
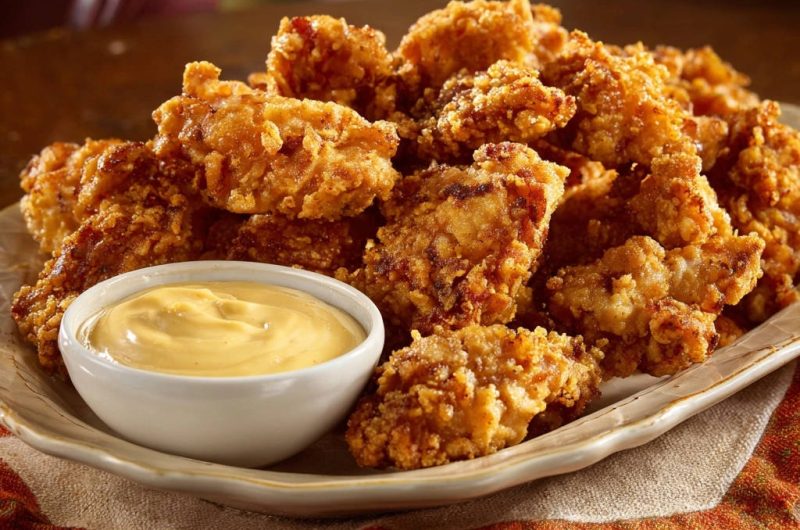
Chicken Bites
Course: Main CourseCuisine: AmericanDifficulty: medium4
servings45
minutes25
minutes750
kcal70
minutesDiscover the secret to perfectly golden and crispy chicken bites that are super tender and juicy inside. This recipe guarantees that amazing contrast every single time with a simple double-dredge technique and a delicious honey mustard dipping sauce.
Ingredients
1.5 pounds boneless, skinless chicken breast or thighs, cut into 1-inch pieces
1/2 cup buttermilk (or regular milk with 1 teaspoon lemon juice or white vinegar added)
1 teaspoon salt, divided
1/2 teaspoon black pepper, divided
1 teaspoon garlic powder, divided
1 teaspoon onion powder, divided
1/2 teaspoon paprika
1/4 teaspoon cayenne pepper (optional, for a little kick)
2 cups all-purpose flour
2 large eggs
4 to 6 cups vegetable oil, for frying
For the Honey Mustard Dipping Sauce:
1/2 cup mayonnaise
2 tablespoons honey
1 tablespoon Dijon mustard
1 teaspoon apple cider vinegar (or lemon juice)
Pinch of salt
Directions
- Prepare the Chicken and Tenderize: In a medium bowl, combine the cut chicken pieces with the buttermilk (or prepared milk), 1/2 teaspoon of the salt, 1/4 teaspoon of the black pepper, 1/2 teaspoon of the garlic powder, and 1/2 teaspoon of the onion powder. Toss well to coat. Cover and refrigerate for at least 30 minutes, or up to 2 hours. This crucial step helps tenderize the chicken and lock in moisture, ensuring it stays juicy.
- Set Up Breading Station: In a shallow dish, whisk together the flour with the remaining 1/2 teaspoon salt, 1/4 teaspoon black pepper, 1/2 teaspoon garlic powder, 1/2 teaspoon onion powder, paprika, and cayenne pepper (if using). In another shallow dish, lightly beat the 2 eggs.
- Bread the Chicken: Remove chicken from the buttermilk mixture, letting any excess drip off. Dredge each chicken piece thoroughly in the seasoned flour, ensuring it’s fully coated. Then, dip it into the beaten egg, letting excess egg drip away. Finally, return the chicken piece to the seasoned flour for a second dredge, pressing gently to ensure a thick, craggy coating. This double-dredge is key for that extra crispy texture. Place breaded chicken on a plate or wire rack while you finish the rest.
- Heat Oil for Frying: Pour vegetable oil into a large, heavy-bottomed pot or Dutch oven until it’s about 2 to 3 inches deep. Heat the oil over medium-high heat until it reaches 350 to 375 degrees Fahrenheit. Use a kitchen thermometer to monitor the temperature; maintaining the right heat is vital for crispiness without greasiness.
- Fry the Chicken: Carefully add a batch of breaded chicken pieces to the hot oil, making sure not to overcrowd the pot. Overcrowding will lower the oil temperature and lead to soggy chicken. Fry for 5 to 7 minutes, turning occasionally, until golden brown and cooked through (internal temperature should reach 165 degrees Fahrenheit).
- Drain and Rest: Using a slotted spoon or spider, transfer the cooked chicken bites to a wire rack set over a baking sheet to drain any excess oil. This allows air to circulate, keeping them crispy as they cool slightly. Repeat with remaining chicken batches.
- Make the Dipping Sauce: While the chicken cools, whisk together all the honey mustard dipping sauce ingredients in a small bowl until smooth.
- Serve: Serve your perfectly crispy, never dry chicken bites immediately with the creamy honey mustard dipping sauce. Enjoy!
Notes
- Marinating is crucial for tender, juicy chicken. Double-dredging creates the ultimate crispy coating. Maintain oil temperature and avoid overcrowding for best frying results.