Mastering Crispy Garlic Potato Medallions: The Science of the Perfect Crunch
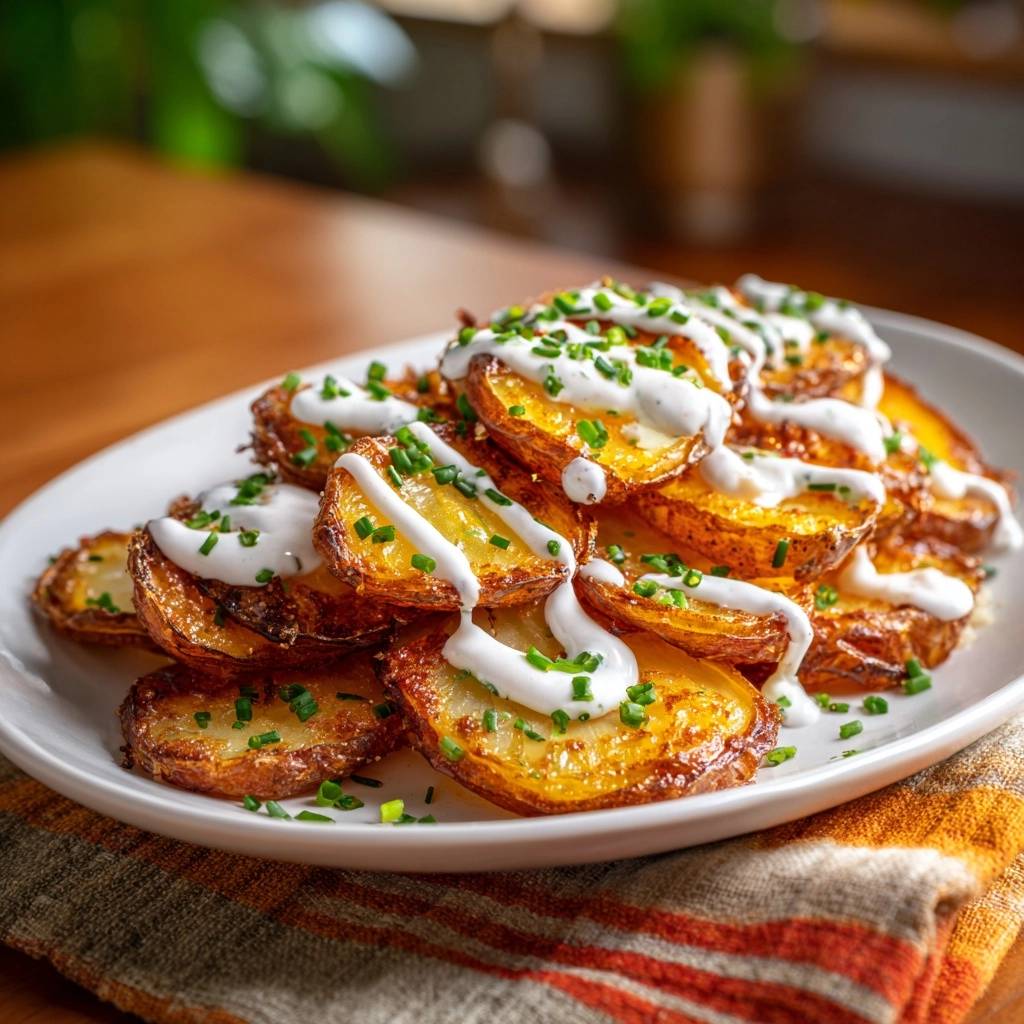
You’ve likely experienced the heartbreak of the soggy oven potato. You chop, you oil, and you roast, only to pull out a tray of limp, greasy rounds that cling stubbornly to the baking sheet. It’s a culinary letdown that happens in kitchens everywhere, but the solution isn’t just adding more oil or cranking the heat.
The secret to a shattering, glass-like crust lies in a specific three-step process: the alkaline par-boil, the rough-up, and the high-heat sear. When you bite into these medallions, you get an immediate, audible crunch that gives way to a center as fluffy as a cloud. It’s a high-contrast sensory experience that turns a humble side dish into the star of the plate.
I’ve found that the real magic happens before the potatoes even touch the oven. By adding baking soda to your boiling water, you change the chemistry of the potato’s surface. This creates a starchy slurry that dehydrates into a micro-textured crust, ensuring your potatoes stay crispy even under a drizzle of cool cream sauce.
The Chemistry of Alkaline Par-Boiling
Most people boil potatoes in plain water, but adding 1/2 teaspoon of baking soda is a total game-changer. Baking soda is alkaline, which breaks down the pectin in the potato much faster than neutral or acidic water. As the pectin dissolves, the exterior of the potato becomes starchy and frayed.
This breakdown creates a thick layer of mashed-potato-like starch on the outside of each medallion. Once this layer hits the hot oil in the oven, it dehydrates and fries into a complex, craggy landscape. Without this alkaline boost, the potato skin remains too smooth, preventing that deep, “skyscraper” crunch we’re after.
Why Yukon Golds Outperform Russets
Yukon Golds are the undisputed champions for this recipe because they sit perfectly between waxy and starchy. While Russets are great for baking, they often fall apart and turn into mush during the “rough-up” phase. Conversely, red potatoes are too waxy and won’t develop that necessary starch slurry.
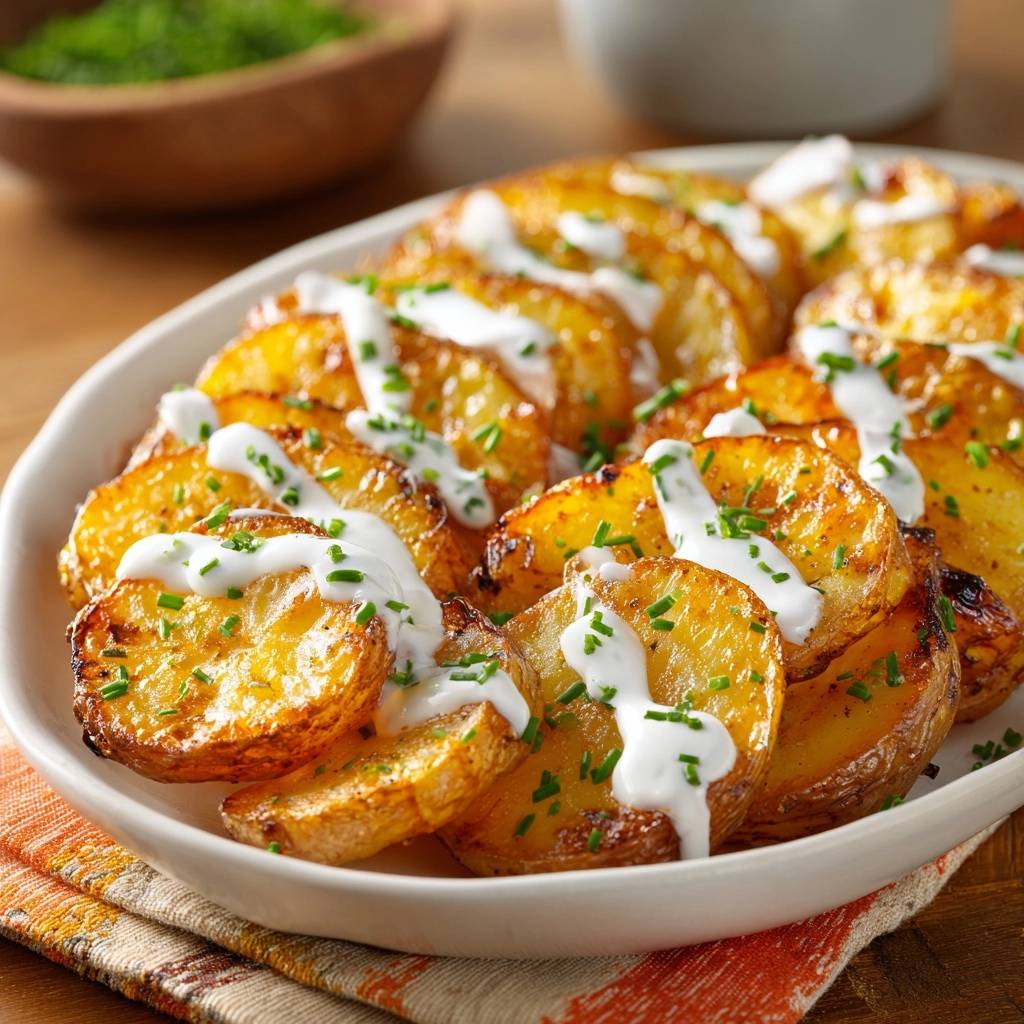
The Yukon Gold holds its structural integrity while providing a creamy, buttery interior. This allows you to shake them vigorously in a colander to build up that fuzzy surface without ending up with a pile of broken scraps. They also naturally caramelize better, leading to a richer golden color.
Essential Components for Crispy Garlic Potato Medallions
Quality ingredients are the foundation of this dish, starting with your fat choice. You need a fat that can withstand 450°F without smoking or breaking down. While butter tastes great, its milk solids will burn at this temperature, leaving you with bitter, blackened spots rather than a golden crust.
We use garlic powder during the roasting phase for a very specific reason. Fresh garlic contains a lot of moisture and tiny sugars that burn quickly in a hot oven. Garlic powder distributes evenly into the starch paste, infusing the entire crust with savory flavor without the risk of acrid, burnt bits.
Fat Selection: Olive Oil vs. Animal Fats
Extra virgin olive oil provides a wonderful, peppery fruitiness that complements the garlic and chives beautifully. It’s a reliable choice for a clean, crisp finish. However, if you want to take the richness to another level, duck fat or beef tallow are incredible alternatives.
Animal fats have a higher smoke point and a unique way of “shattering” when they cool slightly. They interact with the potato starch to create a thicker, more substantial crust. Whichever you choose, ensure the potatoes are thoroughly coated so the heat transfers evenly across every millimeter of the surface.
Phase One: The Alkaline Simmer and Surface Prep
The first 15 minutes are all about precision. You want to simmer the 1/2-inch rounds until the edges are soft and look slightly “furry,” but the centers still offer some resistance. If you overcook them here, they will disintegrate when you try to toss them with the oil.
Keep a close eye on the pot around the 8-minute mark. Use a fork to pierce a medallion; it should go in easily at the edge but feel firm in the middle. Once they reach this stage, drain them immediately. Letting them sit in the hot water for even sixty seconds too long can ruin the texture.
The “Rough-Up” Technique for Micro-Textured Crusts
After draining, let the potatoes steam dry in the colander for about three minutes. This step is vital because excess moisture is the enemy of crispiness. Once they look matte and dry, give the colander a few vigorous shakes. You want the edges of the medallions to look beat up and fuzzy.
This “fuzz” is actually a layer of hydrated starch. By increasing the surface area through these tiny ridges and bumps, you create thousands of extra contact points for the hot oil. In the oven, these points transform into a micro-textured crust that provides a much louder crunch than a smooth-sliced potato ever could.
Phase Two: High-Heat Roasting and Thermal Shock
Thermodynamics plays a huge role in the perfect sear. By preheating your baking sheet at 450°F, you create a “thermal shock” the moment the potatoes touch the metal. You should hear a loud, aggressive sizzle as soon as you spread them out.
This immediate evaporation of surface moisture prevents the potatoes from sticking to the pan. If you put potatoes on a cold tray, they will sit in the oil and slowly warm up, often bonding to the metal. A hot pan ensures they start frying the second they hit the oven floor.
Achieving the Deep Mahogany Sear
The Maillard reaction is what gives roasted foods their savory, complex flavor and brown color. To maximize this, you must avoid overcrowding the pan. If the medallions are touching, they will trap steam between them, leading to soft spots rather than a uniform crunch.
Flip the potatoes after 20 minutes. By this point, the bottom should be a deep, golden brown. Flipping allows the other side to make direct contact with the intense heat of the baking sheet, ensuring both sides are equally structural and delicious. Look for a deep mahogany color on the edges as your final cue.
Phase Three: The Cooling Acidic Cream Drizzle
While the potatoes are hot and salty, the sauce provides a necessary contrast. The richness of the roasted starch needs an acidic “brightener” to keep the dish from feeling too heavy. Sour cream or Greek yogurt provides a thick, tangy base that cuts right through the garlic and oil.
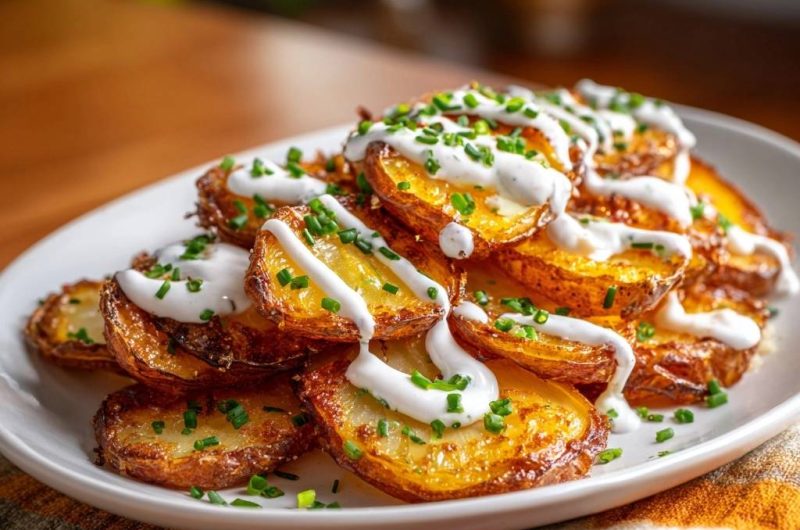
To get that perfect “zig-zag” drizzle, whisk in a tablespoon of heavy cream and a teaspoon of lemon juice. You’re looking for a consistency that holds its shape but flows easily off a spoon. The fresh chives added at the very end provide a hit of oniony sweetness and a pop of color that wakes up the whole plate.
Troubleshooting Common Texture Failures
If your potatoes aren’t crunchy, the most common culprit is overcrowding. When potatoes are too close together, they release steam that “poaches” the neighboring slices. Always use two pans if you’re doubting the space. It’s better to have extra room than a crowded, steamy tray.
Another issue is oven calibration. Many ovens run 25 degrees cooler than the display suggests. If your potatoes look pale after 30 minutes, your oven might be the problem. Don’t be afraid to turn the heat up or move the rack to the bottom position where the heat is most intense.
Preventing Garlic Powder Burn
Garlic powder can turn bitter if it’s exposed to direct, dry heat for too long. The secret is the oil-starch paste you create in the mixing bowl. The oil acts as a heat shield, suspending the garlic particles so they toast gently rather than scorching against the hot metal of the pan.
Optimal Pairings for Garlic-Crusted Potatoes
These medallions are versatile, but they truly shine next to proteins that have a bit of juice or sauce. A seared sea bass with a lemon-butter sauce is a fantastic partner, as the potatoes can soak up the extra liquid without losing their crunch. They also hold up beautifully against a hearty mushroom ragout.
For a perfect pairing, try our Crispy Feta Roasted Baby Potatoes.
For a classic Sunday dinner, serve these alongside a roasted lamb leg seasoned with rosemary. The earthy notes of the lamb play perfectly with the sharp garlic and fresh chives. Because these potatoes are so rich, try to keep your vegetable sides light, like a simple arugula salad or steamed green beans.
Make-Ahead Strategies and Reheating Protocols
Potatoes are best served the moment they leave the oven. As they sit, the moisture from the fluffy interior begins to migrate outward, softening that hard-earned crust. If you must make them ahead of time, under-bake them by about five minutes and let them cool in a single layer.
To reheat, avoid the microwave at all costs; it turns the starch into a rubbery mess. Instead, pop them into a 400°F oven or an air fryer for 3 to 5 minutes. This will re-dehydrate the surface and bring back that signature snap. They’ll be nearly as good as the first time around.
Expert Tips for Scaling the Recipe
When cooking for a crowd, the biggest mistake is trying to fit 4 pounds of potatoes on one tray. You will end up with mashed potatoes. Use multiple baking sheets and rotate them between the top and bottom racks halfway through the cooking time to ensure even browning.
You can also par-boil the potatoes up to 4 hours in advance. After the “rough-up” step, spread them on a tray and let them sit at room temperature. When your guests arrive, toss them in the oil and spices and head straight for the oven. This saves you the stress of boiling water while entertaining.
Frequently Asked Questions
Can I use Red Bliss potatoes instead?
You can, but the results won’t be quite as spectacular. Red Bliss potatoes are very waxy, meaning they have less starch to create that “fuzzy” exterior. They will still be tasty, but they will have a smoother, thinner skin rather than the thick, craggy crust you get with Yukon Golds.
Is the baking soda strictly necessary?
Yes, if you want maximum crunch. While you can roast potatoes without it, the baking soda is what breaks down the pectin to create the starch slurry. Skipping this step results in a much smoother exterior that lacks the complex, micro-textured crunch that makes this recipe famous.
How do I prevent the medallions from breaking?
The key is the thickness of the slice and the gentleness of your toss. Ensure you cut them to a full 1/2 inch; any thinner and they will fall apart during the boil. When mixing with oil, use a large rubber spatula to gently fold the potatoes rather than stirring them aggressively.
What can I substitute for sour cream?
Full-fat Greek yogurt is an excellent substitute and offers a bit more protein and a sharper tang. You could also use labneh or even a savory cashew cream if you want to avoid dairy. Just ensure whatever you use has enough acidity (like extra lemon juice) to balance the richness of the potatoes.
Why is my garlic flavor too subtle?
Garlic powder potency varies wildly between brands. If you find the flavor lacking, check the freshness of your spices. You can also add a few cloves of smashed fresh garlic to the baking sheet during the last 10 minutes of roasting for an extra aromatic punch without the risk of burning.
Potato Medallions
Course: Side DishCuisine: AmericanDifficulty: easy4
servings15
minutes40
minutes240
kcal55
MinutesThese potato medallions solve the problem of soggy oven fries by using a par-boil method with baking soda to create a starchy surface that roasts into a shattering crunch. Served with a cool cream sauce and fresh chives.
Ingredients
2 lbs Yukon Gold potatoes, sliced into 1/2 inch rounds
1/4 cup extra virgin olive oil (or duck fat for extra crunch)
1/2 teaspoon baking soda (added to boiling water)
1 teaspoon garlic powder
1 teaspoon onion powder
1 teaspoon sea salt
1/2 teaspoon cracked black pepper
1/2 cup sour cream or Greek yogurt
1 tablespoon heavy cream (to thin the sauce)
2 tablespoons fresh chives, finely chopped
1 teaspoon lemon juice
Directions
- Preheat your oven to 450°F (230°C). Place a large, heavy rimmed baking sheet inside the oven while it heats. A preheated pan is essential for an immediate sear and to prevent sticking.
- Bring a large pot of water to a boil. Add a generous pinch of salt and 1/2 teaspoon of baking soda. The baking soda breaks down the potato’s pectin, drawing starch to the surface for maximum browning.
- Add potato slices and simmer for 8-10 minutes, or until the outsides are softened but the rounds are still holding their shape.
- Drain the potatoes and let them sit in the colander for 3 minutes to steam dry. Give the colander a few vigorous shakes to “rough up” the edges of the medallions; this creates the fuzzy starch layer seen in the image that turns into a crispy crust.
- In a large bowl, whisk together the olive oil, garlic powder, onion powder, salt, and pepper. Add the warm potatoes and toss thoroughly until the oil and spices combine with the surface starch to form a thick paste.
- Carefully remove the hot baking sheet from the oven. Spread the potatoes in a single layer, ensuring they do not touch. You should hear a loud sizzle.
- Roast for 20 minutes, then flip each medallion. Roast for another 15 minutes until the edges are deep mahogany brown and the centers are fluffy.
- While potatoes roast, whisk the sour cream, heavy cream, lemon juice, and a pinch of salt in a small bowl until smooth and pourable.
- Pile the crispy medallions on a plate. Using a spoon, drizzle the cream sauce in a zig-zag pattern over the stack. Garnish generously with fresh chives and serve immediately.
Notes
- The baking soda is crucial as it breaks down the pectin and draws starch to the surface for maximum browning and crunch.