Mastering Loaded Mashed Potato Meat Cups with a Crispy Crust
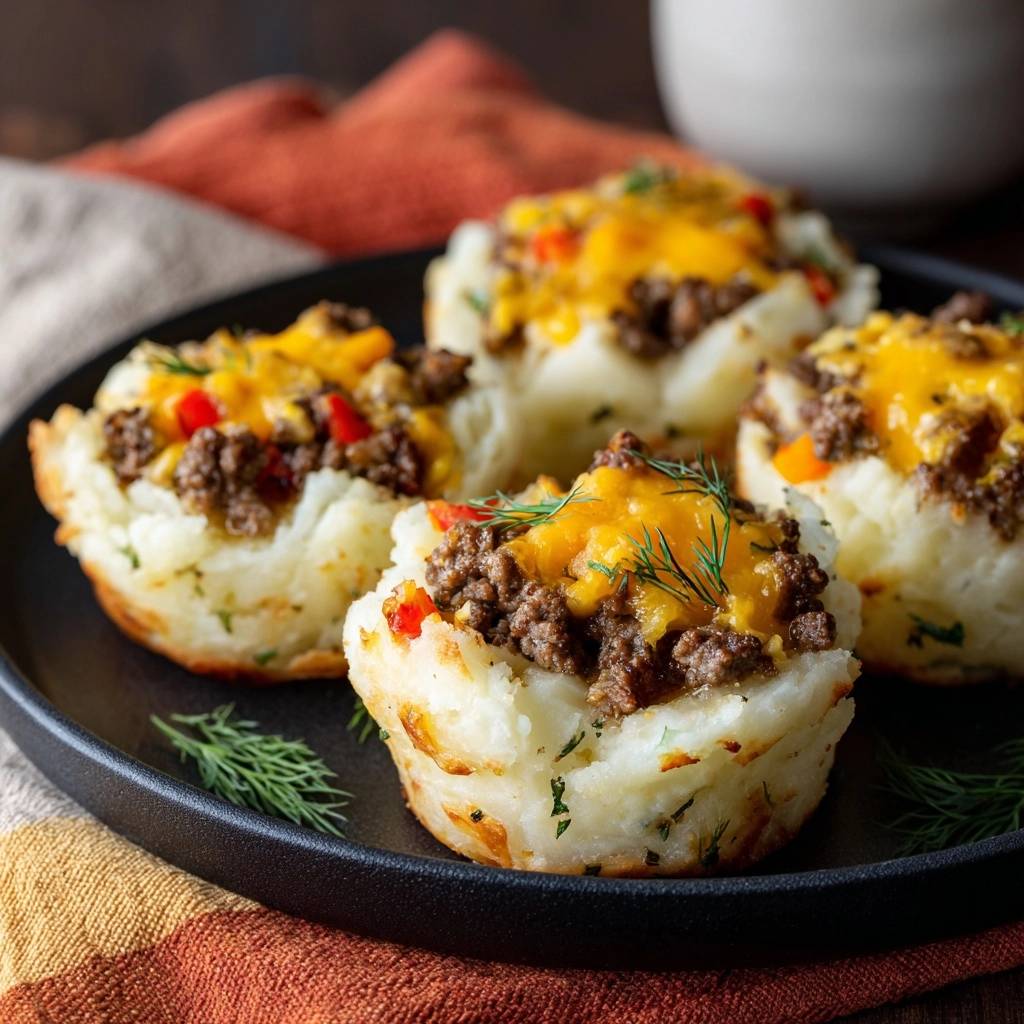
We have all experienced the disappointment of a soggy potato appetizer. You reach for a beautiful-looking potato cup, only to have the bottom collapse into a mushy heap before it even reaches your mouth. It’s frustrating when a dish requires a fork and a prayer just to stay together.
The secret to avoiding this mess lies in a dedicated “Anti-Soggy Bottom” philosophy. By using a double-bake method, you create a structural moisture barrier that stands up to heavy fillings. You get a satisfying, golden crunch on the outside that perfectly contrasts the savory, tender beef tucked inside.
If you enjoy the seasoned meat and pepper combination here, try this spicy skillet breakfast bake for a different morning twist.
The real trick to success is the temperature of your ingredients. Using cold, stiff mashed potatoes is the only way to ensure the walls of your cups don’t slump during the initial bake. This structural integrity is what transforms a simple side dish into a handheld masterpiece that actually holds its shape.
The Structural Components of Loaded Mashed Potato Meat Cups
Success starts with the right potato consistency. You need cold, stiff mashed potatoes rather than the light, whipped versions often served at dinner. Runny or overly creamy potatoes contain too much moisture and fat, which prevents the cup from crisping up into a solid shell.
The egg and parmesan cheese aren’t just for flavor; they act as the “glue” for your vessel. As the egg proteins heat up, they bind the potato starch together, while the parmesan melts and then hardens into a lacy, structural lattice. This combination ensures the cup remains rigid even after you add the hot meat filling.
When choosing your protein, lean ground beef is the best way to go. I recommend a 90/10 or 92/8 blend to minimize grease runoff. Excess fat is the primary enemy of a crispy potato crust, as it can soak into the bottom of the shell and turn it into a greasy sponge.
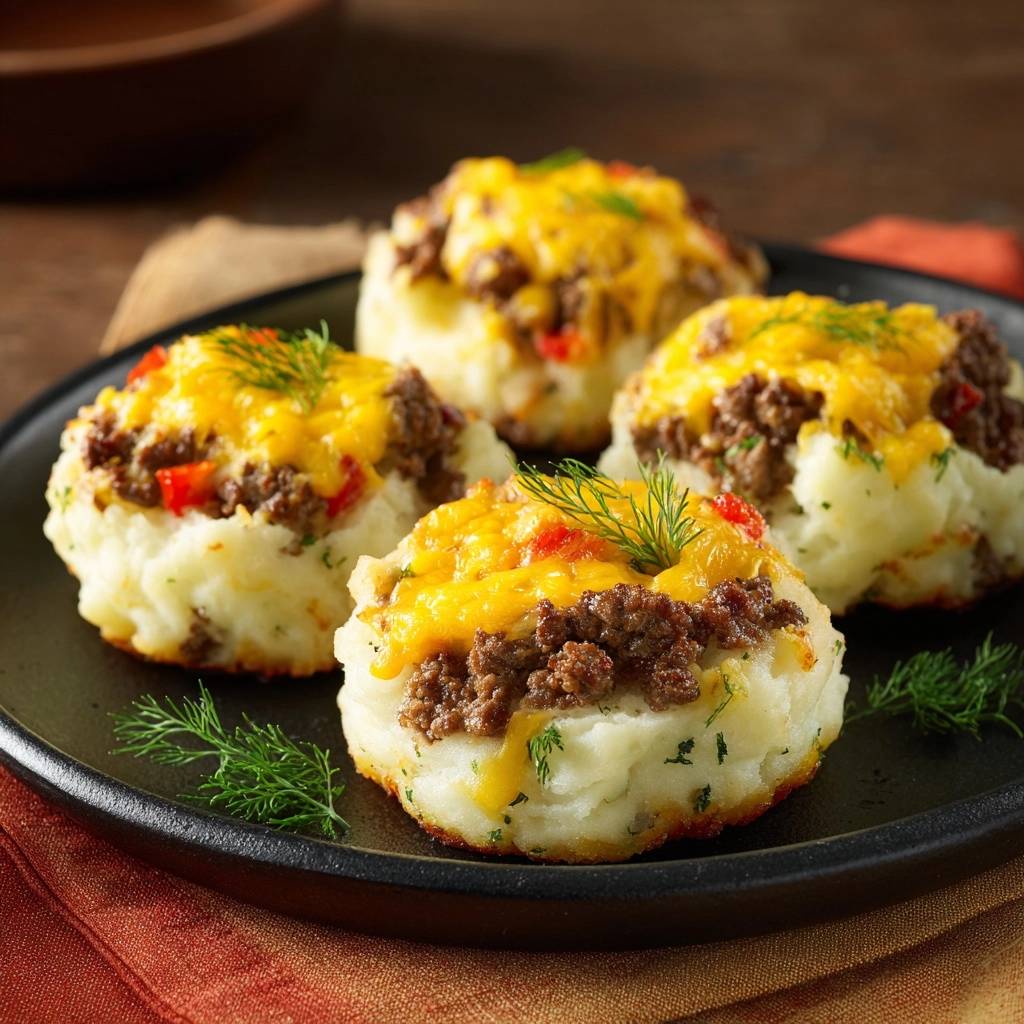
For the aromatic profile, dried dill is mixed directly into the potato base. This provides a consistent, earthy flavor throughout the crust. Save the fresh dill sprigs for the very end, as their bright color and delicate texture provide a beautiful visual contrast to the deep golden brown of the baked cups.
Why Cold Potatoes Outperform Fresh Mash
Chilling your potatoes causes a process called starch retrogradation. As the potatoes cool, the starch molecules realign into a more rigid crystalline structure. This “scaffolding” is exactly what you need to mold the potatoes into a muffin tin without them collapsing into a puddle.
If you try to use warm, freshly mashed potatoes, the starch is too relaxed and hydrated. This results in a cup that is too soft to hold its own weight. Cold potatoes allow you to press a deep, firm well into the center that stays put during the high-heat baking process.
Essential Tools for Uniform Potato Shells
A standard 12-slot muffin tin is the ideal vessel for these meat cups. While jumbo tins work, the standard size provides the best ratio of crispy crust to savory filling. Make sure you use a high-quality non-stick spray or melted butter to ensure the starch doesn’t bond to the metal.
To get perfectly uniform wells, don’t just use your fingers. A small, greased measuring cup or the back of a spoon is the best tool for the job. Pressing down firmly with a smooth surface creates an even thickness across the bottom and sides, which leads to consistent browning.
Phase One: Engineering the Perfect Potato Vessel
Start by mixing your cold potatoes with the beaten egg, parmesan, and dried dill until the mixture is completely homogenous. You want the binder distributed evenly so every bite has the same structural strength. If the mixture feels too loose, you can add an extra tablespoon of parmesan to tighten it up.
When forming the cups, press about 1/3 cup of the mixture into each slot. Work the potatoes up the sides until they reach the top of the rim. Don’t worry about making the edges perfectly smooth; a little bit of “craggy” texture on the top rim is actually better. Those little peaks will catch the heat and turn into extra-crispy, dark golden bits.
Ensure the walls are at least a quarter-inch thick. If the walls are too thin, the weight of the beef filling will cause them to tear when you remove them from the tin. Think of it as building a sturdy bowl that needs to support a heavy, savory payload.
The Science of the First Bake
Baking the empty shells at 400°F is non-negotiable. This high temperature triggers the Maillard reaction, which is the chemical reaction between amino acids and reducing sugars that gives browned food its distinctive flavor. This 20-minute window is when the “crust” actually forms.
This first bake creates a moisture-resistant seal on the interior of the cup. Without this step, the juices from the beef and peppers would immediately soak into the raw potato, resulting in a failed, mushy texture. You are looking for the edges to be visibly golden and the surface to feel set to the touch.
Phase Two: Preparing the Savory Beef Filling
While your potato shells are hardening in the oven, get your skillet hot over medium-high heat. Brown the ground beef thoroughly, breaking it into small crumbles. Smaller crumbles are easier to pack into the potato wells, allowing you to fit more meat into every cup.
Once the beef is browned, you must drain the fat. I often use a slotted spoon to move the meat to a paper-towel-lined plate. Any liquid fat left in the skillet will migrate into your potato crust during the second bake, which will ruin all the hard work you put into making it crispy.
After draining, return the meat to the pan and stir in the diced red bell peppers and spices. The peppers add a subtle sweetness and a bit of crunch that breaks up the richness of the beef. Cook them just until they soften slightly, as they will continue to cook once they go back into the oven.
Phase Three: Assembly and the Final Melt
Remove your golden potato tin from the oven and spoon the beef mixture into each well. Pack it down gently so the cups are full but not overflowing. Top each one with a generous mound of sharp cheddar cheese. The sharpness of the cheddar cuts through the starch of the potato perfectly.
Return the tin to the oven for another 8 to 10 minutes. You aren’t trying to cook the potatoes further; you are simply melting the cheese and marrying the flavors together. Look for the cheese to be bubbling and the very edges of the potatoes to reach a deep, toasted brown color.
The Critical Cooling Period
It is tempting to pop these out immediately, but you must wait at least 5 to 10 minutes. This is a matter of thermodynamics. As the cups cool slightly, the egg proteins and potato starches solidify and “set.” This brief rest period is what allows the cups to slide out of the tin in one piece.
If you try to remove them while they are screaming hot, the starch is still too fluid. The bottom might stay in the pan while the sides come up, or the whole thing might just slump. Patience here ensures a professional presentation and a cup you can actually hold.
Troubleshooting Common Structural Failures
If you find the cups are sticking to the tin despite greasing it, don’t force them. Run a thin offset spatula or a butter knife around the edges to gently release the seal. Usually, a little nudge is all it takes to get the parmesan crust to let go of the metal.
If your potato mixture feels too dry or crumbly while you are molding it, your potatoes might have been exceptionally starchy. You can fix this by adding a tiny bit more of the beaten egg. The mixture should feel like damp sand—pliable enough to hold a shape but not so wet that it sticks to your hands.
For those whose ovens run cool on the bottom, you might find the base of the cup is softer than the top. To fix this, move your oven rack to the lower third of the oven for the first bake. This puts the bottom of the muffin tin closer to the heat source, ensuring a more even crust.
Flavor Variations and Ingredient Swaps
You can easily customize the protein in this recipe. Ground turkey or ground lamb both work beautifully, though lamb will require even more diligent draining due to its higher fat content. If you use turkey, add a splash of Worcestershire sauce to the skillet to deepen the flavor profile.
While sharp cheddar is the classic choice, you can swap it for pepper jack if you want a little kick. Smoked gouda is another fantastic option that complements the smoked paprika in the beef. For the herbs, if you aren’t a fan of dill, finely chopped chives or scallions make an excellent substitute.
If you want to add some heat, finely diced jalapeños can be sautéed right along with the red bell peppers. Just make sure the dice is very small so it integrates well with the beef. You want every bite to have a balanced distribution of meat, veg, and spice.
Make-Ahead Strategies and Reheating Instructions
These are fantastic for meal prep or parties because you can par-bake the potato shells a day in advance. Store the empty, baked shells in the muffin tin covered with plastic wrap in the fridge. When you are ready to serve, just fill them with the beef and cheese and do the final bake.
To reheat leftovers, avoid the microwave at all costs. The microwave will steam the potato crust, making it soft and rubbery. Instead, use an air fryer at 350°F for about 5 minutes or a toaster oven. This dry heat will crisp the exterior back up to its original glory.
Expert Tips for High-Volume Entertaining
If you are making these for a large crowd, you can use mini-muffin tins to create bite-sized appetizers. You will need to adjust the baking times, as the smaller surface area will brown much faster. Reduce the first bake to about 12 to 15 minutes and the second bake to 5 minutes.
When scaling up, it is helpful to have two muffin tins so you can keep a rotation going. You can also prepare the beef filling up to two days in advance. Just make sure to reheat the beef slightly before putting it into the potato cups so the cheese melts evenly without over-baking the potatoes.
Frequently Asked Questions
Can I use leftover instant mashed potatoes?
Instant potatoes are generally not recommended because they lack the natural starch density and fiber found in real potatoes. They tend to be too watery and will likely collapse in the oven. However, if you must use them, “fortify” them by mixing in an extra egg yolk and doubling the amount of parmesan cheese to provide more structural support.
How do I prevent the beef from drying out?
The key is to avoid over-cooking the beef during the initial skillet browning. Since the meat will spend another 10 minutes in a 400°F oven, you should remove it from the skillet the moment it is no longer pink. This ensures it stays juicy and tender after the second bake rather than becoming grainy or tough.
What are the best non-dairy substitutes for the binder?
If you need to avoid dairy, you can replace the parmesan cheese with nutritional yeast to maintain that savory, “umami” flavor profile. For the egg binder, a flax-egg (one tablespoon of ground flaxseed meal mixed with three tablespoons of water) can work, though the crust will be slightly softer than the original version.
Can these be frozen after the second bake?
Yes, you can freeze these, but you must do it correctly to avoid a grainy texture. Let the cups cool completely, then flash-freeze them on a baking sheet for an hour before transferring them to a freezer bag. To eat, bake them directly from frozen at 375°F until the center is hot. Do not thaw them in the fridge first, as this can make the potato base soggy.
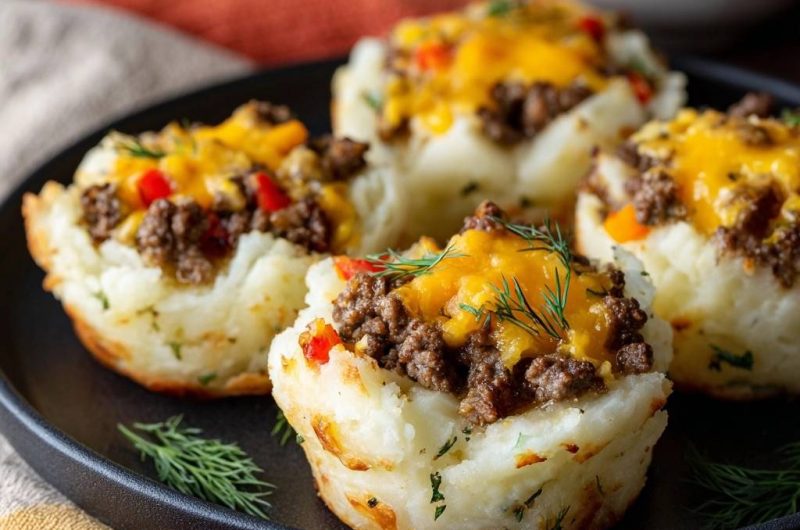
Meat Cups
Course: AppetizerCuisine: AmericanDifficulty: easy12
cups15
minutes30
minutes210
kcal45
MinutesA clever twist on shepherd’s pie, these potato cups feature a structural base of mashed potatoes, egg, and parmesan, filled with seasoned ground beef and melted cheddar cheese.
Ingredients
4 cups cold mashed potatoes (stiff consistency is best; avoid “whipped” or runny potatoes)
1 egg, lightly beaten
1/2 cup grated parmesan cheese
1 tablespoon dried dill (for the potato base)
1 pound lean ground beef
1/2 cup finely diced red bell peppers
1 tablespoon garlic powder
1 teaspoon onion powder
1/2 teaspoon smoked paprika
Salt and black pepper to taste
1 cup shredded sharp cheddar cheese
Fresh dill sprigs for garnish
Directions
- Preheat and Prep: Preheat your oven to 400°F (200°C). Generously grease a standard 12-slot muffin tin with non-stick spray or melted butter.
- Build the Base: In a large bowl, mix the cold mashed potatoes with the beaten egg, parmesan cheese, and dried dill. The egg and parmesan act as the structural “glue,” while the cold temperature ensures the cups hold their shape during molding.
- Form the Cups: Press about 1/3 cup of the potato mixture into each muffin cup. Use the back of a greased spoon or your thumb to press the potatoes firmly against the bottom and up the sides, creating a thick-walled well. Ensure the top edges are slightly textured for that “craggy” golden look shown in the image.
- The First Bake: Bake the empty potato cups for 20 minutes. This is the crucial step. You must pre-bake the shells until the edges are golden brown and the “crust” feels set to the touch. This creates the moisture barrier needed to stop sogginess.
- Prepare the Filling: While the shells bake, brown the ground beef in a skillet over medium-high heat. Drain any excess fat thoroughly-liquid fat is the enemy of a crispy potato cup. Cook until no pink remains and it reaches 160°F (71°C).
- Season: Stir in the diced red peppers, garlic powder, onion powder, smoked paprika, salt, and pepper. Cook for 3-4 minutes until the peppers are slightly softened and the beef is fully browned.
- Assemble: Remove the potato tin from the oven. Fill each golden potato cup with the beef and pepper mixture. Top each with a generous mound of shredded cheddar cheese.
- The Second Bake: Return to the oven for 8-10 minutes, or until the cheese is fully melted and the potato edges have reached a deep golden brown.
- The Set: Let the cups cool in the pan for at least 5-10 minutes. This resting period allows the starch and egg to fully set, ensuring they pop out of the tin without breaking. Garnish with fresh dill sprigs and serve immediately.
Notes
- Use cold, stiff mashed potatoes rather than whipped ones for better structural integrity. Ensure you drain the beef fat thoroughly to prevent the potato base from softening. Let the cups rest for 5-10 minutes after baking so they set properly before removal.