Mastering the Creamy Mushroom and Chicken Pot Pie
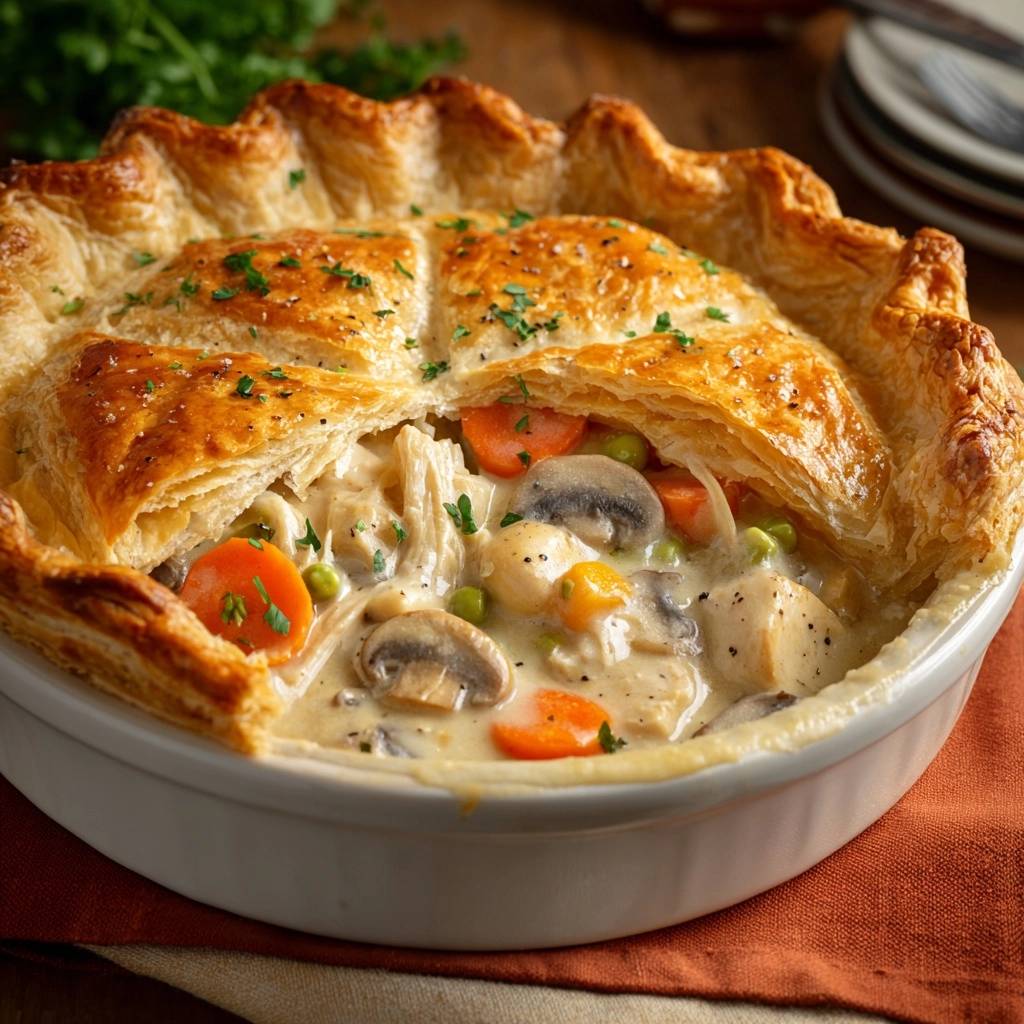
Imagine plunging your spoon through a golden, shatteringly crisp layer of puff pastry that crackles with every touch. Beneath that buttery lid lies a velvety, umami-rich filling where tender chicken and earthy mushrooms are suspended in a thick, savory cream sauce. Most home cooks struggle with the dreaded “soggy bottom” or a crust that sinks into the gravy, turning a classic comfort meal into a doughy disappointment. This recipe solves those structural failures by focusing on moisture control and temperature management.
That same beaten egg technique is what makes the poached eggs in this roasted beet and carrot salad so reliably foolproof.
The secret to this “Anti-Soggy” success lies in the strategic venting and high-heat blast that ensures the pastry stays sky-high. By treating the crust as a structural element rather than just a lid, you create a professional-grade contrast between the crunch of the exterior and the lushness of the interior. It’s about more than just flavor; it’s about the physics of the perfect bite.
One essential tip to keep in your back pocket: always keep your puff pastry in the fridge until the very second you are ready to drape it over the hot filling. If the butter in the dough softens too much before hitting the oven, you lose those distinct, flaky layers. Cold dough meeting a 425°F oven creates the instant steam needed for a spectacular rise.
The Architecture of a Non-Soggy Crust
Achieving a bakery-style lift requires understanding the “Temperature Shock” method. When you slide a cold, butter-laden pastry into a preheated 425°F oven, the water trapped within the layers of dough vaporizes instantly. This rapid expansion forces the layers apart before the gluten has a chance to set, creating that iconic height and airy texture. If the oven is too cool, the butter simply melts and soaks into the flour, resulting in a flat, greasy cracker instead of a puff.
Furthermore, the high heat ensures the exterior sets quickly, forming a rigid structure that resists the humidity rising from the chicken and mushroom mixture below. This temperature is non-negotiable for steam-leavened doughs. You aren’t just browning the top; you are using thermal energy to build a physical barrier against the moisture of the filling. Therefore, always use an oven thermometer to verify your appliance is truly hitting that 425°F mark before the pie goes in.
Strategic Steam Venting Techniques
Most people make the mistake of using a fork to prick tiny holes in their pot pie, but this isn’t enough to handle the volume of steam generated by a rich velouté sauce. Instead, use a sharp knife to cut four large 2-inch slits in the center of the pastry. This creates a “Chimney Effect,” allowing the steam to escape freely into the oven rather than being trapped against the underside of the dough.
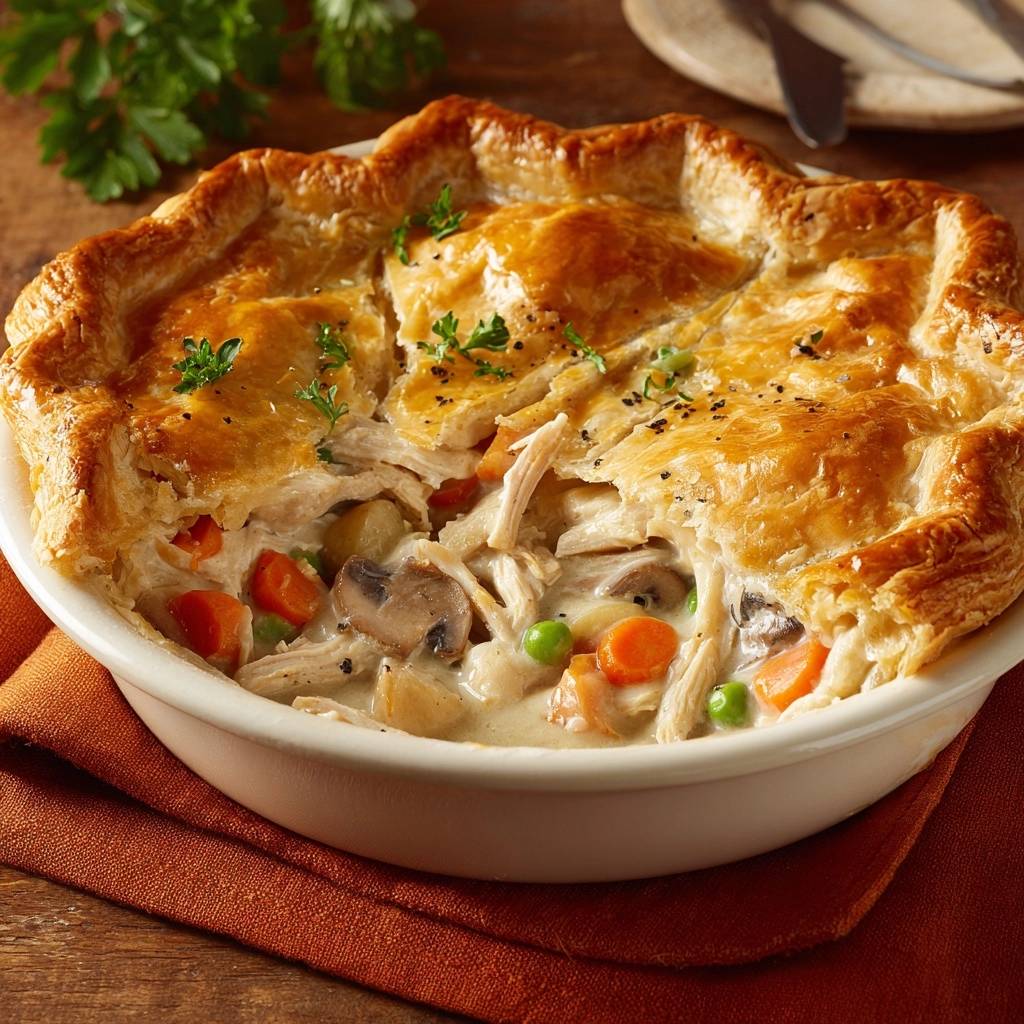
When steam is trapped, it hydrates the bottom of the pastry, turning it gummy and heavy. By creating wide vents, you ensure the air under the crust stays dry, which allows the bottom of the pastry to bake through. When scoring your vents, be careful to cut through the dough completely in the center but leave the edges intact to maintain the pie’s structural integrity.
Essential Components for the Filling
The foundation of a great pot pie is the depth of its filling. While white button mushrooms are common, this recipe calls for Cremini mushrooms because they offer a much deeper, woodsy umami flavor. They have a lower water content than younger mushrooms, which helps prevent the sauce from thinning out during the baking process. In addition, the use of heavy cream provides a stability that milk-based sauces lack, ensuring the filling stays thick and luscious even under high heat.
Using a high-quality chicken broth is equally important. Since the sauce reduces slightly in the oven, the flavors will concentrate. If you use a broth that is too salty, the final dish might become overpowering. Always taste your sauce before adding the chicken to ensure the balance of thyme and black pepper is just right.
Selecting and Preparing the Chicken
You can use a store-bought rotisserie chicken to save time, but for the best texture, poached chicken breast is the way to go. Rotisserie chicken can sometimes be quite salty, so adjust your seasoning accordingly if you take that shortcut. Regardless of the source, ensure your chicken is at room temperature before folding it into the hot sauce. Adding ice-cold meat to a hot pan causes “thermal shock,” which can make the protein fibers seize up and become tough.
The Role of Aromatics and Herbs
Dried thyme is the unsung hero of this dish, providing a subtle earthy note that bridges the gap between the mushrooms and the cream. While fresh herbs are lovely for garnish, dried thyme holds up better during the long simmer and high-heat bake. When adding your garlic, wait until the onions and carrots have softened completely. Garlic burns quickly, and over-browned garlic introduces a bitter aftertaste that can ruin the delicate cream sauce.
Step-by-Step: Building the Umami Base
The most critical technical step in this recipe is the browning of the mushrooms. When you add them to the melted butter, leave them undisturbed for at least three minutes. You want to trigger the Maillard reaction, which is the chemical process that creates those deep, savory brown bits on the surface. If you stir them too early, they will steam in their own juices rather than sear.
Wait until all the moisture has evaporated from the pan before moving on. You will see the mushrooms shrink and turn a deep chestnut color. This step is a major “Anti-Soggy” insurance policy; if you don’t cook the water out now, it will release into your pie later, turning your thick gravy into a watery mess. Once the mushrooms are browned, the aroma should be intensely nutty and savory.
Perfecting the Velouté Sauce
After adding the flour to your sautéed vegetables, stir it constantly for about two minutes. You are looking for the flour to smell slightly toasted, which indicates the “raw” taste has been cooked out. When you whisk in the broth and cream, do it slowly to avoid lumps. The sauce is ready when it is thick enough to coat the back of a spoon—if you run your finger through the sauce on the spoon, the line should stay clean and sharp.
Assembling for Maximum Structural Integrity
To prevent the pastry from shrinking away from the edges, use the “Crimp and Anchor” method. Leave a 1-inch overhang of dough when you place it over your baking dish. Press this extra dough firmly against the outside rim of the ceramic dish. This creates a physical anchor that holds the pastry in place as the fat melts and the gluten stretches. Without this, the lid often slides into the center of the pie, drowning in the sauce.
The egg wash is your final line of defense. Brushing the top thoroughly with a beaten egg creates a moisture-resistant seal. This barrier protects the pastry from the ambient humidity in your kitchen and the steam from the oven, ensuring the crust stays crisp for longer. It also provides that professional, high-gloss golden sheen that makes the dish look as good as it tastes.
Troubleshooting Common Pot Pie Failures
If your filling turns out watery, it is usually because the mushrooms weren’t browned long enough or the frozen peas weren’t drained properly. Peas hold a surprising amount of ice crystals that melt into the sauce. To fix a sauce that looks too thin before baking, simmer it for an extra two minutes on the stove. However, remember that the sauce will naturally thicken further as it rests after coming out of the oven.
If you notice the edges of your pastry are browning too quickly while the center still looks pale, don’t panic. Simply tear off a piece of aluminum foil and cut a hole in the middle to create a “shield.” Place this over the pie so the edges are covered but the center is exposed. This allows the middle to finish crisping up without burning the perimeter.
Why Your Pastry Didn’t Rise
The most common reason for a flat crust is over-handling the dough. Every time you touch the puff pastry, the heat from your hands melts the microscopic layers of butter. If those layers merge with the flour before the pie hits the oven, the “puff” is lost. Work quickly and use a light touch. If the dough feels soft or sticky at any point, pop it back in the freezer for five minutes to firm up the fat.
Make-Ahead Strategies and Storage
You can easily prepare the chicken and mushroom filling up to two days in advance. Store it in an airtight container in the refrigerator, but do not put the pastry on top until you are ready to bake. If you let the raw dough sit on the wet filling in the fridge, it will absorb moisture and become a leaden mass that will never rise properly. When you are ready for dinner, reheat the filling slightly on the stove before topping with the cold pastry and baking.
Reheating Without Losing the Crunch
Never use a microwave to reheat pot pie leftovers. The microwave vibrates water molecules, which will turn your beautiful crust into a soggy, chewy disaster in seconds. Instead, use a toaster oven or a conventional oven set to 350°F. Place the leftover slice on a piece of foil and bake for 10-15 minutes. This gently warms the center while recrisping the pastry layers, restoring that original “shatter” factor.
Vegetable Variations and Flavor Swaps
While carrots and peas are traditional, you can swap them for high-density vegetables like leeks, parsnips, or even diced celery root. These vegetables hold their shape well and don’t release excessive water. Avoid high-moisture vegetables like zucchini or spinach unless you sauté them separately and squeeze out every drop of liquid first. For an extra flavor boost, add a teaspoon of Worcestershire sauce to the broth; it enhances the meatiness of the mushrooms without changing the consistency of the sauce.
Optimal Side Dish Pairings
Because this pot pie is incredibly rich with heavy cream and butter, you want to pair it with something acidic or slightly bitter to cleanse the palate. A simple arugula salad tossed in a sharp lemon vinaigrette is the perfect companion. The peppery greens cut right through the richness of the velouté sauce. Alternatively, roasted balsamic Brussels sprouts provide a nice charred contrast to the soft filling.
Avoid serving heavy starches like mashed potatoes or rice on the side. The puff pastry already provides plenty of carbohydrates, and adding more can make the meal feel overly heavy. Stick to bright, vibrant vegetables or a crisp slaw to keep the dinner balanced and refreshing.
Expert Tips for a Professional Finish
The hardest part of this recipe is the 10-minute rest period after the pie comes out of the oven. It is tempting to dig in immediately, but “carry-over cooking” is still happening. During these ten minutes, the starch in the sauce fully hydrates and sets. If you cut into it too early, the filling will run everywhere. Waiting ensures you get a clean, beautiful scoop where the sauce clings perfectly to the chicken and vegetables.
Frequently Asked Questions
How do I store leftovers and does this freeze well?
Store leftovers in an airtight container in the refrigerator for up to three days. While you can freeze the cooked filling on its own for up to two months, I do not recommend freezing the fully assembled pie with the raw pastry. The moisture from the filling will degrade the pastry’s quality. For best results, freeze the filling in a freezer bag, thaw it in the fridge overnight, and add fresh puff pastry just before baking.
Why is my pot pie filling too runny?
A runny filling usually happens if the flour wasn’t cooked into a thick enough roux or if the vegetables released too much water. Ensure you simmer the sauce until it heavily coats a spoon before adding it to the baking dish. Also, remember that the sauce thickens significantly during the 10-minute resting period after baking. If it looks a little loose right out of the oven, give it time to settle.
Can I use a different type of crust?
Yes, you can use a standard pie crust, but you will lose the dramatic “puff” and airy texture of this specific recipe. If using a standard shortcrust, you may need to lower the oven temperature to 400°F and bake it slightly longer. Puff pastry is preferred here because its light texture perfectly offsets the heavy, creamy filling.
What can I use instead of heavy cream?
If you need a substitute for heavy cream, whole milk mixed with a tablespoon of cornstarch can work, though the sauce will be less stable and slightly less rich. Avoid using fat-free milk, as it tends to break or curdle under the high heat of the oven. For a dairy-free option, full-fat coconut milk can be used, though it will impart a slight coconut flavor to the dish.
Can I make this in individual ramekins?
Absolutely! Individual pot pies are great for dinner parties. Simply divide the filling among six ramekins and cut smaller circles of puff pastry to fit. Reduce the baking time to about 15-20 minutes, as the smaller volume of filling will heat through much faster than a large ceramic dish. Ensure you still cut small vents in each individual lid.
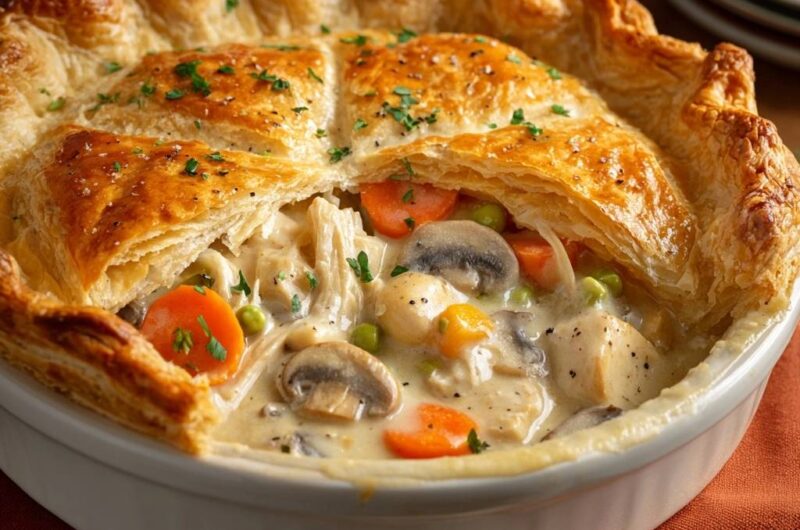
Chicken Pot Pie
Course: Main CourseCuisine: AmericanDifficulty: medium6
servings20
minutes35
minutes485
kcal55
MinutesThis Anti-Soggy Bottom pot pie solves the common issue of limp crusts by using high-heat baking and moisture-reduction techniques. It combines tender chicken, cremini mushrooms, and a velvety cream sauce under a sky-high golden pastry.
Ingredients
1 pound cooked chicken breast, cubed or shredded
1 sheet frozen puff pastry, thawed but kept very cold
2 cups sliced cremini mushrooms
2 large carrots, peeled and sliced into rounds
1 cup frozen peas
1 small yellow onion, diced
3 cloves garlic, minced
1/4 cup all-purpose flour
2 cups chicken broth
1/2 cup heavy cream
3 tablespoons butter (divided)
1 teaspoon dried thyme
Salt and black pepper to taste
1 egg, beaten with 1 teaspoon water (egg wash)
Fresh parsley for garnish
Directions
- Preheat your oven to 425°F (220°C). High heat is the secret to the “Anti-Soggy” promise, as it flashes the butter in the pastry to create instant steam and lift.
- In a large skillet, melt 2 tablespoons of butter over medium-high heat. Add mushrooms and cook undisturbed for 3 minutes, then stir until browned and all moisture has evaporated. This step is crucial; if mushrooms aren’t fully browned, they will release water into your pie later.
- Add the remaining 1 tablespoon of butter, carrots, and onions. Cook for 5 minutes until softened. Stir in garlic and thyme for 1 minute.
- Sprinkle flour over the vegetables and stir constantly for 2 minutes to cook out the raw flour taste. Slowly whisk in chicken broth and heavy cream. Simmer for 3-5 minutes until the sauce is thick enough to coat the back of a spoon.
- Fold in the chicken and peas. Season generously with salt and pepper. Pour the mixture into a deep 9-inch round ceramic baking dish.
- Place the cold puff pastry over the dish. Trim the edges so there is a 1-inch overhang. Press the pastry against the outside rim of the dish to create a “crimp” that anchors the dough, preventing it from shrinking into the liquid.
- Using a sharp knife, score a cross pattern or cut four large 2-inch slits in the center. These vents allow steam to escape freely so the pastry bakes dry and crisp instead of steaming from underneath.
- Brush the top thoroughly with the egg wash. This creates a moisture barrier and the deep golden sheen seen in the image. Sprinkle with a pinch of coarse salt and cracked pepper.
- Bake for 25 to 30 minutes until the pastry is deep golden brown and has risen significantly. Let it rest for 10 minutes before serving to allow the sauce to set. Garnish with fresh parsley.
Notes
- Ensure the puff pastry is kept very cold until the moment of baking. Browning the mushrooms thoroughly is essential to prevent excess moisture from thinning the sauce.