Mastering the Crispy Glazed Chicken Salad
We’ve all been there. You order a crispy chicken salad at a restaurant, and it arrives looking beautiful. However, by the third bite, that promising crunch has vanished, replaced by a soggy, sad coating that’s soaked up all the dressing. It’s a culinary heartbreak that happens because most recipes don’t account for the physics of moisture migration.
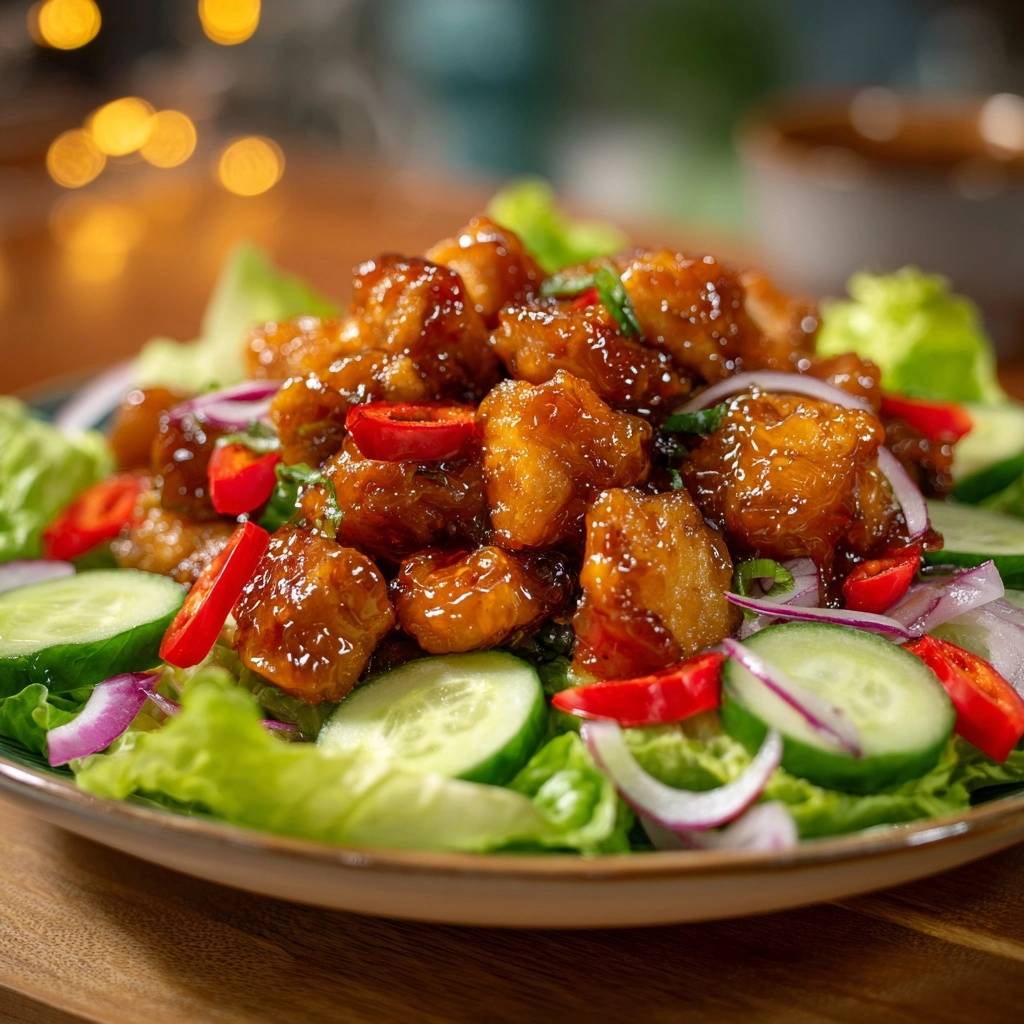
The secret to a truly elite Crispy Glazed Chicken Salad lies in a specific “anti-soggy” architecture. We aren’t just tossing fried chicken in sauce; we’re engineering a shatteringly crisp shell that stands up to a glossy, sweet, and spicy glaze. By using a strategic double-dredge and a high-heat reduction, you can maintain that essential crunch against the cool, refreshing backdrop of fresh greens.
I’ve found that the real trick is the flash-glazing technique. Most home cooks make the mistake of simmering the meat in the sauce, which essentially steams the crust from the outside in. Instead, we’re going to use a high-speed toss that coats the exterior in a microscopic layer of flavor without compromising the structural integrity of the fry. It’s a total game-changer for your weeknight dinner rotation.
The Science of the Cornstarch-Only Coating
When you want a crunch that lasts, you have to ditch the all-purpose flour. Cornstarch is a pure starch with zero gluten, which is the key to a brittle, glass-like texture. Because there’s no protein to develop into a chewy web, the coating fries up much thinner and crispier than a traditional batter. It creates a rigid barrier that naturally repels the moisture in the glaze.
However, cornstarch can be finicky if you don’t treat it right. You’ll notice this recipe calls for a five-minute “hydration period” after the final dredge. This is a vital step because it allows the starch to absorb the moisture from the egg wash, effectively “locking” it onto the chicken. If you skip this, the coating will likely slough off the moment it hits the hot oil, leaving you with naked chicken and a mess in your skillet.
Think of this hydration time as building a primer layer. As the starch sits on the wire rack, it transforms from a loose powder into a tacky, cohesive shell. This shell expands slightly when it hits the oil, creating tiny air pockets that contribute to that sought-after “shatter” when you take a bite. It’s a small technical detail that separates amateur frying from professional results.
Why We Avoid All-Purpose Flour
All-purpose flour contains gluten, which is great for bread but terrible for crispy glazed salads. As soon as flour hits the wet glaze, the gluten network begins to soften and turn “bread-like.” This results in a heavy, doughy coating that sags under the weight of the sauce. Cornstarch stays firm because it lacks those elastic proteins, ensuring your chicken stays loud and crunchy until the very last forkful.
Essential Components for the Crispy Glazed Chicken Salad
Quality ingredients are the backbone of this dish, starting with the chicken. I prefer chicken breast here because its lean structure allows for a very fast fry time, keeping the meat juicy while the outside crisps up. If you use thighs, you’ll need to cook them longer to render the fat, which can sometimes lead to a darker, more bitter crust if you aren’t careful.
The vegetables aren’t just a garnish; they provide the necessary hydration to balance the fried elements. English cucumbers are the gold standard here because they have thinner skins and fewer seeds than standard garden cucumbers. This means they stay firm and won’t release excess water into your salad bowl. Similarly, the red Fresno chilies add a bright, fruity heat that cuts right through the richness of the honey glaze.
For the base, butter lettuce is the undisputed champion. While spring mixes are often too flimsy to support the weight of glazed chicken, butter lettuce has a soft yet sturdy leaf that cups the ingredients perfectly. It offers a buttery mouthfeel that complements the sesame oil in the glaze, creating a cohesive flavor profile from the bottom of the bowl to the top.
Selecting the Right Aromatics
Freshness is non-negotiable when it comes to your aromatics. Always use fresh ginger rather than the powdered stuff; the fresh root provides a zingy, peppery bite that powder simply can’t replicate. The chili garlic sauce is equally important, as it provides the acidity needed to balance the heavy sugars in the honey, preventing the glaze from feeling cloying.
If you love the fresh ginger kick here, try this sweet and spicy chicken salad for another bold twist.
Step-by-Step: Achieving the Perfect Double-Dredge
The double-dredge is your insurance policy for crunch. Start by patting your chicken cubes bone-dry with paper towels. If the meat is wet, the starch will gum up and fall off. Toss the dry chicken in the first half-cup of cornstarch to create a “primer” layer, then move it through the beaten egg.
The final step is the most important: dredge the chicken in the remaining cornstarch and use your hands to firmly press the powder into the meat. You want to see a thick, floury shell. This creates a rugged surface area with plenty of nooks and crannies for the glaze to cling to later. Let them rest on a rack so the coating sets properly before frying.
Precision Frying: Temperature Control and Air Circulation
Frying at 350°F is the “Goldilocks” zone for cornstarch. If the oil is too cool, the starch will soak up the grease like a sponge, leaving you with an oily mess. If it’s too hot, the outside will burn before the chicken is cooked through. Use a heavy skillet or wok, as the thick metal helps maintain a consistent temperature even when you add the cold meat.
Avoid the “Crowding Effect” at all costs. If you dump all the chicken in at once, the oil temperature will plummet, and the chicken will steam instead of fry. Work in batches to keep that oil shimmering. Once the chicken is a deep golden brown, move it to a wire rack. Never use paper towels! Paper towels trap steam underneath the chicken, which will instantly soften your hard-earned crust.
The Reduction Method: Creating a Syrupy Glaze
A watery sauce is the absolute enemy of a crispy salad. To prevent sogginess, you must reduce your glaze until it reaches “Nappe” consistency. This is a fancy culinary term that just means the sauce is thick enough to coat the back of a spoon without immediately running off.
By boiling the soy sauce, honey, and aromatics over medium-high heat, you’re evaporating the water and concentrating the sugars. This creates a sticky, syrupy glaze that will “sit” on top of the chicken coating rather than soaking into it. If the sauce looks thin, keep boiling; it should look like warm maple syrup before you even think about tossing it with the chicken.
The Flash-Glaze Technique to Prevent Sogginess
This is the secret move that makes this recipe work. Instead of simmering the chicken in a pan, place your hot, fried chicken into a large metal bowl. Drizzle the thickened glaze over the top and toss it vigorously for exactly 10 seconds. A metal bowl is best here because it retains the heat of the chicken, helping the glaze set instantly.
The goal is a microscopic layer of flavor. By tossing quickly and serving immediately, you ensure the glaze stays on the surface. If you let the chicken sit in the sauce for even a minute, the moisture will begin to penetrate the cornstarch shell. Speed is your best friend in this stage of the process.
Flavor Variations and Ingredient Swaps
This recipe is incredibly adaptable once you master the base technique. If you don’t have honey on hand, maple syrup makes a fantastic substitute, offering a deeper, woodsy sweetness. For those who prefer a milder heat, swap the Fresno chilies for thinly sliced radishes, which provide a similar crunch and a peppery bite without the spice.
For a heartier take on that creamy chicken base, try this creamy chicken corn pasta salad next.
If you’re cooking for someone who avoids gluten, this recipe is already halfway there. Simply swap the soy sauce for tamari or liquid aminos. Since we are already using cornstarch instead of flour for the coating, it’s an easy transition that doesn’t sacrifice any of the texture or flavor of the original dish.
Troubleshooting Your Crispy Glazed Chicken Salad
If your coating fell off during frying, it’s usually due to one of two things: the chicken wasn’t dry enough before the first dredge, or you didn’t let the starch hydrate for the full five minutes. That resting period is what allows the “glue” to form between the meat and the crust. Don’t rush it!
If the chicken feels tough or dry, you likely overcooked it during the frying stage. Remember that the chicken will continue to cook for a minute while it rests on the wire rack. Aim for a 5 to 6-minute fry time for 1-inch cubes. If your salad wilts, it’s usually because the chicken was plated while it was still screaming hot. Let it sit for just 30 seconds after glazing before hitting the greens.
Managing Oil Temperature Without a Thermometer
Don’t have a digital thermometer? No problem. You can test the oil by dipping the handle of a wooden spoon into the center. If the oil starts bubbling steadily around the wood, you’re ready to fry. Alternatively, drop a single popcorn kernel into the oil; when it pops, the oil is roughly between 350°F and 360°F, which is perfect for this recipe.
Assembling for Maximum Texture Contrast
Plating this salad is all about the “Hot-Cold” bridge. You want the refreshing, cold crunch of the cucumber and the crisp bite of the red onion to act as a counterpoint to the spicy, hot chicken. Arrange the vegetables first, creating a lush bed of greens that can catch any stray drops of glaze.
Serve the dish the very second the chicken hits the lettuce. The “peak crunch” window for any glazed fried food is relatively short, usually about 5 to 10 minutes. By having your table set and your family ready before you start the flash-glaze, you ensure everyone gets the best possible version of this meal.
Expert Tips for Advanced Home Cooks
If you want to take this to the next level, try chilling your salad plates in the freezer for five minutes before you assemble. The cold plate keeps the butter lettuce extra crisp even when the warm chicken is placed on top. For a professional visual finish, sprinkle some toasted sesame seeds or a handful of microgreens over the top right before serving. It adds a layer of complexity that makes the whole dish pop.
How should I store leftovers?
This dish is best enjoyed immediately because the chicken will eventually lose its crunch in the fridge. However, if you have leftovers, store the chicken and the salad components in separate airtight containers. The chicken will stay safe to eat for up to 3 days. To revive it, use an air fryer or oven at 375°F until heated through; avoid the microwave, as it will make the coating rubbery.
What to Serve Next
If you enjoyed the crispy chicken and sticky glaze in that salad, these two recipes lean into similar sweet-savory coatings and crunchy textures.
- For a meatless option with the same glossy finish, try these Sticky Orange Cauliflower Bites — the citrus glaze pairs well with the salad’s dressing.
- Another protein-heavy choice that matches the crisp exterior is the Sticky Glazed Teriyaki Meatballs with a Crisp Crust; the teriyaki sauce echoes the salad’s sweet notes.
Why did my chicken turn out greasy instead of crispy?
Greasy chicken is almost always a result of low oil temperature. If the oil isn’t hot enough (350°F), the cornstarch won’t seal instantly, allowing the oil to soak into the meat. Another culprit is crowding the pan. Fry in small batches so the oil temperature stays high. Also, remember to drain the chicken on a wire rack rather than paper towels to prevent steaming.
Can I use a different type of starch?
Potato starch is the only suitable substitute for cornstarch in this recipe. It actually provides an even crunchier, lighter texture often found in Japanese karaage. Avoid using flour or arrowroot powder, as they won’t provide the same rigid, “anti-soggy” shell that cornstarch or potato starch offers.
Is there a way to make the glaze less spicy?
Absolutely. The heat comes primarily from the chili garlic sauce and the fresh Fresno chilies. You can reduce the chili garlic sauce to one teaspoon or omit it entirely, replacing it with a splash of rice vinegar for acidity. For the salad, swap the Fresno chilies for red bell peppers to keep the color without the burn.
Why is the glaze not sticking to the chicken?
If the glaze is sliding off, it hasn’t been reduced enough. The sauce needs to be thick and syrupy to cling to the cornstarch crust. Make sure you boil the mixture until it is reduced by half. If it still won’t stick, your chicken might have too much residual oil; ensure it drains well on the wire rack for a minute before glazing.
Crispy Glazed Chicken
Course: Main CourseCuisine: Asian FusionDifficulty: easy4
servings15
minutes15
minutes480
kcal30
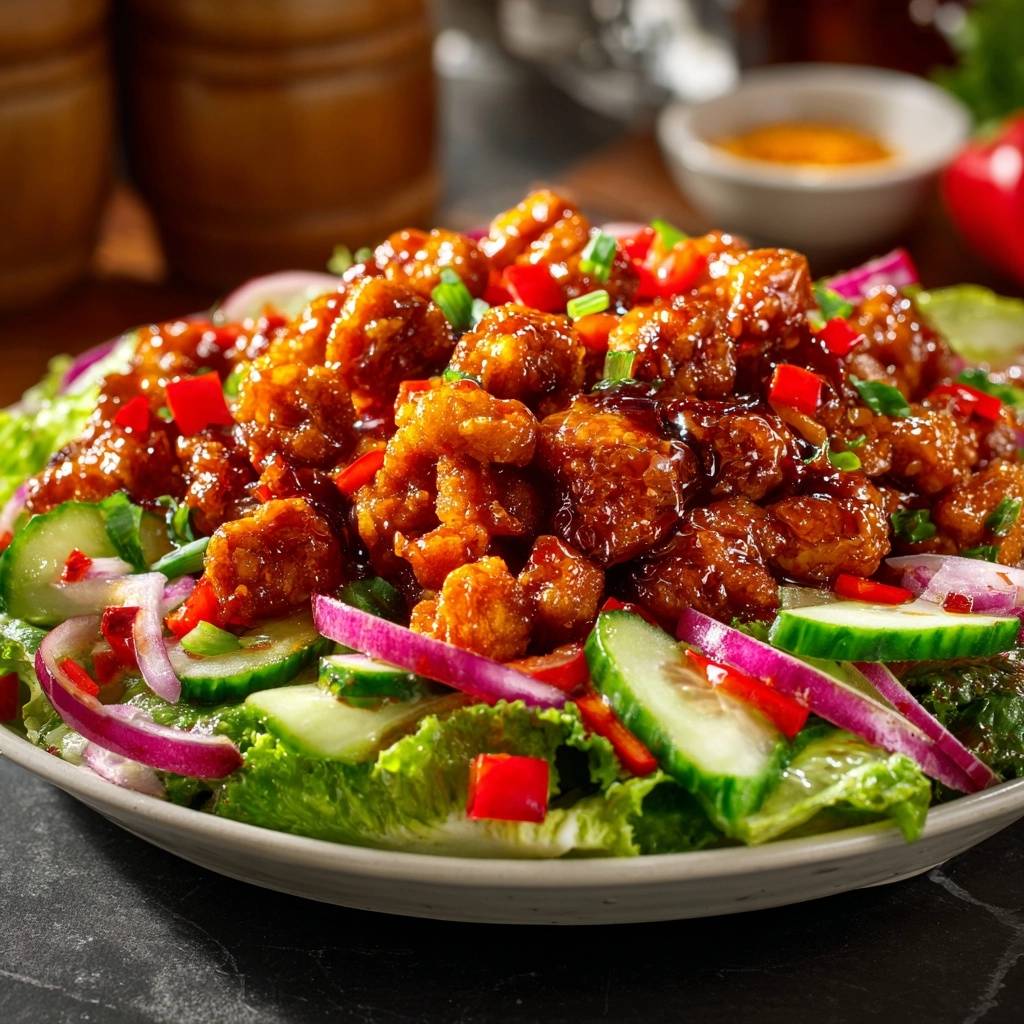
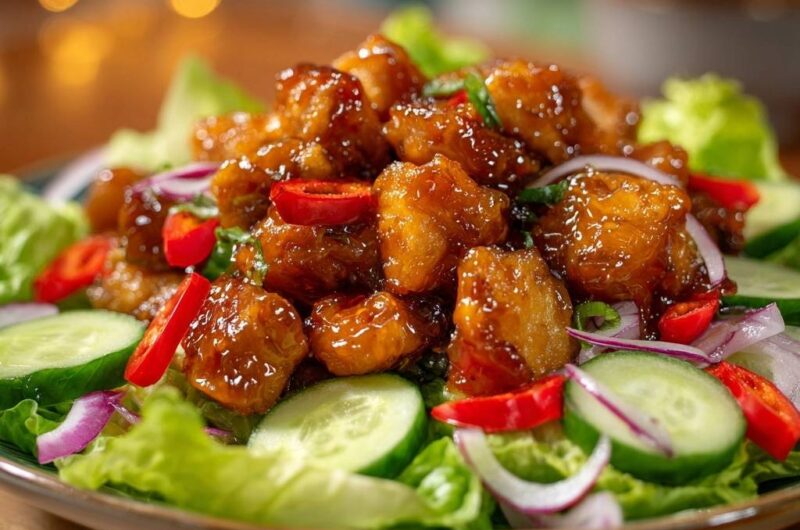
MinutesA vibrant salad featuring ultra-crunchy glazed chicken cubes served over fresh butter lettuce, cucumbers, and red onions. The secret lies in a cornstarch-only coating and a high-heat glaze reduction that prevents the chicken from becoming soggy.
Ingredients
1.5 lbs chicken breast, cut into 1-inch cubes
1.5 cups cornstarch (divided)
2 large eggs, beaten
1/2 cup soy sauce
1/4 cup honey
1 tablespoon chili garlic sauce
1 tablespoon fresh ginger, minced
1 teaspoon sesame oil
1 head butter lettuce, torn
1 English cucumber, sliced into rounds
1/2 red onion, thinly sliced
2 red Fresno chilies, sliced into rings
2 green onions, thinly sliced (for garnish)
Vegetable oil for frying (about 2 cups)
Directions
- Prepare the Chicken: Pat the chicken cubes completely dry with paper towels. This is vital for the coating to stick. Place 1/2 cup of cornstarch in a bowl and toss the chicken to lightly coat. Dip each piece into the beaten egg, then dredge thoroughly in the remaining 1 cup of cornstarch, pressing it on to create a thick, floury shell. Let the coated chicken sit on a wire rack for 5 minutes; this allows the starch to hydrate and “lock” onto the meat so it won’t peel off during frying or glazing.
- Fry: Heat 1 inch of vegetable oil in a heavy skillet or wok to 350°F (175°C). Fry the chicken in batches to avoid crowding the pan, which drops the oil temperature. Fry until the coating is a deep golden brown and very firm, about 5 to 6 minutes. Drain the chicken on a wire rack-not paper towels-to allow air to circulate and prevent the bottom from steaming and softening.
- Reduce the Glaze: While the chicken fries, whisk together the soy sauce, honey, chili garlic sauce, ginger, and sesame oil in a small saucepan. Bring to a hard boil over medium-high heat. Reduce the mixture by half until it reaches a thick, syrupy consistency that coats the back of a spoon.
- The Flash-Glaze: To solve the soggy coating problem, do not simmer the chicken in the sauce. Place the hot, fried chicken in a large metal bowl. Drizzle the thickened glaze over the chicken and toss quickly for 10 seconds using a spatula or by shaking the bowl. This ensures the sauce sticks to the exterior without soaking into the crust.
- Assemble: Immediately arrange the glazed chicken over a bed of fresh butter lettuce, cucumber slices, red onions, and sliced Fresno chilies. Garnish with green onions and serve right away while the contrast between the hot, crunchy chicken and cold, crisp vegetables is at its peak.
Notes
- Always drain fried chicken on a wire rack instead of paper towels to prevent steaming. Ensure the glaze is reduced by half to a syrupy consistency before tossing to maintain the crunch.