Mastering the Loaded Peanut Butter Toffee Dip
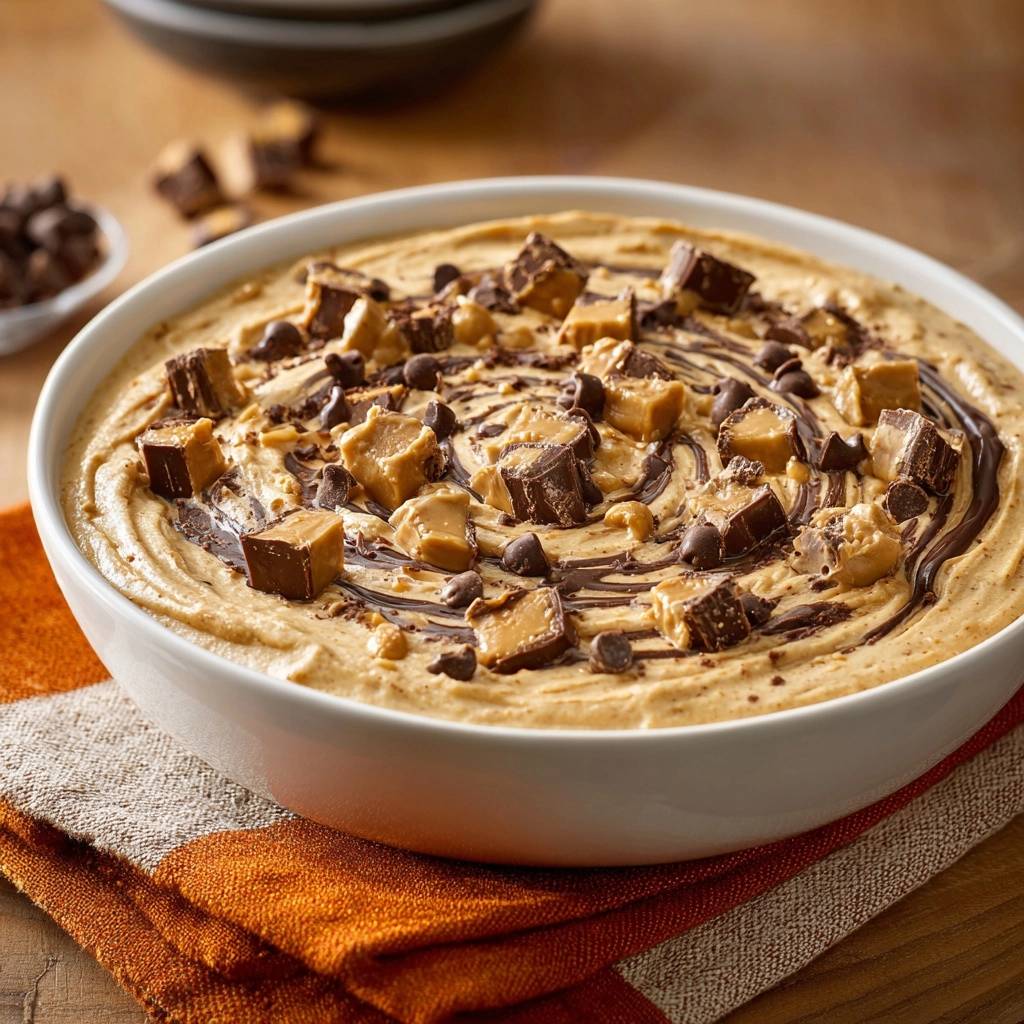
We’ve all been there: you dive into a beautiful dessert dip only to find it’s unpleasantly gritty, oily, or grainy. It’s a total mood killer when you’re expecting a cloud-like treat but get a mouthful of undissolved sugar crystals instead. This Loaded Peanut Butter Toffee Dip is the definitive solution to that common kitchen heartbreak, offering a velvet-smooth base that holds its shape perfectly.
The secret lies in a specific temperature-matching technique and a slow-emulsion whip that creates a professional-grade texture. You get that incredible contrast between the silky, aerated peanut butter base and the massive, crunchy chunks of chocolate-covered toffee. It’s the kind of appetizer that vanishes within minutes at any gathering because it stays creamy from the first scoop to the very last.
I’ve found that the real trick to this recipe is the “Flash-Whip” at the end. By adding a splash of cold heavy cream to the room-temperature base and beating it at high speed, you stabilize the fats. This prevents the dip from weeping or becoming heavy, giving it a mousse-like quality that feels light despite the rich ingredients. Trust me, once you try this method, you’ll never go back to just stirring things together in a bowl.
The Science of a Smooth Dessert Base
Most dessert dips fail because the sugar doesn’t actually dissolve into the fat; it just sits there in suspension. When you mix powdered sugar into cream cheese, the moisture in the cheese needs to hydrate the starch in the sugar. If the ratio is off or the mixing is too rushed, those sugar crystals stay intact, leading to that dreaded “sandiness” on the tongue.
Furthermore, peanut butter is a complex emulsion of roasted nut solids and oils. If you overwork it or introduce temperature shocks, the oil can separate, leaving you with a greasy mess. By understanding how these fats interact, we can create a stable structure that stays fluffy even after sitting out on a party table for a couple of hours.
Temperature Matching for Emulsification
The “Room Temperature” rule is the most important law in this recipe. If your cream cheese is even slightly chilled, it will refuse to bond smoothly with the peanut butter. Instead, it will break into tiny, stubborn lumps that no amount of whisking can fully remove. You want both the cheese and the peanut butter to be at the same pliable consistency before they ever meet.
If you’re in a rush and forgot to set the cream cheese out, don’t reach for the microwave, as it often melts the edges while leaving the center frozen. Instead, place the sealed foil package in a bowl of warm water for about 10 minutes. This gently brings the entire block to the perfect temperature without changing the molecular structure of the fat.
The Role of Heavy Cream in Aeration
While many recipes rely solely on the thickness of the cream cheese, we use a “Flash-Whip” technique with a small amount of cold heavy cream. This acts as a stabilizer, much like making a stabilized whipped cream frosting. The cold liquid hits the room-temperature fats and creates a network of tiny air bubbles.
This step transforms the dip from a heavy, dense spread into something that feels like a gourmet mousse. It provides enough structural integrity to support the heavy toffee chunks and chocolate drizzle without collapsing. It’s the difference between a grocery store tub and a high-end pastry shop creation.
Essential Components for the Toffee Dip
Choosing the right ingredients is just as vital as the technique itself. Since this is a “loaded” dip, every component needs to pull its weight in terms of flavor and texture. You aren’t just looking for sweetness; you’re looking for a balance of salt, fat, and crunch that keeps people coming back for “just one more” bite.
I always recommend using high-quality vanilla extract rather than imitation flavoring here. Since there is no cooking involved, the raw flavor of the vanilla shines through clearly. Additionally, a tiny pinch of extra sea salt can elevate the entire profile, cutting through the richness of the powdered sugar and making the peanut butter flavor pop.
Selecting the Right Peanut Butter
For this specific recipe, I strongly suggest using a standard “No-Stir” commercial peanut butter brand. While natural peanut butters are delicious, the oil separation common in those varieties can ruin the emulsion of a dessert dip. The stabilizers in commercial brands help maintain a uniform texture that won’t weep oil over time.
If you absolutely must use natural peanut butter, ensure it is incredibly well-stirred and at room temperature. However, be warned that the dip may turn out slightly softer and less stable. For that classic, nostalgic flavor and a guaranteed smooth finish, the traditional creamy brands are your best bet.
Toffee Selection: Skor vs. Heath
When it comes to the toffee, you have two main contenders: Skor and Heath. Skor bars tend to be slightly thinner and have a more pronounced buttery crunch, while Heath bars are a bit thicker and use a different blend of chocolate. Both work beautifully, but the key is how you prep them.
Avoid buying the pre-bagged “toffee bits” found in the baking aisle. Those are often too small and lose their crunch quickly when they hit the moisture of the dip. Instead, buy the full-sized bars and chop them yourself into large, irregular chunks. Those big pieces provide a much better textural contrast against the silky base.
The Necessity of Sifted Powdered Sugar
Sifting might feel like an annoying extra step, but it’s the non-negotiable secret to the “Anti-Grainy” promise. Even the most expensive powdered sugar develops tiny, hard beads in the bag due to pressure and humidity. If those beads go into the bowl, they will stay as beads in your dip.
By sifting the sugar, you ensure that every particle is fine and ready to dissolve instantly into the cream cheese. This is what creates that professional, melt-in-your-mouth sensation. It only takes sixty seconds, but it makes a world of difference in the final product’s quality.
Step-by-Step: Achieving the Velvet Texture
Achieving the perfect texture is all about the order of operations. You can’t just dump everything in a bowl and hope for the best. We’re going to build this dip in phases, ensuring each ingredient is fully integrated before moving to the next. Watch for the visual cues as the mixture transforms from two separate ingredients into a singular, pale fluff.
Keep your mixer handy and don’t be afraid to scrape the sides of the bowl frequently. You want to make sure no stray bits of unmixed cream cheese are hiding at the bottom. By the time you’re finished, the dip should look so light and airy that it almost looks like it could float away.
Phase 1: The High-Speed Fat Emulsion
Start by combining your softened cream cheese and peanut butter. You’re going to beat these together on medium-high speed for a full 3 minutes. This might seem like a long time, but you’re doing more than just mixing; you’re aerating the fats and ensuring they are perfectly bonded.
Look for the color to change. The mixture will start as a dark tan and gradually turn into a much paler, creamy beige. It should look completely uniform with no streaks of white or dark brown. This solid foundation is what prevents the dip from feeling heavy or greasy later on.
Phase 2: The Triple-Batch Sugar Integration
Once your fats are aerated, turn the mixer down to its lowest setting. Add your sifted powdered sugar in three separate batches. If you dump it all in at once, you’ll end up in a cloud of sugar dust, and the mixture will struggle to incorporate the dry powder evenly.
Mix just until the sugar disappears after each addition. You’ll notice the mixture thickening significantly during this phase. Use a rubber spatula to scrape the very bottom of the bowl to ensure every bit of sugar has been caught by the beaters. At this stage, the dip will look quite thick, almost like a stiff frosting.
Phase 3: The Flash-Whip Stabilization
Now comes the magic. Pour in your vanilla and that 1/4 cup of cold heavy cream. Immediately crank the mixer up to high speed for about 45 to 60 seconds. You’ll see the dip suddenly “relax” and then puff up as the cream whips into the base.
Be careful not to over-beat here. You’re looking for “peak fluffiness”—the moment the mixture looks like a soft mousse and holds a gentle swirl. If you go too long, you risk over-working the cream into butter, which will make the dip feel grainy again. Stop as soon as it looks light and voluminous.
Artful Assembly and Garnishing Techniques
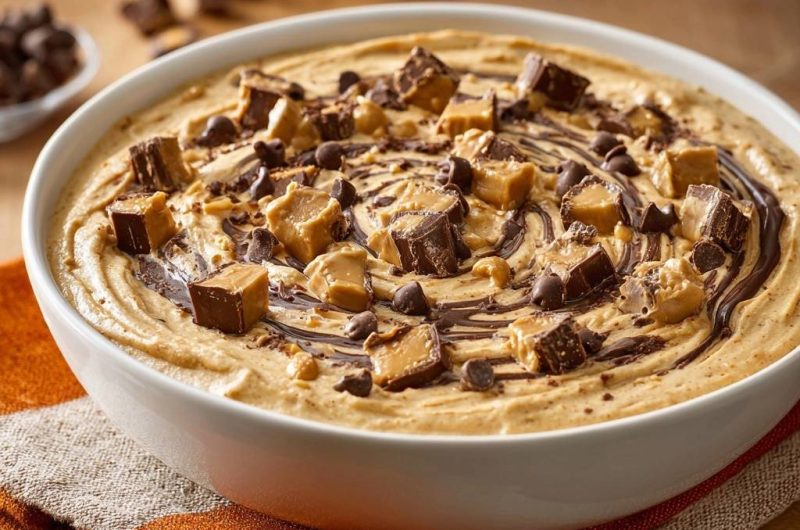
Presentation is half the fun with a loaded dip. Instead of just smoothing the top flat, use the back of a large spoon to create deep, decorative ridges and “valleys” across the surface. These aren’t just for looks; they act as little reservoirs to catch the melted chocolate drizzle and hold the toffee chunks in place.
A wide, shallow serving bowl is much better than a deep, narrow one. It provides more surface area for toppings, ensuring that every single person gets a bit of chocolate and toffee in every scoop. It also makes it much easier for guests to dip without making a mess of the edges.
That same wide shallow bowl would also be perfect for serving this peanut butter caramel chocolate cheesecake.
The Microwave Tempering Method
Melting chocolate chips can be tricky because they are designed to hold their shape. To get a smooth drizzle, microwave them in a small bowl in 15-second intervals. This is the golden rule! If you go for 30 or 60 seconds at once, the chocolate will likely scorch and become thick and clumpy.
Stir vigorously between every interval. Often, the chips will look solid but will melt completely once you start stirring them. If the chocolate feels a bit too thick to drizzle, you can add a tiny drop of neutral oil to thin it out. Use a spoon to create a zig-zag or circular pattern over those ridges you made earlier.
Structural Topping Placement
Don’t just scatter the toffee and mini chips on top like confetti. For the best experience, you want to gently press the large toffee chunks into the dip base. This “anchors” them so they don’t fall off the cracker or apple slice when someone takes a scoop.
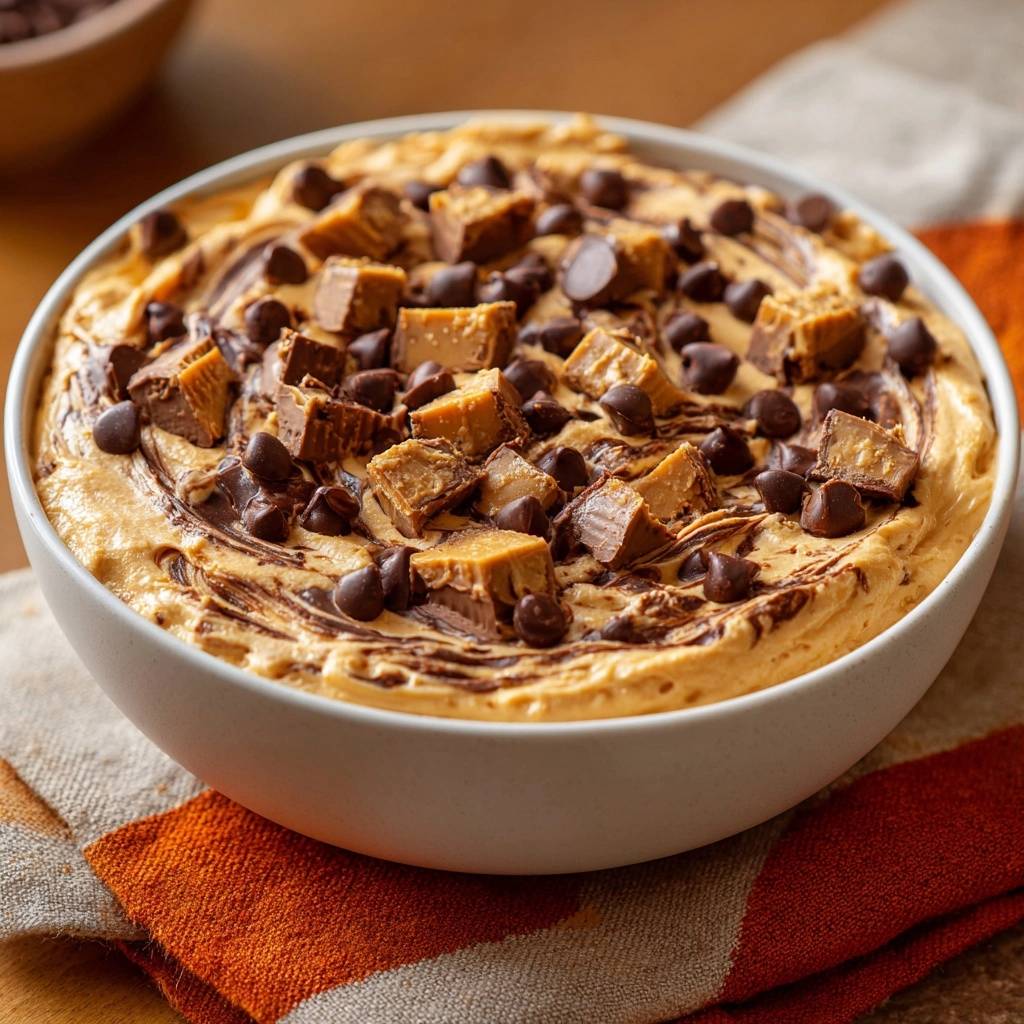
Using a mix of large toffee chunks and mini chocolate chips creates visual depth. The mini chips fill in the gaps between the toffee, ensuring there is a chocolatey element in every square inch of the bowl. It looks professional, intentional, and incredibly appetizing.
Optimal Dippers for Peanut Butter Bases
While the dip is the star, your choice of “dippers” can make or break the experience. You want a variety of textures and flavors that can stand up to the richness of the peanut butter. A mix of sweet, tart, and salty options usually works best to keep the palate excited.
Think about the structural integrity of your dippers too. Since this dip is thick and loaded with chunks, flimsy crackers will snap under the pressure. You need something sturdy enough to act as a shovel for all that toffee goodness.
Fruit Pairings: Beyond the Apple
Apples are the classic choice, but not all apples are created equal. I love using Granny Smith apples because their sharp acidity cuts right through the sweet toffee. Bosc pears are another fantastic option, offering a softer texture and a sophisticated sweetness that pairs beautifully with peanut butter.
To keep your fruit from browning during a party, toss the slices in a little bit of pineapple juice or lemon water. If you’re feeling adventurous, firm banana slices or even fresh strawberries are great additions to the platter. Just make sure the fruit is patted dry so it doesn’t add excess moisture to the dip.
Salty Contrast: Pretzels and Crisps
If you really want to highlight the “sweet and salty” vibe, pretzels are mandatory. Pretzel rods are the sturdiest option, but flat pretzel crisps provide a great surface area for piling on the toppings. The salt on the outside of the pretzel is the perfect foil for the sugary toffee.
For a more unique twist, try sea-salt pita chips or even thick-cut potato chips. The extra salt and the crunch of a kettle chip create a “grown-up” snacking experience that is surprisingly addictive. Graham crackers are also a crowd favorite, especially for kids who want that “cookies and milk” flavor profile.
Troubleshooting Common Dip Consistency Issues
Even with the best instructions, things can sometimes go sideways in the kitchen. The good news is that most dip disasters are easily reversible if you know what to look for. Here are the most common issues and how to fix them quickly.
- Issue: The dip is too stiff. If the dip feels more like a block of fudge than a spread, you likely over-mixed it or your cream cheese was too cold. Simply add one tablespoon of room-temperature heavy cream or milk and gently fold it in until the consistency loosens up.
- Issue: The chocolate drizzle seized. If your melted chocolate turned into a grainy paste, a drop of water likely got into the bowl. You can often save it by stirring in a teaspoon of neutral oil or melted coconut oil until it becomes glossy again.
- Issue: The mixture looks broken or oily. This usually happens if the room is too hot or the peanut butter was too oily. Chill the bowl for 10 minutes, then re-whip it on high speed to bring the emulsion back together.
Make-Ahead Logistics and Storage Standards
You can absolutely make the base of this dip up to 24 hours in advance. In fact, the flavors often meld and deepen after a night in the fridge. However, if you do refrigerate it, you must bring it back to room temperature for at least 30 to 60 minutes before serving to regain that spreadable texture.
Store any leftovers in an airtight container in the refrigerator for up to 4 days. I don’t recommend freezing this dip; the cream cheese and heavy cream will change texture when thawed, often becoming grainy or watery. It’s best enjoyed fresh or within a few days of making.
Expert Tips for Large Scale Events
If you’re hosting a big crowd, this recipe doubles easily. Just make sure you have a large enough bowl to allow for the aeration during the whipping phases. When serving at a party, remember the “Wide Bowl” theory: a wider dish allows more people to access the toppings simultaneously, preventing a “toffee bottleneck” at the snack table.
To keep the dip looking fresh throughout the night, keep it away from direct heat sources like a sunny window or a hot stove. A cool room temperature of around 68°F is the sweet spot. If the party is outdoors, place the serving bowl inside a slightly larger bowl filled with a bit of ice to keep it stable.
Maintaining Texture During Service
The beauty of this specific recipe is that the “Flash-Whip” stabilization helps it hold its fluffiness for hours. Unlike dips made with just whipped topping, this one won’t deflate or turn into liquid. If it does start to look a little dull after a few hours, a quick stir with a spoon will usually revive the sheen.
If you notice the chocolate drizzle hardening too much in a cold room, don’t worry. The snap of the chocolate actually adds another layer of texture. Just ensure your dippers are strong enough to break through that delicious chocolate shell.
Customizing the Loaded Toppings
While toffee and chocolate are the gold standard, you can easily customize this base. For a “Grown-Up” version, try adding a sprinkle of Maldon sea salt and some toasted pecans. Or, for a double-chocolate version, use white chocolate drizzle alongside the semi-sweet.
You can even swap the toffee for crushed pretzels or peanut butter cups if you want to go all-in on the peanut theme. The base is versatile enough to handle almost any crunchy mix-in you can dream up. Just remember to keep the “Anti-Grainy” mixing steps the same, and you’ll have a winner every time.
How do I prevent the dip from getting grainy?
The most important step is sifting your powdered sugar and ensuring your cream cheese is completely at room temperature. Graininess usually comes from undissolved sugar clumps or tiny bits of cold cream cheese. By sifting the sugar and beating the fats for a full three minutes before adding solids, you create a smooth environment where the sugar can dissolve perfectly.
Can I use a different type of nut butter?
Yes, you can substitute almond butter or cashew butter for the peanut butter. However, keep in mind that these nut butters often have a different oil content. Stick to “no-stir” versions if possible to maintain the stability of the dip. If using a natural alternative, you may need to slightly reduce the amount of heavy cream to ensure the dip stays thick enough to hold the toppings.
What is the best way to store leftovers?
Leftover dip should be kept in an airtight container in the refrigerator. It will stay fresh for up to 4 days. Because it contains cream cheese and heavy cream, it will firm up significantly when cold. Before serving leftovers, let the container sit on the counter for about 30 minutes to soften back to its original, creamy consistency.
Why did my chocolate drizzle turn white or chalky?
This is called “bloom,” and it usually happens when chocolate is heated too quickly or stored in a place with fluctuating temperatures. It doesn’t mean the chocolate is bad; it just means the cocoa butter has separated slightly. To avoid this, use the 15-second microwave interval method and stir thoroughly to keep the temperature even. If it happens to your finished dip, don’t worry—it still tastes great!
Can I make this dip dairy-free?
You can attempt a dairy-free version by using a plant-based cream cheese and a dairy-free heavy cream alternative. However, be aware that plant-based fats often have different melting points and may not aerate as well during the “Flash-Whip” phase. You might need to add a bit more powdered sugar to help stabilize the structure if the dairy-free alternatives are too soft.
Why is my dip too runny?
If your dip is runny, it’s likely because the cream cheese was too warm (almost melted) or the heavy cream was over-whipped until it broke. Another culprit could be using a very oily natural peanut butter. To fix a runny dip, try chilling it in the fridge for 30 minutes to firm up the fats, then give it a quick whip with the mixer to see if it regains its structure.
Peanut Butter Toffee Dip
Course: AppetizerCuisine: AmericanDifficulty: easy12
servings15
minutes295
kcal15
MinutesThis Loaded Peanut Butter Toffee Dip features a creamy, aerated base topped with melted chocolate swirls, mini chocolate chips, and crunchy toffee chunks. It is designed to stay perfectly smooth and spreadable for parties.
Ingredients
1 package (8 ounces) cream cheese, softened to room temperature
1 cup creamy peanut butter
1 cup powdered sugar, sifted
1 teaspoon vanilla extract
1/4 cup heavy cream (cold)
1/2 cup semi-sweet chocolate chips (for melting/swirl)
1/2 cup mini chocolate chips (for topping)
1 cup chocolate-covered toffee bars (such as Heath or Skor), chopped into large chunks
Additional sea salt (optional, for balancing sweetness)
Directions
- The secret to avoiding graininess is ensuring your cream cheese is truly at room temperature. If it is even slightly cold, it will create tiny lumps that powdered sugar cannot fix. In a large bowl, beat the softened cream cheese and peanut butter together on medium-high speed for a full 3 minutes until the mixture looks pale, aerated, and completely uniform.
- To prevent a gritty texture, sift your powdered sugar before adding it. Add the sugar in three small batches, mixing on the lowest speed just until incorporated. This prevents the sugar from clumping and ensures it dissolves fully into the fats of the cheese and peanut butter.
- Add the vanilla extract and the heavy cream. Increase the speed to high for 45-60 seconds. This “flash-whip” stabilizes the dip, aerating the heavy cream within the fat base to create a professional, silk-like mouthfeel that isn’t heavy or oily.
- Transfer the base mixture to a wide serving bowl. Use the back of a spoon to create deep decorative swirls and ridges on the surface.
- Place 1/2 cup of semi-sweet chocolate chips in a microwave-safe bowl. Microwave in 15-second intervals, stirring between each, until completely smooth. Using a spoon, drizzle the melted chocolate into the ridges of the dip, following the circular pattern shown in the image.
- Generously top the dip with the large chunks of chopped toffee bars and the mini chocolate chips. Ensure the toffee chunks are pressed slightly into the dip so they stay in place.
- Serve immediately with apple slices, pretzels, or graham crackers. For the best consistency, do not refrigerate right before serving; keep it at a cool room temperature to maintain that perfect, non-grainy spreadability.
Notes
- To maintain the non-grainy texture, ensure the cream cheese is fully at room temperature before starting and do not refrigerate immediately before serving.