Mastering the Raspberry Chocolate Fudge Cake
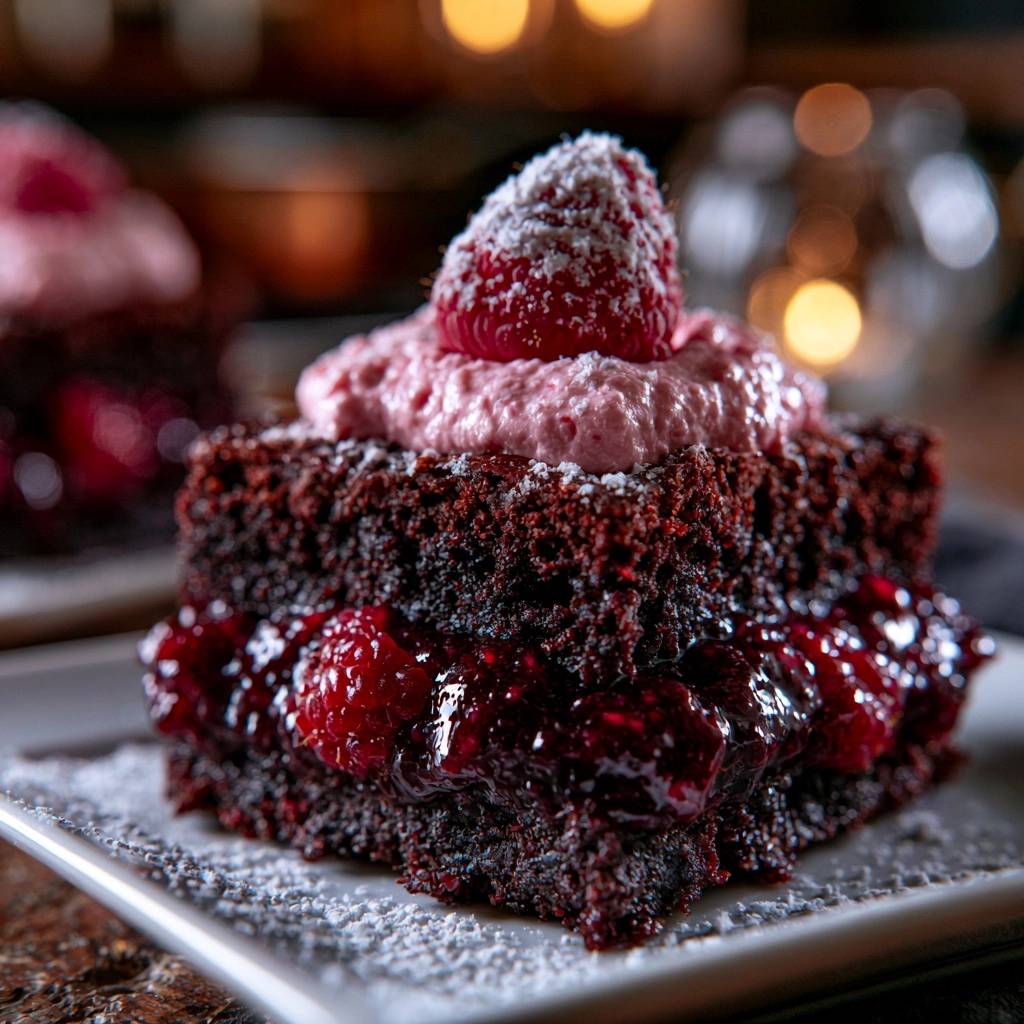
Imagine biting into a slice of cake where the deep, earthy richness of dark cocoa meets the sharp, electric zing of fresh fruit. Most home bakers struggle with fruit-filled cakes because the berries eventually leak, turning a beautiful sponge into a purple, waterlogged mess. This Raspberry Chocolate Fudge Cake changes that narrative entirely by using a professional fruit-sealing technique that keeps every layer distinct and structurally sound.
You’ve likely experienced the disappointment of a “soggy bottom” when working with fresh produce in baking. The secret to this recipe’s success lies in the way we treat the raspberries before they ever touch the chocolate. By creating a thickened glaze, we build a moisture barrier that protects the cake’s crumb while intensifying the natural berry flavor.
Expert bakers know that moisture management is the difference between a dessert that lasts and one that collapses within an hour. I’ve found that using a cornstarch-thickened fruit base acts like a sealant, locking the juices inside a glossy gel. This ensures your fudge base stays dense and velvety, rather than absorbing excess liquid and becoming mushy.
The Chemistry of a Stable Fruit Filling
When you toss raw raspberries into a cake, the heat of the oven or the weight of the layers causes their cell walls to rupture. This releases a flood of juice that migrates directly into the surrounding sponge. To prevent this, we use a process called maceration combined with heat to stabilize the fruit’s structure before assembly.
By simmering the berries with preserves and a cornstarch slurry, you are essentially pre-shrinking the fruit and capturing its liquid in a starch network. This creates a stable, jam-like consistency that stays exactly where you put it. The resulting glaze is thick enough to hold its shape but soft enough to meld with the chocolate fudge base during every bite.
Furthermore, the acidity in the raspberries provides a beautiful contrast to the heavy fats in the chocolate. However, that same acidity can break down the cake’s structure if not properly contained. The cooked glaze method neutralizes this risk, giving you the bright flavor of fresh fruit without the structural compromise.
Why Fresh Berries Need Heat
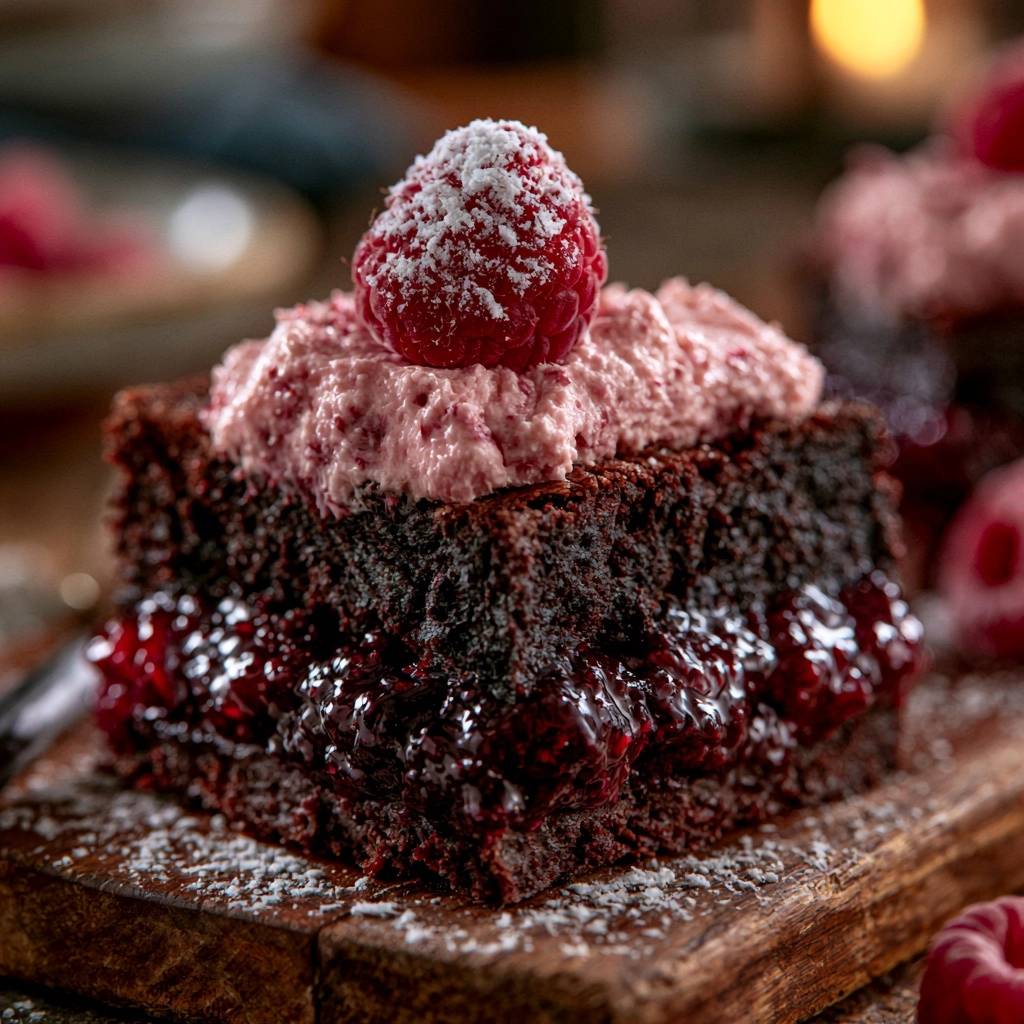
Raspberries are incredibly delicate and contain a high percentage of water. When you apply gentle heat in a saucepan, you are breaking down the pectin and allowing the juices to mingle with the preserves. This step is vital because it ensures the “weeping” effect happens in the pan rather than inside your finished cake.
You’ll notice the berries soften and the mixture becomes fragrant within just a few minutes. This transformation is the key to a professional finish. If you skip this, the raw juice will eventually seep out, creating those unsightly purple stains on your serving plate and softening the bottom layer of your fudge cake.
The Role of Cornstarch in Moisture Control
Cornstarch acts as the primary thickening agent in our “anti-soggy” strategy. When the starch granules reach a specific temperature, they undergo gelatinization, absorbing the raspberry juice and swelling to create a thick, clear gel. This gel is what traps the moisture in place.
You want to look for a “clear, heavy glaze” as your visual cue. If the mixture looks cloudy, the starch hasn’t fully cooked out yet. Once it turns translucent and coats the back of a spoon, you’ve successfully created a moisture-proof barrier that will keep your cake layers perfectly dry and airy.
Essential Components for the Fudge Base
The foundation of this dessert is a one-bowl chocolate fudge cake that relies on pantry staples. We use all-purpose flour because its moderate protein content provides enough structure to support the heavy fruit filling without making the cake tough. It’s the perfect middle ground for a dessert that needs to be both sturdy and tender.
Unsweetened cocoa powder is the star here, providing the deep chocolate flavor. Because this recipe uses baking soda, the natural acidity in the cocoa powder reacts to create carbon dioxide bubbles. This reaction is what gives the cake its lift, ensuring the fudge base isn’t overly dense or brick-like.
Don’t forget the salt! It might seem like a small addition, but salt is a flavor enhancer that cuts through the sugar and makes the chocolate taste more like chocolate. It balances the sweetness of the raspberry preserves and ensures the dessert has a sophisticated, well-rounded profile.
Selecting High-Quality Cocoa Powder
For this specific recipe, you should stick with natural unsweetened cocoa powder rather than Dutch-processed. Natural cocoa is more acidic, which is necessary to activate the baking soda. If you use Dutch-processed, which has been neutralized, your cake might not rise properly and could end up with a soapy aftertaste.
The fat content in your cocoa also matters. Higher-quality cocoa powders often retain more cocoa butter, which contributes to a richer “fudge” mouthfeel. When you whisk the cocoa with the warm water, you’ll smell an immediate intensification of the chocolate aroma as the heat “blooms” the powder.
Oil vs. Butter for Lasting Moisture
While butter offers great flavor, vegetable oil is the superior choice for this fudge cake. Oil remains liquid at room temperature and even when chilled, which means your cake will stay incredibly moist and soft even after a day in the fridge. Butter-based cakes tend to firm up and become dry when cold.
Oil also does a better job of coating the flour proteins. This prevents the development of too much gluten, which is the enemy of a tender crumb. By using oil, you ensure that every square of your Raspberry Chocolate Fudge Cake has that melt-in-your-mouth quality that contrasts so well with the chilled cream topping.
Step-by-Step: Constructing the Chocolate Foundation
Mixing this batter is straightforward, but technique still matters. You want to whisk your dry ingredients first to break up any cocoa clumps. When you add the wet ingredients, whisk just until the batter is smooth. Over-mixing at this stage can lead to a rubbery texture, so stop as soon as the dry streaks disappear.
The warm water is a crucial addition. It helps dissolve the sugar quickly and ensures the cocoa powder is fully hydrated. You’ll notice the batter is relatively thin compared to a standard yellow cake, but don’t worry. This thin consistency allows the baking soda to work efficiently, resulting in a level, even bake.
Preparing the 8×8 Square Pan
To make your life easier, grease your 8×8 pan thoroughly. If you want to be a pro, use a parchment paper “sling.” Cut a strip of parchment that fits the width of the pan and leaves an overhang on two sides. This allows you to lift the entire cake out once it’s cooled, making the horizontal slicing much safer.
Without a sling, you run the risk of the cake sticking to the corners. Since this is a fudge-style cake, it is naturally more delicate than a sponge cake. Taking the extra minute to prep your pan ensures you won’t have any heartbreaking cracks when it’s time to assemble the layers.
Testing for Doneness Without Overbaking
Overbaking is the fastest way to ruin a fudge cake. Start checking your cake at the 30-minute mark. Insert a toothpick into the center; it should come out clean or with just a few moist crumbs attached. If you see wet batter, give it another five minutes.
Remember that carry-over cooking is real. The cake will continue to set as it cools in the pan. If you wait until the toothpick is bone-dry, the cake will likely be overdone by the time it reaches room temperature. Patience is key here—let it cool completely before you even think about slicing it.
Executing the Anti-Soggy Raspberry Glaze
While the cake cools, you can start the glaze. When you add the fresh raspberries to the saucepan, be gentle. You want some of the berries to break down into the sauce, but keeping a few whole pieces provides a wonderful texture. Use a silicone spatula to fold them into the preserves rather than a heavy spoon.
The most important rule for the glaze is that it must be stone-cold before assembly. If you spread warm glaze onto the cake, it will melt into the crumb and ruin the “anti-soggy” barrier you worked so hard to create. I usually pop the glaze in the fridge for 20 minutes to speed things up.
Stabilizing the Raspberry Cream Topping
The topping for this cake isn’t just plain whipped cream. We use freeze-dried raspberry powder, which is a total game-changer. This powder acts as a natural stabilizer, absorbing excess moisture from the heavy cream and preventing it from deflating or weeping over time.
It also provides a vibrant, natural pink color and a concentrated punch of tartness that balances the heavy chocolate. You get all the flavor of fresh raspberries without the liquid volume that usually makes whipped cream toppings go runny after an hour on the counter.
Achieving Stiff Peaks with Heavy Cream
For the best results, chill your mixing bowl and whisk attachment in the freezer for 10 minutes before you start. Cold equipment keeps the fat in the cream stable, allowing it to trap air more effectively. Start on low speed to incorporate the powdered sugar and raspberry powder, then crank it up.
Watch the cream closely. You are looking for stiff peaks—where the cream stands straight up when you lift the whisk. Be careful not to go too far, or you’ll end up with raspberry-flavored butter. The freeze-dried powder makes the cream thicken faster than usual, so stay focused!
Assembly Techniques for Professional Results
Slicing a cake horizontally can be intimidating, but a long serrated knife makes it easy. Keep your hand flat on top of the cake and saw gently, keeping the blade parallel to the counter. If the cake feels too soft, chill it in the fridge for 30 minutes to firm up the fats before slicing.
Once you’ve spread the glaze and replaced the top layer, here is the secret tip: slice the cake into its 9 squares before you add the cream. This ensures that the raspberry filling doesn’t squish out the sides when you cut it later. It gives you those perfectly clean, professional edges you see in high-end bakeries.
Troubleshooting Common Baking Obstacles
If your raspberry glaze seems too thin after cooling, don’t panic. You can return it to the heat and add a tiny bit more cornstarch slurry, simmering until it reaches the desired thickness. It should look like a heavy syrup that doesn’t run easily when dropped from a spoon.
If your cake cracks while you are moving the top layer, just use the raspberry cream to “glue” it back together. Once the powdered sugar is dusted over the top, no one will ever know. If the cream feels soft, pop the whole assembled cake into the fridge for an hour to let everything set up firmly.
Make Ahead and Storage Protocols
This is one of those rare cakes that actually tastes better the next day. The flavors have time to meld, and the chocolate base becomes even fudgier. You can store the assembled cake in an airtight container in the refrigerator for up to three days.
To protect the cream topping from absorbing fridge odors, make sure your container is truly airtight. If you are making this for a party, you can bake the cake and make the glaze a day in advance, then simply whip the cream and assemble the dessert a few hours before serving.
Expert Tips for Perfect Presentation
For that “wow” factor, use a fine-mesh sieve for the powdered sugar dusting. A heavy, even coat of white sugar against the bright pink raspberry cream and dark chocolate cake looks stunning. It provides a professional, finished look that hides any minor imperfections in the cake’s surface.
Wait until the very last second to add the final fresh raspberry on top of each dollop. This keeps the berry looking plump and prevents it from bleeding into the cream. A little extra effort in the presentation goes a long way in making this simple square cake feel like a gourmet masterpiece.
How do I store leftovers?
Store any remaining cake in an airtight container in the refrigerator. It will stay fresh and delicious for up to 3 days. Because of the fresh cream and fruit glaze, this cake should not be left out at room temperature for more than two hours. Do not freeze the assembled cake, as the fresh raspberries and whipped cream will lose their texture upon thawing.
Why did my cake turn out dry?
The most common reason for a dry chocolate cake is overbaking. Since this is a fudge-style cake, it relies on a specific moisture balance. Always check for doneness a few minutes early. Additionally, ensure you are using vegetable oil rather than butter, as oil provides a much more consistent moisture level in cocoa-based cakes.
Can I use frozen raspberries for the filling?
Yes, you can use frozen raspberries for the cooked glaze portion of the recipe. However, do not thaw them first; add them directly to the saucepan with the preserves. You may need to simmer the mixture for an extra minute or two to account for the extra liquid frozen berries often release. Always use fresh raspberries for the final garnish on top.
What if I can’t find freeze-dried raspberry powder?
If you can’t find the powder, you can buy freeze-dried raspberries and pulse them in a clean coffee grinder or food processor until they turn into a fine dust. If you must skip it entirely, the cream will be less stable and lighter in color. In that case, add an extra tablespoon of powdered sugar to help with stability, but serve the cake immediately after topping.
Why is my raspberry glaze runny?
A runny glaze usually means the cornstarch wasn’t activated by enough heat or the ratio was slightly off. Ensure the mixture reaches a full simmer for at least one minute. It must also be completely cold before you spread it on the cake. If it’s still thin after cooling, it won’t provide the “anti-soggy” barrier needed for the layers.
Can I substitute the sugar for a liquid sweetener like honey?
I don’t recommend substituting the granulated sugar with a liquid sweetener in this specific recipe. The sugar is essential for the cake’s structure and crumb. A liquid sweetener would change the moisture ratio significantly, likely resulting in a heavy, gummy cake that won’t rise properly with the baking soda.
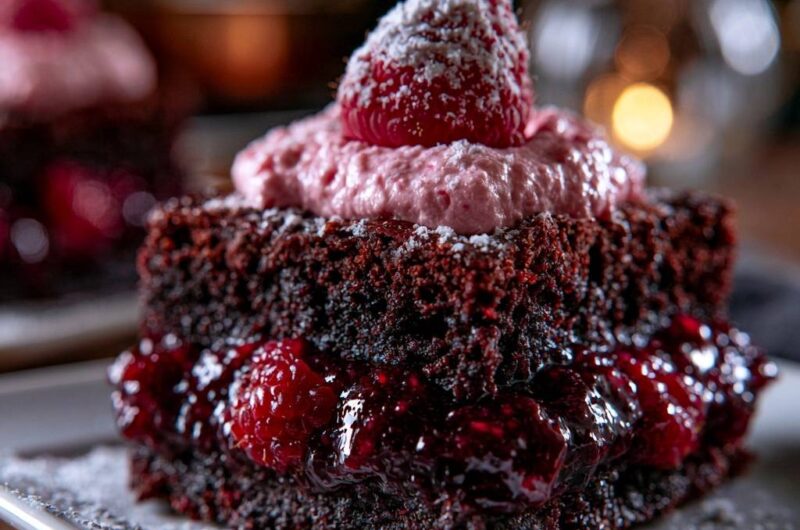
Raspberry Chocolate Fudge Cake
Course: DessertCuisine: AmericanDifficulty: easy9
servings25
minutes35
minutes60
Minutes410
kcalAmerican
Ingredients
1 and 1/2 cups all-purpose flour
1 cup granulated sugar
1/3 cup unsweetened cocoa powder
1 teaspoon baking soda
1/2 teaspoon salt
1 cup warm water
1/3 cup vegetable oil
1 teaspoon vanilla extract
2 cups fresh raspberries, divided
1/2 cup raspberry preserves
1 tablespoon cornstarch mixed with 1 tablespoon cold water
1 cup heavy whipping cream, chilled
3 tablespoons powdered sugar
1/4 cup freeze-dried raspberry powder (for color and stability)
Extra powdered sugar for dusting
Directions
- Preheat your oven to 350°F (175°C) and grease an 8×8 inch square baking pan.
- In a large bowl, whisk together flour, sugar, cocoa, baking soda, and salt. Add water, oil, and vanilla. Whisk until smooth and no dry clumps remain.
- Pour the batter into the pan and bake for 30 to 35 minutes or until a toothpick inserted in the center comes out clean. Let the cake cool completely in the pan before removing.
- Prepare the “Anti-Soggy” filling: In a small saucepan over medium heat, combine the raspberry preserves and 1 and 1/2 cups of fresh raspberries. Stir gently for 2-3 minutes until the berries just begin to release juice. Stir in the cornstarch slurry and simmer for 1 minute until the mixture thickens into a clear, heavy glaze. Remove from heat and cool completely. This cooked glaze seals the fruit and prevents raw juice from migrating into the cake.
- Carefully slice the cooled cake horizontally into two even layers using a serrated knife. Place the bottom layer on a serving plate.
- Spread the cooled, thickened raspberry mixture evenly over the bottom layer. Place the second cake layer on top. Slice the cake into 9 even squares before topping to ensure clean edges.
- In a chilled bowl, beat the heavy cream, powdered sugar, and freeze-dried raspberry powder until stiff peaks form. The raspberry powder provides the deep pink color and thick texture seen in the image without adding excess moisture.
- Dollop a generous amount of the raspberry cream onto each square.
- Top each dollop with a remaining fresh raspberry and finish with a heavy dusting of powdered sugar over the entire dessert. Serve immediately.
Notes
- The secret to this cake is the cornstarch slurry and raspberry preserve glaze which seals the fresh fruit. Using freeze-dried raspberry powder in the whipped cream provides natural color and structural stability without adding extra liquid.