Mastering the Ultra Creamy Cheesy Chicken Casserole
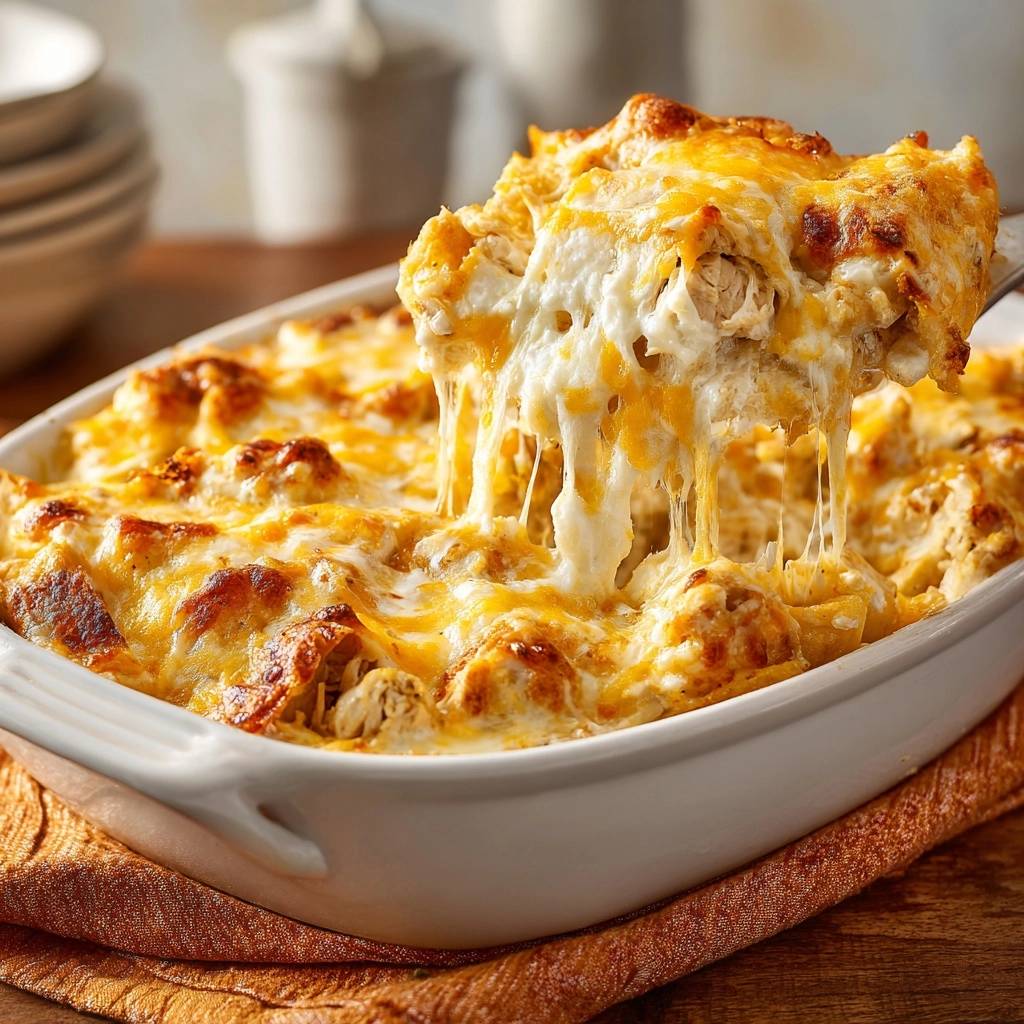
Most home cooks have experienced the disappointment of pulling a casserole out of the oven only to find a puddle of gray liquid lurking beneath the cheese. It’s a common tragedy where what should be a rich, comforting meal turns into a soggy, unappealing mess. This Ultra Creamy Cheesy Chicken Casserole solves that epidemic by focusing on structural integrity and moisture control.
We’ve all been there, craving that deep, soul-warming satisfaction that only a baked dish can provide. However, the technical failure of most recipes lies in a broken sauce or a watery base that ruins the mouthfeel. By understanding how ingredients interact under heat, you can create a dish that stays thick, luscious, and perfectly bound from the first scoop to the last.
The secret to this success is the “Moisture-Lock” philosophy. By treating the chicken and the dairy base with specific techniques, we ensure the fats and proteins stay emulsified. One pro tip you must remember: always pat your cooked chicken dry with paper towels before mixing. This simple step prevents the meat from “weeping” extra water into your beautiful sauce while it bakes.
The Science of the Anti-Soggy Casserole Base
When you slide a 9×13 dish into the oven, you’re essentially creating a small steam chamber. As the ingredients heat up, moisture naturally wants to escape. However, when you top a dish with a thick, heavy layer of cheese, that steam gets trapped. If there is too much water in your chicken or vegetables, it has nowhere to go but down, pooling at the bottom of the dish.
This is why patting the chicken dry is a non-negotiable step for an elite result. Even pre-cooked or rotisserie chicken carries surface moisture or residual juices that will thin out your sauce. By removing this liquid, you allow the cream cheese and sour cream to cling tightly to the protein islands rather than sliding off into a watery puddle.
Furthermore, the protein structure of the sauce itself plays a massive role. We use a combination of high-fat dairy and condensed soup to create a stable matrix. This thick binder acts as a net, holding the fats in place. Without this stability, the sauce “breaks,” meaning the oil separates from the solids, leaving you with a greasy, thin liquid instead of a velvety cream.
Essential Components for the Ultra Creamy Texture
Achieving a texture that is both rich and stable requires the right fat content. This is not the time for “light” or “low-fat” versions of your favorite dairy products. Full-fat sour cream is mandatory because it contains the necessary fat globules to prevent curdling at high temperatures. Lower-fat versions have a higher water-to-protein ratio, which almost guarantees a broken sauce.
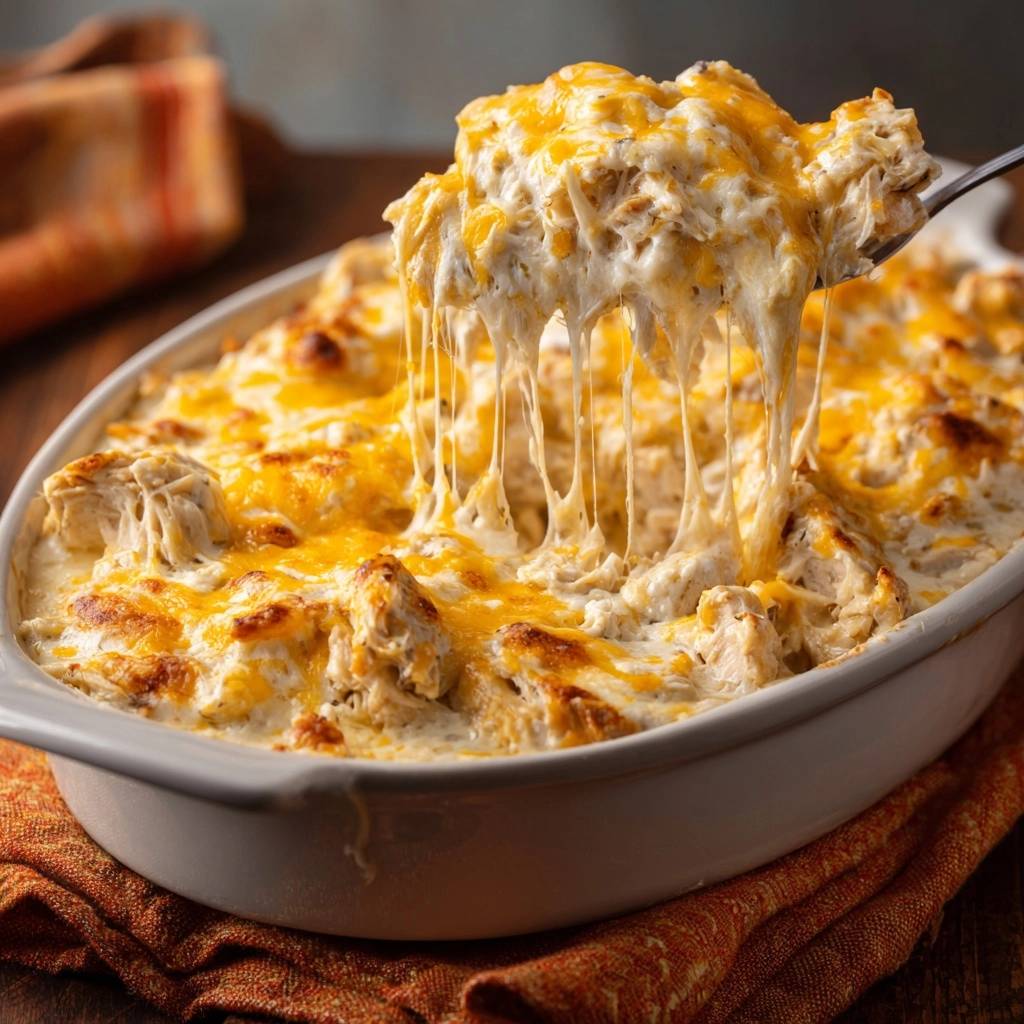
We rely on what I call the “Structural Trio” to build the perfect body. First, the cream cheese provides the heavy lifting; it adds a dense, silky mouthfeel that keeps the casserole from feeling like a soup. Second, the condensed cream of chicken soup offers flavor density and a pre-stabilized base. Finally, the sour cream introduces a necessary hit of acidity to cut through the richness while adding a smooth, tangy finish.
This same cream cheese technique ensures a luscious, velvety texture in this creamy cheesy chicken bake.
When these three elements combine, they create a dairy emulsion that is incredibly resilient. Therefore, even when subjected to the high heat of a 400°F oven, the sauce remains thick and cohesive. It wraps around the chicken chunks like a warm blanket, ensuring every single bite is packed with flavor and a consistent, luxurious texture.
Selecting and Preparing the Chicken Protein
While it might be tempting to use shredded chicken, large chunks are actually superior for this specific recipe. Shredded meat has more surface area, which means it releases more moisture and can easily become mushy when baked in a heavy sauce. You want the chicken to stand its ground against the creaminess.
Larger chunks provide “islands” for the sauce to cling to, creating a varied texture that is much more satisfying to eat. When you take a bite, you should feel the distinct, firm texture of the chicken contrasted against the soft, gooey cheese. This creates a professional-grade mouthfeel that elevates the dish from a simple weeknight bake to something truly special.
The Three-Cheese Blend for Maximum Melt
The topping isn’t just about flavor; it’s about chemistry. We use a specific blend of Mozzarella, Sharp Cheddar, and Parmesan to achieve the perfect crust. Mozzarella is the king of the “pull,” providing those long, stretchy strands that make a casserole look so appetizing. However, Mozzarella on its own is relatively bland and lacks the oil needed for a rich flavor.
That’s where the Sharp Cheddar comes in. It provides the punchy, salty flavor and the fat that creates a beautiful sheen. Finally, the freshly grated Parmesan is the secret weapon. Because it is a hard cheese with high protein solids, it doesn’t just melt; it browns. This is what gives you those gorgeous, dark-spotted blisters on the surface that provide a slight crunch and a deep, nutty aroma.
Step-by-Step: Building the Ultra Creamy Cheesy Chicken Casserole
Building this dish is a three-phase process that starts with creating a stable dairy emulsion. You must ensure your cream cheese is truly softened to room temperature before you begin. If it’s even slightly cold, you’ll end up with tiny white lumps in your sauce. While they might melt eventually, they often create “oil pockets” that can cause the sauce to separate during the baking process.
Whisk the sour cream, cream cheese, and soup together until the mixture looks like a thick, glossy frosting. You shouldn’t see any streaks or lumps. Once you fold in your dried chicken chunks and spices, you’ll notice the mixture is very thick. This is exactly what you want. It should feel heavy on your spoon, indicating that the “Moisture-Lock” is in place and ready for the oven.
The second phase is the “Compression Technique.” After you spread the mixture into your greased 9×13 dish, don’t just leave it loose. Use a sturdy spatula to press the mixture down firmly into the corners and across the surface. This removes air pockets that can cause the sauce to boil unevenly or create “volcanoes” of steam that break through the cheese layer. A compressed casserole holds its shape much better when sliced.
Finally, we move to the thermal finish. Most people bake casseroles at 350°F, but we are cranking it up to 400°F. This higher temperature is the key to achieving a professional finish. It allows the exterior to brown and the cheese to bubble vigorously before the interior chicken has a chance to overcook and become dry. It’s all about that high-heat blast to set the structure quickly.
Creating a Stable Dairy Emulsion
To get that perfectly smooth binder, start by mashing the softened cream cheese against the side of the bowl with a whisk before adding the other liquids. Gradually incorporate the sour cream. You are looking for a visual cue of “smooth ribbons” when you lift the whisk. If the mixture looks curdled at this stage, keep whisking; it will eventually smooth out into a cohesive, velvety base.
The Compression Technique for Structural Integrity
When you press the mixture into the dish, you are essentially “setting” the final shape of your meal. By removing the air, you ensure that the heat conducts evenly through the dense dairy and chicken. This prevents the edges from becoming oily while the center stays cold. A well-compressed casserole results in a clean, square scoop that looks beautiful on a plate rather than a slumped pile of food.
Thermal Execution: Why 400°F Changes Everything
The jump from 350°F to 400°F is where the magic happens. This higher heat triggers the Maillard reaction on the cheese surface much faster. This reaction is the chemical process that creates those savory, toasted flavors and the iconic brown spots. If you bake too low and slow, the cheese simply melts into a yellow sheet without ever developing that complex, crusty character.
Furthermore, the intense heat causes the edges of the casserole to caramelize against the ceramic dish. This creates a “crust” of sauce and cheese that is arguably the best part of the entire meal. By the time the center is bubbling and the cheese is blistered, the chicken inside is perfectly heated through without being subjected to a long, drying bake time. It’s a win-win for texture and flavor.
The Mandatory Rest: Why Patience Prevents Collapse
I know it’s tempting to dive in the second the timer goes off, but you must wait. The 10-minute resting period is a mandatory part of the cooking process. When the casserole is bubbling hot, the fats in the cheese and cream are in a liquid state. If you cut into it immediately, the sauce will run everywhere, and the structure will collapse into a mess.
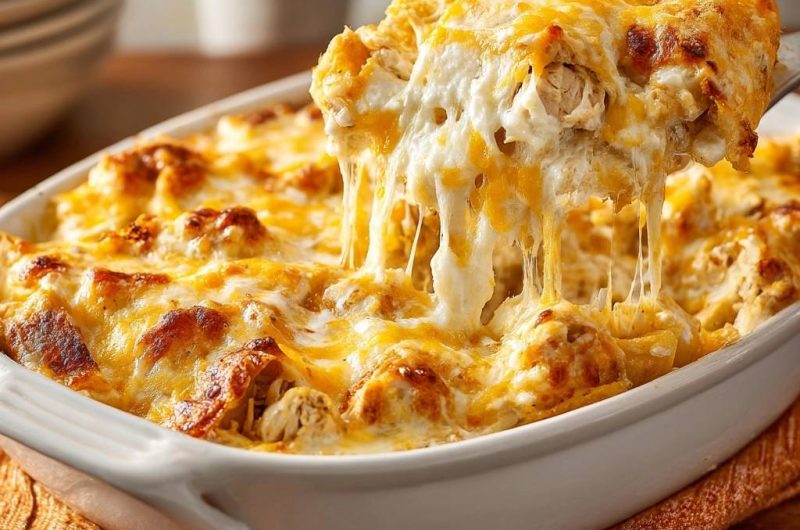
During those ten minutes, the temperature drops just enough for the fats to begin regaining their viscosity. The proteins in the cheese and the starches in the soup “set,” locking everything into place. This is the difference between a “collapsed mess” and a “clean scoop.” When you finally cut into it, you’ll get that dramatic, slow-motion cheese pull while the base stays firmly on the spatula.
Make Ahead and Freezer Preservation Strategies
This casserole is a fantastic candidate for meal prep. You can assemble the chicken and sauce mixture up to 48 hours in advance. However, here is a pro tip: store the cheese topping in a separate airtight bag and only add it right before you put the dish in the oven. This prevents the cheese from absorbing moisture from the sauce, ensuring it stays perfectly shreddy and melts correctly.
If you have leftovers, store them in an airtight container in the fridge for up to three days. When reheating, avoid the microwave if possible, as it can cause the dairy to break and become oily. Instead, place a portion in a small oven-safe dish, cover with foil, and heat at 325°F until warmed through. This “low and slow” approach protects the emulsion and keeps the chicken tender.
Troubleshooting Common Casserole Failures
If you find liquid at the bottom of your dish, the most likely culprit is the chicken. Next time, ensure you pat it completely dry or check if you added any watery vegetables like un-drained canned mushrooms. Another common issue is a curdled sauce. This usually happens if you used low-fat sour cream or if the sauce reached a violent boil for too long. Stick to full-fat ingredients for the best stability.
Is your cheese not browning? Check your oven rack position. If the dish is too low in the oven, the bottom will overcook before the top browns. Move it to the upper-middle rack. If the chicken feels dry, you might have cut the chunks too small or used pre-shredded meat that was already overcooked. Aim for one-inch cubes to maintain that juicy, tender interior that contrasts so well with the creamy sauce.
Optimal Pairings for Rich Poultry Dishes
Because this Ultra Creamy Cheesy Chicken Casserole is so rich and decadent, you want side dishes that offer a sharp contrast. A heavy dish needs a “palate cleanser” to keep the meal from feeling overwhelming. A crisp green salad with a bright lemon vinaigrette or a sharp apple cider dressing is the perfect companion. The acidity cuts right through the heavy cream and cheese.
Roasted cruciferous vegetables are another excellent choice. Think charred broccoli with a squeeze of lime or roasted Brussels sprouts with a dash of balsamic glaze. These vegetables provide a bitter, earthy counterpoint and a crunchy texture that balances the soft, velvety nature of the casserole. These pairings ensure that every bite of the main dish feels as exciting as the first one.
Frequently Asked Questions
How do I store leftovers and does this freeze well?
Store leftovers in an airtight container in the refrigerator for up to 3 days. While you can freeze this dish, dairy-heavy sauces can sometimes change texture upon thawing, appearing slightly grainy. If you must freeze it, do so before baking. Thaw it completely in the fridge for 24 hours before following the standard baking instructions. Do not bake from frozen, as the exterior will burn before the center thaws.
Why was my casserole sauce watery or thin?
This usually happens for two reasons: the chicken wasn’t dried properly before mixing, or low-fat dairy was used. Surface moisture on the chicken releases into the sauce as it heats, thinning it out. Additionally, full-fat sour cream and cream cheese provide the necessary thickness; “light” versions have more water content and will result in a runnier consistency.
Can I substitute the cream of chicken soup?
Yes, you can use cream of mushroom or cream of celery soup if you prefer those flavors. If you want to avoid canned soups entirely, you can make a very thick homemade roux-based gravy (velouté) using chicken stock and heavy cream. However, ensure the homemade version is very thick—almost the consistency of pudding—to maintain the structural integrity of the casserole.
Why didn’t my cheese get those dark brown spots?
The dark spots come from the protein in the Parmesan cheese and the high heat of the broiler. If your cheese is just melted and yellow, you likely didn’t use enough Parmesan or your oven wasn’t hot enough. Ensure you don’t skip the final 3-minute broil step, and keep the oven rack in the upper-middle position to catch that intense heat.
Can I add vegetables like broccoli or peas to this?
You can, but you must be careful with moisture. If using broccoli, steam it first and squeeze it dry with a towel. If using frozen peas, thaw them and pat them dry. Adding raw or wet vegetables will release water into the sauce and ruin the “Moisture-Lock” effect we worked so hard to achieve. Always pre-cook and dry any added veggies.
What is the best way to reheat a single serving?
To keep the sauce from separating, reheat a single serving in the oven at 325°F covered with foil for about 15 minutes. If you must use a microwave, use 50% power in short 45-second bursts, stirring gently in between. High microwave heat can “break” the dairy emulsion, leaving you with a greasy puddle instead of a creamy sauce.
Cheesy Chicken Casserole
Course: Main CourseCuisine: AmericanDifficulty: easy6
servings15
minutes30
minutes700
kcal45
MinutesThis recipe focuses on structural integrity and a thick cheese pull. By using a specific layering technique, drying the chicken, and finishing with a high-heat broil, it delivers a creamy texture without the watery mess common in traditional casseroles.
Ingredients
4 cups cooked chicken breast, cut into large chunks
1 cup sour cream (full fat)
4 oz cream cheese, softened
1 can (10.5 oz) condensed cream of chicken soup
1 teaspoon garlic powder
1 teaspoon onion powder
1/2 teaspoon black pepper
1/2 teaspoon smoked paprika
2 cups shredded mozzarella cheese
1 cup shredded sharp cheddar cheese
1/2 cup freshly grated Parmesan cheese
Directions
- Preheat your oven to 400°F (200°C). Lightly grease a 9×13 inch ceramic baking dish. A higher temperature is essential to achieve the deep golden-brown cheese blisters shown in the image without overcooking the interior.
- To solve the soggy bottom problem, ensure your cooked chicken is patted dry with paper towels before use. Excess moisture on the surface of the meat is the primary cause of a watery base.
- In a large bowl, whisk together the sour cream, softened cream cheese, and condensed soup until completely smooth. The addition of cream cheese provides the structural “body” seen in the image, preventing the sauce from breaking or becoming runny. Stir in the garlic powder, onion powder, pepper, and paprika.
- Fold the chicken chunks into the sauce. Do not over-mix; you want large pieces of chicken to remain intact to create the chunky texture visible in the scoop.
- Spread the mixture into the prepared baking dish. Press it down firmly with a spatula to remove air pockets.
- Combine the mozzarella, cheddar, and parmesan. Top the casserole with a very thick, heavy layer of this cheese blend. The parmesan adds the salt and protein needed for that specific dark-spotted crust.
- Bake for 20-25 minutes. For the final 3 minutes, turn the oven to Broil. Watch closely; you are looking for the cheese to bubble vigorously and develop deep brown toasted spots. The chicken is done when it reaches 165°F (74°C) in the thickest part.
- Remove from the oven and let the casserole rest for 10 minutes. This resting period is mandatory; it allows the fats to re-absorb and the proteins to set, ensuring a clean scoop with a dramatic cheese pull rather than a collapsed mess.
Notes
- The 10-minute resting period is mandatory to allow the proteins to set and ensure a clean scoop. Always pat the chicken dry to prevent excess moisture.