Pumpkin Spice Truffles: Flawless, Crack-Free Coating Secret
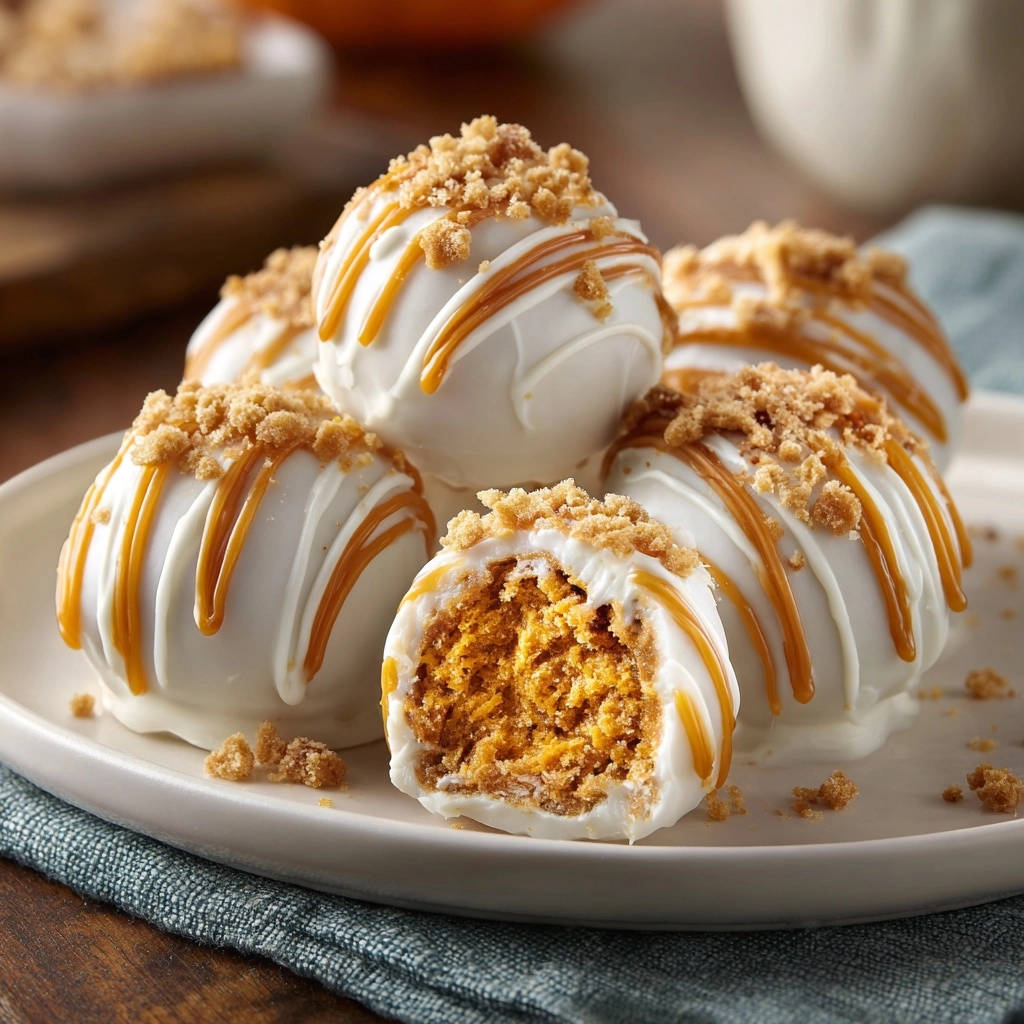
For years, I struggled with homemade truffles, especially those temperamental chocolate coatings. Nothing was more frustrating than a batch of beautiful treats ruined by unsightly cracks. That all changed when I finally perfected the method for these incredible Pumpkin Spice Truffles, guaranteeing a perfectly smooth, flawless shell every single time.
This recipe isn’t just about delicious flavor; it’s about mastering the technique for a show-stopping finish. You’ll gain confidence in creating elegant confections that are as beautiful to look at as they are delightful to eat, making them perfect for any autumn gathering or a cozy indulgence.
Unlocking the Secret to Flawless Pumpkin Spice Truffles
These Pumpkin Spice Truffles redefine ease and elegance, offering a gourmet experience without the fuss. Our unique cake mix base ensures a consistently moist, never-dense texture, making the truffle centers incredibly tender.
The true magic, however, lies in our foolproof method for achieving a crack-free white chocolate coating. By meticulously controlling the truffle temperature and employing a clever secret ingredient in the chocolate, we eliminate common frustrations.
This approach transforms what might seem like a complex dessert into an accessible baking triumph. You’ll impress everyone with these stunning, perfectly coated Pumpkin Spice Truffles that taste even better than they look.
The Heart of the Treat: Essential Ingredients You’ll Need
The Unique Cake Mix Base
Using a baked and crumbled yellow cake mix forms the foundation of these truffles. It provides a consistent, tender texture and infuses a subtle, comforting flavor base without requiring extensive baking from scratch.
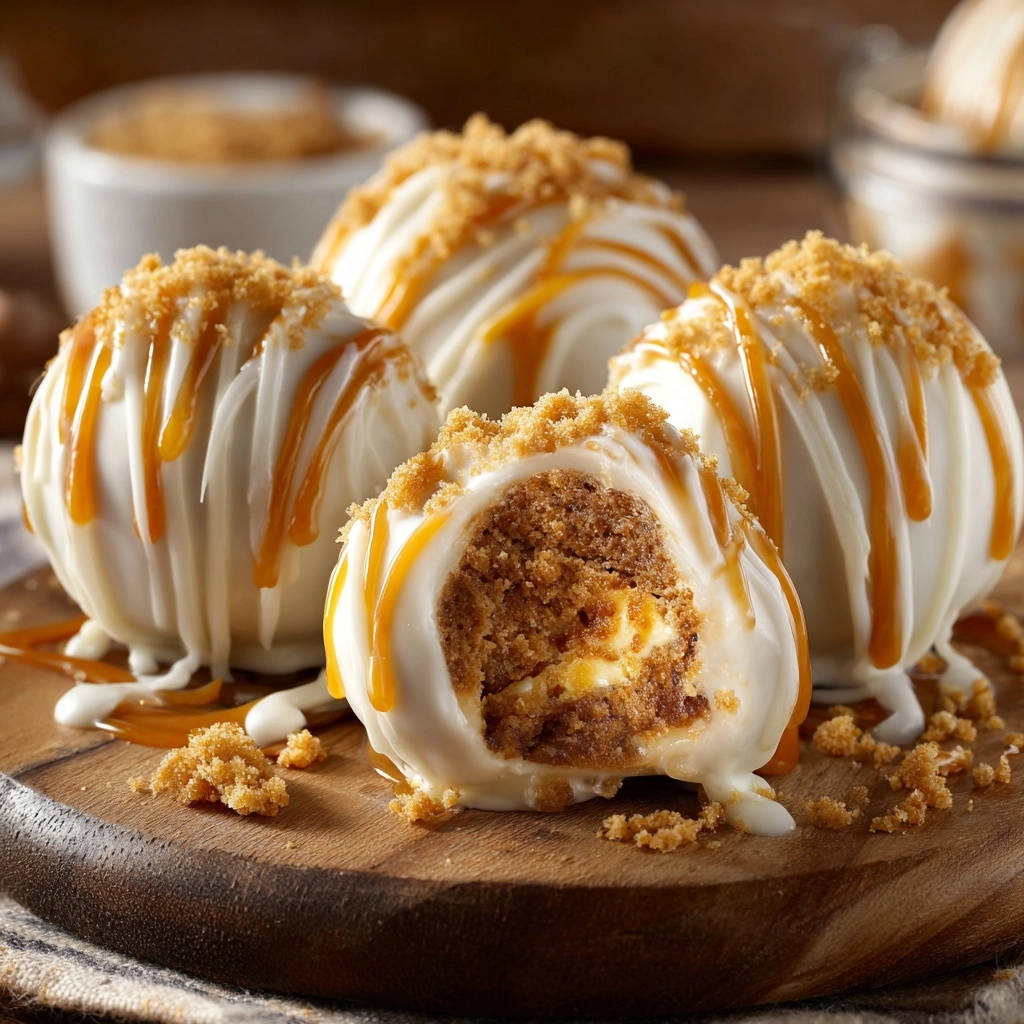
Ensure the cake is fully cooled before crumbling it into fine, even crumbs. This uniformity is key for a smooth truffle mixture that rolls easily and maintains its shape.
Pumpkin Puree and Cream Cheese: The Flavor & Texture Duo
Well-drained pumpkin puree is non-negotiable for the right truffle consistency. Excess moisture can make your mixture too soft and sticky, preventing firm rolling.
Softened cream cheese is vital for creating a rich, creamy, and pliable truffle dough. It binds the ingredients, adding a tangy depth that beautifully complements the pumpkin and spice notes.
Spice and Vanilla: Enhancing the Autumnal Notes
Pumpkin pie spice is the soul of these truffles, delivering that signature warm, aromatic blend of cinnamon, nutmeg, ginger, and cloves. Adjust to your preference for a bolder or milder flavor.
Vanilla extract amplifies and harmonizes all the flavors, adding a subtle sweetness and depth. Use a good quality pure vanilla for the best results.
The Star Coating: White Chocolate & Its Secret Weapon
For a truly flawless coating, opt for good quality white chocolate melting wafers. They are formulated to melt smoothly and set beautifully without any additives.
If you prefer white chocolate chips, the secret weapon is one tablespoon of coconut oil or vegetable shortening. This addition is crucial for thinning the chocolate, making it more elastic, and significantly reducing the risk of cracks as it sets.
Garnishes for a Dazzling Finish: Caramel & Crumbs
A drizzle of caramel sauce adds a luxurious touch, both visually and in flavor, creating a perfect sweet and slightly salty contrast to the rich truffle.
Graham cracker crumbs or crushed gingersnap cookies offer a delightful textural crunch and an extra layer of warm, spiced flavor. Apply them immediately after dipping while the chocolate is still wet.
Essential Tools for Your Truffle-Making Adventure
Large Mixing Bowl: Essential for combining all the truffle base ingredients thoroughly and without a mess.
Electric Mixer (Handheld or Stand): While not strictly mandatory, an electric mixer makes beating the cream cheese and incorporating the ingredients much easier, ensuring a smooth, uniform mixture.
Parchment-Lined Baking Sheets: Crucial for preventing your rolled truffles from sticking during chilling and freezing, and for easy handling after dipping.
Small Cookie Scoop (Optional): A 1-inch or 1.5-inch scoop helps create uniformly sized truffle balls, leading to a professional and consistent appearance.
Toothpicks or Dipping Tools: These are indispensable for cleanly dipping truffles into melted chocolate and allowing excess to drip off without making a mess on your hands.
Microwave-Safe Bowl: For safely and gradually melting your white chocolate, ensuring even heating without scorching.
Crafting Your Truffles: A Detailed Step-by-Step Guide
- Prepare the Truffle Base:
In a large bowl, combine the finely crumbled baked yellow cake, thoroughly drained pumpkin puree, softened cream cheese, pumpkin pie spice, and vanilla extract. Use an electric mixer or sturdy spatula to mix these ingredients until a uniform, dough-like mixture forms.
It’s important that the mixture is firm enough to roll into balls. If it seems too wet, ensure your pumpkin puree was very well drained. The cake crumbs absorb moisture, creating that perfect consistency.
- Initial Chill for Formability:
Cover the bowl with plastic wrap and refrigerate the truffle mixture for at least 30 minutes. This initial chilling period is crucial as it firms up the dough, making it much easier to handle and roll into neat balls without sticking to your hands.
- Roll the Truffles:
Once chilled, scoop or roll the mixture into uniform 1-inch to 1.5-inch balls. Aim for consistency in size for even dipping and a professional finish. Place these rolled balls on your parchment-lined baking sheet, leaving a small space between each.
- Crucial Freeze for Crack-Free Coating:
This is arguably the most critical step for achieving a flawless coating. Transfer the baking sheet with the rolled truffle balls to the freezer for a minimum of 20-30 minutes, or until they are very firm and thoroughly cold.
Freezing ensures the truffle centers are solid. When dipped into warm chocolate, the cold surface quickly sets the chocolate, creating a thin, smooth, and robust shell that is significantly less prone to cracking as it cools and contracts.
- Melt the White Chocolate Coating (with the Secret Ingredient):
While your truffles are freezing, prepare your white chocolate. In a microwave-safe bowl, combine your white chocolate melting wafers. If using white chocolate chips, add one tablespoon of coconut oil or vegetable shortening now.
Microwave the chocolate in short 30-second intervals, stirring thoroughly after each. Continue until the chocolate is just melted and smooth, avoiding overheating. The added fat (coconut oil/shortening) is the secret to a thinner, more elastic coating when using chips, which dramatically reduces cracks.
- Dip the Truffles:
Work with only a few frozen truffles at a time, keeping the rest in the freezer to maintain their crucial cold temperature. Insert a toothpick or a specialized dipping tool into a truffle ball.
Submerge the truffle completely into the melted white chocolate, ensuring an even and full coating. Speed is key here to prevent the truffle from warming too much.
- Achieve a Thin, Even Coat (Tap Off Excess):
Lift the dipped truffle from the chocolate. Gently tap the toothpick or dipping tool against the side of the bowl. This technique allows any excess chocolate to drip back into the bowl, leaving a thinner, more uniform coating.
A thinner layer of chocolate is much more flexible and less prone to cracking than a thick, heavy coat, contributing significantly to that coveted crack-free finish.
- Immediate Decorating:
Carefully slide the coated truffle off the toothpick onto your clean parchment-lined baking sheet. Immediately, while the chocolate is still wet, drizzle with caramel sauce and sprinkle with graham cracker crumbs or crushed gingersnap cookies.
This ensures the garnishes adhere beautifully to the still-setting chocolate, creating a stunning visual and textural appeal.
For a different take on crunchy coatings, check out these Cheetos Nutella crunch balls.
- Repeat and Maintain Chocolate Consistency:
Continue the dipping and decorating process with the remaining truffles, bringing a few out of the freezer at a time. Periodically check your melted chocolate’s consistency.
If it starts to thicken, gently rewarm it in the microwave for a very short 10-15 second burst, stirring well. Avoid overheating, as this can cause the chocolate to seize or become dull.
- Final Chill and Storage:
Once all the truffles are coated and decorated, refrigerate them for at least 1 hour, or until the white chocolate coating is completely firm and set. This final chill locks in the flavors and ensures a solid, beautiful shell.
Store your finished Pumpkin Spice Truffles in an airtight container in the refrigerator for optimal freshness and texture. They are perfect for enjoying over several days.
Chef’s Secrets for Irresistible, Crack-Free Truffles
The Power of Proper Chilling and Freezing
The initial refrigeration of the truffle mixture (Step 2) makes the dough firm and workable. This prevents stickiness and helps you roll perfectly smooth, compact balls.
The subsequent freezing (Step 4) is a scientific game-changer for chocolate coating. A deeply cold truffle instantly chills the melted chocolate upon contact, causing it to set quickly and uniformly. This rapid setting minimizes contraction and significantly reduces stress on the chocolate, thus preventing cracks.
Mastering the Melt: Optimal Chocolate Temperature is Key
When melting your white chocolate (Steps 5 & 9), warmth is desired, but never heat. Overheating white chocolate can cause it to seize (become grainy and thick) or develop a dull, streaky finish.
Microwave in short bursts, stirring diligently after each, until just smooth and fluid. If the chocolate cools and thickens during dipping, a very gentle rewarm is acceptable, but always prioritize stirring over prolonged heating.
The Magic of Coconut Oil for a Smooth Shell
If you’re using white chocolate chips, adding a small amount of coconut oil or vegetable shortening (Step 5) is essential. Unlike wafers, chips contain stabilizers that make them thicker and less fluid when melted alone.
The added fat thins the chocolate, making it more fluid and elastic. This flexibility allows the coating to conform to the truffle’s shape and expand/contract slightly with temperature changes, making it far less prone to cracking.
Achieving That Perfect Thin, Even Coat
The dipping technique, particularly tapping off excess chocolate (Step 7), is crucial for a professional result. A thin, even layer of chocolate is not only more aesthetically pleasing but also less likely to crack.
Thick coatings are more brittle and prone to breakage. A brief tap ensures a streamlined finish and a more enjoyable truffle experience.
Creative Topping Ideas Beyond the Basics
While caramel and graham cracker crumbs are classic, don’t shy away from other delightful garnishes. Consider a fine sprinkle of sea salt flakes to enhance the caramel flavor.
A drizzle of melted dark chocolate adds a sophisticated contrast, or festive autumn-themed sprinkles can make these Pumpkin Spice Truffles holiday-ready. Finely chopped pecans or candied ginger also add wonderful flavor and texture.
Truffle Troubleshoot: Common Issues & Quick Fixes
“Why Is My Truffle Mixture Too Soft/Sticky?”
This often happens if the pumpkin puree wasn’t thoroughly drained, or the cream cheese wasn’t softened enough initially. You can try adding a tablespoon or two more of finely crumbled plain yellow cake to absorb excess moisture.
Alternatively, return the mixture to the refrigerator for a longer chill; sometimes, an extra hour can make all the difference in firmness.
“Help, My White Chocolate Coating is Cracking!”
Cracking is typically due to insufficient freezing of the truffle balls (they weren’t cold enough), overheating the chocolate, or applying too thick a coating. Ensure your truffles are deeply frozen for at least 20-30 minutes before dipping.
If using chocolate chips, confirm you added coconut oil for elasticity. Also, remember to gently tap off excess chocolate after dipping to create a thinner, more flexible shell.
“My Truffles Aren’t Holding Their Shape.”
If your truffle balls are slumping, the mixture might be too warm or too soft. Pop them back into the freezer for 10-15 minutes to firm up. When rolling, work quickly and use slightly moistened hands if necessary to prevent sticking and help them hold their form.
“The Chocolate Seized While Melting!”
Chocolate seizing means it’s gone from smooth to a thick, grainy paste. This usually occurs from overheating or introducing even a tiny drop of water. Unfortunately, seized white chocolate is difficult to rescue for coating.
To avoid this, microwave in very short intervals, stir frequently, and ensure your bowl and stirring utensils are completely dry. If it happens, you might need to start with a fresh batch of chocolate.
Enjoying & Storing Your Homemade Delights
Elegant Serving Suggestions for Any Occasion
These Pumpkin Spice Truffles make a stunning addition to any dessert platter, especially during the fall and holiday seasons. Arrange them on a tiered stand or a festive plate with a dusting of cinnamon for a sophisticated presentation.
They are also perfect as thoughtful homemade gifts, nestled in small decorative boxes. Pair them with a warm mug of coffee or a spiced chai tea for a delightful treat.
Optimal Storage for Maximum Freshness
For the best quality and to maintain their firm texture and crack-free coating, store your finished truffles in an airtight container in the refrigerator. This prevents them from absorbing odors and keeps the chocolate crisp.
When stored properly, these delicious treats will remain fresh and delightful for up to one week. Bring them to room temperature for a few minutes before serving for optimal flavor.
Making Ahead: Plan Your Perfect Party Treats
These Pumpkin Spice Truffles are ideal for making in advance, making party planning a breeze. You can prepare the truffle mixture up to 2-3 days ahead, rolling the balls and keeping them chilled or frozen until you’re ready to dip.
The finished, coated truffles can be made a day or two before your event and stored in the refrigerator, ready to impress your guests with minimal last-minute effort.
Your Top Pumpkin Spice Truffles Questions Answered
Can I Use Dark or Milk Chocolate for the Coating?
Absolutely! While white chocolate highlights the pumpkin spice beautifully, dark or milk chocolate can be used for a different flavor profile. Remember that dark chocolate often melts thinner, while milk chocolate might benefit from a tiny bit of coconut oil for fluidity. For another autumnal chocolate treat, try these Decadent Pumpkin Pie Truffles with a different chocolate base!
How Can I Make These Gluten-Free?
To make these truffles gluten-free, simply substitute the regular yellow cake mix with a gluten-free yellow cake mix. Ensure it’s baked and crumbled according to package directions, just like the original recipe. Always double-check ingredient labels for any hidden gluten.
What If I Don’t Have Pumpkin Pie Spice?
No pumpkin pie spice? No problem! You can easily create your own blend. Combine 1/4 teaspoon ground cinnamon, a generous pinch of ground nutmeg, a tiny pinch of ground ginger, and an even tinier pinch of ground cloves for an excellent substitute. This homemade mix will provide that warm, autumnal flavor profile.
Can I Freeze the Finished Truffles?
Yes, you can! Freezing finished Pumpkin Spice Truffles is a great way to extend their shelf life. Arrange them in a single layer on a parchment-lined tray until firm, then transfer them to an airtight, freezer-safe container. They will keep for up to 1 month. Thaw them in the refrigerator before serving.
What’s the Best Way to Drain Pumpkin Puree?
To effectively drain pumpkin puree, line a fine-mesh sieve with a few layers of cheesecloth or a coffee filter. Place the pumpkin puree in the lined sieve, set it over a bowl, and let it sit in the refrigerator for at least 30 minutes, or even overnight, to remove excess liquid. Pressing gently with a spoon can also help.
Ready to Impress? Share Your Truffle Masterpiece!
Now that you’re armed with the secrets to perfect, crack-free Pumpkin Spice Truffles, it’s time to create your own edible masterpieces! These delightful treats are more than just a dessert; they’re a testament to thoughtful baking and smart techniques.
I encourage you to try this recipe, embrace the process, and then share your beautiful creations! Tag us on social media with your stunning truffles, or if you’re looking for more delicious fall baking inspiration, explore our recipe for Chewy Pumpkin Chocolate Chip Blondies.
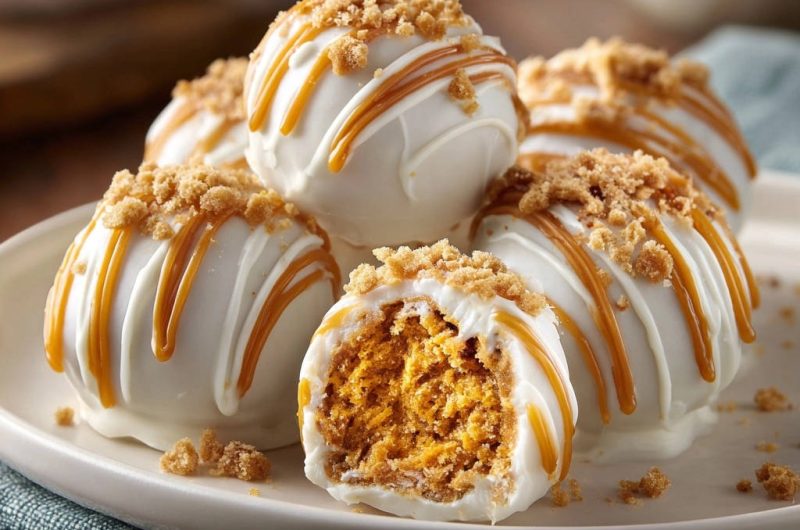
Pumpkin Spice Truffles
Course: DessertCuisine: AmericanDifficulty: medium24
truffles1
hour80
kcal120
minutesDiscover the secret to making perfectly smooth, crack-free homemade pumpkin truffles. This recipe guides you through creating delicious pumpkin-cake balls coated in a flawless white chocolate shell, complete with caramel and graham cracker toppings. A stunning and simple treat for any season!
Ingredients
1 (15 ounce) can pumpkin puree (well drained)
1 box yellow cake mix (baked according to package directions and crumbled into fine crumbs, about 4 cups)
1 (8 ounce) package cream cheese, softened
1/2 teaspoon pumpkin pie spice
1 teaspoon vanilla extract
16 ounces good quality white chocolate melting wafers or white chocolate chips
1 tablespoon coconut oil or vegetable shortening (if using chocolate chips)
Caramel sauce for drizzling
1/2 cup graham cracker crumbs or crushed gingersnap cookies for topping
Directions
- In a large bowl, combine the crumbled baked cake, well-drained pumpkin puree, softened cream cheese, pumpkin pie spice, and vanilla extract. Mix thoroughly until a uniform, dough-like mixture forms. It should be firm enough to roll.
- Cover the bowl and refrigerate the mixture for at least 30 minutes, or until firm enough to handle easily. This initial chilling helps the balls hold their shape.
- Roll the chilled mixture into 1-inch to 1.5-inch balls. Place them on a parchment-lined baking sheet.
- Important for Crack-Free Coating: Place the rolled truffle balls in the freezer for at least 20-30 minutes, or until very firm and cold. This ensures they are solid and helps them set the chocolate coating quickly and smoothly, which is crucial for preventing cracks.
- While the truffles are freezing, prepare your white chocolate coating. In a microwave-safe bowl, combine the white chocolate melting wafers (or chocolate chips with coconut oil/shortening). Microwave in 30-second intervals, stirring well after each, until the chocolate is just melted and smooth, but not hot. Stir until completely smooth and fluid. The added fat (coconut oil/shortening) is crucial if using chips, as it makes the coating thinner and more elastic, significantly reducing the chance of cracks.
- Working with only a few frozen truffles at a time (keep the rest in the freezer), insert a toothpick or a dipping tool into a truffle ball. Dip it completely into the melted white chocolate, ensuring it’s fully coated.
- Lift the truffle out, gently tapping the toothpick/tool against the side of the bowl to allow excess chocolate to drip off. This creates a thinner, even coating that is less likely to crack than a thick layer.
- Carefully slide the coated truffle off the toothpick onto the parchment-lined baking sheet. Immediately drizzle with caramel sauce and sprinkle with graham cracker crumbs before the chocolate fully sets.
- Repeat with the remaining truffles, ensuring the melted chocolate stays fluid (rewarm gently if needed, but avoid overheating).
- Once all truffles are coated and decorated, refrigerate them for at least 1 hour, or until the chocolate coating is completely firm. Store in an airtight container in the refrigerator.
Notes
- Ensure cake is fully baked and cooled before crumbling. Freezing the balls before dipping is crucial for preventing chocolate cracks.