Cheesy Shredded Beef Burritos: The Secret to Juicy Perfection
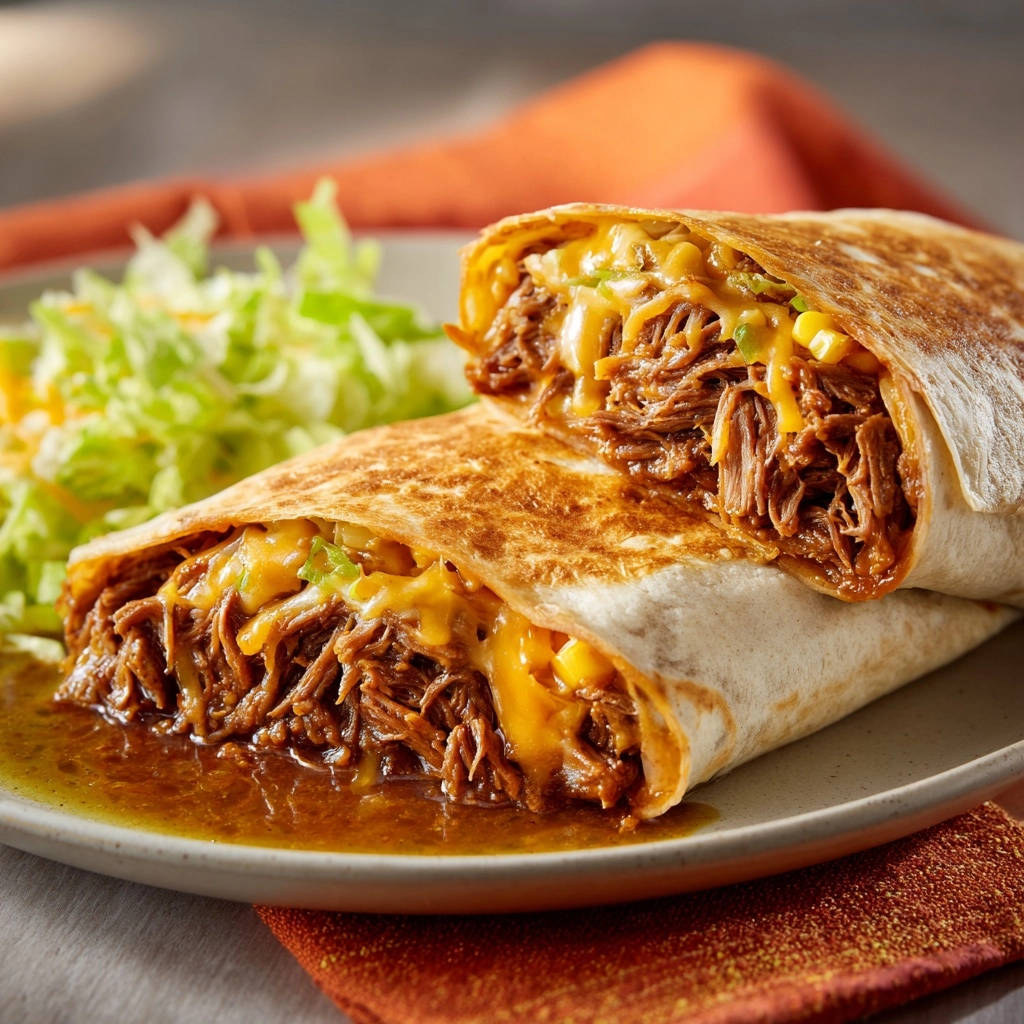
I used to face the ultimate burrito dilemma: a craving for savory shredded beef often led to dry, uninspired fillings. After countless kitchen experiments, I finally cracked the code to perfectly moist, melt-in-your-mouth beef, and I’m thrilled to share it with you. This recipe for Cheesy Shredded Beef Burritos will transform your mealtime, promising an unforgettable experience with every tender bite.
Why Our Cheesy Shredded Beef Burritos Will Become Your New Favorite
The “Never Dry” Promise: Unlocking Melt-in-Your-Mouth Beef
Gone are the days of tough, arid burrito fillings. Our unique slow-cooking method, combined with the crucial step of returning the shredded beef to its own flavorful juices, guarantees unparalleled moisture.
Every forkful of these Cheesy Shredded Beef Burritos is incredibly tender, rich, and literally melts in your mouth. You’ll wonder how you ever made them any other way.
More Than Just a Meal: Versatile & Family-Friendly Appeal
These burritos are a true crowd-pleaser, perfect for busy weeknights or a casual gathering with friends. Their satisfying nature and customizable fillings make them a hit with both kids and adults.
The delicious shredded beef component is also fantastic for meal prepping. Enjoy the convenience of having a flavorful filling ready for quick assembly throughout the week.
For easy meal prep, try the same tender beef in a shredded beef barbacoa for a different flavor twist.
Gather Your Essentials: Key Ingredients for Irresistible Burritos
The Heart of the Filling: Boneless Beef Chuck Roast
Boneless beef chuck roast is our star ingredient for a reason. Its generous intramuscular fat renders beautifully during long, slow cooking, resulting in supremely tender and flavorful shredded beef.
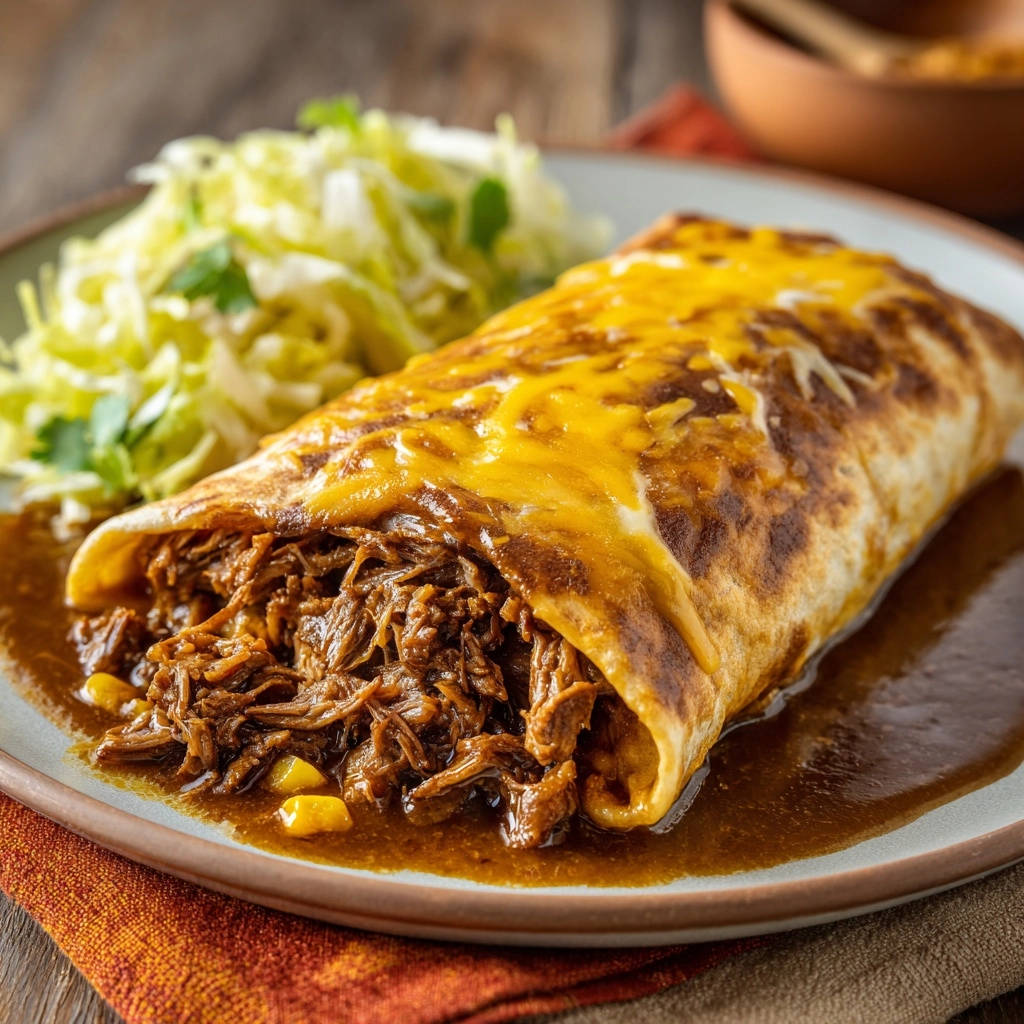
This cut is specifically designed to break down into succulent, easy-to-shred strands, making it ideal for the ultimate burrito filling.
Aromatic Anchors & Flavor Enhancers: Onion, Garlic, & Spices
Fresh onion and garlic form the foundational flavor layer for our braising liquid, adding essential savory aromatics. These humble ingredients create a robust base for the beef.
Taco seasoning then introduces a vibrant, complex spice profile that permeates the beef as it cooks. These elements are crucial for a truly delicious and well-rounded filling.
Liquid Gold: Broth and Salsa for Maximum Moisture
Low-sodium beef broth provides the rich braising liquid, ensuring deep beefy flavor without excessive salt. It’s the medium for tenderizing the chuck roast.
Salsa or tomato sauce adds a tangy, savory depth and a crucial touch of acidity to balance the richness of the beef. This flavorful liquid is key to both tenderness and taste.
The Perfect Wrap: Tortillas, Cheese, and Sweet Corn
Large flour tortillas offer the ideal pliable vessel for our hearty filling, ensuring a sturdy and satisfying wrap that holds everything together.
Shredded cheddar cheese provides that irresistible gooey, cheesy interior that makes these Cheesy Shredded Beef Burritos so comforting. Thawed corn adds a burst of sweetness and pleasant texture, beautifully complementing the savory beef.
Tools of the Trade: Equipping Your Kitchen for Success
Essential Cookware: The Mighty Dutch Oven
A heavy, oven-safe pot like a Dutch oven is indispensable for this recipe. It allows for superior searing, creating a deep, flavorful crust on the beef.
Furthermore, it ensures even, consistent heat for slow braising in the oven. This robust vessel locks in moisture perfectly, guaranteeing tender beef.
Beyond the Basics: Handy Helpers for Assembly & Frying
A large non-stick skillet is essential for achieving that beautifully golden, crispy exterior on your assembled burritos. Its surface prevents sticking and promotes even browning.
Tongs are perfect for safely turning the burritos during frying without damaging their shape. Two sturdy forks will make the shredding process quick and easy once the beef is tender.
Crafting Culinary Magic: Your Step-by-Step Guide to Cheesy Shredded Beef Burritos
Searing for Deep Flavor Foundations
Start by thoroughly patting your beef chuck roast dry with paper towels. This crucial step removes surface moisture, allowing for a deep, even sear rather than steaming the meat.
Heat 1 tablespoon of vegetable oil in a heavy Dutch oven over medium-high heat. Sear the beef on all sides until a beautiful, deep brown crust forms, about 3-4 minutes per side. This process, known as the Maillard reaction, builds incredible foundational flavor.
Building the Aromatic Braising Liquid
Remove the seared beef from the pot and set it aside. In the same pot, add the chopped onion and cook until it softens and becomes translucent, about 5 minutes.
Next, stir in the minced garlic and taco seasoning. Cook for just 1 minute until fragrant, allowing the spices to bloom and release their full aroma. This creates a vibrant, savory base for your braising liquid.
The Slow Cook Secret: Oven-Baked Tenderness
Return the seared beef to the pot, nestling it into the aromatic base. Pour in the beef broth and salsa/tomato sauce, ensuring the liquid comes at least halfway up the sides of the beef.
Bring the mixture to a gentle simmer on the stovetop, then cover the pot tightly. Transfer it to a preheated oven at 300°F (150°C).
Cook for 3-4 hours, or until the beef is unbelievably tender and easily shreds with a fork. This long, slow, moist cooking process is the absolute key to achieving that melt-in-your-mouth texture for your shredded beef.
Infusing Every Strand: Returning Beef to its Juices
Carefully remove the incredibly tender beef from the pot and shred it thoroughly using two forks. It should practically fall apart with minimal effort.
Crucially, return all the shredded beef to the flavorful cooking liquid in the pot. Stir well to ensure every single strand is coated and infused with the rich, savory juices. This guarantees maximum moisture and deep flavor throughout your Cheesy Shredded Beef Burritos.
Layering for Flavor and Structure
Lay a large flour tortilla flat on a clean, dry surface. Spoon a generous amount of the warm, juicy shredded beef onto the center of the tortilla, leaving a clear border around the edges.
Evenly sprinkle shredded cheese and thawed corn over the beef. This layered approach ensures every bite of your Cheesy Shredded Beef Burrito is perfectly balanced with flavor and texture.
The Art of the Tight Roll
First, fold in the short sides of the tortilla over the filling. This creates a secure “wall” to hold the ingredients in place and prevent them from spilling out.
Next, starting from the bottom, tightly roll the tortilla upwards. Aim for a compact, neat burrito package that will hold together beautifully during cooking and eating. A tight roll prevents unraveling.
Pan-Frying for Golden Crunch
Heat 2 tablespoons of vegetable oil in a large non-stick skillet over medium heat until shimmering. The right oil temperature is key for a crispy, golden exterior.
Carefully place the rolled burritos seam-side down in the hot oil. Starting seam-side down helps seal the burrito and prevents it from unraveling while it cooks.
Achieving Even Browning and Melted Cheese
Cook the burritos for 2-3 minutes per side, turning them carefully with tongs, until they are beautifully golden brown and crispy on all sides. This creates a delightful textural contrast to the soft, tender filling.
Continue cooking until the cheese inside is perfectly melted and gooey. Serve your Cheesy Shredded Beef Burritos immediately with your favorite toppings to enjoy that ultimate crispy, juicy combination.
That same skillet technique works perfectly for this crispy no-sog Philly cheesesteak grilled cheese.
Phase 1: Achieving Unbelievably Tender, Juicy Shredded Beef
Phase 2: Expert Assembly for the Perfect Burrito Roll
Phase 3: Golden Perfection: Pan-Frying for a Crispy Exterior
Elevate Your Burrito Game: Expert Tips & Tricks
Ensuring Maximum Juiciness: Beyond the Recipe Basics
To guarantee your shredded beef is always succulent, never overcook it past the point of fork-tenderness. Once it’s easily shredded, it’s done; further cooking can dry it out.
Always allow the seared beef to rest for 10-15 minutes after shredding and returning it to the juices. This allows the meat fibers to relax and reabsorb moisture fully, enhancing tenderness.
If you prefer an even saucier filling, don’t hesitate to add a splash more beef broth or salsa to the shredded beef mixture when you return it to the pot. Adjust to your desired consistency.
Flavor Boosters & Customization Ideas
For a smoky kick, add a diced chipotle in adobo sauce (and a teaspoon of its sauce) to the braising liquid with the aromatics. This introduces a wonderful depth of flavor.
Experiment with different spice blends like extra chili powder, cumin, or a pinch of smoked paprika alongside the taco seasoning. Fresh cilantro stirred in at the end brightens the entire dish with vibrant herbaceous notes.
Consider a squeeze of fresh lime juice over the shredded beef before assembly. It adds a zesty brightness that elevates all the savory flavors and cuts through the richness.
Smart Shortcuts and Time-Saving Hacks
Save valuable prep time by using pre-chopped onions and pre-minced garlic, readily available in most grocery stores. This speeds up your initial cooking considerably.
Opt for your favorite store-bought salsa or a good quality canned tomato sauce for the braising liquid. This delivers consistent flavor without extra chopping and blending.
Cook the shredded beef component a day or two in advance. Store it covered in the refrigerator, then gently reheat before assembling and frying the burritos. This makes weeknight meals effortless.
Troubleshooting Your Cheesy Shredded Beef Burritos: Common Questions Answered
“My Beef Isn’t Tender Enough!”
Tough beef usually means it hasn’t cooked long enough. Simply return the pot to the oven and continue cooking for another 30-60 minutes, or until it easily shreds with a fork. Patience is key.
Ensure your oven temperature is accurate and consistent, and that the liquid level in the pot remains adequate throughout the cooking process. Low and slow cooking in sufficient liquid is the mantra for tender beef.
“My Burritos are Falling Apart!”
The most common culprit for unraveling burritos is overfilling. Use a generous but manageable amount of filling that allows you to securely fold the sides and roll tightly.
Gently warming your flour tortillas before assembly makes them much more pliable and easier to roll tightly without tearing or cracking. You can microwave them briefly or warm them in a dry skillet.
“How Do I Get a Crispier Exterior?”
Ensure your skillet and oil are sufficiently hot before adding the burritos. The oil should shimmer, but not smoke, indicating the correct temperature for immediate browning.
Avoid overcrowding the pan. Cook only 2-3 burritos at a time to maintain consistent oil temperature and allow for proper air circulation, which promotes optimal crispiness. Flip them patiently and evenly.
Serving Suggestions: What to Pair with Your Perfect Burritos
Classic Toppings and Fresh Sides
Serve your hot Cheesy Shredded Beef Burritos with a generous mound of fresh shredded lettuce for a cooling crunch. A dollop of cool sour cream or creamy guacamole adds richness and balance.
Brighten the flavors further with vibrant pico de gallo or a squeeze of fresh lime juice over each burrito. Don’t forget any extra savory pan juices from the beef for dipping!
Complementary Drinks and Desserts
Refresh your palate with a tall glass of homemade horchata or a zesty virgin margarita. Iced tea or a sparkling agua fresca also make excellent non-alcoholic pairings for your meal.
For dessert, keep it light and refreshing with fresh fruit salad or a simple cinnamon-sugar churro. A scoop of vanilla bean ice cream would also be a delightful and simple finish.
What to Serve with Those Burritos
If you have extra shredded beef or just want to keep the meal going, a crunchy, cheesy side fits right in.
- Pile the same beef onto chips with The Architecture of Ultimate Loaded Beef Nachos for a shareable plate that uses similar bold seasoning.
- For a texture contrast without any limp chips, try Loaded Beef Nachos: Crunchy, No-Soggy-Chip Recipe alongside or after the burritos.
Plan Ahead: Make-Ahead, Storage & Reheating Guidance
Preparing the Beef in Advance
The shredded beef filling is perfect for preparing 1-2 days in advance. Cook the beef as directed through step 5, ensuring it’s returned to its flavorful juices for storage.
Store the beef in an airtight container in the refrigerator. This advance prep allows you to quickly assemble and fry burritos when you’re short on time, making weeknight dinners a breeze.
Storing Cooked Burritos Safely
To store leftover cooked burritos, allow them to cool completely to room temperature. Wrap each burrito individually and tightly in plastic wrap or aluminum foil.
Place the wrapped burritos in an airtight container and refrigerate for up to 3-4 days. Proper wrapping prevents them from drying out and absorbing other fridge odors.
Reviving Leftovers: Best Reheating Methods
For best results, reheat cooked burritos in an oven or air fryer. This method helps maintain a crispy exterior, essential for a satisfying leftover experience.
Place unwrapped burritos on a baking sheet and bake at 350°F (175°C) for 15-20 minutes, or air fry at 350°F (175°C) for 8-10 minutes, until heated through and crispy. Microwaving is quicker but often results in a softer exterior.
Frequently Asked Questions About These Cheesy Shredded Beef Burritos
Can I Use a Slow Cooker for the Shredded Beef?
Absolutely! A slow cooker is an excellent alternative for cooking the beef. After searing the beef and sautéing aromatics as instructed, transfer everything to your slow cooker pot.
Cook on low for 6-8 hours or on high for 3-4 hours, until the beef is incredibly tender. Ensure the liquid covers the beef sufficiently. Shred and return to the liquid as directed in the recipe.
What Are Good Cheese Alternatives?
While cheddar is classic, many cheeses work beautifully in burritos. Monterey Jack, Colby, or a Mexican blend would all provide excellent melting qualities and complementary flavor.
For those who enjoy a little heat, Pepper Jack cheese adds a pleasant spicy kick to your Cheesy Shredded Beef Burritos. Feel free to mix cheeses for a more complex profile.
How Can I Make This Recipe Gluten-Free?
To make these Cheesy Shredded Beef Burritos gluten-free, the primary adjustment is using gluten-free flour tortillas. Many excellent brands are now available in most grocery stores.
Additionally, always double-check that your taco seasoning and beef broth are certified gluten-free, as some brands may contain hidden gluten-containing ingredients in their formulations.
Can I Freeze Assembled Burritos?
Yes, you can absolutely freeze assembled burritos! For the best texture and flavor upon reheating, I recommend cooking them first until golden and crispy.
Allow them to cool completely, then wrap each burrito tightly in plastic wrap, followed by aluminum foil to prevent freezer burn. Freeze for up to 2-3 months. Reheat from frozen in the oven or air fryer until hot throughout.
Ready to Roll? Share Your Cheesy Shredded Beef Burritos Creation!
You now have all the tools and expert guidance to create the most incredible Cheesy Shredded Beef Burritos imaginable. This recipe isn’t just about preparing food; it’s about crafting moments of pure, juicy satisfaction that everyone will remember.
I genuinely believe this method will become a staple in your kitchen, simplifying your meal prep and elevating your weeknight dinners. So, gather your ingredients, follow these proven steps, and get ready to experience burrito perfection. Don’t forget to share your delicious creations with me and your friends!
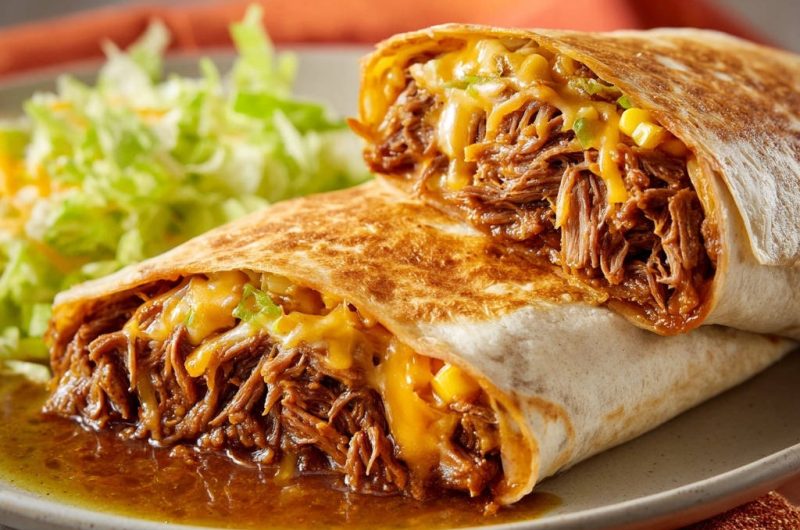
Cheesy Shredded Beef
Course: Main CourseCuisine: MexicanDifficulty: medium8
burritos45
minutes3
hours750
kcal240
minutesDiscover the secret to perfectly moist, melt-in-your-mouth shredded beef that will elevate your burrito game. These cheesy burritos are filled with tender, flavorful beef, corn, and cheese, then pan-fried to golden perfection. Say goodbye to dry burritos forever!
Ingredients
2 pounds boneless beef chuck roast
1 tablespoon vegetable oil
1 onion, chopped
2 cloves garlic, minced
1 tablespoon taco seasoning
1 cup beef broth (low sodium)
1/2 cup salsa or tomato sauce
8 large flour tortillas (burrito size)
2 cups shredded cheddar cheese
1 cup frozen corn, thawed
2 tablespoons vegetable oil (for pan-frying)
Shredded lettuce, for serving
Directions
- For the Shredded Beef (The “Never Dry” Secret): Pat the beef chuck roast completely dry with paper towels. Heat 1 tablespoon vegetable oil in a large oven-safe pot or Dutch oven over medium-high heat. Sear the beef on all sides until deeply browned, about 3-4 minutes per side. This step builds incredible flavor!
- Remove the seared beef from the pot. Add the chopped onion and cook until softened, about 5 minutes. Stir in minced garlic and taco seasoning, cooking for 1 minute until fragrant.
- Return the seared beef to the pot. Pour in beef broth and salsa/tomato sauce. Ensure the liquid comes at least halfway up the sides of the beef. Bring the mixture to a simmer, then cover the pot tightly.
- Transfer the covered pot to a preheated oven at 300°F (150°C) and cook for 3-4 hours, or until the beef is incredibly tender and easily shreds with a fork. The key is long, slow cooking in liquid.
- Remove the beef from the pot and shred it thoroughly using two forks. Return the shredded beef to the flavorful cooking liquid in the pot and stir to coat. This ensures every strand is infused with moisture and flavor. Keep warm.
- Assemble the Burritos: Lay out a large flour tortilla on a clean surface. Spoon a generous amount of the juicy shredded beef onto the center, leaving space at the edges. Sprinkle evenly with shredded cheese and thawed corn.
- Fold in the short sides of the tortilla, then tightly roll it up from the bottom, creating a neat burrito package.
- Heat 2 tablespoons vegetable oil in a large non-stick skillet over medium heat. Carefully place the rolled burritos seam-side down in the hot oil.
- Cook for 2-3 minutes per side, turning carefully, until golden brown and crispy on all sides, and the cheese inside is perfectly melted.
- Serve immediately with a side of fresh shredded lettuce and any extra savory pan juices from the beef. Enjoy that perfectly moist filling!
Notes
- The key to moist beef is slow cooking and returning it to the braising liquid.