Creamy Custard Bars: Perfect Caramelized Crunch Every Time
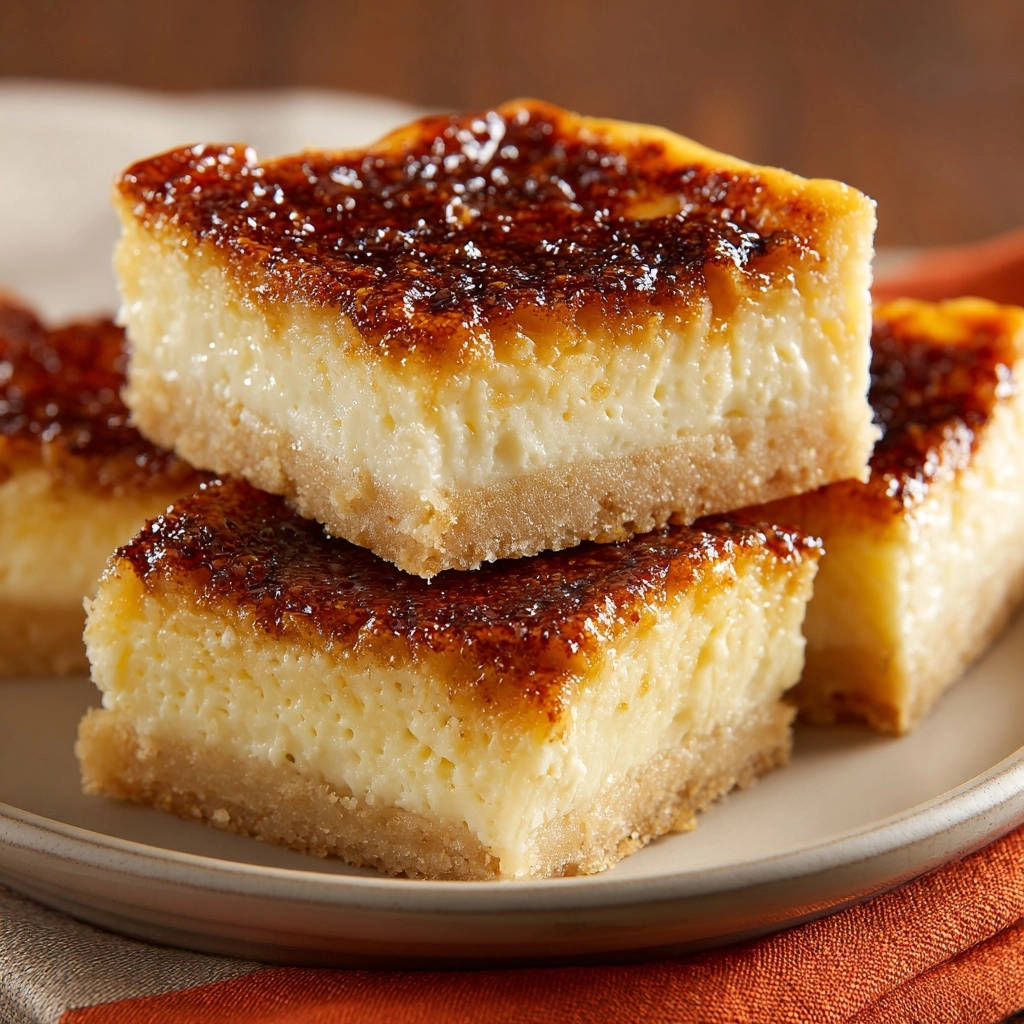
There’s a magical moment when the spoon breaks through a golden, glass-like top to reveal a silky-smooth dessert beneath. Achieving that flawless caramelized crunch on homemade treats, especially something as delicate as Creamy Custard Bars, can feel intimidating. However, I’ve refined a technique that guarantees that satisfying crackle every time, transforming a simple dessert into an extraordinary experience.
Unlock the Secret to Perfect Caramelized Creamy Custard Bars
These aren’t just any dessert bars; they’re a masterclass in contrasting textures and balanced flavors. The secret lies in a few precise steps that elevate simple ingredients into a truly memorable sweet.
Why This Recipe Guarantees Success
Our recipe for Creamy Custard Bars is meticulously designed for foolproof execution. It simplifies the often-tricky caramelized topping, ensuring a consistent, beautiful finish without the stress.
If the crisp crust on these custard bars appeals to you, you will love the buttery base of these turtle cheesecake bars.
Beyond the crunch, the filling achieves an incredibly smooth, melt-in-your-mouth texture that perfectly complements the sturdy, buttery graham cracker crust. It’s a harmonious blend of creamy, sweet, and crisp in every bite.
The Signature Crackle: A Dessert Game-Changer
The caramelized sugar topping isn’t just for looks; it adds an essential textural dimension. This thin, crisp layer provides a delightful counterpoint to the soft, luscious custard, making each serving feel like a gourmet indulgence.
It’s a simple addition that takes these Creamy Custard Bars from delicious to absolutely irresistible, ensuring everyone asks for the recipe.
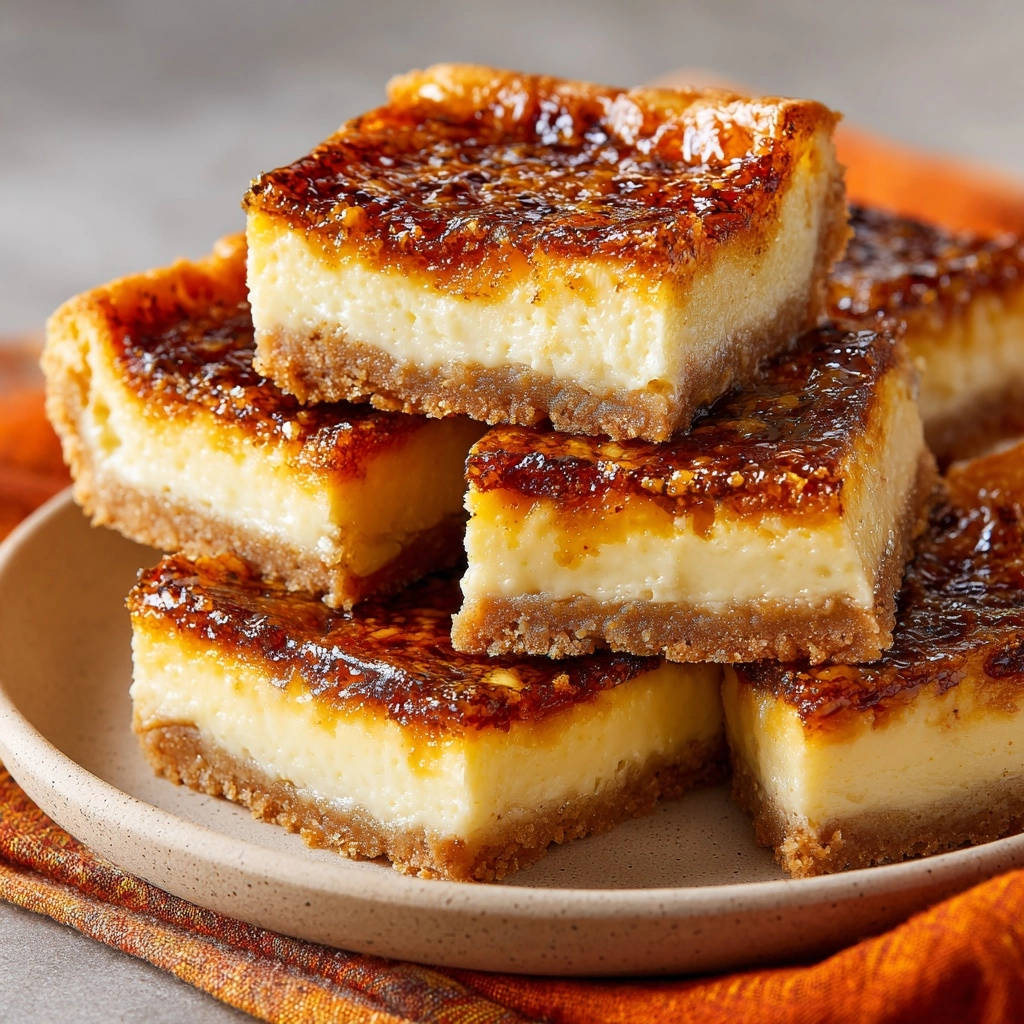
Essential Ingredients for Your Luscious Custard Bars
Success begins with understanding your ingredients. Each component plays a vital role in the final texture and flavor of your Creamy Custard Bars.
Building the Golden Base: The Crust Essentials
The foundation of these bars is a classic graham cracker crust, providing a buttery, slightly sweet base that perfectly supports the creamy filling.
Graham Cracker Crumbs: For a consistent texture, finely ground crumbs are essential. You can buy them pre-crushed or easily make your own by pulsing graham crackers in a food processor.
Granulated Sugar: A small amount of sugar enhances the crust’s sweetness, creating a balanced flavor profile.
Unsalted Butter, Melted: Melted butter binds the crumbs together, ensuring the crust sets firmly and delivers a rich, tender base without being overly greasy.
The Heart of the Treat: Creamy Filling Must-Haves
This is where the magic happens, transforming simple dairy into a luxurious, smooth custard.
Cream Cheese, Softened: Using softened cream cheese is paramount for a lump-free, velvety filling. It beats smoothly and integrates seamlessly with the other ingredients, creating that signature creamy texture.
Granulated Sugar: Sweetens the custard, balancing the tang of the cream cheese.
Large Eggs: Eggs are crucial for the custard’s structure and richness. Adding them one at a time and beating well ensures they are fully incorporated, preventing a grainy texture.
Vanilla Extract: High-quality vanilla extract elevates the flavor profile, adding warmth and depth to the creamy filling. Don’t skimp here!
Heavy Cream: This provides an extra layer of richness and helps achieve the incredibly smooth, almost ethereal texture of the custard. Remember to avoid overmixing once it’s incorporated to keep the filling light and tender.
That Dazzling Finish: Simple Topping Ingredients
The magic of the caramelized top relies on just one humble ingredient.
Granulated Sugar: When exposed to intense heat, this simple sugar transforms into a golden, brittle layer that defines these bars.
Your Kitchen Toolkit for Effortless Custard Bars
Having the right tools makes the baking process smooth and enjoyable, ensuring your Creamy Custard Bars turn out perfectly every time.
8×8 inch baking pan: This size is ideal for producing thick, satisfying bars that hold their shape well.
Parchment paper: Absolutely essential! Leaving an overhang makes removing the chilled bars incredibly easy and helps keep them intact.
Medium bowl: Perfect for combining your crust ingredients.
Large bowl: Provides ample space for beating the cream cheese and mixing the filling.
Electric mixer (handheld or stand): Your best friend for achieving a smooth, lump-free cream cheese base for the filling. It saves time and effort.
Wire rack: Critical for proper cooling after baking, allowing air circulation around the bars and preventing condensation.
Baking sheet: Used specifically for the broiling step, providing a stable surface for the bars under intense heat.
Sharp knife: For clean, precise cuts once the bars are fully chilled and the topping has hardened.
Crafting Perfection: A Step-by-Step Guide to Creamy Custard Bars
Follow these steps closely, paying attention to the details, and you’ll be rewarded with truly spectacular Creamy Custard Bars.
Preparing Your Pan & Crust
Start by preheating your oven to 350 degrees Fahrenheit. Line an 8×8 inch baking pan with parchment paper, making sure to leave an overhang on the sides. This thoughtful step will be a lifesaver for easy removal later, ensuring your beautiful bars stay intact.
In a medium bowl, combine the graham cracker crumbs, 1/4 cup of granulated sugar, and the melted butter. Mix these ingredients thoroughly until the crumbs are evenly moistened. Firmly and evenly press this mixture into the bottom of your prepared pan; a flat-bottomed glass or the back of a spoon can help create a compact, uniform crust. Bake this crust for 8 minutes, then remove it from the oven and allow it to cool slightly while you prepare the filling.
Mixing the Dreamy Custard Filling
In a large bowl, use an electric mixer to beat the softened cream cheese and 1/2 cup granulated sugar. Continue beating until the mixture is beautifully smooth and creamy, scraping down the sides of the bowl as needed to ensure everything is incorporated.
Next, add the large eggs one at a time, beating well after each addition until just combined. Overmixing the eggs can incorporate too much air, which might lead to cracks in your baked custard, so gentle handling is key here. Finally, stir in the vanilla extract and heavy cream until everything is fully incorporated and the mixture is smooth; again, avoid overmixing to maintain that delicate texture.
Baking to Golden Perfection
Carefully pour the smooth custard filling over the slightly cooled crust in your prepared pan. Spread it evenly to ensure uniform baking.
Bake the bars for 25-30 minutes. You’ll know they’re ready when the edges appear set and slightly golden, but the center still has a gentle, slight jiggly motion when you lightly tap the pan. The surface should not look wet or liquid, indicating it’s almost done.
The Chill Factor: Why Patience Pays Off
Once baked, remove the Creamy Custard Bars from the oven and let them cool completely on a wire rack at room temperature. This initial cooling allows the bars to settle.
Once cooled, the most crucial step for achieving that perfect crackle comes into play: refrigeration. Transfer the bars to the refrigerator for at least 4 hours, or preferably overnight, until they are thoroughly chilled and firm. This firm, cold surface is absolutely vital for the next step, ensuring the sugar caramelizes beautifully without melting the underlying custard.
Mastering the Caramelized Top: The Broiler Method
When your bars are completely chilled, preheat your broiler to high. This intense, direct heat is what creates the signature caramelized layer. Using the parchment overhang, carefully lift the chilled bars from the pan and place them onto a baking sheet.
Evenly sprinkle the 2 tablespoons of granulated sugar over the entire surface of the bars. Ensure you create a thin, uniform layer for the best, most even results. Place the baking sheet with the sugared bars about 4-6 inches away from the broiler element. This distance is important for controlled caramelization.
Now, watch them like a hawk! The sugar will melt and caramelize very quickly under the broiler, usually within 1-3 minutes. Rotate the baking sheet frequently for even browning, ensuring no spots burn. As soon as the sugar turns a beautiful deep amber color and looks bubbly, remove them immediately from the oven. Do not walk away; this step requires your full attention!
Cool, Cut, and Conquer!
After broiling, let the caramelized bars cool at room temperature for just a few minutes. Then, transfer them back to the refrigerator for at least 30 minutes. This final chilling step is essential as it helps the hot, liquid caramelized sugar harden into that desired crisp, crackly texture.
Once the sugar topping has completely hardened, use a sharp knife to cut the Creamy Custard Bars into neat squares. Now, you can finally enjoy your perfectly caramelized treat!
Pro Tips for Flawless Creamy Custard Bars Every Time
Unlock even greater success with these expert insights, ensuring your Creamy Custard Bars are nothing short of spectacular.
The Chilling Truth: Why Time in the Fridge Matters. Thorough chilling, both before and after broiling, is paramount. Before broiling, it creates a cold surface that prevents the custard from melting too quickly. After broiling, it allows the caramelized sugar to harden into that perfect, satisfying crackle.
Broiler Mastery: Achieving that Perfect Amber Glow. Position your oven rack 4-6 inches from the broiler element for optimal heat distribution. Stay vigilant! The sugar can go from perfect to burnt in seconds, so watch continuously and rotate the pan frequently for even caramelization across the entire surface.
Precision Cutting: Clean Slices for Showstopping Bars. For neat edges, use a very sharp knife. For the cleanest cuts, run your knife under hot water, wipe it dry, and then slice. Clean the knife between each cut to prevent stickiness and ensure professional-looking Creamy Custard Bars.
Ingredient Insights: Elevating Flavor and Texture. Always use truly softened cream cheese to avoid lumps in your filling. Additionally, do not overmix the custard once the eggs are added, as this can incorporate too much air and lead to a less smooth texture or even cracks during baking. High-quality vanilla extract also makes a noticeable difference.
Common Custard Bar Conundrums & Quick Fixes
Even seasoned bakers encounter challenges. Here’s how to troubleshoot common issues with your Creamy Custard Bars.
Crust Too Crumbly or Too Hard?
If your crust is crumbly, you might need a tiny bit more melted butter next time to bind the crumbs properly. If it’s too hard, you may have pressed it too firmly into the pan or over-baked it slightly. Aim for a firm but tender texture.
Filling Not Setting or Too Runny?
This often indicates underbaking. Check the center for the signature “jiggle” – it should be slightly wobbly but not liquid. Overmixing the eggs can also sometimes lead to a less stable set; ensure you only beat until just combined after adding them.
Caramelized Top Issues: Burnt, Uneven, or Sticky?
A burnt top means the bars were too close to the broiler or left in too long. Reduce the distance or time next go-round. Uneven caramelization usually results from uneven sugar sprinkling or not rotating the pan, so be meticulous with those steps. If the top is sticky, it likely wasn’t chilled long enough after broiling; the sugar needs sufficient time in the cold to harden into that desired crackly texture.
Your Creamy Custard Bars Questions Answered
Here are some frequently asked questions about making these delightful Creamy Custard Bars.
Can I Make These Dairy-Free or Gluten-Free?
While this specific recipe uses dairy and graham crackers, it is possible to adapt it. For gluten-free, substitute with gluten-free graham cracker crumbs. For dairy-free, you would need dairy-free cream cheese, butter, and heavy cream alternatives, but note that the texture and richness may vary. For other dessert ideas, explore our recipes for delicious raspberry crumb bars which can be adapted with gluten-free flour.
How Far in Advance Can I Prepare Creamy Custard Bars?
These bars are fantastic for make-ahead convenience! You can bake the custard and chill it overnight, then do the broiling step a few hours before serving. This allows the caramelized top to set perfectly. The ideal taste and texture is within 24-48 hours of broiling.
What’s the Best Way to Store Leftover Custard Bars?
Store any leftover Creamy Custard Bars in an airtight container in the refrigerator. This helps maintain their fresh taste and crisp topping. They typically remain delicious for 3-4 days.
Can I Use a Different Size Baking Pan?
Yes, you can, but adjustments will be necessary. For a 9×13 inch pan, you might need to increase the recipe by about 1.5 times to maintain thickness, and baking times will likely decrease. For a smaller pan, like an 8×8 as used here, the given proportions are perfect. Always watch for the visual cues of doneness, as baking times are estimates.
Serving Suggestions & Storing Your Delicious Creation
Once you’ve mastered the perfect Creamy Custard Bars, it’s time to enjoy them!
For a perfect pairing, try our Mastering Creamy Lemon Coconut Bars with a Crisp Crust.
The Best Ways to Enjoy Your Bars
These bars are exquisite on their own, allowing the textures and flavors to shine. For an extra touch of elegance, consider serving them alongside fresh berries like raspberries or blueberries, which add a lovely tart contrast. They also make a stunning addition to any dessert platter, especially alongside other delightful treats like rich chocolate crumb cheesecake bars.
Proper Storage for Lasting Freshness
To preserve their iconic crackly top and creamy filling, always store your Creamy Custard Bars in an airtight container in the refrigerator. This prevents the caramelized sugar from becoming sticky and keeps the custard perfectly set.
Freezing for Future Delights
While the custard portion freezes well, the caramelized top may lose its crispness upon thawing. For best results, freeze the un-caramelized bars in a single layer until firm, then wrap tightly in plastic wrap and foil. Thaw in the refrigerator, then proceed with the broiling and final chilling steps just before serving. This ensures the signature crackle remains intact.
Ready to Create Your Own Custard Bar Masterpiece?
With this detailed guide, you now possess the knowledge to create truly exceptional Creamy Custard Bars with that irresistible caramelized crunch. Don’t let the broiler intimidate you; a little vigilance is all it takes to achieve dessert perfection. I’m confident you’ll find this recipe to be a rewarding addition to your baking repertoire, delivering rave reviews every time.
What to Serve with Custard Bars
These creamy custard bars with their crunchy caramelized topping pair nicely with a few extra sweet treats that share similar textures or complementary flavors.
- For a rich, nutty contrast, scoop up some Loaded Peanut Butter Toffee Dip — the crunchy toffee bits and creamy peanut butter echo the caramelized crunch and smooth custard.
- Brighten the spread with Glazed Lemon Poppy Seed Scones, whose citrus tang cuts through the sweetness of the custard bars while the poppy seeds add a subtle crunch.
For the Crust:
1 1/2 cups graham cracker crumbs
1/4 cup granulated sugar
6 tablespoons unsalted butter, melted
For the Filling:
8 ounces cream cheese, softened
1/2 cup granulated sugar
2 large eggs
1/2 teaspoon vanilla extract
1/4 cup heavy cream
For the Topping:
2 tablespoons granulated sugar
- Preheat oven to 350 degrees Fahrenheit. Line an 8×8 inch baking pan with parchment paper, leaving an overhang on the sides for easy removal.
- For the crust: In a medium bowl, combine graham cracker crumbs, 1/4 cup granulated sugar, and melted butter. Press firmly and evenly into the bottom of the prepared pan. Bake for 8 minutes. Remove from oven and let cool slightly.
- For the filling: In a large bowl, beat softened cream cheese and 1/2 cup granulated sugar with an electric mixer until smooth and creamy, scraping down the sides of the bowl as needed.
- Add eggs one at a time, beating well after each addition until just combined. Stir in vanilla extract and heavy cream until fully incorporated and the mixture is smooth. Do not overmix.
- Pour the filling over the cooled crust.
- Bake for 25-30 minutes, or until the edges are set and the center is still slightly jiggly. The bars should not look wet.
- Remove from oven and let cool completely on a wire rack. Once cooled, refrigerate for at least 4 hours, or preferably overnight, until thoroughly chilled and firm. This firm, cold surface is crucial for the next step.
- To achieve the crackly top: Once the bars are completely chilled, preheat your broiler to high.
- Carefully remove the chilled bars from the pan using the parchment overhang and place them on a baking sheet.
- Evenly sprinkle the 2 tablespoons of granulated sugar over the entire surface of the bars. Ensure a thin, uniform layer for best results.
- Place the baking sheet with the sugared bars about 4-6 inches away from the broiler element. Watch them like a hawk! The sugar will melt and caramelize very quickly, usually within 1-3 minutes. Rotate the baking sheet frequently for even browning.
- As soon as the sugar turns a deep amber color and looks bubbly, remove them immediately from the oven. Do not walk away!
- Let the caramelized bars cool at room temperature for a few minutes, then transfer them back to the refrigerator for at least 30 minutes. This chilling step helps the caramelized sugar harden into that desired crackly texture.
- Once the sugar topping has hardened, cut the bars into squares using a sharp knife. Enjoy your perfectly caramelized treat!
Go ahead, preheat that oven, gather your ingredients, and prepare to impress everyone with these truly luscious and perfectly crunchy treats!
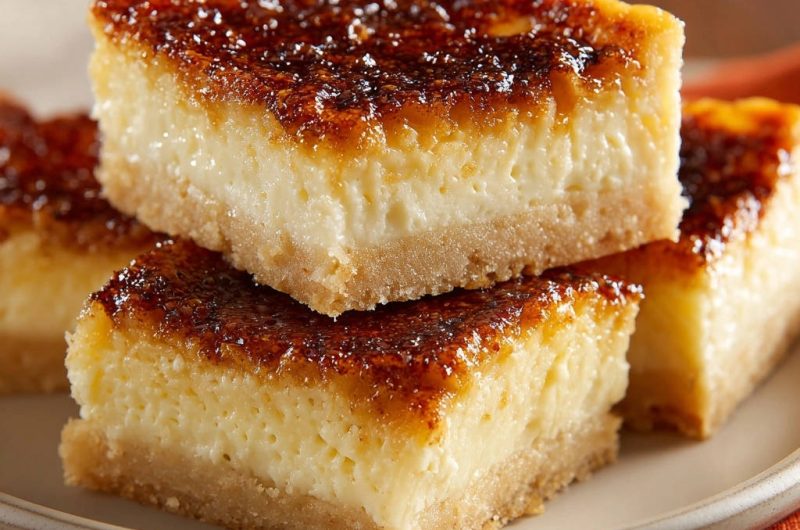
Custard Bars
Course: DessertCuisine: AmericanDifficulty: medium9
bars20
minutes35
minutes160
kcal60
minutesDiscover the simple trick to making Creamy Custard Bars with a perfectly caramelized sugar crust. This recipe guides you through achieving that golden, crisp topping and a smooth, creamy filling, making it easier than you think to create a picture-perfect dessert every time.
Ingredients
Directions
Notes
- Requires significant cooling and chilling time for best results, ideally overnight.