Crispy Parmesan Chicken Skewers: Golden, Juicy & Never Dry!
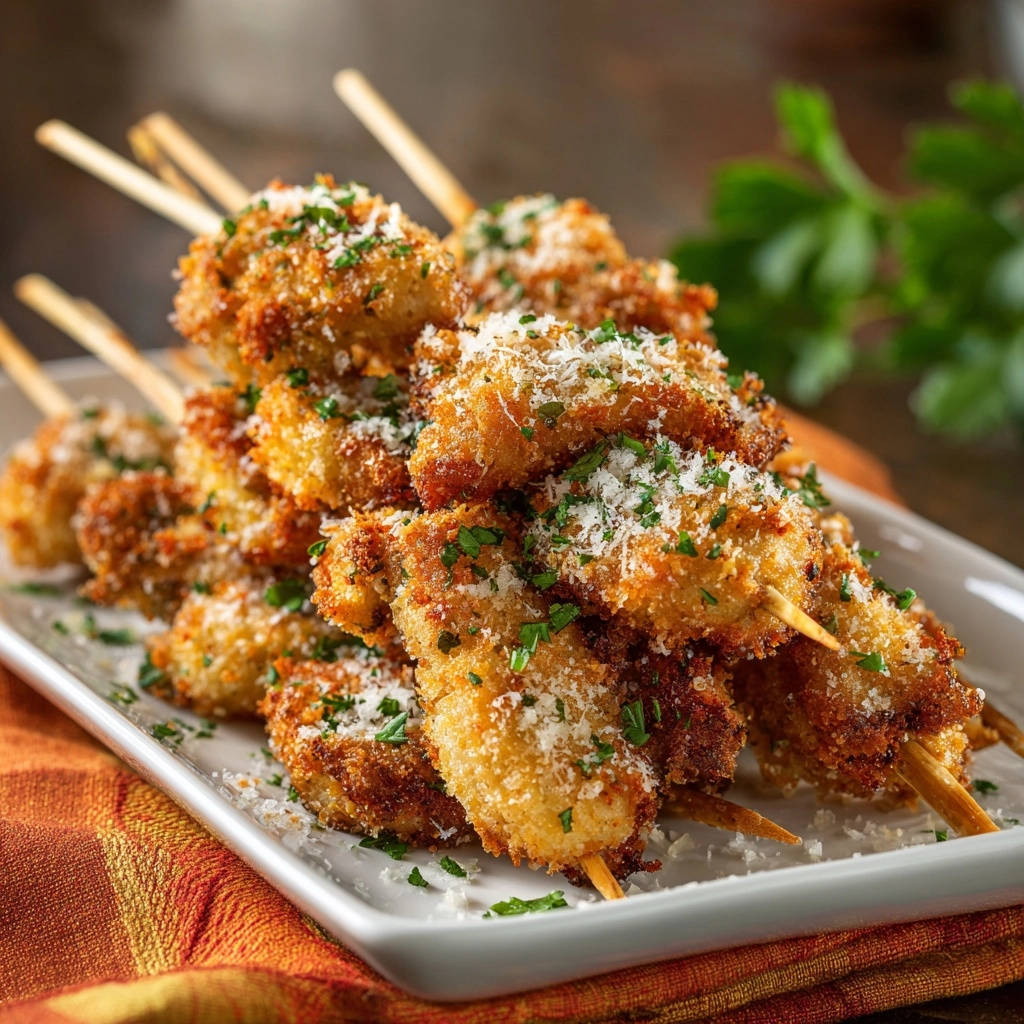
I remember a time when achieving perfectly crispy chicken, especially on skewers, felt like an unattainable dream. It often ended up soggy on the outside or disappointingly dry inside. But after countless kitchen experiments, I cracked the code! These Crispy Parmesan Chicken Skewers are a game-changer, delivering an irresistible golden crunch and unbelievably juicy chicken every single time, transforming a common meal into a culinary triumph.
Beyond Basic: Why These Crispy Parmesan Chicken Skewers Stand Out
This recipe isn’t just about frying chicken; it’s about mastering specific techniques that elevate a simple dish into something truly spectacular. We’re tackling common pitfalls head-on to guarantee success.
The Secret to a Truly Crispy, Never-Soggy Coating
The magic lies in a few precise steps: meticulously drying the chicken, a perfected breading station, and the strategic addition of Parmesan cheese. These elements work in harmony to create a consistently crunchy, golden exterior that stays crisp.
No more soggy breading! Our method ensures maximum adhesion and a truly satisfying texture with every bite.
Achieving Perfectly Juicy Chicken, Every Single Time
The secret to succulent chicken is surprisingly simple: precise oil temperature and quick cooking. This technique seals in the natural juices, preventing the chicken from drying out.
You’ll enjoy tender, moist chicken encased in that gorgeous crispy shell, a testament to balanced cooking.
If you love this crispy coating technique, you’ll also enjoy these shatteringly crisp panko chicken tenders.
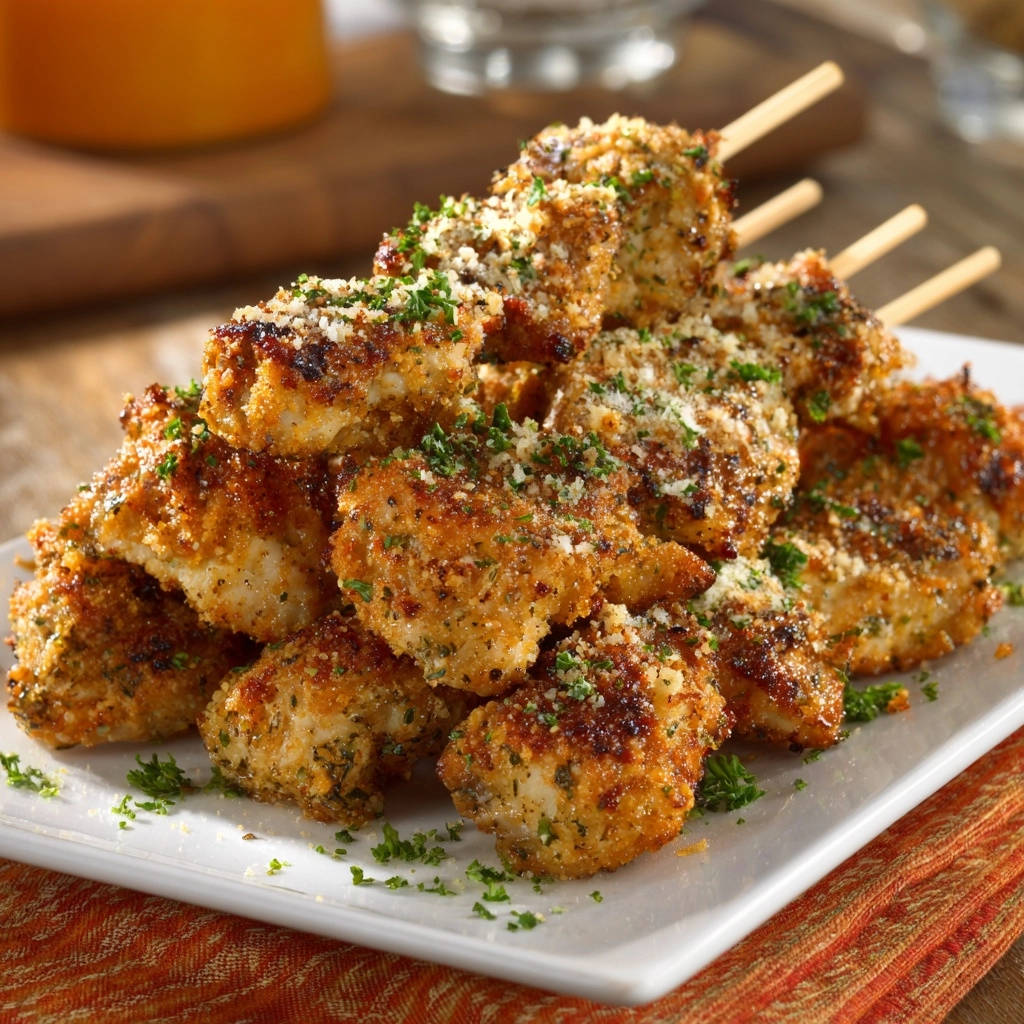
Quick & Easy Weeknight Dinner Perfection
Despite its gourmet-like results, this recipe for Crispy Parmesan Chicken Skewers is surprisingly fast and straightforward. It’s designed to fit seamlessly into busy weeknight schedules.
With minimal prep and cooking time, you can have a delicious, impressive meal on the table in under 30 minutes, making it ideal for the whole family.
Unlocking the Crunch: The Essential Ingredients List
Every ingredient plays a vital role in achieving the perfect balance of flavor and texture for these delectable skewers.
Chicken Breast: The Lean Protein Base
Boneless, skinless chicken breast is our canvas here, offering a lean and versatile protein. Cutting it into 1-inch pieces ensures even cooking and perfect bite-sized portions.
The consistent size is key for achieving uniform doneness and crispiness across all your skewers.
The Breading Trio: Flour, Egg, and Panko Parmesan Power
Our breading is a carefully designed system. All-purpose flour provides the initial dry layer for adhesion, while the egg wash acts as a crucial binder.
Panko breadcrumbs, known for their larger, flakier texture, are the foundation for serious crunch. Grated Parmesan cheese isn’t just for flavor; its natural oils contribute to that beautiful golden-brown color and an extra layer of savory crispness.
Flavor Boosters & Frying Medium
Simple seasonings like salt and black pepper enhance the chicken’s natural taste. Fresh chopped parsley adds a vibrant pop of color and herbaceous freshness as a garnish.
Vegetable oil, with its high smoke point, is ideal for shallow frying, ensuring a clean taste and even cooking.
Your Kitchen Arsenal: Tools for Skewer Perfection
Having the right tools makes all the difference in crafting these delicious skewers with ease.
Must-Have Equipment for Frying Success
Large Skillet or Frying Pan: A wide, heavy-bottomed pan is essential for even heat distribution and enough surface area to fry several skewers without overcrowding.
Wire Rack & Baking Sheet: Placing cooked skewers on a wire rack allows air circulation, ensuring they stay crispy as they cool and drain excess oil.
The Role of Wooden Skewers (and why they need soaking!)
Wooden Skewers: These are perfect for individual portions and easy handling. Their sturdy nature keeps the chicken pieces neatly aligned.
Soaking Explained: It’s critical to soak wooden skewers in water for at least 30 minutes before use. This prevents them from charring or catching fire during the frying process, keeping your meal safe and intact.
Mastering the Method: How to Make Crispy Parmesan Chicken Skewers
Follow these detailed steps to achieve the ultimate Crispy Parmesan Chicken Skewers, loaded with flavor and texture.
Preparation is Key: Soaking Skewers and Drying Chicken
Before anything else, submerge your wooden skewers in water for at least 30 minutes. This crucial step prevents them from burning during cooking.
Next, thoroughly pat the cut chicken pieces dry with paper towels. Removing excess moisture is absolutely critical for the breading to adhere properly and become truly crispy.
Finally, season the dried chicken all over with 1/2 teaspoon of salt and 1/4 teaspoon of black pepper.
Crafting the Breading Station: Your Assembly Line Setup
Set up a three-stage breading station to streamline the process. In the first shallow dish, whisk together the flour, remaining 1/2 teaspoon salt, and 1/4 teaspoon black pepper.
In the second shallow dish, prepare your egg wash by whisking the two large eggs with 1 tablespoon of water until well combined.
For the final coating, combine the 1.5 cups of Panko breadcrumbs and 1/4 cup of grated Parmesan cheese in the third shallow dish. The Parmesan is key for that irresistible golden crust!
The Triple-Dredge Technique for Optimal Coverage
Working in small batches, take each chicken piece and dredge it first in the seasoned flour, ensuring it’s fully coated, then gently shake off any excess.
Next, dip the floured chicken into the egg mixture, allowing any surplus egg to drip off.
Finally, roll the chicken thoroughly in the Panko and Parmesan mixture. Press gently but firmly to ensure a thick, even layer of breading; this creates the best crispy texture.
Threading the Skewers: Don’t Overcrowd!
Carefully thread 3-4 breaded chicken pieces onto each pre-soaked skewer. Ensure you leave a little space between each piece.
Overcrowding the skewers can prevent even cooking and crisping, so give each piece room to breathe.
The Golden Rule of Frying: Perfect Oil Temperature
Heat the 1/2 cup of vegetable oil in a large skillet or frying pan over medium-high heat. The correct oil temperature is paramount for success.
To test if the oil is ready, sprinkle a few Panko breadcrumbs into the pan; they should immediately sizzle and turn golden brown within seconds.
This ideal temperature ensures the breading crisps beautifully without soaking up too much oil, and the chicken cooks quickly to stay juicy inside.
Sizzling to Perfection: Cooking and Draining
Carefully place a few skewers into the hot oil, being careful not to overcrowd the pan, which can drop the oil temperature and lead to soggy results.
Cook the chicken for 2-3 minutes per side, turning occasionally, until the breading reaches a deep, inviting golden brown color and the chicken is cooked through to an internal temperature of 165°F (74°C). Cooking quickly at the right temperature is key to maintaining internal juiciness.
Once cooked, remove the skewers from the pan and place them on a wire rack set over a baking sheet. This allows any excess oil to drain away, maintaining maximum crispiness. For more delicious chicken ideas, you might also enjoy our Crispy Glazed Chicken Bites.
The Finishing Touch: Garnish and Serve
Repeat the cooking process with any remaining skewers, adding more oil to the pan if needed to maintain adequate depth.
Before serving, garnish your finished Crispy Parmesan Chicken Skewers with an extra sprinkle of grated Parmesan cheese and a scattering of fresh chopped parsley for both flavor and visual appeal. Serve them warm and enjoy!
If you’re hooked on that golden, crunchy coating, try these ultra crispy chicken tenders for another satisfying bite.
Chef’s Secrets: Elevating Your Skewered Chicken Experience
Unlock even more flavor and perfect results with these expert tips for your Crispy Parmesan Chicken Skewers.
The Power of Patting Dry: This seemingly small step is the most critical for achieving a truly crispy coating that adheres perfectly. Don’t rush it!
Temperature Control is King: Constantly monitor your oil temperature. If it’s too low, the chicken will be greasy; too high, and the breading burns before the chicken cooks through.
Don’t Skimp on the Parmesan: The grated Parmesan in the breading isn’t just for flavor; its natural oils contribute to that beautiful golden-brown color and extra crispiness.
Batch Frying Best Practices: Avoid overcrowding the pan. Frying in smaller batches ensures the oil temperature remains consistent, leading to uniformly crispy results.
Rest for Juiciness: While these are best served immediately, a very brief rest (1-2 minutes) on the wire rack after draining can help the juices redistribute slightly.
Solved: Common Crispy Chicken Skewer Challenges
Don’t let these common issues deter you; they’re easily remedied with a little know-how.
Problem: My Chicken is Soggy, Not Crispy!
This is often due to insufficient drying of the chicken, or the oil not being hot enough when the skewers are added. Ensure your chicken is thoroughly patted dry, and always verify your oil temperature before cooking each batch.
Problem: The Chicken is Dry Inside!
Dry chicken usually means it was cooked too long or at too low a temperature, forcing extended cooking time. Maintain medium-high heat and cook quickly, using a meat thermometer to ensure it reaches 165°F without overshooting.
Problem: Breading Falls Off During Frying!
If the breading is separating, the chicken may not have been dry enough, or you didn’t press the Panko-Parmesan mixture firmly enough onto the chicken. Ensure a good, even coating is gently pressed on at the breading station.
Beyond the Plate: Perfect Pairings & Serving Ideas
Complement your Crispy Parmesan Chicken Skewers with these fantastic sides and dipping sauces for a complete meal.
Fresh Sides That Complement the Flavor
Lemon Herb Orzo: A light and tangy pasta salad can cut through the richness of the fried chicken.
Simple Green Salad: A crisp salad with a vinaigrette dressing offers a refreshing contrast.
Roasted Asparagus or Broccoli: Oven-roasted vegetables add a healthy, flavorful component. For an extra boost of flavor, try our recipe for Crispy Baked Asparagus.
Dipping Sauces to Elevate Every Bite
Marinara Sauce: A classic pairing for Parmesan chicken, offering a tangy counterpoint.
Ranch Dressing: A creamy, herby option that kids and adults alike will love.
Honey Mustard: For a sweet and tangy kick that complements the savory chicken.
What to Serve With Crispy Parmesan Chicken Skewers
These golden chicken skewers pair well with something cheesy and shareable. Both options work as a starter or a side to round out the meal.
- For a rich, savory-sweet pull-apart bread, the Cranberry Brie Monkey Bread brings tangy fruit and melted cheese that contrasts nicely with the crispy chicken.
- If you want a creamy, veggie-forward companion, the Spinach Artichoke Pull-Apart Bread offers the same kind of warm, dippable texture that makes the whole plate feel indulgent.
Plan Ahead & Preserve: Storage and Reheating Tips
Make your life easier with these tips for preparing ahead and handling leftovers.
Can You Prep Them in Advance?
You can bread the chicken pieces up to a few hours in advance. Arrange them in a single layer on a baking sheet lined with parchment paper and refrigerate, loosely covered, until ready to fry. This can actually help the breading adhere even better!
Proper Storage for Leftovers
Store any leftover Crispy Parmesan Chicken Skewers in an airtight container in the refrigerator for up to 3-4 days. Allow them to cool completely before storing to prevent sogginess.
Reheating for Maximum Crispiness
To best reheat, place skewers on a wire rack set over a baking sheet and bake in a preheated oven at 375°F (190°C) for 10-15 minutes, or until heated through and re-crisped. An air fryer at 350°F (175°C) for 5-7 minutes also works wonderfully for restoring crunch.
Your Top Questions Answered About Crispy Parmesan Chicken Skewers
Let’s address some common queries to ensure your success.
Can I Bake or Air Fry These Instead of Frying?
While shallow frying yields the ultimate crispiness, you can bake them at 400°F (200°C) for 20-25 minutes, flipping halfway, or air fry at 375°F (190°C) for 12-15 minutes. Note that the texture will be slightly less crispy than fried, but still delicious!
What About Gluten-Free Options?
Yes, you can easily make this recipe gluten-free! Simply substitute the all-purpose flour with a gluten-free all-purpose flour blend and ensure you use certified gluten-free Panko breadcrumbs.
Can I Use Chicken Thighs?
Absolutely! Boneless, skinless chicken thighs can be used. They tend to stay even juicier due to their higher fat content, but may require a minute or two longer to cook through. Cut them into similar 1-inch pieces.
Can I Prepare the Chicken Ahead of Time and Freeze It?
You can freeze the breaded chicken pieces (without skewers) in a single layer on a baking sheet until solid, then transfer to an airtight freezer bag for up to 2-3 months. Fry from frozen, adding a few extra minutes to the cooking time, or thaw first for best results.
Ready to Dazzle? Share Your Culinary Creation!
Now that you’re armed with the secrets to perfectly crispy, wonderfully juicy Crispy Parmesan Chicken Skewers, it’s time to get cooking! This recipe is a guaranteed crowd-pleaser, whether you’re making a quick family dinner or entertaining guests. Don’t be surprised if these become a staple in your kitchen!
We’d love to see your creations! Share your photos and tag us on social media, or leave a comment below with your experience or any unique twists you added. Happy cooking!

Crispy Parmesan Chicken Skewers
Course: Main CourseCuisine: AmericanDifficulty: easy6
skewers35
minutes25
minutes450
kcal60
minutesSay goodbye to soggy breaded chicken! This recipe reveals a simple trick to achieving a wonderfully crispy exterior and juicy interior on every Crispy Parmesan Chicken Skewer. Perfect for a delicious meal or appetizer.
Ingredients
1 pound boneless, skinless chicken breast, cut into 1-inch pieces
1/2 cup all-purpose flour
1 teaspoon salt
1/2 teaspoon black pepper
2 large eggs
1 tablespoon water
1.5 cups Panko breadcrumbs
1/4 cup grated Parmesan cheese, plus extra for garnish
2 tablespoons fresh parsley, chopped, for garnish
1/2 cup vegetable oil, for shallow frying
6-8 wooden skewers
Directions
- If using wooden skewers, soak them in water for at least 30 minutes to prevent burning during cooking. Pat the cut chicken pieces thoroughly dry with paper towels; this is key for crispy breading adhesion. Season the dried chicken pieces all over with 1/2 teaspoon of salt and 1/4 teaspoon of black pepper.
- Set up a breading station. In one shallow dish, combine the flour, remaining 1/2 teaspoon salt, and 1/4 teaspoon black pepper. In a second shallow dish, whisk the eggs with 1 tablespoon of water. In a third shallow dish, combine the Panko breadcrumbs and 1/4 cup grated Parmesan cheese.
- Working in batches, dredge each chicken piece first in the seasoned flour, shaking off any excess. Then dip it into the egg mixture, allowing excess to drip off. Finally, roll it thoroughly in the Panko and Parmesan mixture, pressing gently to ensure a thick, even coating. The Parmesan in the breadcrumbs helps achieve that beautiful golden crispiness.
- Thread 3-4 breaded chicken pieces onto each soaked skewer, leaving a little space between each piece for even cooking. Do not overcrowd the skewers.
- Heat the vegetable oil in a large skillet or frying pan over medium-high heat. The oil is ready when a sprinkle of Panko breadcrumbs immediately sizzles and turns golden. This correct oil temperature is crucial for ensuring the breading gets crispy without absorbing too much oil and for the chicken to cook through quickly without drying out.
- Carefully place a few skewers into the hot oil, ensuring not to overcrowd the pan. Cook the chicken for 2-3 minutes per side, turning occasionally, until the breading is a deep golden brown and the chicken is cooked through to an internal temperature of 165 degrees Fahrenheit. Cooking quickly at the right temperature is the secret to keeping the chicken juicy inside.
- Remove the cooked skewers from the pan and place them on a wire rack set over a baking sheet to drain any excess oil.
- Repeat with the remaining skewers, adding more oil to the pan if necessary.
- Garnish the finished skewers with extra grated Parmesan cheese and chopped fresh parsley before serving warm.
Notes
- Ensure chicken is patted thoroughly dry before seasoning for best breading adhesion.