Mastering the Spinach Artichoke Pull-Apart Bread
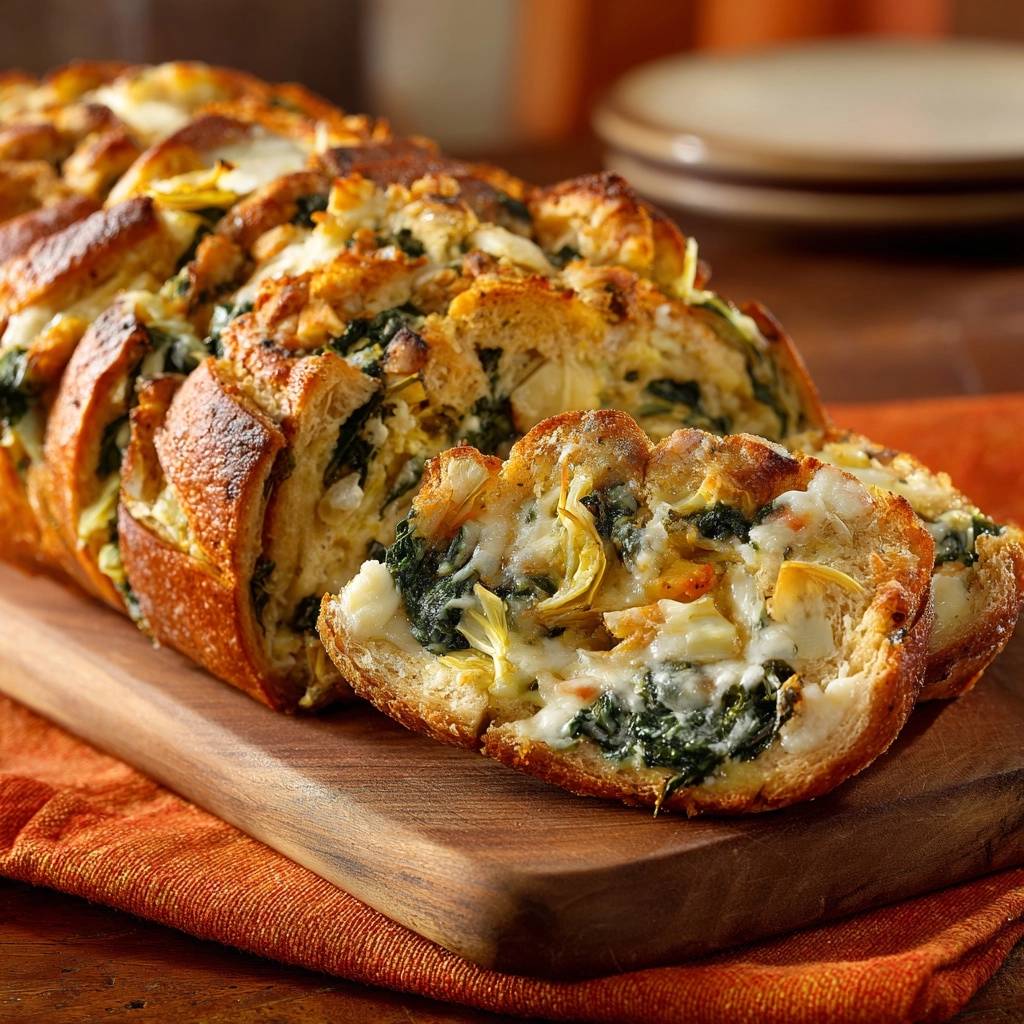
We’ve all been there at a party, reaching for a beautiful loaf of stuffed bread only to find the middle is a gummy, unappetizing mess. It’s the classic “soggy bottom” syndrome that plagues even the most seasoned home cooks. This Spinach Artichoke Pull-Apart Bread is designed specifically to solve that problem, turning a standard appetizer into a structural masterpiece of crunch and creaminess.
The secret to this recipe isn’t just the flavor; it’s the engineering behind the moisture control. By treating the ingredients with a specific drying technique, you ensure the bread stays toasted and firm while the filling remains rich. You’re going to love how the edges of the bread shatter when you pull a piece away, revealing a perfectly set, savory center.
I’ve found that the real trick to success lies in the “fat barrier” method. Before any filling touches the crumb, we seal the bread with a layer of melted butter. This simple step prevents the moisture from the vegetables from migrating into the bread fibers, keeping the loaf crisp from the first bite to the last. It’s a total game-changer for your appetizer game.
The Science of Moisture Control in Stuffed Breads
When you bake a stuffed loaf, you’re essentially creating a small steam chamber inside the bread. Vegetables like spinach and artichokes are naturally high in water, and as they heat up, that water turns into steam. Without proper preparation, that steam has nowhere to go but into the porous crumb of your loaf, resulting in a mushy texture that no amount of extra baking can fix.
Moisture-wicking is the process of removing that liquid before it ever hits the oven. Traditional spinach artichoke dips are often too “wet” for bread because they rely on sour cream or heavy cream, which release liquid as they break down under heat. By focusing on a drier, more stable filling, we maintain the structural integrity of the sourdough or Italian loaf.
Why Frozen Spinach Requires Mechanical Drying
Frozen spinach is a convenient pantry staple, but its cellular structure changes during the freezing process. As the water inside the leaves turns to ice, it expands and ruptures the cell walls. Once thawed, all that internal moisture is released, leaving you with a soggy pile of greens that can ruin a bake.
Simply draining the spinach in a colander isn’t enough to get the job done. You need to use a clean kitchen towel, pile the thawed spinach in the center, and wring it with all your might. You’ll be shocked at how much green liquid comes out. You want the spinach to feel almost like dry wool before it goes into your mixing bowl.
Artichoke Preparation: Beyond the Drain
Canned or jarred artichoke hearts are packed in a salty brine or oil that can be quite acidic. If you dump them straight from the can into your bread, that acid starts to break down the gluten structure of the bread almost immediately. This leads to a “weeping” filling that makes the bottom of the loaf fall apart.
After you drain and chop your artichokes, spread them out on a layer of paper towels. Pat them firmly from the top to soak up every lingering drop of brine. This ensures that the artichokes provide a meaty texture and tangy flavor without compromising the crunch of the crusty Italian bread.
Essential Components for the Perfect Loaf
Choosing the right ingredients is the first step toward a successful pull-apart bread. Since the bread acts as the vessel for a heavy, cheesy filling, you can’t just grab any loaf from the bakery aisle. You need something with “backbone” that can stand up to the heat and the weight of the spinach mixture.
I always recommend a hearty Sourdough or a thick-crusted Italian loaf. These breads have a sturdy exterior that crisps up beautifully in the oven. Avoid soft sandwich breads, brioche, or challah for this recipe; their high sugar and fat content make them too soft, and they will likely collapse under the weight of the artichoke hearts and mozzarella.
The Fat Barrier: Mayonnaise vs. Sour Cream
While many dip recipes call for sour cream, we are using mayonnaise here for a very specific scientific reason. Mayonnaise is a stable emulsion of oil and egg yolks. Because oil is a fat, it creates a natural waterproof barrier. When the bread is in the oven, the mayo helps seal the bread’s surface rather than soaking into it.
Sour cream has a much higher water content and tends to “break” or curdle when exposed to high heat for 25 minutes. By using mayonnaise, you get a richer mouthfeel and a much more stable filling. Don’t worry about the flavor; once it’s mixed with garlic and parmesan, it simply tastes like a decadent, creamy sauce.
Cheese Selection for Melt and Flavor
For the ultimate cheese pull, mozzarella is the undisputed king. However, mozzarella on its own can be a bit bland. That’s why we pair it with freshly grated parmesan. The parmesan adds a salty, umami punch that cuts through the richness of the cream cheese and mayonnaise.
If possible, grate your cheese yourself from a block. Pre-shredded cheeses are coated in potato starch or cellulose to prevent clumping in the bag. This coating prevents the cheese from melting into that smooth, gooey consistency we want. Freshly grated cheese melts faster and creates a much better “pull” when you’re serving guests.
Step-by-Step: Engineering the Anti-Soggy Loaf
Assembling this bread is where the magic happens. You aren’t just stuffing a loaf; you’re building layers of flavor and texture. Start by preheating your oven to 375°F. This temperature is high enough to crisp the bread but low enough to melt the cream cheese without scorching the garlic.
Line your baking sheet with parchment paper to catch any stray cheese drips. This makes cleanup a breeze and prevents the bottom of the bread from sticking to the metal. Now, let’s get into the technical side of the assembly to ensure that perfect, non-soggy finish.
The Accordion Cut Technique
Place your loaf on the cutting board and use a long serrated bread knife. Slice the bread crosswise at one-inch intervals. The key here is to stop about a half-inch before you hit the bottom crust. You want the loaf to open up like an accordion while remaining attached at the base.
This intact base is vital because it acts as a tray for the filling. If you cut all the way through, the cheese will leak out onto the pan, and the bread will lose its structural integrity. Keeping the bottom connected also helps the heat distribute evenly through the entire loaf as it bakes.
Applying the Internal Butter Shield
Once your loaf is sliced, melt your unsalted butter and mix in the dried oregano. Use a small pastry brush to lightly coat the inside of every single slit. You don’t need to drench it, but you want a visible sheen of butter on the “walls” of the bread slices.
This is your primary defense against sogginess. The fat in the butter soaks into the surface of the bread and creates a seal. When the spinach mixture starts to release its remaining steam, the butter shield prevents that moisture from entering the bread’s crumb. Plus, it adds a wonderful herby flavor to every bite.
Stuffing and Layering for Maximum Coverage
Now it’s time to get your hands a little messy. Take a spoonful of the spinach and artichoke mixture and tuck it deep into each slit. Use your fingers to push the filling all the way to the bottom. You want the bread to be bursting with filling, but try not to tear the slices away from the base.
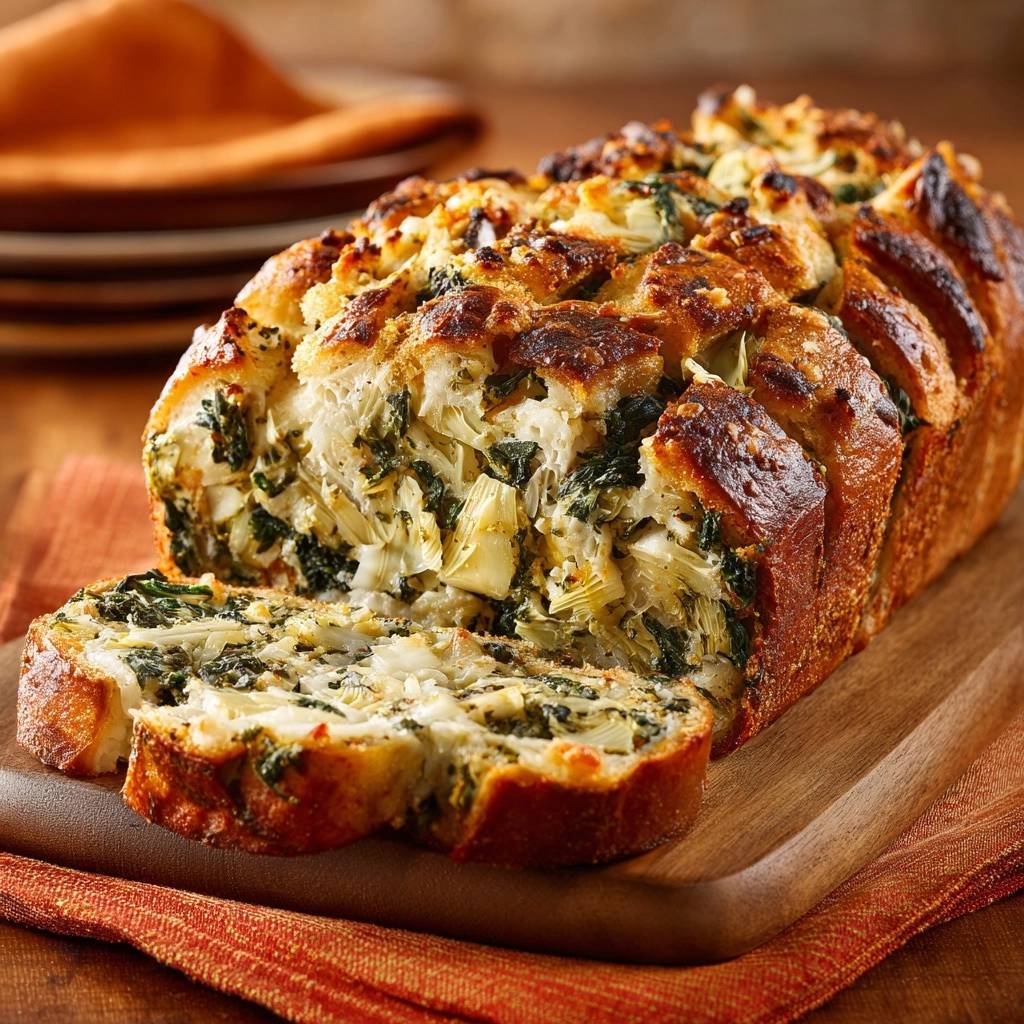
After all the slits are filled, sprinkle the remaining mozzarella and parmesan over the top. Make sure some of that cheese falls into the cracks. This creates a “lid” of melted cheese that holds everything together. The visual of the green spinach peeking through the golden cheese is exactly what you’re looking for.
Thermal Management: The Foil and Broil Method
Baking this bread requires a two-stage approach to manage heat and moisture. If you just throw it in the oven uncovered, the top will burn before the cream cheese in the center has a chance to melt. However, if you wrap the whole thing in foil, you’ll end up steaming the bread, which leads back to that soggy texture we’re trying to avoid.
The solution is a partial wrap. Place the loaf on the parchment-lined sheet and wrap foil only around the bottom and the sides, leaving the top completely exposed. This protects the bottom from getting too dark while allowing steam to escape freely from the top of the loaf.
Venting Steam with Partial Foil Wrapping
By leaving the top open, you’re encouraging the moisture to evaporate upward. This is the “secret sauce” of the recipe. The foil on the sides acts like a heat shield, keeping the bread from drying out too much, while the exposed top allows the cheese to begin browning and the bread edges to get that toasted, crouton-like texture.
Bake the loaf at 375°F for about 20 minutes. At this point, the kitchen should smell incredible—garlicky, cheesy, and warm. The center of the loaf should be hot to the touch, and the cheese should be fully melted and starting to bubble around the edges of the spinach.
The High-Heat Finish for Texture
For the final five minutes, we want to trigger the Maillard reaction. This is the chemical reaction between amino acids and reducing sugars that gives browned food its distinctive flavor. Crank the oven up to 400°F or turn on the broiler for a quick blast of intense heat.
That same browning reaction works beautifully to create the golden top on this creamy baked spaghetti bake.
Watch the bread closely during this stage! You want the cheese to turn a deep golden brown and the tips of the bread to become very crunchy. This contrast between the crispy, toasted exterior and the molten, creamy interior is what makes this pull-apart bread so addictive. Once it’s golden, pull it out and let it rest for just two minutes before serving.
Troubleshooting Common Bread Baking Issues
Even with the best techniques, things can sometimes go sideways in the kitchen. If you find that your cheese is browning too quickly but the center of the bread still feels cold, don’t panic. Simply lay a loose piece of foil over the top of the loaf to stop the browning and let it bake for another five minutes.
Another common issue is the bread moving around on the pan. If your loaf feels unstable, you can “scrunch” the foil around the base a bit tighter to create a more secure nest. This keeps the loaf upright so the filling doesn’t spill out sideways during the melting process.
What to Do if the Center Stays Cold
If the interior is still chilly, it usually means the loaf was very dense or the filling was straight from the fridge. To fix this, lower the oven temperature back to 350°F and tent the entire loaf with foil. This traps enough heat to warm the center without further browning the crust.
In the future, try to let your cream cheese reach true room temperature before mixing. This ensures the filling starts at a higher baseline temperature, leading to a more even bake. You can also move the oven rack to the middle position to ensure the heat circulates properly around the entire loaf.
Fixing an Overly Dry Filling
If you were a bit too enthusiastic with the spinach-wringing and the filling looks crumbly rather than creamy, there’s an easy fix. Before you put the bread in the oven, stir an extra tablespoon of mayonnaise or a splash of melted garlic butter into the mixture. This adds back just enough moisture to keep it luscious.
Remember, the goal is “creamy,” not “wet.” A little extra fat (like butter or mayo) will provide that moisture without the steam issues that water-based liquids cause. If the bread is already baked and feels dry, serve it with a side of warm marinara or a little extra melted butter for dipping.
Make-Ahead Strategies and Storage
This is a fantastic party dish because you can do most of the work in advance. You can prepare the spinach and artichoke filling up to two days ahead of time. Just store it in an airtight container in the refrigerator. This actually allows the garlic and oregano flavors to meld and intensify.
However, I strongly recommend waiting to slice and stuff the bread until you are ready to bake. If you stuff the bread hours in advance, the moisture from the filling will eventually win the battle against your butter shield. For the best results, assemble the loaf while the oven is preheating.
Prepping the Filling in Advance
When you’re ready to host, pull the filling out of the fridge about 30 minutes before assembly. Cold filling takes longer to melt, which can lead to the “burnt top, cold center” problem we discussed earlier. Giving the mixture a chance to take the chill off ensures a much smoother baking experience.
If you have leftover filling that didn’t fit in the bread, don’t toss it! It makes a great topping for grilled chicken or can be stirred into hot pasta for a quick lunch the next day. It’s versatile, savory, and too good to waste.
Reheating Without Losing the Crunch
If you have leftovers, please step away from the microwave! Microwaving bread makes it rubbery and tough. To revive that original crunch, use a toaster oven or a standard oven set to 350°F. Wrap the bottom in foil again and bake for 10 minutes until the cheese is bubbling.
An air fryer is also an incredible tool for reheating pull-apart bread. Set it to 320°F for about 5 minutes. The circulating air is perfect for re-crisping the crust while gently warming the spinach and artichoke center. It’ll taste almost as good as it did the moment it first came out of the oven.
Expert Tips for Flavor Customization
Once you’ve mastered the basic technique, you can start playing with the flavor profile. The “Anti-Soggy” framework works with many different ingredients. You can easily swap the oregano for fresh basil or even a bit of lemon zest to brighten up the heavy cheese and artichokes.
The key to any addition is moisture control. If you add sun-dried tomatoes, make sure they are the oil-packed kind and pat them very dry. If you want to add mushrooms, sauté them first to cook out all their water. As long as you keep the filling “dry,” the bread will stay “crispy.”
Infusing Aromatics into the Butter
The butter shield is a great place to add extra layers of flavor. Instead of just oregano, try simmering the butter with a sprig of fresh rosemary or thyme for a few minutes. This infuses the fat with herbal oils that will perfume the entire loaf of bread as it bakes.
You can also add a teaspoon of onion powder or even a dash of Worcestershire sauce to the butter for a deeper, more savory “umami” profile. These small tweaks don’t add moisture, so they won’t affect the crunch, but they will make your guests wonder what your secret ingredient is.
Adding Heat and Depth
If you like a bit of a kick, don’t be shy with the red pepper flakes. I like to add them both to the filling and a little sprinkle on top of the cheese. The heat cuts through the richness of the mozzarella and cream cheese beautifully, making the dish feel lighter.
For even more depth, try adding a teaspoon of smoked paprika to the filling. It gives the bread a subtle “fire-roasted” flavor that pairs perfectly with the artichokes. Just remember to keep the balance; you want the spinach and artichoke to remain the stars of the show.
Pairing Suggestions for a Complete Spread
Because this bread is so rich and savory, it pairs best with items that offer a bit of acidity or freshness. You want something to cleanse the palate between those cheesy, garlicky bites. It’s a heavy appetizer, so keep the surrounding dishes light and vibrant.
Think about textures as well. Since the bread is crunchy and the filling is creamy, a crisp salad or a refreshing drink provides the perfect contrast. This helps prevent “palate fatigue,” ensuring your guests keep coming back for “just one more piece” until the whole loaf is gone.
Refreshing Beverage Counterpoints
A sharp lemon-mint cooler is a fantastic choice here. The citrus and mint cut right through the fat of the cheese. Alternatively, a sparkling botanical water with hints of cucumber or lime provides a clean, crisp finish that complements the earthy artichokes.
If you prefer something warmer, a light herbal tea can also work well. However, most people find that cold, carbonated drinks are the best match for the hot, melty bread. The bubbles help lift the richness of the cream cheese off the tongue, making every bite feel like the first one.
Complementary Side Dishes
A simple arugula salad with a lemon vinaigrette is the perfect partner for this bread. The peppery bite of the arugula and the acid from the lemon juice balance the savory garlic and cheese. It’s a classic pairing for a reason—it just works.
You could also serve this alongside a platter of raw vegetables like sliced cucumbers, radishes, and bell peppers. These provide a cool, crunchy contrast to the warm bread. Avoid serving other heavy, bready appetizers like pizza or sliders; let this Spinach Artichoke Pull-Apart Bread be the centerpiece of your spread.
Frequently Asked Questions
How do I store leftovers and can I freeze this bread?
Store any leftover bread in an airtight container in the refrigerator for up to 3 days. While you can technically freeze the unbaked filling, I do not recommend freezing the assembled bread. The bread’s texture will become grainy and the artichokes can turn mushy upon thawing. For the best experience, eat it fresh or reheated from the
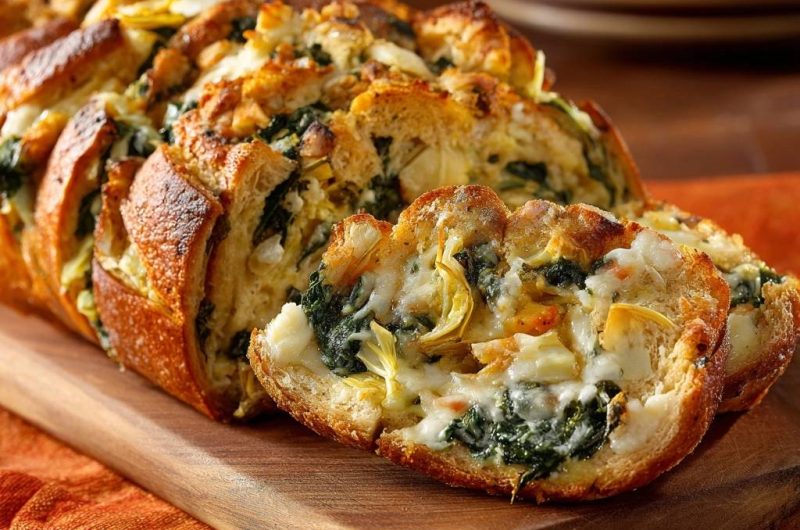
Spinach Artichoke Bread
Course: AppetizerCuisine: AmericanDifficulty: easy8
servings15
minutes25
minutes450
kcal40
MinutesThis recipe solves the common problem of mushy stuffed bread by using a specific layering technique and moisture removal process. Crusty bread is stuffed with a rich spinach and artichoke mixture, then baked until golden and crunchy.
Ingredients
1 large loaf crusty Italian or Sourdough bread (unsliced)
10 ounces frozen chopped spinach, thawed and squeezed bone-dry
1 can (14 oz) artichoke hearts, drained, chopped, and patted dry
4 ounces cream cheese, softened
1/4 cup mayonnaise (provides a better oil-base barrier than sour cream)
2 cups shredded mozzarella cheese
1/2 cup grated parmesan cheese
3 cloves garlic, minced
1/2 teaspoon red pepper flakes (optional, for depth)
1/4 cup unsalted butter, melted
1 teaspoon dried oregano or Italian seasoning
Directions
- Preheat your oven to 375°F (190°C). Line a baking sheet with parchment paper.
- The secret to avoiding a soggy bottom starts with the spinach and artichokes. Place the thawed spinach in a clean kitchen towel and wring it out until no more liquid escapes. Do the same with the chopped artichokes using paper towels. Removing this excess water is the only way to prevent the bread from steaming and getting mushy.
- In a medium bowl, mix the cream cheese, mayonnaise, garlic, and oregano until smooth. Fold in the dried spinach, dried artichokes, and 1 cup of the mozzarella.
- Slice the bread loaf crosswise into 1-inch thick slices, but do not cut all the way through the bottom crust. This keeps the loaf intact.
- To further prevent sogginess, brush the inside of each bread slit lightly with the melted butter before adding the filling. This creates a fat barrier that keeps the moisture from the dip from soaking into the bread fibers.
- Generously stuff the spinach mixture between each slice. Ensure the filling is tucked deep into the slits but also visible at the top. Top the entire loaf with the remaining mozzarella and parmesan cheese.
- Wrap the bottom and sides of the loaf in foil, leaving the top completely exposed. This allows steam to escape from the top while the bottom crisps up against the hot pan.
- Bake for 20 minutes. For the final 5 minutes, increase the heat to 400°F or turn on the broiler to ensure the cheese is bubbly and the edges of the bread are golden brown and crunchy, matching the visual texture of a toasted crust. Serve immediately while hot.
Notes
- The key to success is wringing the spinach bone-dry and brushing the bread slits with butter to create a moisture barrier. Leaving the top of the foil open allows steam to escape, ensuring a crispy texture.