Mastering the Black Forest Chocolate Cake with Anti-Soggy Technology
The Schwarzwälder Kirschtorte, or Black Forest cake, stands as a titan of German confectionery. Traditionally, this dessert marries deep cocoa sponges with tart cherries and clouds of whipped cream. However, many home bakers encounter a frustrating structural failure: the “mushy bottom.” Because the cherries and their juices sit directly against the delicate sponge, the cake often absorbs too much liquid, losing its airy crumb and turning into a purple, sodden mess within hours.
Professional pastry chefs solve this by focusing on structural integrity. By introducing a thin, crisp chocolate barrier between the fruit and the cake, you can preserve the texture of the sponge while keeping the cherries juicy. This technical adjustment ensures your cake remains as impressive on the plate as it looks on the stand. It’s about balancing the rustic flavors of the Black Forest with modern culinary physics.
The secret to a bakery-quality result lies in the temperature of your chocolate seal. If the chocolate is too hot, it will soak into the pores of the cake; if it’s too cold, it won’t spread thinly enough to cut through later. You want a fluid, room-temperature ganache-like consistency that sets into a snap-able shield. This single step elevates the dish from a standard home bake to a professional-grade masterpiece.
The Architecture of a Perfect Black Forest Chocolate Cake
A successful Black Forest cake relies on a deliberate contrast of textures. You have the light, almost ethereal quality of the chocolate sponge, which must compete with the heavy, moisture-rich cherry filling and the dense richness of the whipped cream. Without a proper plan, these elements can collapse into one another, muddying the distinct flavors that make the cake famous.
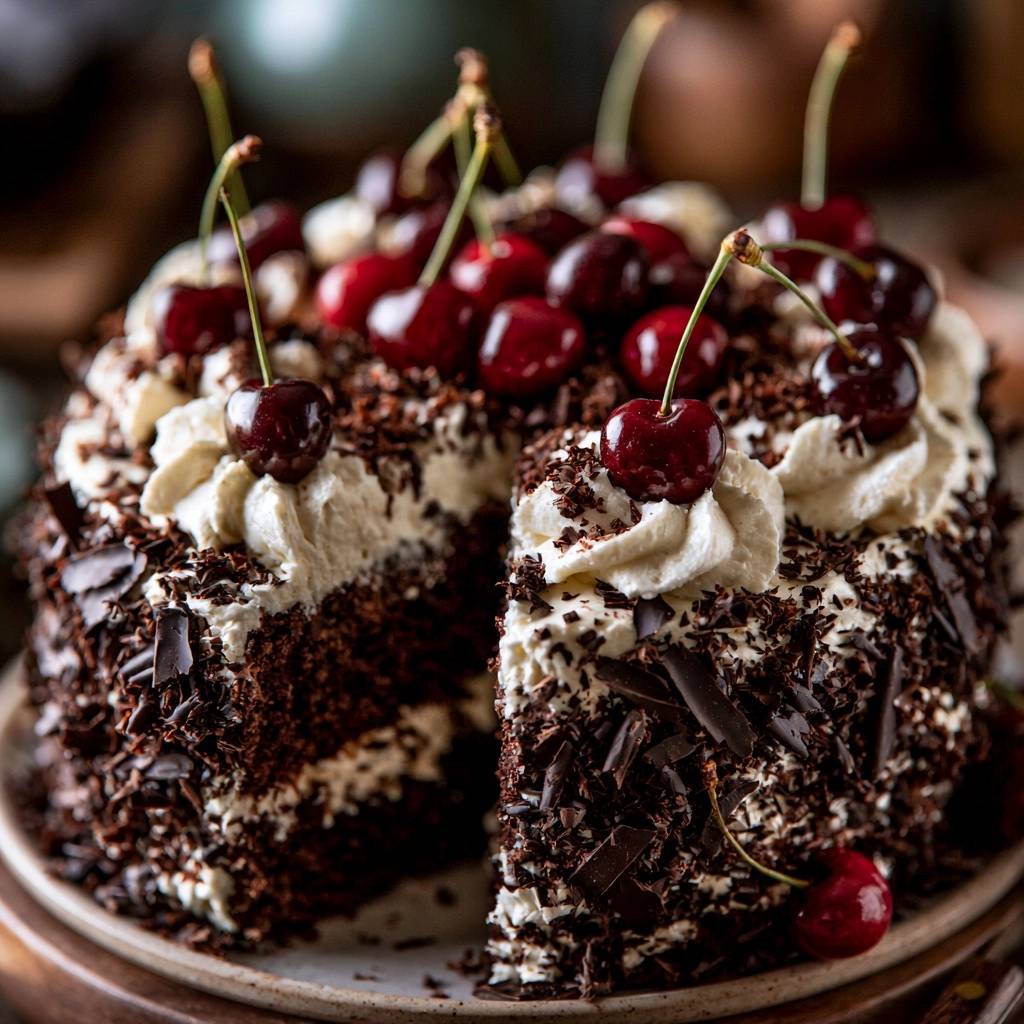
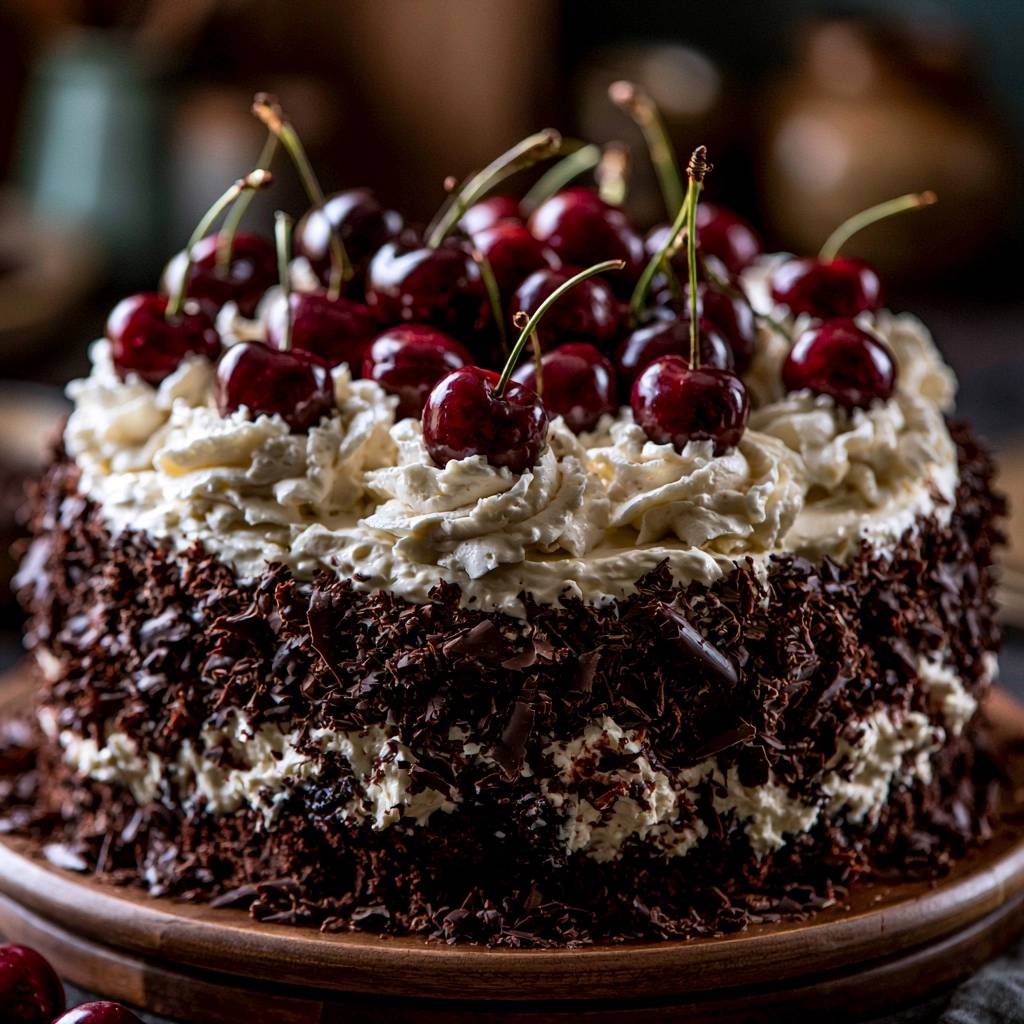
This recipe balances the natural acidity of the cherries with the slight bitterness of dark chocolate. When you take a bite, you should first hit the pillowy cream, followed by the burst of tart fruit, and finally the soft, chocolatey crumb. The chocolate shavings on the exterior aren’t just for show; they provide a necessary crunch that breaks up the softness of the interior layers.
Why Hot Coffee is Essential for Cocoa Bloom
You might wonder why a chocolate cake recipe calls for a full cup of hot coffee. This isn’t about making the cake taste like mocha; it’s about “blooming” the cocoa powder. When hot liquid hits the cocoa, it dissolves any stubborn lumps and releases trapped flavor compounds that cold liquids simply can’t reach.
This process results in a much deeper, more intense chocolate profile. Because the coffee is hot, it also helps the sugar dissolve more quickly, leading to a smoother batter. Don’t worry about the thin consistency of the final mixture. That high moisture content, triggered by the hot coffee, is exactly what creates the signature melt-in-your-mouth texture.
The Role of Buttermilk in Crumb Structure
Buttermilk is the unsung hero of the chocolate sponge. As an acidic ingredient, it reacts immediately with the baking soda to produce carbon dioxide. This chemical reaction is what gives the cake its impressive lift and creates a tender, fine-grained crumb that feels luxurious on the tongue.
Beyond the rise, buttermilk adds a subtle tang that cuts through the sugar. This acidity is crucial because it prevents the cake from feeling cloyingly sweet. It provides the structural strength needed to support the weight of the cherries and cream without making the cake feel heavy or bready.
Essential Components for the Black Forest Chocolate Cake
Quality ingredients are the foundation of this build. When selecting your cocoa, look for a high-quality unsweetened version. While Dutch-processed cocoa offers a darker color and mellower flavor, natural cocoa works perfectly here because the baking soda needs the acidity to react. The choice often comes down to how dark you want your final layers to appear.
The whipped cream is the most volatile component of the cake. You must use heavy whipping cream with at least 36% milk fat. Anything lower will lack the protein structure to hold stiff peaks, causing your cake to sag or “weep” liquid after a few hours. Keep the cream, the bowl, and the whisk attachments in the fridge until the very second you are ready to use them.
For the chocolate shavings, choose a bar with a high cocoa butter content. This ensures the shavings curl beautifully rather than shattering into dust. If the chocolate is too dry or cheap, you won’t get those elegant, long curls that define the classic Black Forest aesthetic.
Selecting the Right Cherries: Fresh vs. Canned
Traditionalists often reach for Morello cherries, which are prized for their tartness and firm texture. If you can’t find them, canned black cherry filling is a reliable, convenient option that provides a consistent syrup. However, if you use fresh Bing cherries, you must macerate them first in sugar and juice to soften their skins and release their natural juices.
If you choose fresh fruit, pit them carefully to keep the berries whole. Let them sit in their juices for at least an hour before draining. This prevents excess water from leaking into your cream layers later, which could cause the cake to slide apart during assembly.
The Importance of High-Percentage Dark Chocolate
For the moisture barrier, use dark chocolate with 60% to 70% cacao. This percentage provides the right balance of fats to create a firm seal. Avoid milk chocolate or compound chocolate “melts,” as these contain stabilizers and excess sugar that prevent the chocolate from setting with a clean snap.
The dark chocolate also provides a flavor bridge. It connects the sweetness of the cherry filling to the earthy notes of the cocoa sponge. When chilled, this layer acts as a structural floor, allowing you to stack the heavy fruit and cream without compromising the bottom sponge.
Step-by-Step: Baking the High-Moisture Chocolate Sponge
When you mix the batter, don’t be alarmed by how liquid it looks. It will be significantly thinner than a standard yellow cake batter. Resist the urge to add more flour! This high hydration is what ensures the cake stays moist even after being refrigerated, which is a requirement for whipped cream cakes.
Watch the oven closely around the 30-minute mark. Use the toothpick test: it should come out with a few moist crumbs attached, but no wet batter. Let the cakes rest in their pans for exactly 10 minutes. This allows the structure to set through carry-over cooking before you attempt to flip them onto the cooling racks.
The Anti-Soggy Hack: Applying the Chocolate Seal
This is the defining step for a long-lasting cake. Once your bottom layer is completely cool and leveled, you will apply the “Waterproof Barrier.” Melt your dark chocolate gently, ensuring it is smooth and glossy. If the chocolate is too hot, it will melt into the cake; it should be just warm enough to pour.
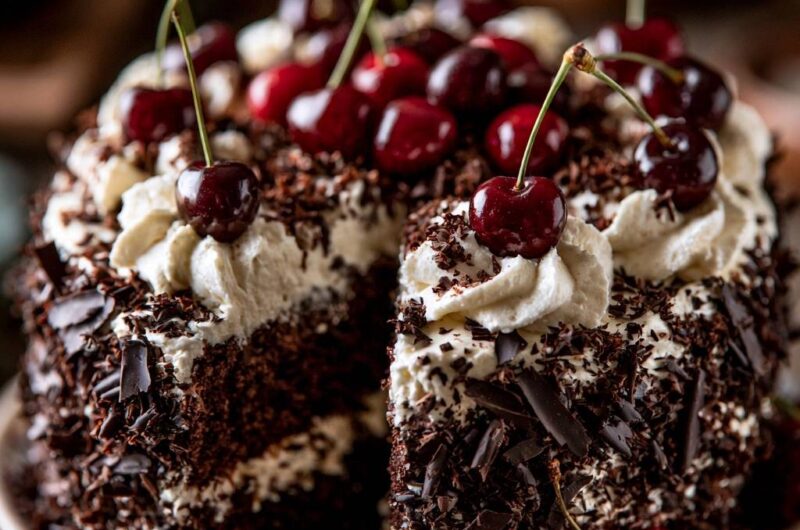
Pour the chocolate into the center of the cake and use an offset spatula to spread it in a thin, even layer toward the edges. You aren’t looking for a thick slab, just a consistent coating that fills the pores of the sponge. Pop the layer into the fridge for about 10 minutes. Once it’s hard to the touch, you’ve successfully created a shield that cherry juice cannot penetrate.
This technique allows you to assemble the cake a day in advance without worrying about the bottom layer turning into purple mush. It also adds a delightful, unexpected textural element—a thin, chocolatey crunch in the middle of a soft cake. It’s a small detail that makes a massive difference in the final eating experience.
Temperature Control for the Moisture Barrier
If you apply the chocolate to a cake that is even slightly warm, the chocolate will liquefy and disappear into the crumb. Conversely, if the cake is ice-cold from the freezer, the chocolate will seize instantly, making it impossible to spread smoothly. Aim for a room-temperature cake and fluid chocolate.
If the chocolate layer cracks when you place the second sponge on top, don’t panic. The whipped cream will fill those small gaps. The goal is to cover the majority of the surface area to block the bulk of the cherry moisture from migrating downward.
Creating the Whipped Cream Structural Dam
To keep the cherries from leaking out the sides, you need to build a “dam.” After spreading a thin base of cream over the hardened chocolate, pipe a thick ring of whipped cream around the very edge of the cake layer. This creates a circular wall that holds the fruit in place.
Fill the center of this ring with your cherries. This method ensures that when you place the top layer on, the weight is supported by the cream ring rather than squishing the cherries out the sides. It’s the secret to those perfectly straight, clean sides you see in professional bakeries.
Assembling the Layers for Maximum Stability
When stacking, precision is your friend. Before adding the top layer, lightly brush the underside with cherry juice. This adds flavor without making the exterior of the cake soggy. Place the top sponge carefully, ensuring it is centered on the cream dam below.
Apply a “crumb coat” first—a very thin layer of whipped cream over the entire cake to trap any loose chocolate crumbs. Chill the cake for 15 minutes before applying the final, thick layer of frosting. This two-step process ensures your white cream stays pristine and free of brown specks.
Achieving Professional Chocolate Shavings and Curls
To make perfect curls, take a room-temperature block of dark chocolate. Use a vegetable peeler and run it firmly along the long edge of the block. The friction and slight warmth from the blade will create beautiful, delicate spirals. If the chocolate is too cold, it will just flake; if it’s too warm, it will smudge.
When applying the shavings to the sides of the cake, try not to touch them directly with your hands, as your body heat will melt them instantly. Use a bench scraper or a piece of parchment paper to gently press the shavings into the whipped cream. This keeps the curls intact and your hands clean.
Equipment: Tools for Professional Cake Construction
A rotating cake stand, or turntable, is almost essential for this recipe. It allows you to keep the offset spatula steady while the cake moves, resulting in a perfectly smooth cream finish. Without it, you’ll likely end up with “steps” or uneven ridges in your frosting.
Always use a metal bowl for whipping your cream, and if possible, chill it in the freezer for 10 minutes beforehand. Metal retains the cold much better than plastic or glass, which helps the fat globules in the cream stay solid, leading to a more stable, voluminous foam.
Troubleshooting Common Black Forest Cake Issues
If your whipped cream looks grainy, you’ve over-whipped it. You can often fix this by gently folding in a tablespoon or two of un-whipped liquid cream until it smooths out. If the chocolate barrier feels too hard to cut, ensure you spread it thinly; it should be a veil, not a brick.
For domed cake layers, always use a serrated knife to saw off the rounded top before assembly. A flat surface is non-negotiable for stability. If you see cherry juice bleeding into the white cream, it usually means the cherries weren’t drained well enough or the cream dam wasn’t thick enough to contain them.
Make-Ahead Strategies and Storage Requirements
This cake actually tastes better after sitting in the fridge for at least two hours. This time allows the cherry flavors to permeate the cream and the chocolate barrier to fully set. However, because whipped cream is highly perishable and absorbs fridge odors, keep the cake in a dedicated carrier or a large airtight container.
Do not freeze this cake once it is fully assembled. Whipped cream changes texture when thawed, often becoming watery and losing its lift. If you need to prep ahead, you can bake and freeze the chocolate sponges weeks in advance, then thaw and assemble with fresh cream and cherries on the day of serving.
Expert Tips for Clean Slicing and Presentation
To get those sharp, professional slices, use a long, thin knife dipped in hot water. Wipe the blade dry before each cut. The heat from the metal will glide through the chocolate barrier and the chilled cream without dragging or crushing the layers. It makes a world of difference in the final presentation.
For a standard 9-inch cake, pipe 12 large cream swirls around the edge. This acts as a visual guide for serving sizes, ensuring every guest gets a fresh cherry on top of their slice. It’s a simple way to make the cake look symmetrical and intentional.
Making a Cherry Juice Reduction
For extra depth of flavor, create a cherry reduction. Simmer tart cherry juice in a small saucepan until it reduces by half, then add a tiny drop of almond extract. The extract adds the subtle, nutty flavor of cherry pits.
Brush this reduction onto the cake layers just as you would plain juice. It provides the necessary moisture and tartness that defines the Black Forest profile. The concentrated juice offers a vibrant color and a punchy fruit flavor that stands up well against the rich chocolate.
Managing Humidity During Assembly
High humidity is the enemy of whipped cream. If you are baking on a particularly hot or humid day, your cream might lose its structure quickly. You can stabilize it by adding one teaspoon of cornstarch or skim milk powder for every cup of heavy cream before you start whipping.
These powders absorb excess moisture and provide extra protein to support the air bubbles. This ensures your decorative swirls stay sharp and your cake doesn’t start to “wilt” while sitting on the dessert table. Always keep the cake refrigerated until the very moment you are ready to serve.
How do I store leftovers?
Store any leftover cake in an airtight container in the refrigerator for up to 3 days. Because the frosting is made of fresh whipped cream, it is highly perishable and will eventually begin to deflate or absorb other flavors from the fridge. Do not freeze the assembled cake, as the cream will become grainy and watery upon thawing.
Why did my whipped cream turn watery?
Whipped cream usually turns watery for two reasons: under-whipping or temperature. If the cream wasn’t whipped to stiff peaks, it won’t hold its structure. More commonly, if the cake sits at room temperature for too long, the fat in the cream melts, causing it to collapse. Always keep the cake chilled until serving.
Can I use frozen cherries instead of canned or fresh?
Yes, you can use frozen cherries, but you must thaw and drain them completely first. Frozen fruit releases a lot of liquid as it thaws, which can ruin the cream. Toss the thawed, drained cherries with a little sugar and a teaspoon of cornstarch to help bind any remaining juices before adding them to the cake.
What if I don’t have a piping bag for the dam?
If you don’t have a professional piping bag, you can use a large plastic freezer bag. Fill the bag with whipped cream and snip off one of the bottom corners. This will allow you to pipe a consistent ring around the edge of the cake to hold the cherry filling in place.
Why is my chocolate sponge crumbly?
A crumbly sponge usually results from over-baking or over-mixing the batter. Once you add the hot coffee, stir only until the streaks of flour disappear. If you bake the cake too long, the moisture evaporates, leaving the structure brittle. Check the cake 5 minutes before the timer goes off to ensure it stays moist.
Black Forest Chocolate Cake
Course: DessertCuisine: GermanDifficulty: easy12
servings45
minutes35
minutes80
Minutes510
kcalGerman
Ingredients
2 cups all-purpose flour
2 cups granulated sugar
3/4 cup unsweetened cocoa powder
2 teaspoons baking soda
1 teaspoon baking powder
1 teaspoon salt
1 cup buttermilk
1/2 cup vegetable oil
2 large eggs
2 teaspoons vanilla extract
1 cup hot coffee
3 cups heavy whipping cream, chilled
2/3 cup powdered sugar
1/2 cup cherry juice (for brushing)
1 cup canned black cherry filling or macerated pitted cherries
6 ounces dark chocolate, melted (for the moisture barrier)
2 cups dark chocolate curls or large shavings (for the sides and top)
12-15 fresh whole cherries with stems for topping
Directions
- Preheat your oven to 350°F (175°C). Grease and flour two 9-inch round cake pans.
- In a large bowl, whisk together flour, sugar, cocoa, baking soda, baking powder, and salt.
- Add buttermilk, oil, eggs, and vanilla. Mix on medium speed until well combined. Stir in the hot coffee by hand. The batter will be very thin.
- Pour batter evenly into the prepared pans and bake for 30 to 35 minutes, or until a toothpick comes out clean. Let the cakes cool in the pans for 10 minutes, then turn out onto wire racks to cool completely.
- Once cooled, use a serrated knife to level the tops of the cakes. Lightly brush the cut side of the bottom layer with cherry juice for flavor.
- The Anti-Soggy Hack: Take your melted dark chocolate and brush a thin, even layer over the top surface of the bottom cake layer. Let this set in the fridge for 10 minutes until hard. This creates a waterproof barrier so the cherry juice cannot soak into the sponge.
- In a chilled bowl, whip the heavy cream and powdered sugar until stiff peaks form.
- Spread a thin layer of whipped cream over the hardened chocolate barrier. Pipe a ring of whipped cream around the edge of the cake to act as a dam, then fill the center with the cherry filling.
- Place the second cake layer on top. Frost the top and sides of the entire cake with the remaining whipped cream.
- Press the large chocolate shavings generously into the sides of the cake and sprinkle more over the top surface, leaving room for the cream swirls.
- Pipe large decorative swirls of cream around the top edge. Place a fresh whole cherry with the stem attached onto each swirl and pile a few extra in the center.
- Chill for at least 2 hours before serving. This allows the chocolate barrier to stay crisp and the cream to stabilize for clean slicing.
Notes
- The melted chocolate barrier must be fully set in the fridge before adding the whipped cream and cherry filling to ensure the moisture seal works correctly.