Mastering the Caramel Apple Pecan Upside-Down Cake
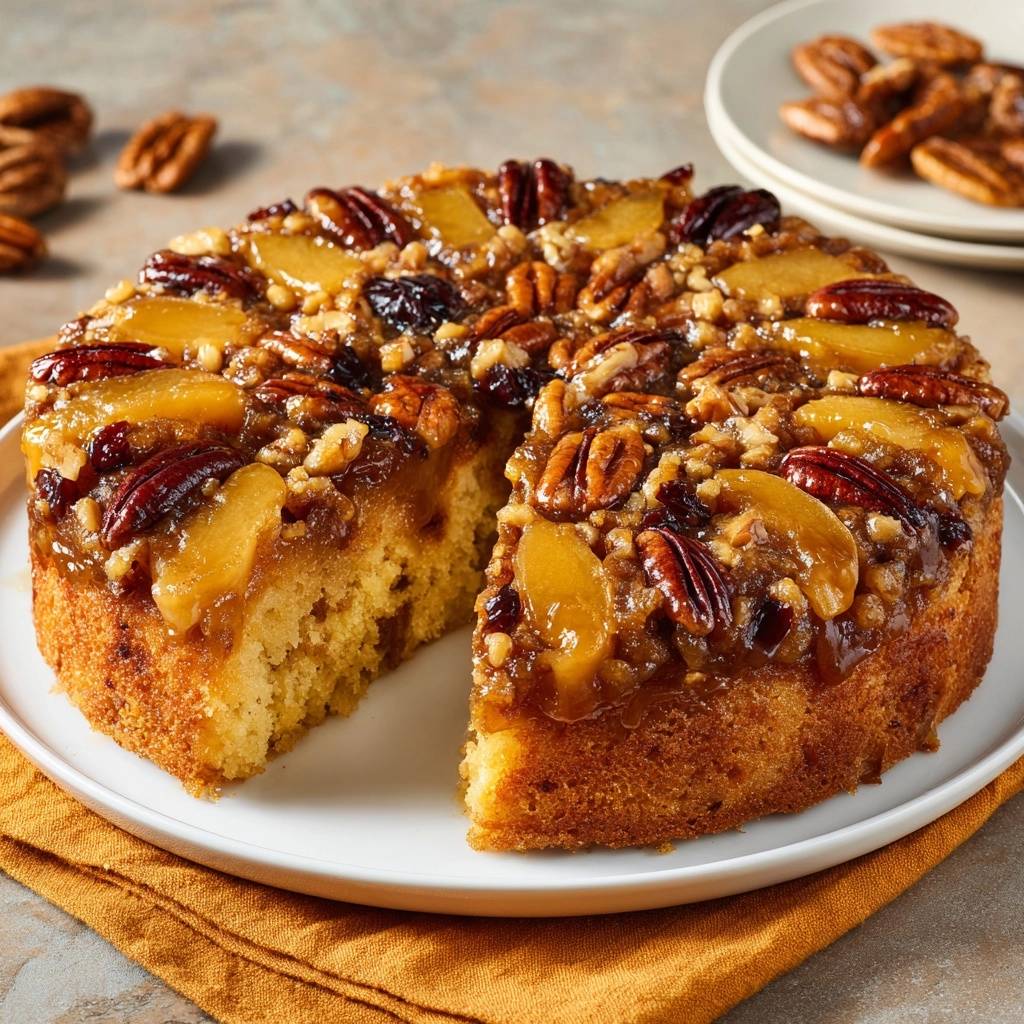
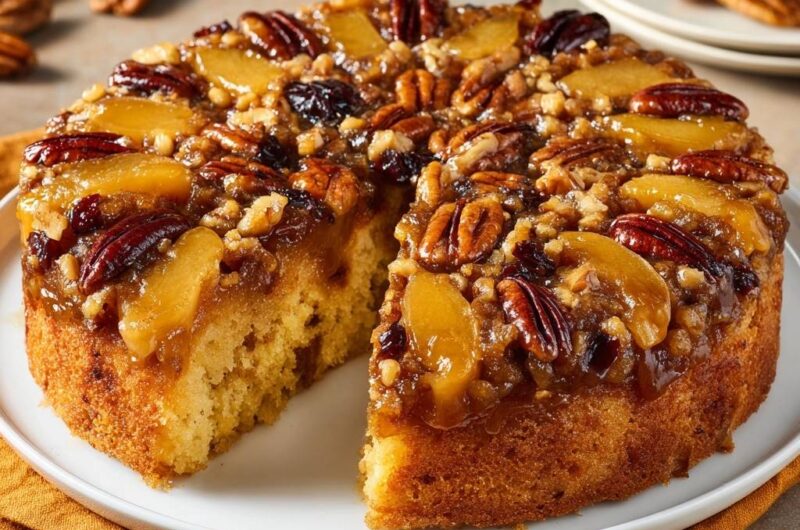
There is a specific kind of heartbreak that only a baker understands. It happens the moment you flip your cake pan over, lift it up, and realize half of your beautiful, caramelized fruit is still stuck to the bottom of the metal. Instead of a stunning centerpiece, you’re left with a patchy mess and a lot of frustration. This Caramel Apple Pecan Upside-Down Cake is designed to end that cycle of disappointment forever.
The secret lies in the perfect marriage of textures and flavors. You get the sharp, bright snap of Granny Smith apples, the deep earthy crunch of toasted pecans, and a buttery vanilla sponge that soaks up just enough caramel to stay moist without becoming soggy. It’s a sophisticated dessert that looks like it came from a high-end bakery, but it’s built on a foundation of simple, reliable techniques.
I’ve found that the real trick to this recipe isn’t just the ingredients; it’s the physics of the pan release. By using a specific parchment-to-butter ratio, we create a non-stick environment that allows the heavy caramel and fruit to slide right out. If you’ve ever struggled with a “stuck” cake, this method is going to be your new best friend in the kitchen.
The Mechanics of a Perfect Pan Release
To achieve that flawless finish, we use what I call the Double-Barrier Method. Most people just grease the pan and hope for the best, but sugar is a powerful adhesive when it heats up. By tracing and cutting a parchment paper circle for the bottom, you create a physical wall between the sticky caramel and the metal pan.
However, the paper alone isn’t enough. You must grease the pan sides heavily with butter, lay the parchment down, and then grease the top of the paper as well. This ensures that the caramel “floats” on a thin layer of fat, preventing it from bonding to the fibers of the paper or the edges of the pan. It’s a small extra step that guarantees a professional result every single time.
Timing is the other half of the battle. You have a narrow 10-minute window once the cake leaves the oven. During this time, the sugar is transitioning from a bubbling liquid to a tacky, honey-like state. If you flip too early, the caramel is too thin and will run off the sides. If you wait too long, the sugar sets into a hard candy-like bond that won’t let go. Stick to the timer, and you’ll see the cake glide out effortlessly.
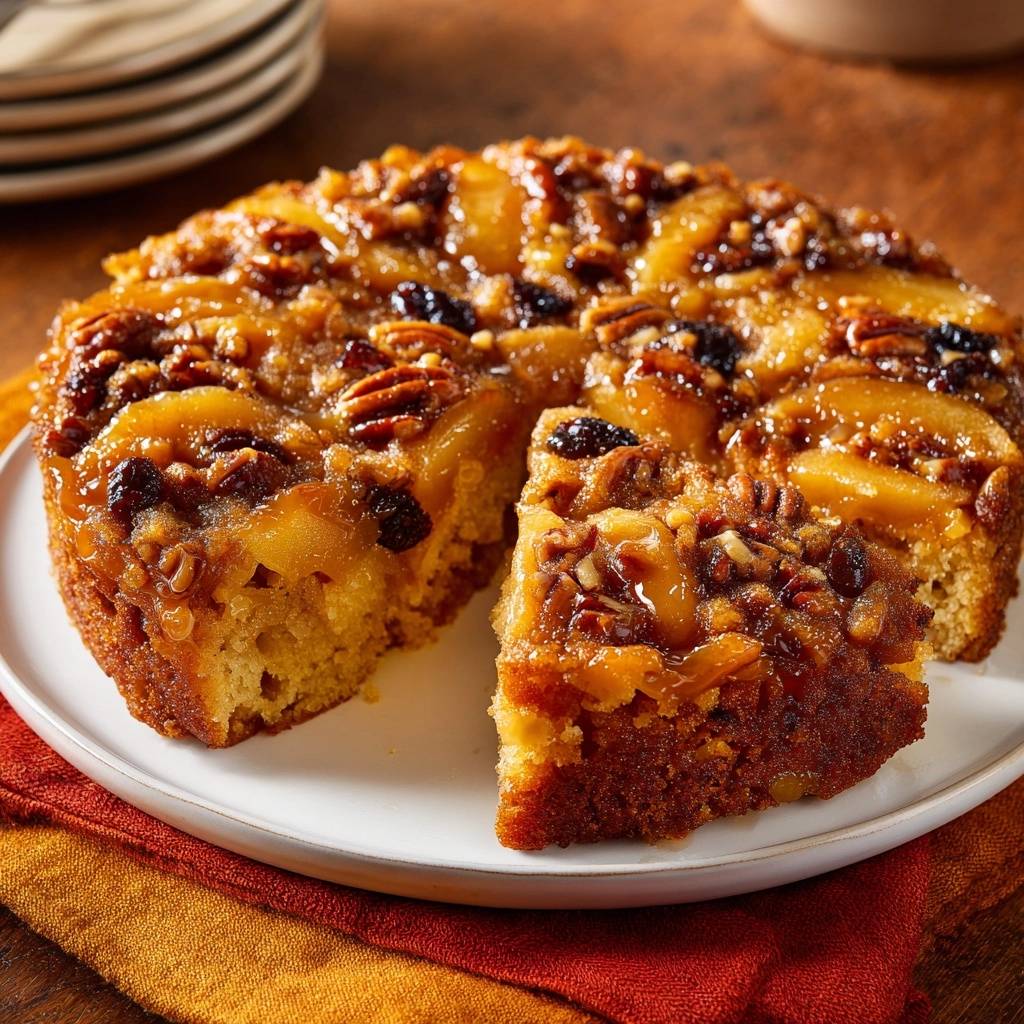
Essential Components for the Caramel Apple Base
The topping is the star of the show, so ingredient choice matters immensely. I always reach for Granny Smith apples because they are the industry standard for a reason. Their high pectin content helps them hold their shape under heat, while their natural acidity cuts through the intense sweetness of the brown sugar and butter.
For the caramel, light brown sugar is preferable over dark brown sugar here. Dark brown sugar contains more molasses, which can sometimes overpower the delicate flavor of the apples and pecans. Light brown sugar provides a mellow, toffee-like sweetness that lets the fruit shine. Using whole pecan halves instead of just chopped pieces also adds structural integrity, creating a beautiful “mosaic” look that holds together better when sliced.
Selecting and Preparing Your Fruit
Precision slicing is key to a bake that is both beautiful and evenly cooked. You want to aim for exactly 1/2-inch wedges. If you slice them too thin, the apples will break down into a mushy sauce during the 45-minute bake. If they’re too thick, they won’t soften enough to meld with the cake batter.
If you enjoy the texture that room-temperature butter creates here, you’ll love the tender crumb of this cinnamon sugar apple bundt cake.
I love adding a handful of dried cranberries into the gaps between the apples. They provide a gorgeous pop of deep red color against the golden caramel. More importantly, they offer a tiny burst of tartness that wakes up the palate and balances the rich, buttery pecans and walnuts.
The Role of Fats in Topping Stability
We use two different states of butter in this recipe for very specific reasons. For the topping, we use melted butter mixed with sugar to create a thick slurry. This slurry acts as a protective bed for the fruit, effectively poaching the apples in caramel as the cake bakes.
In the cake batter itself, we use softened, room-temperature butter. This allows us to trap air during the creaming process, which is vital for a light crumb. The melted butter in the base stays heavy and rich, while the softened butter in the cake keeps the sponge airy enough to support the weight of the fruit topping.
Building the Vanilla Bean Sponge Layer
The cake layer needs to be sturdy enough to hold the fruit but tender enough to melt in your mouth. This starts with the creaming method. You’ll want to beat your softened butter and sugar for at least three minutes. You’re looking for the mixture to turn pale yellow and look noticeably fluffy, which means you’ve successfully incorporated the air needed for a good rise.
One of the biggest mistakes you can make is using cold eggs. Cold eggs will cause the creamed butter to seize and curdle, breaking the emulsion you just worked so hard to build. If your eggs are room temperature, they will blend smoothly into the fat, resulting in a uniform, velvety crumb that won’t turn oily or dense in the oven.
Dry Ingredients and Structural Integrity
All-purpose flour is the best choice here because it has just enough protein to provide structure without making the cake tough. I always whisk the flour, baking powder, and salt together thoroughly before adding them to the wet ingredients. This ensures the leavening agent is distributed evenly so you don’t end up with “tunnels” or lopsided rising.
The 1.5-cup flour ratio is the “sweet spot” for this recipe. It creates a batter that is thick enough to stay on top of the fruit without sinking through to the bottom of the pan. This ensures you have two distinct, beautiful layers when the cake is flipped.
The Alternating Addition Technique
When it’s time to combine everything, always alternate your dry ingredients and the milk, starting and ending with the flour. This is a classic baking technique that prevents the batter from “breaking.” If you add all the liquid at once, the fat can’t absorb it; if you add all the flour at once, the batter becomes too thick and you’ll likely overmix it.
If you enjoy testing baked goods for doneness, the same careful approach works for this cinnamon streusel coffee cake.
Overmixing is the enemy of a tender cake. Once the flour hits the wet ingredients, gluten starts to develop. You want to mix on low speed just until you no longer see streaks of white. This keeps the sponge soft and delicate, providing the perfect contrast to the crunchy pecan topping.
Step-by-Step: Constructing the Upside-Down Cake
Construction begins with the parchment foundation. Once your pan is greased and lined, you’ll spread the brown sugar and melted butter paste over the bottom. It will be thick, but try to get it as even as possible so every bite of fruit gets its fair share of caramel.
Next comes the radial apple pattern. Start at the outer edge of the pan and lay the apple wedges down, slightly overlapping them like shingles on a roof. This creates a tight, professional look. Once the outer ring is done, fill in the center. This tight arrangement prevents the batter from seeping through to the bottom and obscuring your fruit design.
After the apples are set, drop your pecans, walnuts, and cranberries into the remaining gaps. Press them down gently into the sugar paste. Finally, dollop the batter over the top in small mounds. Use an offset spatula to gently spread the batter to the edges. Be careful not to press too hard, or you’ll disturb the beautiful fruit pattern you just created.
Baking Times and Temperature Precision
We bake this cake at 350°F, which is the ideal temperature to cook the sponge through while slowly caramelizing the sugar base without burning the nuts. Because the fruit is on the bottom, it stays moist and protected while the cake on top browns beautifully.
Don’t rely solely on the toothpick test. While a clean toothpick is a good sign, also look for the sensory cues. The cake should start to pull away slightly from the sides of the pan, and your kitchen should smell strongly of toasted pecans and warm vanilla. Remember that the cake continues to cook for those 10 minutes it sits on the counter, so don’t overbake it.
Troubleshooting Common Caramel Apple Cake Issues
If your caramel comes out too runny, it’s usually because the apples had a very high water content or the cake didn’t rest long enough before flipping. To fix this next time, ensure you are using Granny Smiths and stick strictly to that 10-minute cooling rule to let the sugars thicken.
A dry cake is almost always the result of overbaking or overmixing the batter. If you notice the edges of your cake are browning too quickly while the center is still wobbly, you can tent the pan loosely with aluminum foil. This protects the top (which will eventually be the bottom) and the pecans from burning while the center finishes cooking.
What to Serve Alongside
That caramel apple pecan upside-down cake calls for sides that echo its warm, nutty, and sweet notes. Try these two recipes for a full autumn spread.
- Brighten the table with Caramelized Pineapple Chunks — the skillet method delivers concentrated sweetness without a watery glaze, and the tangy fruit cuts through the cake’s buttery richness.
- For another layer of toasted
If the center of your cake remains raw while the outside is done, check your pan depth. This recipe requires a pan at least 2 inches deep. In a shallower pan, the batter is spread too thin or crowded, which messes with the heat distribution. Also, ensure your oven is properly calibrated with an oven thermometer.
Optimal Serving and Storage Practices
This cake is best served warm, about 20 to 30 minutes after flipping. The caramel is still gooey, and the apples are at their peak tenderness. To balance the richness, I highly recommend a dollop of unsweetened whipped cream or a scoop of high-quality vanilla bean gelato. The cold cream melting into the warm caramel is a heavenly experience.
If you have leftovers, store them in an airtight container in the refrigerator for up to three days. The caramel will firm up when cold, so I suggest reheating individual slices. A quick 15-second zap in the microwave or 5 minutes in a 300°F oven will revive the textures and make the caramel glossy and delicious again.
Frequently Asked Questions
Can I use a springform pan instead of a standard cake pan?
I don’t recommend using a springform pan for this recipe. The caramel topping becomes very liquid in the oven, and springform pans are rarely 100% leak-proof. You run a high risk of the butter and sugar leaking out onto the floor of your oven, which creates smoke and a difficult cleanup. A solid 9-inch round cake pan is the safest choice.
Can I substitute walnuts for all the pecans?
Yes, you can absolutely use all walnuts if that’s what you have on hand. Walnuts have a slightly more bitter skin than pecans, which actually works quite well with the sweet caramel. Just make sure they are fresh, as walnuts can go rancid faster than pecans. You could also use almonds or even hazelnuts for a different flavor profile.
How do I prevent the apples from browning while I prep the batter?
Granny Smith apples brown slower than sweeter varieties, but if you are worried, you can toss the slices in a tablespoon of lemon juice. However, since these apples are about to be covered in brown sugar and baked into a dark caramel, a little bit of natural oxidation won’t be visible in the final result at all.
Can this recipe be made in a cast-iron skillet?
Yes, a 9-inch cast-iron skillet works beautifully for upside-down cakes. Cast iron retains heat exceptionally well, which can result in an even crispier, more deeply caramelized crust. If using cast iron, you can skip the parchment paper, but make sure the skillet is very well-seasoned and heavily buttered before adding the sugar mixture.
Why did my cake sink in the middle?
A sunken center usually happens for two reasons: either the oven door was opened too early, causing a sudden temperature drop, or the baking powder was expired. Always check the date on your leavening agents. Additionally, make sure you don’t overbeat the batter once the flour is added, as too much incorporated air can cause the cake to rise rapidly and then collapse.
Caramel Apple Pecan Cake
Course: DessertCuisine: AmericanDifficulty: mediumYields8
servingsPrep Time20
minutesCook Time45
minutesCalories440
kcalTotal Time65
MinutesThis professional-grade dessert combines caramelized Granny Smith apples, toasted pecans, and walnuts on top of a moist vanilla cake. The recipe focuses on a double-barrier greasing method to ensure the fruit and nut topping stays perfectly intact when flipped.
Ingredients
Topping:
1/2 cup unsalted butter, melted
3/4 cup light brown sugar, packed
1/2 teaspoon ground cinnamon
2 large Granny Smith apples, peeled and sliced into 1/2-inch wedges
1 cup whole pecan halves
1/2 cup chopped walnuts
1/4 cup dried cranberries (optional, for visual depth)
Cake Batter:
1 1/2 cups all-purpose flour
1 1/2 teaspoons baking powder
1/2 teaspoon salt
1/2 cup unsalted butter, softened
3/4 cup granulated sugar
2 large eggs, room temperature
1 teaspoon vanilla extract
1/2 cup whole milk, room temperature
Directions
- Preheat your oven to 350°F (175°C). To solve the sticking problem, trace the bottom of a 9-inch round cake pan (at least 2 inches deep) onto parchment paper and cut it out. Grease the pan sides heavily with butter, place the parchment circle in the bottom, and grease the top of the paper as well. This double-barrier method is the secret to a clean release.
- In a small bowl, stir together the 1/2 cup melted butter, brown sugar, and cinnamon until it forms a thick paste. Spread this evenly over the parchment paper at the bottom of the pan.
- Arrange the apple wedges in a tight circular pattern on top of the sugar mixture. Fill the gaps between the apples with whole pecans, chopped walnuts, and dried cranberries. Press the nuts and fruit firmly into the sugar layer to ensure they are encased in caramel.
- In a medium bowl, whisk together the flour, baking powder, and salt.
- In a separate large bowl, cream the softened butter and granulated sugar with an electric mixer until light and fluffy (about 3 minutes). Add eggs one at a time, beating well after each addition, then stir in the vanilla.
- Gradually add the dry ingredients to the wet ingredients, alternating with the milk (start and end with dry). Mix on low speed until just combined; do not overmix or the cake will be tough.
- Carefully dollop the batter over the fruit and nut layer. Use an offset spatula to spread it gently to the edges without disturbing the fruit arrangement underneath.
- Bake for 40 to 45 minutes, or until the top is golden brown and a toothpick inserted into the center of the cake comes out clean.
- Let the cake cool in the pan for exactly 10 minutes. This timing is critical; if it is too hot, the caramel is liquid and will run off; if it is too cold, the caramel will set and stick to the pan.
- Run a thin knife around the edge of the pan. Place a flat serving plate upside down over the pan and, using oven mitts, quickly and confidently flip it over. Let it sit for 30 seconds to allow the caramel to drip down, then gently lift the pan and peel off the parchment paper to reveal the perfect, intact topping.
Notes
- The 10-minute cooling window is critical for the caramel consistency. Use the double-barrier parchment method to prevent the topping from sticking to the pan.