Mastering the Fresh Strawberry Marble Layer Cake

Nothing ruins a celebration faster than a beautiful cake that turns into a soggy, purple mess the moment you slice it. Most fruit-filled cakes suffer from the “sponge effect,” where the porous cake layers soak up every drop of juice from the fresh berries. This leads to a structural collapse and a texture that feels more like wet bread than a light, airy dessert.
The Fresh Strawberry Marble Layer Cake solves this problem with a strategic moisture-barrier technique. By using a fat-based sealant between the fruit and the sponge, we ensure the cake stays tender while the strawberries remain vibrant and juicy. This isn’t just about flavor; it’s about engineering a cake that looks as sharp on the plate as it does on the stand.
The secret to this recipe’s success is the stiff-consistency buttercream dam. If your frosting is too soft, the weight of the upper layers will squeeze the strawberry filling right out the sides. I’ve found that chilling your buttercream for just ten minutes before piping the “dam” creates a structural wall that keeps the fruit exactly where it belongs.
Essential Components for a Stable Strawberry Sponge
Choosing the right flour is the first step in building a cake that can handle heavy fruit. While many bakers reach for cake flour for its fine crumb, this recipe relies on all-purpose flour. The slightly higher protein content provides the necessary “skeleton” to support the weight of the strawberry preserves and the moisture-barrier frosting without compressing.
Temperature control is your best friend when it comes to emulsion. You must use room-temperature milk and egg whites to ensure they incorporate smoothly into the creamed butter. If these ingredients are cold, they’ll cause the butter to seize, resulting in a curdled batter and a dense, uneven bake. When the liquids are at the same temperature as the fats, they create a silky, stable emulsion that traps air beautifully.
Granulated sugar does more than just sweeten the sponge. During the creaming process, the sugar crystals cut tiny air pockets into the butter. These pockets expand in the oven, giving you that sought-after light texture. Don’t rush this step; let the mixer run until the mixture looks noticeably paler and feels like soft velvet between your fingers.

The Role of High-Fat Buttercream as a Sealant
In this recipe, the buttercream acts as a hydrophobic shield. Because oil and water don’t mix, the high fat content in the butter prevents the water-based strawberry juices from migrating into the cake. You need a stiff-consistency frosting here; if it’s too runny, the juice will simply leak through the gaps.
Think of this layer as a primer on a wall. It fills the pores of the sponge and creates a smooth, waterproof surface. This allows the fresh chopped strawberries to sit on top of the layer rather than sinking into it, preserving the distinct colors and textures of each component.
Selecting and Preparing Fresh Strawberries
When shopping for berries, look for deep red fruit that feels firm to the touch. Avoid any strawberries that look bruised or overly soft, as these carry too much internal water. Excess moisture is the enemy of a stable layer cake, so we want fruit that holds its shape when sliced.
If you are working with fresh berries, you might also enjoy this strawberry dream cake for another fruity layer idea.
Finely chopping the strawberries is much better than mashing or pureeing them for the internal layers. Small, uniform cubes provide a burst of fresh flavor in every bite without releasing all their juice at once. After chopping, pat the berries dry with a paper towel to remove any surface moisture before they go onto the cake.
The Science of the Moisture Barrier Technique
The moisture barrier technique is rooted in the physics of osmosis. In a standard cake, the high sugar concentration in the sponge naturally pulls moisture out of the fruit. This is why a cake might look perfect when you finish it but becomes a weeping mess four hours later. The sponge literally “drinks” the strawberry juice until it becomes saturated and heavy.
By applying a 1/4 inch layer of buttercream over the entire top of the cake layer before adding the fruit, you interrupt this process. The fat in the butter creates a physical wall that the juice cannot penetrate. This keeps the cake crumb dry and the fruit filling bright and tart, maintaining the intended flavor profile of the dessert.
Traditional methods often suggest “sealing” the cake with a simple syrup, but this actually makes the problem worse by adding more liquid. Our fat-based barrier is the only way to ensure the structural integrity of a multi-layered fruit cake. It allows you to stack three or even four layers high without worrying about the bottom layer being crushed by moisture-induced weight.
Step-by-Step: Mixing and Baking the Base Layers
Start by creaming your butter and sugar on medium-high speed. You are looking for a “pale and fluffy” appearance, which usually takes about three to five minutes. The mixture should look almost like whipped cream. If it still looks yellow and dense, keep mixing; this is where your lift comes from.
When adding your dry and wet ingredients, use the alternating method. Start with one-third of the flour mixture, then half of the milk and egg whites, and repeat. This technique prevents the batter from “breaking” or becoming over-saturated with liquid. It also helps you avoid over-mixing, which develops too much gluten and makes the cake tough.
Stop the mixer the moment you see the last streaks of flour disappear. Use a rubber spatula to do a final fold by hand, scraping the bottom of the bowl to catch any unmixed butter. Divide the batter evenly between your prepared pans to ensure they bake at the same rate and reach the same height.
Precision Assembly: Building the Internal Architecture
Before you even touch the frosting, you must level your cakes. Use a long serrated knife to saw off the domed tops. A flat surface is mandatory for stability; if your layers are even slightly curved, the weight of the fruit will cause the cake to lean or slide as it sits.
The “piped dam” is your next line of defense. Using a piping bag fitted with a large round tip, create a thick ring of frosting around the very edge of the cake layer. This dam should be about half an inch high. It acts as a container for the chopped strawberries and preserves, preventing them from oozing out the sides under the weight of the next layer.
Once the dam is in place, spread your thin moisture barrier inside the ring. Add your chopped berries and a light drizzle of preserves, then carefully place the next cake layer on top. Press down very gently to set the layer, but don’t push hard enough to break the dam. Repeat this for the second layer and finish with the final cake sponge, bottom-side up, for a perfectly flat top.
Achieving the Feathered Chevron Marble Exterior
To get that professional marbled look, you must start with a cold cake. Apply a thick, smooth base coat of white buttercream over the entire exterior. Use a bench scraper to get the sides perfectly vertical. Once frosted, pop the cake in the fridge for 15 minutes. This sets the surface so the strawberry preserves don’t bleed into the white frosting.
After the cake is chilled, place small dots of strawberry preserves in vertical lines around the sides. Space the dots about an inch apart. For the top, create a spiral pattern of dots starting from the center. Work quickly so the preserves stay thick and don’t start to run down the cold frosting.
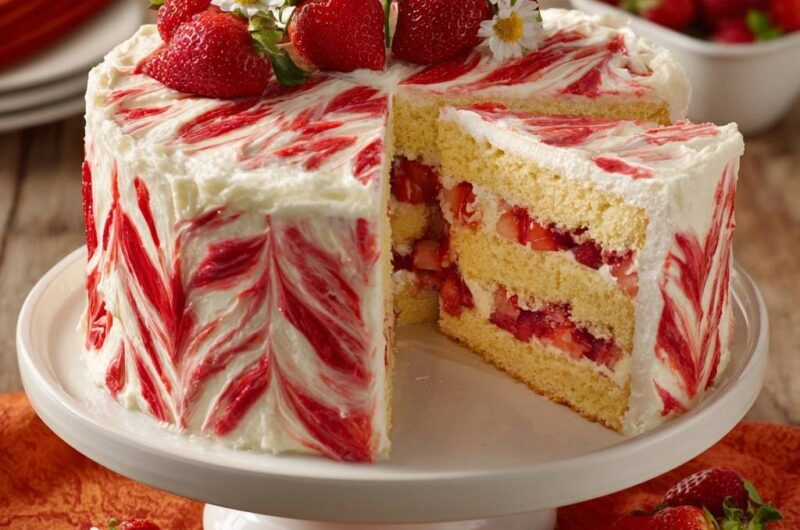
Take a clean offset spatula or a toothpick and drag it through the dots in a continuous “V” motion. For the sides, move the tool up through one line of dots and down through the next. This creates the feathered chevron effect. On the top, drag the tool from the center outward to create a starburst marble. Don’t over-work the lines; two or three passes are all you need for a clean, sharp design.
Critical Equipment for Professional Results
A rotating cake turntable is the most important tool for this project. It allows you to apply the base coat and the marble pattern in one fluid motion, which is essential for keeping the lines straight. If you have to stop and start to turn the cake by hand, you’ll end up with jagged edges in your chevron pattern.
An offset spatula provides the leverage and angle needed to smooth the frosting without your knuckles hitting the cake. While a toothpick works for the marbling, a small metal offset spatula actually creates a more defined “feather” because it moves a bit more of the preserve across the surface. A metal bench scraper is also vital for achieving those crisp, professional side walls.
Troubleshooting Common Structural Failures
If you notice your cake layers starting to slide, it’s usually because the filling is too warm or the dam is too soft. Immediately put the cake in the fridge for 30 minutes to firm up the fats. In the future, ensure your preserves are chilled before assembly and your buttercream is stiff enough to hold its shape.
The “bulging waistline” effect happens when the weight of the cake pushes the filling against the outer frosting. This is solved by using a very stiff buttercream for the dam and allowing the assembled cake to “settle” in the fridge for an hour before applying the final exterior coat. This settling period allows the layers to bond and any air pockets to escape.
If your sponge feels dense, you likely under-creamed the butter and sugar or over-mixed the flour. Remember that the creaming stage is the only time you should be mixing vigorously. Once the flour enters the bowl, you must be gentle. If the jam is bleeding into the white frosting, your base coat wasn’t cold enough or your preserves were too watery; try straining your preserves next time to remove excess liquid.
Make-Ahead Logistics and Storage Standards
You can easily bake the cake layers 24 hours in advance. Once they are completely cool, wrap them tightly in plastic wrap and store them at room temperature. This actually makes the cake easier to level and handle because the crumb has time to set. Don’t refrigerate the plain layers, as this can dry them out prematurely.
After the cake is fully assembled and decorated, it needs at least one hour in the fridge. This is a critical step for the moisture barrier to fully set and for the flavors to meld. For long-term storage, keep the cake in an airtight container or a cake carrier. The frosting acts as an insulator, but the cut sides will dry out if left exposed to the fridge’s air.
Expert Tips for Clean Slicing
To showcase the beautiful internal layers and the marble exterior, you need a clean cut. Dip a long, thin knife into a tall glass of hot water, then wipe it completely dry with a clean towel. The heat from the blade will glide through the buttercream and preserves without dragging the colors into the white sponge.
Make one decisive downward cut, then pull the knife out through the bottom of the slice rather than lifting it back up. Wipe the blade clean and re-dip it in hot water before every single cut. This extra effort ensures that every guest gets a slice that looks like a work of art, with the chevron pattern and the fruit layers perfectly preserved.
Can I use frozen strawberries for the filling?
Frozen strawberries are generally discouraged for the internal layers because they release a massive amount of water as they thaw. This extra liquid will likely overwhelm the moisture barrier and cause the cake to become mushy. If you must use frozen berries, you should cook them down in a saucepan with a little sugar and cornstarch until they form a very thick, jam-like reduction. Let this mixture cool completely before using it as a filling.
Why did my marble pattern turn pink instead of defined lines?
This usually happens for two reasons: either the base coat of frosting was too soft, or you dragged the spatula through the preserves too many times. If the base coat isn’t chilled and firm, the red preserves will mix with the wet white frosting, creating a muddy pink color. To keep the lines sharp, make sure the cake is cold to the touch and use a single, confident stroke for each part of the chevron pattern.
How do I prevent the egg whites from deflating the batter?
While this recipe doesn’t require you to whip the egg whites to stiff peaks separately, they still provide a lot of the cake’s lift. When you add the milk and egg white mixture to the creamed butter, do it gradually. If you dump it all in at once, the heavy liquid will collapse the air pockets you worked so hard to create during the creaming stage. Use a low mixer speed and stop as soon as the liquid is incorporated.
What are the best edible flowers to substitute for daisies?
If you can’t find edible daisies, pansies and violas are excellent alternatives. They come in a wide variety of colors and have a mild, slightly minty flavor that won’t clash with the strawberries. Always ensure the flowers are specifically labeled as “edible” and have not been treated with pesticides. You can also use small sprigs of fresh mint or even thin slices of strawberry arranged in a floral pattern for a similar aesthetic.
Strawberry Layer Cake
Course: DessertCuisine: AmericanDifficulty: medium12
servings45
minutes30
minutes480
kcal75
MinutesThis multi-layered sponge cake uses a specific jam-swirl method and a buttercream moisture barrier to maintain a clean interior and a vibrant strawberry flavor.
Ingredients
2 and 1/2 cups all-purpose flour
1 and 1/2 cups granulated sugar
1 tablespoon baking powder
1/2 teaspoon salt
3/4 cup unsalted butter, softened
1 cup whole milk, room temperature
1 tablespoon vanilla extract
4 large egg whites
2 cups fresh strawberries, hulled and finely chopped
1/2 cup high-quality strawberry preserves (smooth or strained)
4 cups vanilla buttercream frosting (stiff consistency)
Whole strawberries and edible daisies for garnish
Directions
- Preheat your oven to 350°F (175°C). Grease and flour three 8-inch round cake pans.
- In a large bowl, cream the butter and sugar until pale and fluffy. In a separate jug, whisk the milk, egg whites, and vanilla.
- Sift the flour, baking powder, and salt together. Alternating in three batches, add the dry ingredients and the milk mixture to the butter, mixing on low speed until just combined.
- Divide the batter evenly between the three pans. Bake for 25-30 minutes or until a toothpick comes out clean. Cool in the pans for 10 minutes, then transfer to a wire rack to cool completely.
- Level the cakes: Use a serrated knife to trim the tops of the cakes so they are perfectly flat.
- The Moisture Barrier: Place the first cake layer on a stand. Spread a thin, even layer of buttercream (about 1/4 inch) over the entire top surface. This fat-based layer prevents the fruit juices from soaking into the sponge.
- The Filling: Pipe a “dam” of frosting around the outer edge of the cake layer. Fill the center with half of the chopped strawberries and a drizzle of strawberry preserves. Place the second cake layer on top and repeat the process. Top with the third cake layer.
- The Base Coat: Frost the entire exterior of the cake with a smooth, thick layer of white buttercream. Chill the cake for 15 minutes to set the surface.
- The Marble Effect: Place small dots of the strawberry preserves in vertical lines around the sides and in a circular pattern on the top of the cake.
- The Feathering: Using a clean offset spatula or a toothpick, drag the tool through the jam dots in a continuous “V” or “chevron” motion (up and down for the sides, radiating outward for the top) to create the feathered marble look shown in the image.
- Garnish: Arrange whole strawberries and daisies on top. Chill for at least 1 hour before slicing to ensure the layers are stable and the moisture barrier has fully set.
Notes
- The moisture barrier of buttercream prevents fruit juices from soaking into the sponge. Chill for at least 1 hour before slicing to ensure stability.