Mastering Zesty Chili Lime Chicken Bowls
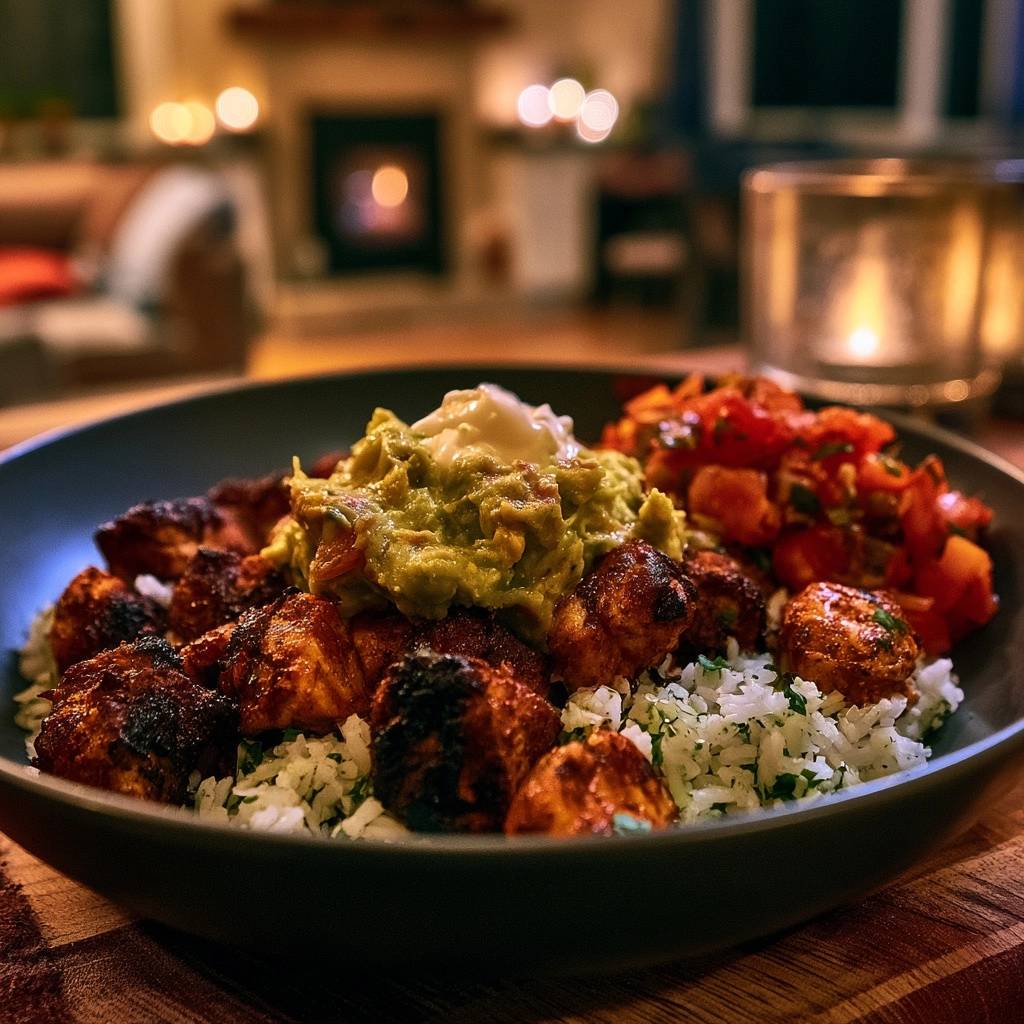
Forget everything you know about those sad, rubbery chicken breasts that taste like nothing but steam and disappointment. We’ve all been there, staring at a bowl of bland poultry hidden under a mountain of salsa just to make it edible. These Zesty Chili Lime Chicken Bowls are the definitive cure for the common weeknight dinner, offering a masterclass in high-heat searing and bold flavor balancing.
The philosophy behind this dish is simple: it’s a calculated collision of high-heat char, acidic brightness, and cooling fats. Instead of drowning the meat in a watery marinade that boils the protein, we use a concentrated dry-rub blooming technique. This method ensures the spices actually stick to the meat, creating a deeply caramelized crust that locks in every drop of juice.
If you want that restaurant-quality finish, the secret is in the prep. You must pat the chicken completely dry with paper towels before the spice paste ever touches it. Any surface moisture will create steam in the pan, and steam is the absolute enemy of a perfect, golden-brown sear. Once you master this one small step, your home cooking will never be the same.
The Science of Searing and Spice Blooming
When the chicken hits that hot cast-iron surface, a complex chemical reaction called the Maillard reaction takes place. This isn’t just browning; it’s the rearrangement of amino acids and sugars that creates hundreds of new flavor compounds. By using a thick paste rather than a liquid soak, you’re allowing the heat to interact directly with the protein and the spices simultaneously.
Blooming your spices in oil before they cook is a game-changer for your palate. Raw spices can often taste dusty or one-dimensional, but when they’re heated in a fat like avocado oil, their fat-soluble flavor compounds are released. This transforms the chili powder and cumin from simple pantry staples into a deep, earthy, and aromatic base that permeates the meat rather than just sitting on top.
Moisture is the primary obstacle to achieving this transformation. If the chicken is wet, the pan’s energy goes into evaporating that water instead of searing the meat. This is why we skip the long, wet marinades. By the time the water evaporates in a traditional marinade, the chicken is usually overcooked and tough. Our method hits the “sweet spot” of a charred exterior and a tender, juicy interior every single time.
Why Dry Rubs Outperform Wet Marinades
Wet marinades are often a trap because they rely on osmosis, which is a slow and often ineffective process for flavoring the center of the meat. More importantly, the high water content in citrus juices or vinegars prevents the chicken from reaching the temperatures needed for a crust to form. You end up with “gray” meat that lacks texture.
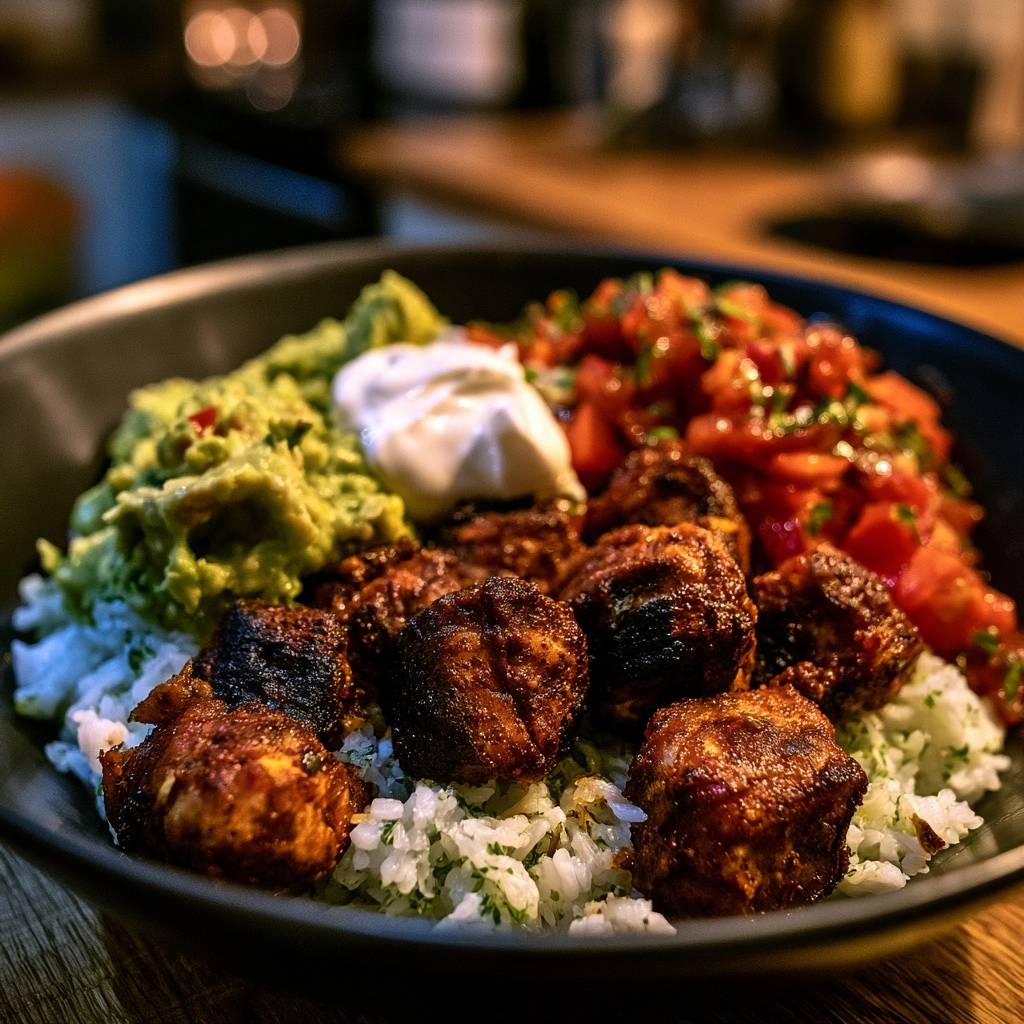
The concentrated spice paste used here acts as a protective barrier and a flavor intensifier. It creates a crust that provides a satisfying crunch against the soft rice and creamy guacamole. You get all the acidic zing from the lime juice without the soggy side effects of a liquid soak.
Essential Components for Zesty Chili Lime Chicken Bowls
Quality ingredients are the backbone of a dish this simple. Since there are only a few moving parts, each one needs to pull its weight. I always recommend using a high-smoke point oil like avocado oil. Unlike olive oil, which can turn bitter and smoky at high temperatures, avocado oil stays neutral and stable, allowing the spices to shine without burning.
The spice blend is a carefully curated team. Cumin provides that essential “taco” earthiness, while smoked paprika adds a layer of backyard-grill depth without needing an actual smoker. Garlic and onion powders provide a savory foundation that fresh aromatics sometimes can’t achieve in a high-heat sear because fresh garlic tends to burn and turn bitter in a hot skillet.
Don’t overlook the salt. Using kosher salt is vital because the larger grains distribute more evenly and help draw out just enough surface moisture to aid in the crust formation. If you use fine table salt, you risk over-salting the dish, so stick to the coarse stuff for the best control over your seasoning.
Selecting the Right Poultry Cut
You have two main paths here: chicken thighs or chicken breasts. Thighs are the “chef’s choice” because their higher fat content makes them incredibly forgiving. They stay juicy even if you leave them in the pan a minute too long. If you’re looking for that rich, succulent mouthfeel, go with boneless, skinless thighs.
However, chicken breasts work beautifully if you’re looking for a leaner option. The key is precision. Because breasts lack the fat of the thigh, you must be vigilant about your cook time. Regardless of the cut, ensure you cube the meat into uniform 1-inch pieces. This ensures every piece finishes cooking at the exact same moment, preventing the dreaded “one dry, one raw” scenario.
The Role of Acid: Fresh Lime vs. Bottled
If there is one rule in my kitchen, it’s that bottled lime juice is forbidden. The stuff in the plastic lime has a metallic, muted flavor that can ruin a fresh bowl. Fresh lime juice contains volatile oils in the zest and a bright, sharp acidity that cuts right through the richness of the avocado and the heat of the chili.
The acid doesn’t just add flavor; it acts as a palate cleanser. Every time you take a bite of that charred chicken and creamy crema, the lime juice resets your taste buds. This makes the second bite taste just as vibrant and exciting as the first one.
Step-by-Step: Achieving the Perfect Char
The most important part of the cooking process happens when you put the spatula down. Once you’ve tossed your dried chicken in that dark, fragrant spice paste, drop it into the hot pan and walk away. It’s tempting to move the pieces around, but you must let them sit undisturbed for at least three to four minutes.
During this time, the “bloom” is happening. You’ll see the edges of the chicken start to turn opaque, and a dark, reddish-brown crust will form on the bottom. If you try to flip the chicken and it sticks to the pan, it’s not ready. When the sear is perfect, the meat will naturally release from the cast iron. This is the pan telling you it’s time to flip.
Work in batches if your skillet isn’t large enough to hold all the chicken in a single layer with space between the pieces. If the pan is crowded, the temperature drops instantly, and the chicken will start to leak juices and poach in its own liquid. A little patience between batches results in a much better texture and flavor profile.
Preparing the Concentrated Spice Paste
Your spice paste should be thick, dark, and almost sludge-like. When you whisk the oil, lime juice, and spices together, you’re creating a temporary emulsion. This thick coating is what allows the flavor to stay glued to the chicken during the high-heat transition. It should look like a rich, mahogany-colored mud before you add the meat.
The lime juice in the paste serves a dual purpose. While it adds flavor, the acidity also slightly “tenders” the surface of the meat. Because we are cooking immediately, it doesn’t have time to turn the meat mushy, which is a common problem with long-term acidic marinades.
Managing Heat in a Cast-Iron Skillet
Cast iron is the king of the kitchen for a reason: heat retention. Once a cast-iron pan gets hot, it stays hot, even when you add cold meat. This consistent energy is what creates that restaurant-style char. You’ll know the pan is ready when you see those first tiny wisps of smoke rising from the surface.
Be careful not to let the pan get so hot that the oil smells acrid. If it’s smoking heavily, pull it off the heat for thirty seconds before adding the chicken. Remember, the oil is already in the paste on the chicken, so you don’t need to add extra oil to the pan. This prevents unnecessary splattering and keeps the flavors concentrated.
Building the Foundation: Cilantro Lime Rice
The rice shouldn’t just be a filler; it should be a fluffy, fragrant base that complements the chicken. Use a long-grain white rice like Basmati or Jasmine for the best results. These varieties have less starch, meaning the grains will stay separate and distinct rather than clumping together into a sticky mess.
The timing of your additions is everything. Always wait until the rice is fully cooked and slightly cooled before folding in the fresh cilantro and lime juice. If you add the cilantro to boiling water, it will wilt and turn a dull, unappetizing brown. By folding it in at the end, you keep the herb’s bright green color and peppery, citrusy punch intact.
Customizing Your Zesty Chili Lime Chicken Bowls
One of the best things about these bowls is how easily they adapt to different lifestyles. While the rice and chicken combo is a classic, you can swap out the base to fit your specific needs. The bold flavors of the chili and lime are strong enough to carry almost any foundation you choose.
Don’t be afraid to experiment with the toppings, either. While guacamole and pico de gallo are the gold standard, you could add pickled red onions for extra crunch or charred corn for a bit of sweetness. The goal is to maintain a balance of textures: crunchy, creamy, and soft.
Low-Carb and Grain-Free Alternatives
If you’re skipping grains, cauliflower rice is a fantastic substitute. To keep it from getting soggy, sauté the cauliflower rice in a dry pan for a few minutes to cook off the moisture before seasoning it with the lime and cilantro. It mimics the texture of the rice perfectly while soaking up all the juices from the charred chicken.
For an even fresher take, try serving the chicken over a bed of finely shredded cabbage or massaged kale. The bitterness of the greens provides a sophisticated contrast to the smoky spices. Just be sure to give the greens a little squeeze of lime and a pinch of salt so they don’t taste bland compared to the rest of the bowl.
Heat Level Adjustments
This recipe is designed to be “zesty” rather than “burn-your-mouth hot.” If you want to kick things up a notch, swap half of the smoked paprika for chipotle powder. This adds a fiery, smoky heat that lingers. You can also toss some sliced fresh serrano peppers into the pan during the last minute of cooking the chicken.
If you’re cooking for kids or those who prefer a milder meal, simply reduce the chili powder by half and increase the amount of smoked paprika. You’ll still get that beautiful dark color and deep flavor without the spicy tingle. Adding an extra dollop of sour cream at the end also helps neutralize any lingering heat.
Troubleshooting Common Texture Issues
If your chicken ends up dry, you likely overcooked it or cut the pieces too small. Aim for that 165°F internal temperature and remember that the meat will continue to cook for a minute after you take it out of the pan. Always let the chicken rest for at least three minutes before serving; this allows the juices to redistribute so they don’t run out the moment you bite in.
If your spices are burning before the chicken is cooked through, your heat is too high. Cast iron holds onto heat intensely, so you may need to dial the burner back to medium once the initial sear is established. If the rice is mushy, you likely used too much water or over-stirred it while it was cooking. Next time, rinse the rice under cold water until the water runs clear to remove excess starch.
Meal Prep and Storage Strategies
These bowls are a meal prepper’s dream, but you have to be smart about how you pack them. Store the chicken and rice together in one container, but keep the “cold” toppings like guacamole, salsa, and sour cream in separate, smaller containers. This prevents the rice from getting soggy and keeps your toppings fresh.
When it’s time to reheat, do it gently. A quick 60-90 seconds in the microwave is usually enough. If you have the time, tossing the chicken back into a hot, dry skillet for two minutes will revive that charred crust much better than a microwave ever could. The chicken will stay fresh in the fridge for up to four days, making it a perfect Monday-through-Thursday lunch option.
Expert Tips for Restaurant-Style Presentation
We eat with our eyes first, so take an extra minute to assemble the bowl with care. Start with a flat bed of rice, then pile the chicken on one side to create height. This “mound” technique makes the portion look generous and professional. Use the vibrant colors to your advantage by placing the green guacamole right next to the reddish-charred chicken.
For the final touch, don’t just plop the sour cream on top. Thin it out with a tiny splash of lime juice or water until it reaches a drizzling consistency. Use a spoon to create a zig-zag pattern across the chicken and guacamole. This adds a high-end look and ensures you get a little bit of creamy goodness in every single forkful.
Frequently Asked Questions
Can I use frozen chicken for this recipe?
Yes, you can use frozen chicken, but it must be completely thawed before you start. The best way is to thaw it in the refrigerator overnight. Once thawed, it is even more important to pat the meat dry with paper towels, as frozen chicken tends to release more moisture than fresh. If the meat is still icy or wet, the spice paste won’t stick, and you’ll lose that signature char.
What is the best substitute for avocado oil?
If you don’t have avocado oil, any neutral oil with a high smoke point will work. Grapeseed oil, canola oil, or sunflower oil are all excellent choices. Avoid using extra virgin olive oil or butter for the initial sear, as they will burn and smoke at the temperatures required to get a good crust on the chicken. You want an oil that can handle the heat without adding its own flavor.
How do I keep my guacamole from browning if I prep early?
The enemy of guacamole is oxygen. If you’re prepping the bowls ahead of time, press a piece of plastic wrap directly onto the surface of the guacamole so there are no air bubbles. Additionally, the extra lime juice in this recipe acts as a natural antioxidant. For best results, though, try to scoop the avocado fresh or keep it in a tightly sealed, small container with very little headspace.
Can this be made in an Air Fryer?
Absolutely! To make this in an air fryer, follow the steps to coat the chicken in the spice paste. Pre-heat your air fryer to 400°F. Place the chicken in a single layer in the basket, making sure they aren’t touching. Cook for 10-12 minutes, shaking the basket halfway through. You won’t get the exact same deep sear as a cast-iron skillet, but it’s a fantastic, hands-off alternative that still produces very juicy results.
Why is my chicken sticking to the pan?
Chicken usually sticks for two reasons: the pan wasn’t hot enough when you started, or you’re trying to flip it too soon. When the proteins in the chicken are properly seared, they undergo a process that naturally releases them from the cooking surface. If you feel resistance when you try to slide a spatula under a piece, give it another 60 seconds. Also, ensure your cast-iron skillet is well-seasoned for a naturally non-stick experience.
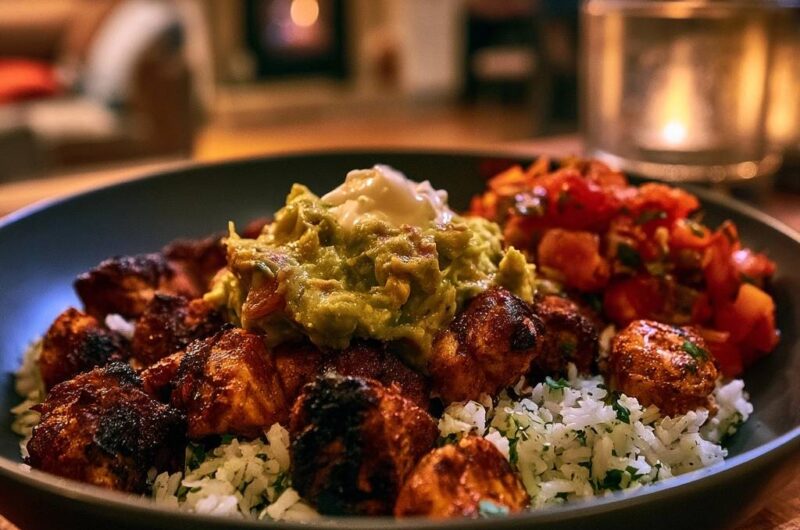
Zesty Chili Lime Chicken Bowls
Course: Main CourseCuisine: Mexican-AmericanDifficulty: easy4
servings15
minutes15
minutes30
Minutes485
kcalMexican-American
Ingredients
1.5 lbs chicken thighs or breast, cut into 1-inch cubes
2 tablespoons avocado oil (or high-smoke point oil)
1 tablespoon chili powder
1 teaspoon smoked paprika
1 teaspoon ground cumin
1/2 teaspoon garlic powder
1/2 teaspoon onion powder
1 teaspoon kosher salt
1/2 teaspoon black pepper
2 cups cooked long-grain white rice
1/2 cup fresh cilantro, finely chopped
2 tablespoons lime juice, divided
1 cup chunky guacamole (with visible tomato and onion)
1/2 cup pico de gallo or fresh tomato salsa
2 tablespoons sour cream or Mexican crema
Directions
- In a large bowl, whisk together the oil, chili powder, smoked paprika, cumin, garlic powder, onion powder, salt, pepper, and 1 tablespoon of lime juice to create a thick, dark spice paste.
- Pat the chicken cubes completely dry with paper towels. This is the most important step to prevent steaming and ensure a dark crust forms. Toss the chicken in the spice paste until every piece is heavily and evenly coated.
- Heat a large cast-iron skillet over medium-high heat until it begins to wisps of smoke appear. Do not add extra oil to the pan; the oil in the paste is sufficient.
- Place the chicken in the pan in a single layer. Do not crowd the pan; work in two batches if necessary to maintain high heat.
- Let the chicken sit undisturbed for 3 to 4 minutes. This allows the spices to “bloom” in the heat and the proteins to develop a dark, charred crust.
- Flip the chicken pieces and cook for another 3 to 4 minutes until the edges are blackened in spots and the internal temperature reaches 165°F. Remove from heat and let rest for 3 minutes.
- While the chicken rests, toss the warm cooked rice with the finely chopped cilantro and the remaining 1 tablespoon of lime juice.
- Assemble the bowls: Start with a base of cilantro lime rice. Arrange the charred chicken pieces over the rice.
- Top with a generous mound of chunky guacamole in the center, a side of fresh salsa, and a small dollop of sour cream directly on top of the guacamole to match the visual presentation. Serve immediately.
Notes
- Patting the chicken completely dry before coating is the most important step to prevent steaming and ensure a dark, flavorful crust forms.