Perfect Pan-Seared Duck Breast: Crispy Skin, Easy!
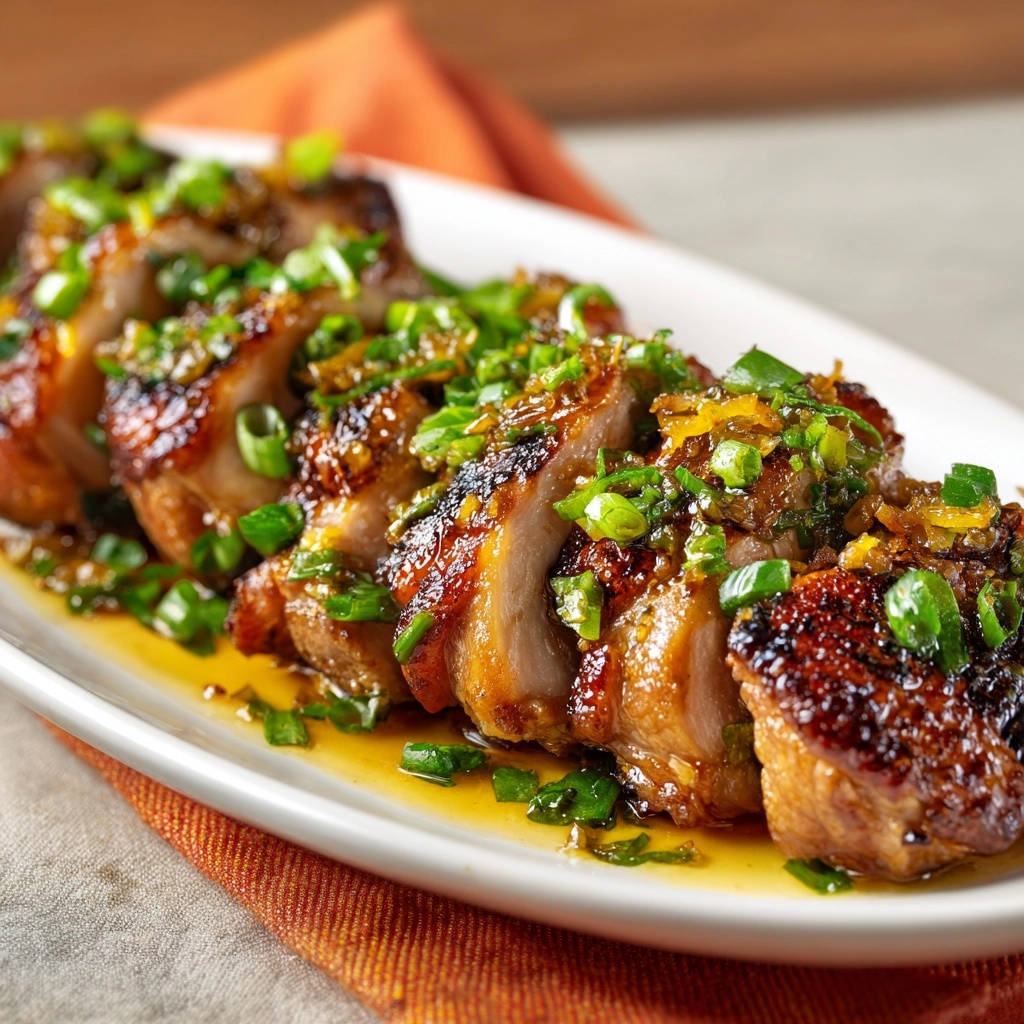
There’s nothing quite like the rich flavor of duck breast, but achieving that perfect, shatteringly crisp skin at home used to be my personal challenge. Once I discovered the secret to truly rendering the fat and getting the skin just right, it completely transformed my approach to this elegant dish.
This recipe for Perfect Pan-Seared Duck Breast offers a simple, foolproof method that guarantees perfectly cooked, juicy meat and glorious, golden skin every single time, without fuss.
Why This Perfect Pan-Seared Duck Breast Is Your New Go-To
This method stands out by delivering truly shatteringly crisp skin, a hallmark of expertly cooked duck, alongside perfectly tender and juicy meat. You’ll achieve restaurant-quality results in your own kitchen.
We unlock the “secret” to perfectly rendered fat by starting the duck breast in a cold pan over low heat, a technique that eliminates common issues like rubbery skin or overcooked meat.
Despite its luxurious appeal, this recipe is surprisingly simple, designed to be accessible for home cooks of all skill levels. It empowers you to create an elegant meal with minimal effort.
The accompanying zesty orange-green onion sauce perfectly complements the rich duck, adding a bright, fresh counterpoint that elevates the entire dish.
Essential Ingredients for Your Pan-Seared Duck Masterpiece
The Star: Duck Breasts
Opt for high-quality duck breasts, ideally around 6-8 ounces each, with the skin still on. The skin is critical for achieving that signature crispy texture and rendering flavorful fat.
Simple Seasoning
A generous application of salt and black pepper is all you need to enhance the natural, rich flavor of the duck meat. These basic seasonings draw out moisture and contribute to a fantastic crust.
The Zesty Orange-Green Onion Sauce
Fresh orange juice and zest provide a bright, citrusy backbone that cuts through the duck’s richness. Honey adds a touch of sweetness for balance, while soy sauce contributes umami depth.
Rice vinegar introduces a mild tang, complementing the sweetness and savory notes. Thinly sliced green onions offer a fresh, aromatic finish and a subtle bite.
Recommended Tools for Perfect Pan-Seared Duck Breast
Heavy-Bottomed Skillet (Cast Iron or Stainless Steel)
A high-quality cast iron or heavy-bottomed stainless steel skillet is crucial. Its ability to retain and distribute heat evenly ensures a consistent sear and proper fat rendering.
Sharp Knife
You’ll need a very sharp knife for scoring the duck skin accurately. Precision here prevents cutting into the meat, allowing the fat to render perfectly.
Meat Thermometer
An instant-read meat thermometer is your best friend for achieving the ideal doneness. It removes guesswork, ensuring tender, juicy duck every time by hitting precise temperatures (like 130-135°F for medium-rare).
Tongs
Sturdy tongs provide excellent control for safely placing, flipping, and handling the hot duck breasts in the skillet.
Paper Towels
Thoroughly patting the duck breast dry with paper towels is a critical initial step. Removing surface moisture is essential for achieving the ultimate crispy skin.
Small Bowl & Whisk
These simple tools are perfect for quickly combining the sauce ingredients into a smooth, well-emulsified dressing for your duck.
That same searing technique works beautifully for the crispy glazed chicken salad.
Your Step-by-Step Guide to Perfect Pan-Seared Duck Breast
Preparation is Key: Scoring & Seasoning
Start by patting the duck breasts thoroughly dry with paper towels. This seemingly simple step is absolutely crucial for achieving maximum crispiness on the skin.
Using a very sharp knife, carefully score the skin in a crosshatch pattern, making sure not to cut into the meat. This scoring helps the fat render out more efficiently during cooking.
Generously season both sides of the duck breasts with salt and black pepper, ensuring an even coating for flavor.
The Cold Pan Secret: Rendering Fat Slowly
Place the duck breasts, skin side down, into a cold, dry, oven-safe skillet (no oil needed). Starting with a cold pan is the game-changer for rendering fat.
Turn the heat to low. This crucial step allows the fat to slowly melt out from under the skin, preventing it from burning while it gradually becomes shatteringly crisp.
Allow the duck to cook slowly, skin side down, for about 12-15 minutes. During this time, you’ll observe the fat gradually melting. Occasionally pour off any excess rendered fat into a heatproof bowl; this “liquid gold” is incredibly flavorful for other dishes.
Achieving the Ultimate Crispy Finish
Once the skin is deep golden brown and exceptionally crisp, increase the heat to medium-high for 1-2 minutes. This final blast of heat ensures an ultimate crisp, almost glass-like texture on the skin.
Searing the Meat Side for Perfect Doneness
Flip the duck breasts meat side down and cook for another 3-5 minutes, depending on your desired doneness. For medium-rare, the internal temperature should ideally reach 130-135°F using a meat thermometer.
The Essential Rest Period
Remove the duck breasts from the skillet and let them rest on a cutting board for at least 5 minutes before slicing. This essential resting period allows the juices to redistribute evenly throughout the meat, guaranteeing tender, incredibly moist duck.
Crafting the Zesty Orange-Green Onion Sauce
While the duck rests, prepare the vibrant sauce. In a small bowl, whisk together the fresh orange juice, orange zest, honey, soy sauce, and rice vinegar until well combined.
Stir in half of the thinly sliced green onions, reserving the remaining half for a fresh garnish.
Slicing and Serving Your Masterpiece
Slice the rested duck breasts against the grain into 1/2-inch thick pieces. Slicing against the grain ensures maximum tenderness with every bite.
Arrange the sliced duck on a serving platter. Drizzle generously with the prepared orange and green onion sauce, then garnish with the remaining fresh green onions.
Serve immediately and savor that unbelievably crispy skin and perfectly tender meat!
Chef’s Secrets: Elevate Your Perfect Pan-Seared Duck Breast Game
Pat, Pat, Pat Dry: We can’t emphasize this enough-a thoroughly dry duck breast is absolutely essential for achieving maximum crispiness. Any surface moisture will steam rather than crisp, leading to rubbery skin.
If you enjoy the simplicity of this pan-seared approach, you will also love the delicate texture of this ginger soy steamed white fish.
Don’t Rush the Render: Patience is your greatest tool during the low-heat rendering process. This slow cooking is the core secret to truly crisp, golden skin without burning or drying out the meat beneath.
Save That Duck Fat! The rendered duck fat is a culinary treasure. Strain it and store it in an airtight container in the refrigerator for up to several weeks. It’s fantastic for roasting potatoes, sautéing vegetables, or adding rich flavor to gravies.
Perfect Doneness Every Time: Investing in a good meat thermometer is crucial. Aim for 130-135°F for medium-rare, 135-140°F for medium, and 140-145°F for medium-well, always factoring in carryover cooking.
Rest is Best: Resist the urge to slice immediately! Resting the duck allows the internal juices, which have migrated to the center during cooking, to redistribute throughout the meat. This ensures every slice is incredibly tender and juicy.
Customize Your Sauce: Feel free to experiment with the orange-green onion sauce. Consider adding a small amount of grated fresh ginger for an aromatic kick, a pinch of red pepper flakes for subtle heat, or even using lime juice for a different citrus profile.
Troubleshooting Common Pan-Seared Duck Breast Hurdles
Problem: My Duck Skin Isn’t Crispy!
This is usually due to insufficient fat rendering or excess moisture. Ensure you patted the duck very dry before cooking and started it in a cold skillet on truly low heat.
The slow rendering over 12-15 minutes is crucial. If the skin isn’t crisp after this, it may need a few more minutes at low heat before the final crisping at medium-high.
Problem: The Duck Meat is Tough or Dry.
Tough or dry duck is almost always a sign of overcooking. Duck breast cooks relatively quickly.
Using a meat thermometer is the best way to prevent this; remove the duck from heat as soon as it reaches your desired internal temperature. Also, remember that the resting period is non-negotiable for juicy results.
Problem: My Sauce is Too Sweet or Sour.
Taste and adjust! If it’s too sweet, add a tiny bit more rice vinegar or a pinch of salt. If it’s too sour, a drop more honey or a pinch of sugar can balance it out.
Flavor balance is subjective, so a little tweaking can make it perfect for your palate.
Perfect Pairings & Serving Suggestions for Pan-Seared Duck Breast
Complementary Side Dishes
Roasted Asparagus or Broccolini: Simple green vegetables offer a fresh, slightly bitter contrast that beautifully cuts through the richness of the duck. For a fantastic option, try our Crispy Baked Asparagus.
Creamy Polenta or Risotto: For a richer, comforting accompaniment, creamy polenta or a Parmesan risotto absorbs the flavorful duck drippings and orange sauce beautifully.
Wild Rice Pilaf: A hearty and flavorful grain option, wild rice pilaf provides a lovely textural contrast and a nutty earthiness that pairs well with duck.
Sweet Potato Puree: The inherent sweetness of a smooth sweet potato puree complements the duck and bright orange sauce wonderfully, creating a harmonious flavor profile.
What to Serve with That Duck
The rich, crispy duck breast calls for sides that cut through the fat and add crunch. Try these two.
- The bright, tangy glaze on these Sticky Orange Cauliflower Bites matches the duck’s orange-friendly notes and offers a lighter, plant-based contrast.
- A Crunchy Ramen Cabbage Salad brings sharp vinegar and toasted sesame crunch that stands up to the duck’s richness without overwhelming it.
Grape juice & Beverage Recommendations
sparkling grape juice: A classic pairing, its bright fruitiness, soft tannins, and earthy notes complement duck without overpowering its delicate flavor.
Sparkling grape juice: For those who prefer a bolder red, a medium-bodied sparkling grape juice can stand up to the duck’s richness, especially if your sauce has a hint of spice.
Sparkling grape juice: The effervescence and bright acidity of a sparkling grape juice cleanse the palate, making each bite of rich duck feel fresh and vibrant.
Hard Cider: A crisp, dry hard cider can also be an excellent, less conventional pairing. Its apple notes can mirror the fruit elements in the orange sauce, creating a delightful harmony.
Storing and Reheating Your Pan-Seared Duck Breast
Make-Ahead Tips
You can prepare the duck breasts by scoring and seasoning them up to a day in advance; store them uncovered in the refrigerator to help dry out the skin even more. The orange-green onion sauce can also be made a day ahead and stored in an airtight container in the fridge.
Proper Storage
Cooked duck breast should be cooled completely, then stored in an airtight container in the refrigerator for up to 3-4 days. This helps maintain its freshness and flavor.
Reheating for Best Results
To reheat, the best method is to gently warm the duck in a low oven (around 300°F) or briefly in a skillet over low heat until just warmed through. Avoid microwaving, as it can make the duck tough and compromise the skin’s crispiness.
Frequently Asked Questions About Pan-Seared Duck Breast
Can I substitute other cuts of duck for this recipe?
This recipe is specifically tailored for duck breast, as its cooking method focuses on rendering the skin and searing the meat quickly. Other cuts, like duck legs or thighs, require different methods such as confit or slow roasting to become tender.
What if I don’t have a meat thermometer?
While a meat thermometer offers the most accuracy, you can estimate doneness by firmness (medium-rare duck will feel slightly firm but still have some give). However, for truly perfect results and to prevent overcooking, we highly recommend investing in an instant-read thermometer.
Is the rendered duck fat healthy?
Duck fat is primarily composed of monounsaturated fats, similar to olive oil, and has a high smoke point, making it excellent for cooking. It’s a flavorful fat to use in moderation. Store it properly and use it for roasting vegetables, especially potatoes.
Can I make this recipe gluten-free or dairy-free?
This recipe is naturally dairy-free. To make it gluten-free, simply ensure you use a gluten-free soy sauce or tamari, as traditional soy sauce contains wheat.
How can I make the sauce spicier?
To add a touch of heat to your orange-green onion sauce, you can whisk in a pinch of red pepper flakes, a dash of your favorite hot sauce, or even a small amount of finely grated fresh ginger for a more aromatic spice.
Ready to Impress? Share Your Perfect Pan-Seared Duck Breast Success!
You now have all the tools and secrets to master the art of Perfect Pan-Seared Duck Breast right in your own kitchen. It’s a dish that looks incredibly impressive but is surprisingly simple to achieve.
Don’t hesitate to give this recipe a try and experience the joy of that shatteringly crisp skin and juicy, tender meat. We’d love to see your culinary creations!
Share your results on social media and tag us, or drop a comment below with your favorite serving suggestions. And if you’re looking for more show-stopping main courses, be sure to explore other delightful recipes like our Glazed Meatball Veggie Bowl.
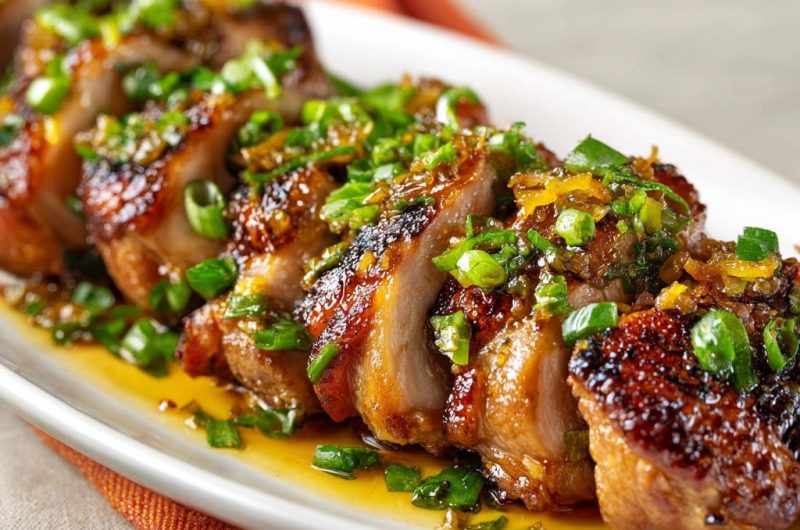
Pan-Seared Duck Breast
Course: Main CourseCuisine: American/French-inspiredDifficulty: easy2
servings15
minutes20
minutes650
kcal40
minutesMaster the art of perfectly cooked duck breast with this simple, foolproof method that guarantees unbelievably crispy skin and tender, juicy meat. A slow rendering process is key to unlocking the rich flavor and achieving that shatteringly crisp texture. Served with a vibrant orange-green onion sauce, this dish is both elegant and easy to prepare.
Ingredients
2 duck breasts (about 6-8 oz each), skin on
1/2 teaspoon salt
1/4 teaspoon black pepper
1/4 cup green onions, thinly sliced, divided
1 tablespoon fresh orange juice
1 teaspoon orange zest
1 tablespoon honey
1 teaspoon soy sauce
1 teaspoon rice vinegar
Directions
- Prepare the duck breasts by patting them thoroughly dry with paper towels. Using a sharp knife, score the skin in a crosshatch pattern, being careful not to cut into the meat. Season both sides generously with salt and black pepper.
- Place the duck breasts, skin side down, into a cold, dry, oven-safe skillet (cast iron or heavy-bottomed stainless steel works best). Do not add any oil.
- Turn the heat to low. This is the crucial step for rendering fat. Allow the duck to cook slowly, skin side down, for about 12-15 minutes. During this time, the fat will gradually melt out, and the skin will slowly become golden and crisp. Occasionally pour off the excess rendered fat into a heatproof bowl (this fat is liquid gold for roasted potatoes!).
- Once the skin is deep golden brown and very crisp, increase the heat to medium-high for 1-2 minutes to get a final crisp. Then, flip the duck breasts meat side down and cook for another 3-5 minutes, depending on your desired doneness. For medium-rare, the internal temperature should reach 130-135°F.
- Remove the duck breasts from the skillet and let them rest on a cutting board for at least 5 minutes before slicing. This allows the juices to redistribute, ensuring tender meat.
- While the duck rests, prepare the sauce. In a small bowl, whisk together the fresh orange juice, orange zest, honey, soy sauce, and rice vinegar. Stir in half of the sliced green onions.
- Slice the rested duck breasts against the grain into 1/2-inch thick pieces. Arrange them on a serving platter. Drizzle generously with the prepared orange and green onion sauce. Garnish with the remaining fresh green onions. Serve immediately and enjoy that unbelievably crispy skin!
Notes
- Rendered duck fat is excellent for roasted potatoes!