Spring Blossom Buttercream Cake: Perfect Pipes & Petals
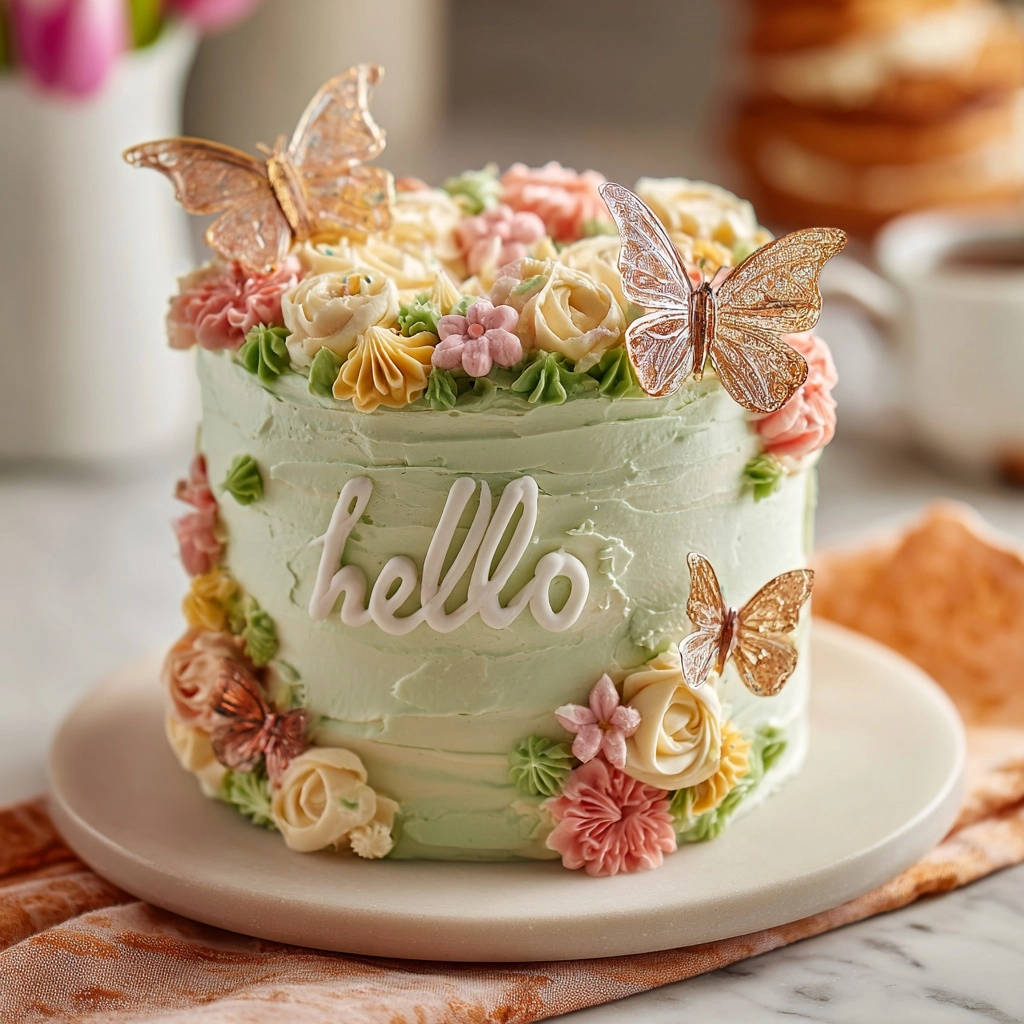
I remember the frustration of seeing delicate buttercream flowers droop, losing their charm moments after piping. That’s why mastering a truly stable buttercream became my mission, leading to this exquisite Spring Blossom Buttercream Cake. This recipe isn’t just about baking; it’s about crafting edible art with confidence, ensuring your piped blossoms hold their shape beautifully.
Beyond Basic: Why This Spring Blossom Buttercream Cake Will Be Your New Favorite
Forget the days of temperamental frosting and uneven cake layers. This recipe empowers you to create a show-stopping dessert that’s as delightful to look at as it is to eat. It’s designed for reliability, ensuring every step leads to success.
No More Drooping: The Secret to Stable Buttercream Success
Traditional buttercream can often be too soft, especially for intricate piping, or break down easily. Our secret lies in the precise butter temperature and an extended aeration period.
This method builds an incredibly stable emulsion, allowing your delicate flowers to stand tall and proud, just as they should.
Effortless Elegance: Why This Recipe is Your Go-To for Stunning Desserts
Achieving a professional-looking cake doesn’t have to be daunting. This Spring Blossom Buttercream Cake recipe simplifies the process, breaking down complex decorating into manageable, confidence-building steps.
What to Serve with Your Cake
If you are making the Spring Blossom Buttercream Cake for a gathering, add a second baked option to the table.
- Pair the floral cake with a batch of Coconut Dream Muffins for a tropical note that contrasts the buttercream.
- For chocolate lovers, offer Ultra-Gooey Chocolate Cinnamon Rolls as a rich, spiced counterpoint to the light cake.
It’s perfect for birthdays, baby showers, or any celebration where you want to impress with a beautiful, homemade touch.
Your Baking Arsenal: Essential Tools for Spring Blossom Buttercream Cake Success
Having the right tools makes all the difference in achieving a flawless result. These essentials ensure precision and ease throughout your baking and decorating journey.
Must-Have Mixing & Baking Essentials
Electric Mixer: Absolutely crucial for aerating the butter to achieve that light, stable buttercream and for thoroughly combining cake batter ingredients.
6-Inch Round Cake Pans: Two pans ensure even baking and give you the perfect foundation for a beautifully layered cake.
Mixing Bowls: Several sizes are needed for separating wet and dry ingredients and for coloring your buttercream.
Wire Rack: Essential for cooling your cake layers completely, preventing condensation and ensuring a perfect texture.
Piping Precision: The Right Tools for Floral Artistry
Piping Bags: Disposable or reusable, these are indispensable for controlled application of buttercream.
Piping Tips: A variety, such as star tips (Wilton 1M, 2D), petal tips (Wilton 104, 124), and small round tips, allows for diverse floral designs and leaves.
Offset Spatula: Ideal for applying smooth, even layers of buttercream, especially for the crumb coat and final frosting layer.
Bench Scraper: Helps achieve perfectly smooth, straight sides on your frosted cake, giving it a professional finish.
The Heart of the Blossom: Key Ingredients Unpacked for Perfection
Each ingredient plays a vital role in the texture and flavor of your Spring Blossom Buttercream Cake. Understanding their purpose helps ensure success.
For the Cake: Achieving That Perfectly Fluffy Crumb Base
All-Purpose Flour: The structural backbone of your cake, providing tender crumb. Measure precisely by weight or the spoon-and-level method.
Baking Powder & Salt: These leavening agents and flavor enhancers are critical for the cake’s rise and balance. Ensure your baking powder is fresh for optimal lift.
Unsalted Butter (Softened): Provides richness and moisture. Using unsalted butter allows you to control the overall salt content in the recipe.
Granulated Sugar: Sweetens and tenderizes the cake, contributing to its fine crumb.
Large Eggs: Bind the ingredients, add moisture, and contribute to the cake’s structure and richness.
Vanilla Extract: A classic flavor enhancer that complements the sweetness of the cake and buttercream.
Milk: Adds moisture and richness, creating a tender and moist cake crumb.
The Star: Crafting Our Ultra-Stable Buttercream Base
Unsalted Butter (Softened, Cool to Touch): This is the most crucial ingredient for your stable buttercream. It must be cool enough to hold its structure but soft enough to whip.
Powdered Sugar (Sifted): Provides sweetness and body. Sifting is non-negotiable for a silky-smooth, lump-free buttercream, which is essential for perfect piping.
Cold Milk or Cold Heavy Cream: Using cold liquid helps maintain the firmness of the butter, preventing the buttercream from becoming too runny. Heavy cream adds a richer texture.
Vanilla Extract: Enhances the sweet flavor of the buttercream. Use a good quality extract for the best taste.
Gel Food Coloring: Delivers vibrant pastel shades without adding excess liquid, which could thin your carefully crafted buttercream. Avoid liquid food coloring for this recipe.
Your Path to Perfection: Baking & Decorating Steps for Your Spring Blossom Buttercream Cake
Follow these detailed steps to create a beautiful and delicious Spring Blossom Buttercream Cake that will impress everyone.
Crafting the Delicate Cake Layers
- Prepping for Success:
Preheat your oven to 350°F (175°C) and meticulously grease and flour two 6-inch round cake pans. Proper preparation prevents sticking and ensures clean cake release.
- The Dry Mix Foundation:
In a medium bowl, whisk together the all-purpose flour, baking powder, and salt. This step ensures that the leavening agents are evenly distributed, promoting a uniform rise.
- Creaming for Lightness:
Using an electric mixer in a large bowl, cream the softened butter and granulated sugar on medium speed for 3 to 5 minutes. The mixture should become noticeably light and fluffy, incorporating air that contributes to the cake’s tender texture.
- Building the Batter:
Beat in the eggs one at a time, mixing thoroughly after each addition, then stir in the vanilla extract. Gradually add the dry ingredient mixture to the wet, alternating with the milk, beginning and ending with the dry ingredients. Mix on low speed only until just combined to avoid overmixing, which can lead to a tough cake.
- Baking to Perfection:
Pour the batter evenly into your prepared cake pans. Bake for 25 to 30 minutes, or until a wooden skewer inserted into the center of the cakes comes out clean, indicating they are fully baked.
- Cooling Gracefully:
Allow the cakes to cool in their pans for 10 minutes before gently inverting them onto a wire rack. Ensure they cool completely to room temperature before frosting; this prevents your beautiful buttercream from melting.
Mastering the Buttercream: The Secret to Stable Blooms
- The Crucial Butter Temperature:
Begin with unsalted butter that is softened but still cool to the touch. This precise temperature is the foundation for creating a stable emulsion that holds its shape for intricate piping.
- The Aeration Power-Whip:
In a large bowl, beat the softened butter with an electric mixer on medium-high speed for a full 5 to 7 minutes. This lengthy beating process is the true secret, incorporating significant air to make the butter extremely pale, light, and fluffy, providing the essential structural integrity for piped flowers.
- Gradual Sugar Incorporation:
Reduce mixer speed to low. Gradually add the sifted powdered sugar, one cup at a time, mixing until each addition is just incorporated before adding the next. This prevents a powdered sugar cloud and ensures smooth integration.
- Cold Liquid for Firmness:
With the mixer still on low, slowly drizzle in the cold milk or heavy cream, 1 tablespoon at a time, until your desired consistency is reached. Using cold liquid helps maintain the firmness and structure of the buttercream, preventing a runny frosting.
- The Final Flourish Whip:
Increase the mixer speed to medium-high and beat the buttercream for another 2 to 3 minutes. This final whip incorporates even more air, making the frosting incredibly light, fluffy, and exceptionally stable for holding delicate piped shapes.
- Coloring Your Creation:
Divide the buttercream into separate bowls. Add gel food coloring to each bowl to achieve your desired pastel shades for flowers and leaves, being careful not to overmix. Keep one portion untinted for the main cake coverage.
Assembling Your Floral Masterpiece: From Crumb Coat to Final Flourish
- Leveling Your Layers:
Once your cake layers are completely cooled, use a serrated knife or cake leveler to trim any domes, ensuring flat, even layers for a professional-looking cake.
- The Essential Crumb Coat:
Place one cake layer on your serving plate or cake stand and spread a thin layer of buttercream over it. Add the second cake layer on top. Apply a very thin “crumb coat” of buttercream over the entire cake to trap any loose crumbs. Chill the cake in the refrigerator for 15 to 20 minutes to set this coat.
- Smooth Final Application:
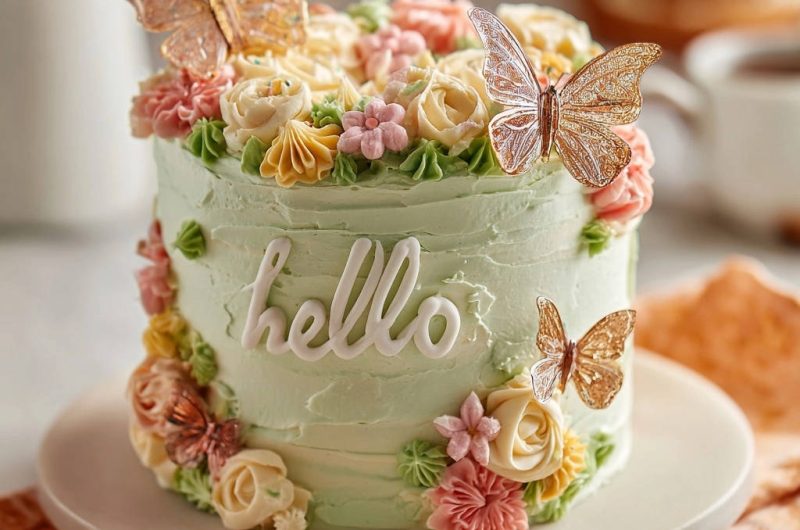
Once the crumb coat is set, apply the main layer of your light green buttercream smoothly over the entire chilled cake. Use an offset spatula or a bench scraper to achieve a clean, even finish.
- Piping Your Vision:
Transfer your tinted buttercreams to piping bags fitted with various tips (star, petal, or small round). Pipe your desired floral designs and leaves directly onto the cake, confident that your stable buttercream will beautifully hold its shape.
- Edible Accents:
Carefully attach edible wafer paper butterflies to the cake. If using, pipe or carefully place the pre-made “hello” sugar letters on the side for a personalized touch.
- Setting the Scene:
Chill the decorated Spring Blossom Buttercream Cake briefly before serving to ensure all decorations are firmly set and the buttercream is perfectly firm.
For a perfect pairing, try our Mastering the Glazed Blueberry Lemon Bundt Cake.
Expert Tips & Tricks for a Flawless Spring Blossom Buttercream Cake
Elevate your baking with these pro tips, ensuring your cake is not just good, but exceptional.
Butter Temperature Precision: Ensure your butter is softened but cool to the touch, not greasy. This precise temperature is absolutely crucial for creating a stable emulsion that holds its shape for piping.
Don’t Rush the Whip: The lengthy beating of the butter (5-7 minutes) is the true secret to aeration, making it pale, light, and providing the structural integrity for piped flowers. Don’t cut this time short!
Sift Your Powdered Sugar: Always sift your powdered sugar to prevent lumps in your buttercream, ensuring a smooth, pipeable consistency that won’t clog your tips. This step is critical for smooth piping.
Use Gel Food Coloring: Liquid food colorings can thin your buttercream, compromising its stability. Gel colors provide vibrant hues without affecting consistency, which is vital for maintaining pipeable frosting.
Scrape Down Frequently: During mixing, regularly scrape down the sides and bottom of your bowl. This ensures all butter and sugar are evenly incorporated and aerated, preventing uneven texture.
Chill Between Steps: Brief chilling periods for cake layers (after leveling, after crumb coat) make the assembly process much cleaner and easier to manage, leading to a much neater final product. For another delightful, easy-to-manage dessert, consider our Decadent Pumpkin Pie Truffles, which also benefit from strategic chilling.
Troubleshooting Your Spring Blossom Buttercream Cake: Solving Common Hurdles
Even experienced bakers face challenges. Here’s how to quickly resolve common issues with your Spring Blossom Buttercream Cake.
Help! My Buttercream is Too Soft/Runny
This is often due to butter being too warm or not enough powdered sugar/aeration. Try chilling the buttercream for 15-20 minutes, then re-whipping it on high speed. If still too soft, gradually add more sifted powdered sugar, one tablespoon at a time, until the desired consistency is reached.
Ensuring your butter is softened but cool to the touch is vital from the start to prevent this common problem. Our guide to making a perfect Almond Caramel Layer Cake also emphasizes precise ingredient temperatures for optimal results.
Why Did My Cake Sink or Turn Out Dry?
A sinking cake can result from underbaking, opening the oven door too early, or too much leavening. A dry cake is almost always due to overbaking. Ensure your oven temperature is accurate and test for doneness with a wooden skewer – it should come out clean, but not bone dry.
Uneven Cake Layers? Quick Fixes!
Don’t despair! You can easily level your cake layers with a serrated knife or a dedicated cake leveling tool. This creates a flat, stable surface for assembly, ensuring a beautiful, even Spring Blossom Buttercream Cake.
Beyond the Bake: Serving, Storage & Make-Ahead Tips
Maximize the enjoyment and longevity of your beautiful Spring Blossom Buttercream Cake with these practical tips.
Presentation Pointers: Serving Your Spring Blossom Delight
For an elegant presentation, serve slices with a sprig of fresh mint or a few carefully placed edible flowers. A light dusting of powdered sugar over the plate or a drizzle of fruit coulis can also add a touch of sophistication and visual appeal.
If you enjoy working with floral piping, try this same approach on a glazed lemon blueberry loaf for a bright, fruity finish.
Keeping Your Masterpiece Fresh: Storage Guidelines
Store your Spring Blossom Buttercream Cake in an airtight cake carrier at cool room temperature for up to 2-3 days. If your kitchen is very warm, or if you prefer, refrigerate for up to 5 days. Always bring it to room temperature for about an hour before serving for the best flavor and texture.
Bake Ahead: Prep Tips for Stress-Free Decorating
You can bake the cake layers a day or two in advance. Once completely cooled, wrap them tightly in plastic wrap and store at room temperature, or freeze them for up to a month for longer storage. The buttercream can also be made a day ahead, stored in an airtight container in the fridge, then brought to room temperature and re-whipped until fluffy before decorating, making assembly day much easier.
Your Spring Blossom Buttercream Cake Questions Answered
Here are answers to common questions about adapting and perfecting your Spring Blossom Buttercream Cake.
Can I Use Different Pan Sizes for This Spring Blossom Buttercream Cake Recipe?
Yes, you can adapt this recipe for different pan sizes. For an 8-inch cake, you may need to increase the recipe by 1.5 times and adjust baking time accordingly, usually a few minutes longer. For cupcakes, expect shorter baking times (18-22 minutes) and fill liners about two-thirds full.
Gluten-Free or Dairy-Free Adaptations for This Recipe?
For a gluten-free version, substitute the all-purpose flour with a 1:1 gluten-free baking blend that contains xanthan gum for structure. For dairy-free, use a good quality plant-based butter alternative that bakes and creams well, and a plant-based milk (like unsweetened almond or soy milk) for both the cake and buttercream. Note that the texture and flavor of the buttercream might vary slightly with dairy-free butter, but it can still be delicious.
What Are the Best Piping Tips for Creating Different Flower Designs?
For various flower designs, a Wilton 1M or 2D (open/closed star tips) are excellent for beautiful rosettes and starbursts. Petal tips like 104 or 124 are perfect for creating realistic roses, ruffles, and intricate flower petals. Small round tips (like Wilton 3 or 5) are great for small dots, beads, or even fine writing. Experimentation is key to finding your favorites and developing your unique floral style!
Ready to Bloom? Share Your Spring Blossom Buttercream Cake!
Armed with these techniques and a little patience, you’re now ready to create a truly enchanting Spring Blossom Buttercream Cake. The joy of piping delicate flowers that actually hold their shape is incredibly rewarding, and the taste of this moist, fluffy cake with stable, airy buttercream is simply divine.
We’d love to see your floral masterpieces! Share your creations on social media and tag us. Happy baking, and may your cakes always bloom beautifully!
Buttercream Cake
Course: DessertCuisine: AmericanDifficulty: medium8
servings1
hour30
minutes550
kcal120
minutesDiscover the secret to perfectly stable buttercream that holds intricate piped flowers. This delightful Spring Blossom Buttercream Cake recipe ensures your beautiful designs stay defined, making every celebration a masterpiece.
Ingredients
For the Cake:
1 1/2 cups all-purpose flour
1 1/2 teaspoons baking powder
1/4 teaspoon salt
1/2 cup (1 stick) unsalted butter, softened
1 cup granulated sugar
2 large eggs
1 teaspoon vanilla extract
1/2 cup milk
For the Buttercream Frosting:
1 cup (2 sticks) unsalted butter, softened (important: cool to the touch, not greasy)
4 cups powdered sugar, sifted
2 to 4 tablespoons cold milk or cold heavy cream
1 teaspoon vanilla extract
Gel food coloring (various pastel colors)
For Decoration:
Edible wafer paper butterflies
Pre-made edible “hello” sugar letters (optional)
Directions
- For the Cake: Preheat oven to 350F (175C). Grease and flour two 6-inch round cake pans.
- In a medium bowl, whisk together the flour, baking powder, and salt. Set aside.
- In a large bowl, using an electric mixer, cream the softened butter and granulated sugar together on medium speed until the mixture is light and fluffy, about 3 to 5 minutes.
- Beat in the eggs one at a time, mixing well after each addition. Stir in the vanilla extract.
- Gradually add the dry ingredient mixture to the wet ingredients, alternating with the milk, beginning and ending with the dry ingredients. Mix on low speed until just combined. Do not overmix.
- Pour the batter evenly into the prepared cake pans. Bake for 25 to 30 minutes, or until a wooden skewer inserted into the center of the cakes comes out clean.
- Allow the cakes to cool in the pans for 10 minutes before inverting them onto a wire rack to cool completely. Ensure cakes are completely cool before frosting to prevent melting.
- For the Buttercream Frosting (The Key to Stable Piping!):
- Begin with butter that is softened but still cool to the touch. This precise temperature is absolutely crucial for creating a stable emulsion that holds its shape.
- In a large bowl, beat the softened butter with an electric mixer on medium-high speed for a full 5 to 7 minutes. This lengthy beating process is the secret to aerating the butter, making it extremely pale, light, and fluffy. This aeration is what provides the structural integrity needed for piped flowers to stay put. Scrape down the sides of the bowl frequently to ensure even beating.
- Reduce the mixer speed to low. Gradually add the sifted powdered sugar, one cup at a time, mixing until each addition is just incorporated before adding the next.
- Once all the sugar is added, with the mixer still on low, slowly drizzle in the cold milk or heavy cream, 1 tablespoon at a time, until your desired consistency is reached. Using cold liquid helps maintain the firmness and structure of the butter, preventing a runny frosting. For piping intricate flowers, you will want a buttercream that is thick enough to hold firm peaks but still smooth enough to pipe without breaking or clogging.
- Increase the mixer speed to medium-high and beat the buttercream for another 2 to 3 minutes. This final whip incorporates more air, making the frosting incredibly light, fluffy, and exceptionally stable for holding delicate piped shapes.
- Divide the buttercream into separate bowls. Add gel food coloring to each bowl to achieve your desired pastel shades for the flowers and leaves. Keep one portion untinted for the main cake coverage.
- Assembling and Decorating:
- Once the cake layers are completely cooled, level them with a serrated knife if necessary. Place one cake layer on your desired serving plate or cake stand.
- Spread a thin layer of buttercream over the first cake layer. Place the second cake layer on top.
- Apply a thin “crumb coat” of buttercream over the entire cake. This traps any loose crumbs. Chill the cake in the refrigerator for 15 to 20 minutes to set the crumb coat.
- Apply the main layer of your light green buttercream smoothly over the entire chilled cake. Use an offset spatula or a bench scraper to achieve a clean, even finish.
- Transfer your tinted buttercreams to piping bags fitted with various tips (such as star tips, petal tips, or small round tips). Pipe your desired floral designs and leaves directly onto the cake. Thanks to the stable buttercream, your intricate flowers will beautifully hold their shape.
- Carefully attach the edible wafer paper butterflies to the cake.
- If using, pipe or carefully place the pre-made “hello” sugar letters on the side of the cake.
- Chill the decorated cake briefly before serving to ensure all decorations are set.
Notes
- Ensure butter for frosting is softened but cool to the touch for optimal stability. Completely cool cakes before frosting to prevent melting.