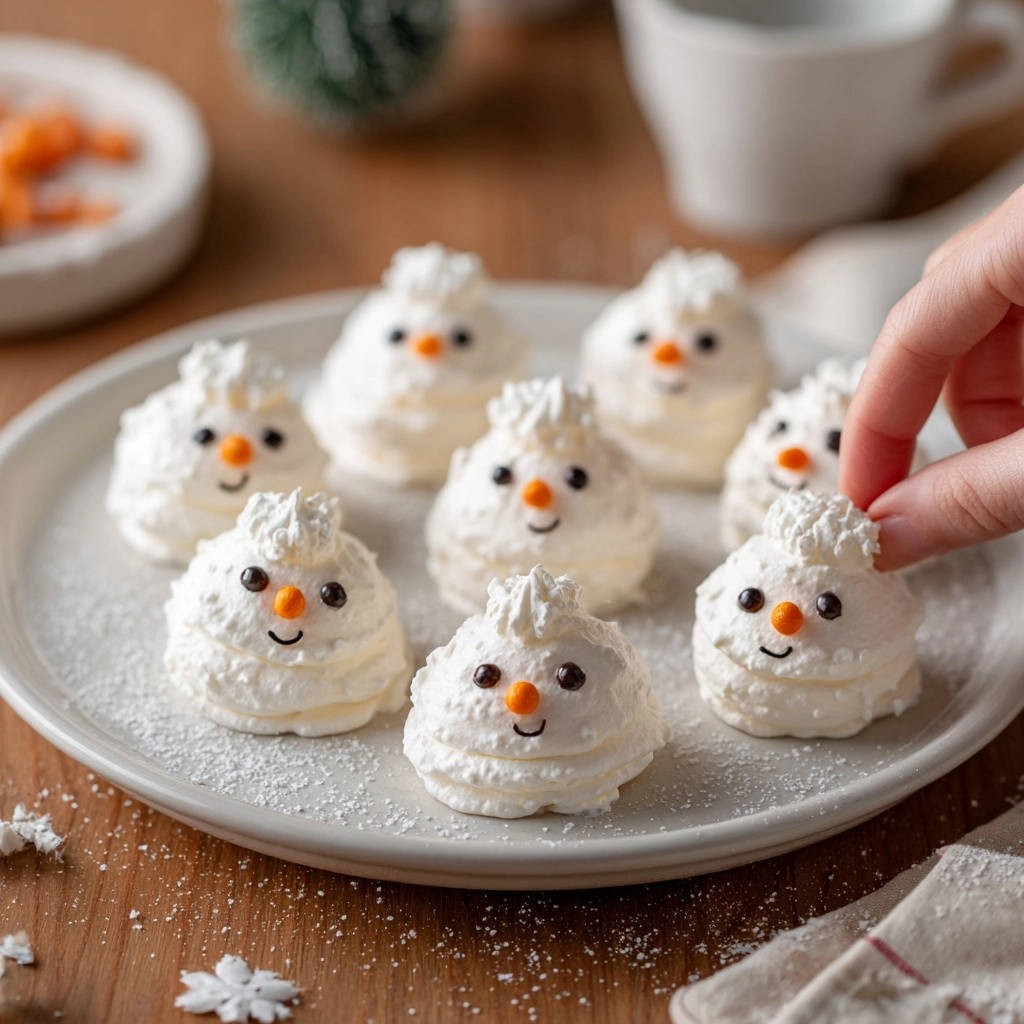
Whimsical Snowman Meringues: Perfectly Puffy & Picture-Ready
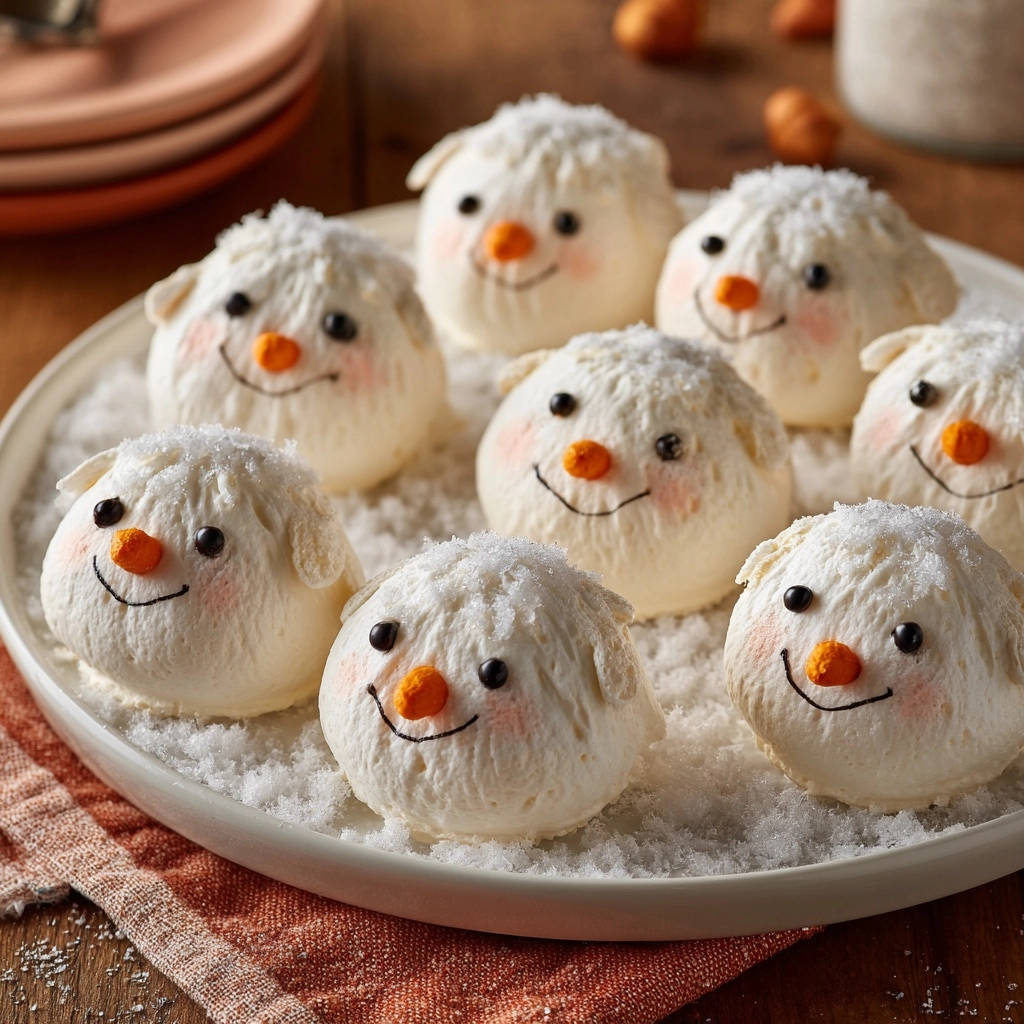
Ever found yourself disheartened when delicate desserts, especially meringues, lose their charming shape or weep sadly before they even make it to the table? It’s a common baking frustration. But through years of perfecting sweet creations, I’ve discovered the precise method to craft the most charming, perfectly puffy, and truly picture-ready Whimsical Snowman Meringues, guaranteeing they stand tall and crisp, no matter the occasion.
This recipe isn’t just about adorable holiday treats; it’s about mastering meringue stability. You’ll learn the secrets to achieving that satisfying “snap” and a truly melt-in-your-mouth texture, ensuring your efforts pay off with delightful, display-worthy results every single time.
The Secret to Stable, Picture-Perfect Meringues (No Weeping Here!)
What sets these Whimsical Snowman Meringues apart? It’s a combination of meticulous technique and a crucial low-and-slow drying process. This isn’t just baking; it’s a gentle dehydration that locks in their structural integrity.
Unlike many meringue recipes that can leave you with sticky, fragile, or weeping results, our method focuses on gradual sugar incorporation and an extended, low-temperature bake followed by an in-oven cool-down. This dual approach ensures the sugar fully dissolves and the meringue completely dries out from the inside, preventing the common pitfalls of collapse or moisture release.
You’ll achieve light-as-air treats with a delicate crispness that holds up beautifully, whether they’re adorning your holiday dessert platter or simply bringing a smile to a child’s face. The payoff is a truly stable meringue that maintains its delightful form and texture for days.
Your Meringue-Making Toolkit: Must-Have Essentials
Before diving into the magic, ensure you have these essential tools ready for success, as the right equipment makes all the difference in meringue creation.
Impeccably Clean Mixing Bowl & Whisk
Cleanliness is paramount here. Any trace of grease, even a minuscule speck, will prevent your egg whites from whipping to their full, voluminous potential. Stainless steel or glass bowls are ideal, as plastic can sometimes retain oils.
Reliable Stand Mixer (or Hand Mixer)
Achieving stiff, glossy peaks requires consistent, powerful beating. A stand mixer with a whisk attachment is highly recommended for hands-free operation and optimal aeration, but a good quality hand mixer will also get the job done with a little more arm work.
Piping Bag with Round Tip
A large round tip (like an Ateco 809 or Wilton 1A) is perfect for creating the distinct snowman body and head shapes. If you don’t have a piping bag, a sturdy freezer-safe zip-top bag with a corner snipped off works as an excellent substitute for simple shapes.
Parchment Paper & Baking Sheet
Parchment paper is absolutely crucial for preventing the meringues from sticking to the baking sheet and ensuring easy, clean release once they’re baked and cooled. Never use wax paper, as it will stick.
Small Saucepan or Microwave-Safe Bowl
You’ll need this for gently melting your orange candy melts or warming store-bought frosting for the snowman’s carrot noses. Gentle heat is key to prevent scorching or seizing the melts.
Fine-Tipped Applicators for Decorating
For precise details like eyes and smiles, a toothpick, the tip of a small knife, or a fine-tipped black gel icing tube will be your best friend. A soft, clean brush is essential for applying the rosy cheek color.
Crafting Sweet Snowmen: Essential Ingredients List
While the full ingredient list will be in the recipe card, understanding the role of each component elevates your baking expertise and helps you predict results.
If you enjoy working with meringue, the soft texture of these golden coconut cookies makes a lovely change of pace.
The Meringue Foundation: Egg Whites & Granulated Sugar
Large egg whites are the backbone of your meringue, providing the protein structure that traps air. Always separate them carefully from the yolks; even a tiny bit of yolk (fat) can sabotage your meringue. Granulated sugar, added slowly, works to stabilize the whipped egg whites, creating a strong, glossy, and non-weeping meringue as it fully dissolves.
Stability Secrets: Cream of Tartar & Vanilla Extract
Cream of tartar, an acidic salt, acts as a stabilizer, helping the egg whites whip faster and achieve maximum volume and stiffness. It prevents them from collapsing and contributes to that beautiful glossy finish. Vanilla extract, added at the end, infuses your meringues with a classic, comforting flavor. For a festive twist, consider a tiny hint of almond extract or peppermint for different holiday delights.
Bringing Them to Life: Decoration Elements
Orange candy melts or store-bought orange frosting are perfect for crafting cute carrot noses. Mini chocolate chips or black gel icing create expressive eyes, while black gel icing forms those cheerful smiles. For a touch of warmth, pink edible dust or a tiny amount of pink gel food coloring, delicately applied with a brush, gives your snowmen rosy cheeks.
The Snowy Finish: Shredded Coconut or Powdered Sugar
Sweetened shredded coconut adds a delightful texture and a realistic “snow” effect around the base of your snowmen. Alternatively, a dusting of powdered sugar creates a softer, more subtle snowy appearance, both equally charming.
Step-by-Step Guide to Adorable Snowman Meringues
Follow these steps precisely, paying close attention to the “why” behind each action, to ensure your meringues are nothing short of perfect.
Prepping for Perfection: The Foundation of Stable Meringue
The very first step is the most critical for success: ensure your mixing bowl and whisk attachment are impeccably clean and completely grease-free. Residue from previous baking, even seemingly invisible, will prevent your egg whites from whipping properly and holding their desired form. Carefully separate your egg whites from the yolks, making sure no speck of yolk (which contains fat) contaminates the whites.
Building Brilliance: Whipping Egg Whites to Glossy Peaks
In your ultra-clean bowl, add the egg whites and cream of tartar. Begin beating on medium speed. Watch closely as the mixture transforms, continuing to beat until soft peaks form-these peaks will hold their shape but curl slightly at the tip.
Now, gradually add the granulated sugar, about a tablespoon at a time, while continuing to beat on high speed. This slow, steady addition is paramount; it allows the sugar crystals to fully dissolve and integrate into the egg white structure, creating a strong, stable meringue that resists weeping or collapsing. Continue beating until stiff, glossy peaks form (they should hold their shape firmly and not curl). To ensure the sugar is completely dissolved, rub a little meringue between your fingers; it should feel smooth, not gritty. Gently fold in the vanilla extract until just combined.
Piping Playfully: Shaping Your Snowman Crew
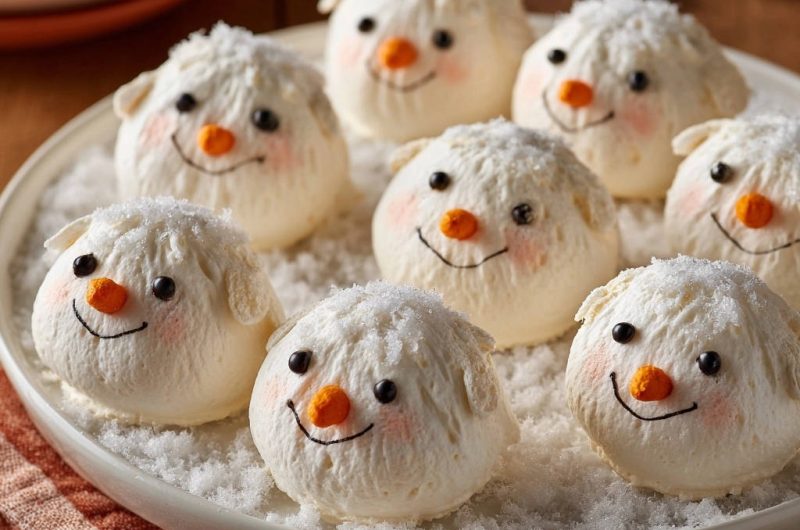
Carefully transfer the brilliant, glossy meringue mixture to a large piping bag fitted with a large round tip. If you don’t have a specific tip, simply snip off the end of the piping bag to create a wider opening. On a baking sheet lined with parchment paper, pipe round mounds of meringue. Start with a larger mound for the body (about 2-3 inches in diameter), then pipe a slightly smaller one directly on top for the head. For the ‘ears,’ pipe two small, slightly flattened dollops on the sides of each snowman’s head, giving them that classic whimsical touch.
The “No-Weep” Bake: Mastering the Low-Temperature Dry
This is the absolute secret to achieving perfectly stable, crisp, and no-weep meringues. Preheat your oven to a very low temperature, around 200°F (95°C). Carefully place the baking sheet with your piped meringues into the preheated oven. Bake for about 1 hour and 30 minutes to 2 hours, or until the meringues are completely dry to the touch, easily lift from the parchment paper without sticking, and sound hollow when gently tapped on the bottom.
Here’s the crucial “no-weep” step: once baked, turn off the oven completely. Leave the meringues inside the oven with the oven door slightly ajar (you can prop it open with a wooden spoon) for at least another hour, or even overnight, to cool completely and dry out further. This slow, passive drying process is essential for preventing cracks, eliminating any chance of weeping, and ensuring your Whimsical Snowman Meringues maintain their crisp, stable, and picture-perfect shape.
Bringing Characters to Life: Decorating with Personality
Once your meringue snowmen are completely cooled and crisp, it’s time for the fun part: decorating! Gently melt the orange candy melts or warm the orange frosting slightly until it’s a pipeable consistency. Use a toothpick or a small piping bag with a tiny hole to create adorable carrot noses on each meringue face. Apply eyes using mini chocolate chips or dots of black gel icing, and use a fine-tipped black gel icing tube for cheerful, expressive smiles.
If you enjoy working with meringue, these airy chocolate chip cloud cookies use a similar technique for a soft, melt-in-your-mouth texture.
For the rosy cheeks, lightly dip a clean, soft brush into pink edible dust and gently dab it onto the sides of the snowman’s face. If using pink gel food coloring, dilute an tiny amount with a drop of clear extract (like vanilla) and apply sparingly with the brush.
A Winter Wonderland Finish: Adding the Snowy Touch
To complete your winter wonderland scene, generously sprinkle sweetened shredded coconut or powdered sugar around the base of your snowmen on the serving platter. This creates a beautiful, edible snowy effect that adds to their whimsical charm and makes them even more inviting.
Chef’s Secrets for Flawless Meringue Snowmen
Years of baking have taught me these invaluable tips for mastering the art of meringue. Incorporate them for truly flawless results.
Grease-Free is Key: Seriously, this cannot be stressed enough. Even a tiny speck of fat from your hands, a greasy utensil, or a bowl that wasn’t washed properly can completely deflate your egg whites. Always use glass or metal bowls, and wipe them down with a paper towel dipped in lemon juice or vinegar for extra assurance.
Slow and Steady Sugar: Rushing the sugar addition leads to an unstable, gritty meringue that’s prone to weeping. Adding it gradually, a tablespoon at a time, allows each sugar crystal to fully dissolve and integrate, building a robust, silky structure.
The “Snap” Test: Your Whimsical Snowman Meringues are perfectly dry when they feel incredibly light, crisp, and snap cleanly in half with little effort. If they bend, feel sticky, or are chewy inside, they need more time in the oven during the drying phase.
Patience in Cooling: This is the ultimate secret. Resist the urge to yank your meringues out of the oven immediately. The slow, gradual cooling and drying inside the turned-off oven prevent thermal shock, which can cause cracking, and ensures all internal moisture evaporates, leading to that coveted crispness and stability.
Room Temperature Egg Whites: While not an absolute deal-breaker, using egg whites that have come to room temperature (about 30 minutes out of the fridge) can help them whip up faster and achieve slightly greater volume, leading to lighter meringues. This is particularly true for delicate treats like these.
Humidity is the Enemy: Meringues are hygroscopic, meaning they readily absorb moisture from the air. Avoid making them on very humid days if possible, or ensure your kitchen is as dry as can be. Store them immediately in an airtight container once completely cooled.
Meringue Woes Solved: Common Issues & Quick Fixes
Don’t be discouraged by common meringue mishaps; most have simple solutions once you understand the cause.
Why Did My Meringues Weep or Collapse?
Weeping (small beads of syrup forming on the surface) or collapsing is almost always due to sugar not being fully dissolved or insufficient drying time. Ensure you add sugar very gradually, beating until no grit is felt, and always follow the extended low-oven drying process. Grease contamination is another culprit; double-check your equipment for cleanliness.
Why Are My Snowmen Cracked or Brown?
Cracking often happens when the oven temperature is too high, causing the exterior to bake too quickly while the inside is still moist, or if the meringues cool too rapidly. Browning indicates the oven was too hot. Stick to the precise 200°F (95°C) temperature and the slow, in-oven cooling method to prevent these issues.
Pair These With Your Snowman Meringues
These light, airy meringues are a sweet treat on their own, but they pair well with something warm and spiced or a bright, fruity contrast.
- A slice of Cinnamon Streusel Coffee Cake brings a buttery, spiced crumb that balances the meringue’s crisp sweetness.
- For a cooler option, a Tropical Mango Smoothie Bowl adds creamy, tangy fruit that cuts through the sugar for a refreshing combo.
My Meringues Are Chewy or Sticky Inside!
This is a clear sign of under-baking or, more commonly, insufficient drying. The meringue hasn’t fully dehydrated. They need more time in the turned-off oven with the door ajar. Don’t remove them until they are completely dry and crisp throughout.
My Snowmen Lost Their Shape When Piping!
If your piped shapes flatten or spread, it usually means your meringue wasn’t whipped to sufficiently stiff peaks. The mixture needs to be firm enough to hold its form. Go back to step 3 and ensure your meringue passes the “stiff peak” and “smooth between fingers” tests before piping.
Serving & Storing Your Whimsical Snowman Meringues
Once your adorable meringue snowmen are complete, knowing how to serve and store them properly ensures their deliciousness and charm endure.
Best Ways to Serve These Adorable Treats
These Whimsical Snowman Meringues are perfect for so many occasions! Arrange them on a festive holiday dessert platter to instantly elevate your spread. They make fantastic edible gifts, delightful toppers for cupcakes or larger cakes, and a whimsical treat alongside a steaming mug of hot cocoa. Their light texture makes them a perfect finish to any meal, especially after heartier fare like a savory Decadent Pumpkin Pie Truffles dessert.
Keeping Them Fresh: Storage Tips for Meringues
Meringues are highly sensitive to moisture, so proper storage is key to maintaining their crispness. Once completely cooled, store your meringue snowmen in an airtight container at room temperature. A cookie tin or a plastic container with a tight-fitting lid works wonderfully. Avoid refrigerating meringues, as the damp environment will make them sticky and chewy. They can typically be stored for up to 3 to 4 days.
Make-Ahead Magic: Can You Prepare Them in Advance?
Absolutely! The stability of this recipe makes these Whimsical Snowman Meringues ideal for making ahead, which is a huge bonus during busy holiday seasons. You can bake and decorate them several days in advance, as long as they are stored correctly in an airtight container at room temperature. This allows you to tackle your holiday baking in stages, reducing stress and maximizing enjoyment.
Your Whimsical Snowman Meringues Questions Answered
Let’s address some common queries about these delightful holiday treats.
Can I make these Whimsical Snowman Meringues without cream of tartar?
While cream of tartar is highly recommended for its stabilizing properties, you can substitute it with an equal amount of lemon juice or white vinegar. These acids help strengthen the egg white structure, allowing them to whip up to firm, stable peaks.
How do I know if my egg whites are whipped enough?
Your egg whites are perfectly whipped when they form stiff, glossy peaks. This means when you lift the whisk, the peaks stand straight up without collapsing or curling. You can also carefully invert the bowl; if done correctly, the meringue should not slide or move.
Can I add food coloring to my Whimsical Snowman Meringues?
Yes, you can! Use gel food coloring, as liquid food coloring can introduce too much moisture and compromise the meringue’s stability. Add a small amount of gel food coloring when the meringue reaches soft peak stage, before adding the sugar, and continue beating to incorporate. For more intricate baking and dessert ideas, you might also enjoy exploring Chewy Coconut Macaroons.
What if I don’t have a piping bag?
No problem! A sturdy zip-top bag with the corner snipped off will work perfectly for piping. Alternatively, you can use two spoons to scoop and shape the meringue onto the parchment paper, creating a more rustic, free-form snowman shape that’s still incredibly charming.
Are Whimsical Snowman Meringues gluten-free?
Yes, by nature, these Whimsical Snowman Meringues are gluten-free, as they are made primarily from egg whites, sugar, and flavorings. Always double-check labels on decorative elements like candy melts or gel icing to ensure they are also certified gluten-free if catering to specific dietary needs.
Ready to Create Joy? Share Your Snowman Meringues!
There’s immense satisfaction in baking something that looks as magical as it tastes, and these Whimsical Snowman Meringues truly deliver on both fronts. They are a delightful testament to how simple ingredients, combined with careful technique, can create edible art that brings smiles to every face.
Now that you’re equipped with all the secrets to perfect meringue stability and decoration, I encourage you to whip up a batch (or two!) of these adorable holiday treats. Share your creations, tag us in your photos, and spread the joy that only homemade sweets can bring. Happy baking!
Meringues
Course: DessertCuisine: AmericanDifficulty: medium4
(multiple snowmen)30
minutes1
hour240
kcal180
minutesDiscover the secret to perfectly puffy and stable snowman meringues that won’t lose their shape. This recipe guarantees adorable, picture-ready treats from piping to plate, ensuring your efforts pay off with delightful results. Enjoy a fun and frustration-free baking experience.
Ingredients
4 large egg whites
1 cup granulated sugar
1/2 teaspoon cream of tartar
1 teaspoon vanilla extract
2 ounces orange candy melts or store-bought orange frosting
Mini chocolate chips or black gel icing for eyes
Black gel icing for smiles
Pink edible dust or a tiny amount of pink gel food coloring with a soft brush for cheeks
1/2 cup sweetened shredded coconut or powdered sugar for snow
Directions
- Preparation for stability: Before you begin, make sure your mixing bowl and whisk attachment are impeccably clean and completely grease-free. Even a tiny speck of fat can prevent your egg whites from whipping properly and holding their form. Carefully separate your egg whites from the yolks, ensuring no yolk gets into the whites.
- Whip the whites: In your clean bowl, add the egg whites and cream of tartar. Beat on medium speed until soft peaks form.
- Build the meringue: Gradually add the granulated sugar, about a tablespoon at a time, while continuing to beat on high speed. This slow addition allows the sugar to fully dissolve and incorporate, creating a strong, stable meringue that won’t weep or collapse. Continue beating until stiff, glossy peaks form and the sugar is completely dissolved. To test, rub a little meringue between your fingers; it should feel smooth, not gritty. Gently fold in the vanilla extract.
- Shape the snowmen: Transfer the meringue mixture to a large piping bag fitted with a large round tip (or simply snip off the end of the bag for a wider opening). On a baking sheet lined with parchment paper, pipe round mounds of meringue, about 2 to 3 inches in diameter. For the ‘ears,’ pipe two small, slightly flattened dollops on the sides of each snowman head.
- The secret to holding shape: This is the most crucial step for stability! Preheat your oven to a very low temperature, around 200°F (95°C). Place the baking sheet with the meringues in the oven and bake for about 1 hour and 30 minutes to 2 hours, or until the meringues are dry to the touch, easily lift from the parchment, and sound hollow when tapped on the bottom. Crucially, turn off the oven and leave the meringues inside with the oven door slightly ajar for at least another hour, or even overnight, to cool completely and dry out further. This slow drying process is essential for preventing cracks, weeping, and maintaining their crisp, stable shape.
- Decorate: Once completely cooled and crisp, melt the orange candy melts or warm the orange frosting slightly. Use a toothpick or small piping bag to create carrot noses on each meringue. Use mini chocolate chips or black gel icing for the eyes, and a fine-tipped black gel icing tube for the smiles. For the cheeks, lightly dip a clean, soft brush into pink edible dust and gently dab onto the sides of the snowman’s face for a rosy glow.
- Add snow: Sprinkle generously with sweetened shredded coconut or powdered sugar to create the snowy effect around the base of your snowmen.
- Serve and store: Serve immediately or store in an airtight container at room temperature for up to 3 to 4 days. Enjoy your perfectly shaped, adorable snowman meringues!
Notes
- Ensure all mixing equipment is impeccably clean and grease-free for stable meringue. The slow drying process in the oven is crucial for preventing cracks, weeping, and maintaining crispness.