Bright Lemon Squares: The Secret to Perfectly Moist Bites
You know that feeling when you bite into a lemon square, hoping for that bright, tangy burst and a tender crumb, but instead you get dry disappointment? I’ve certainly been there, and it’s simply the worst!
After countless batches and dedicated recipe testing, I finally cracked the code to making these classic treats perfectly moist and bursting with fresh lemon flavor, every single time. My secret to these truly exceptional Bright Lemon Squares lies in one simple, game-changing step.
Why These Bright Lemon Squares Will Be Your New Favorite
The “Never Dry” Promise: Our Secret Syrup Soak
The hallmark of a truly great lemon square is its unparalleled moistness, and that’s precisely what sets this recipe apart. We achieve this through a unique lemon syrup soak applied immediately after baking.
This critical step ensures the cake base remains incredibly tender and juicy, preventing any dryness often found in traditional recipes. It’s the simple secret to a consistently delightful texture.
A Burst of Sunshine: Flavor That Delights
These Bright Lemon Squares deliver an intense, balanced citrus flavor from every angle. Fresh lemon zest is infused directly into the cake batter, creating a fragrant base.
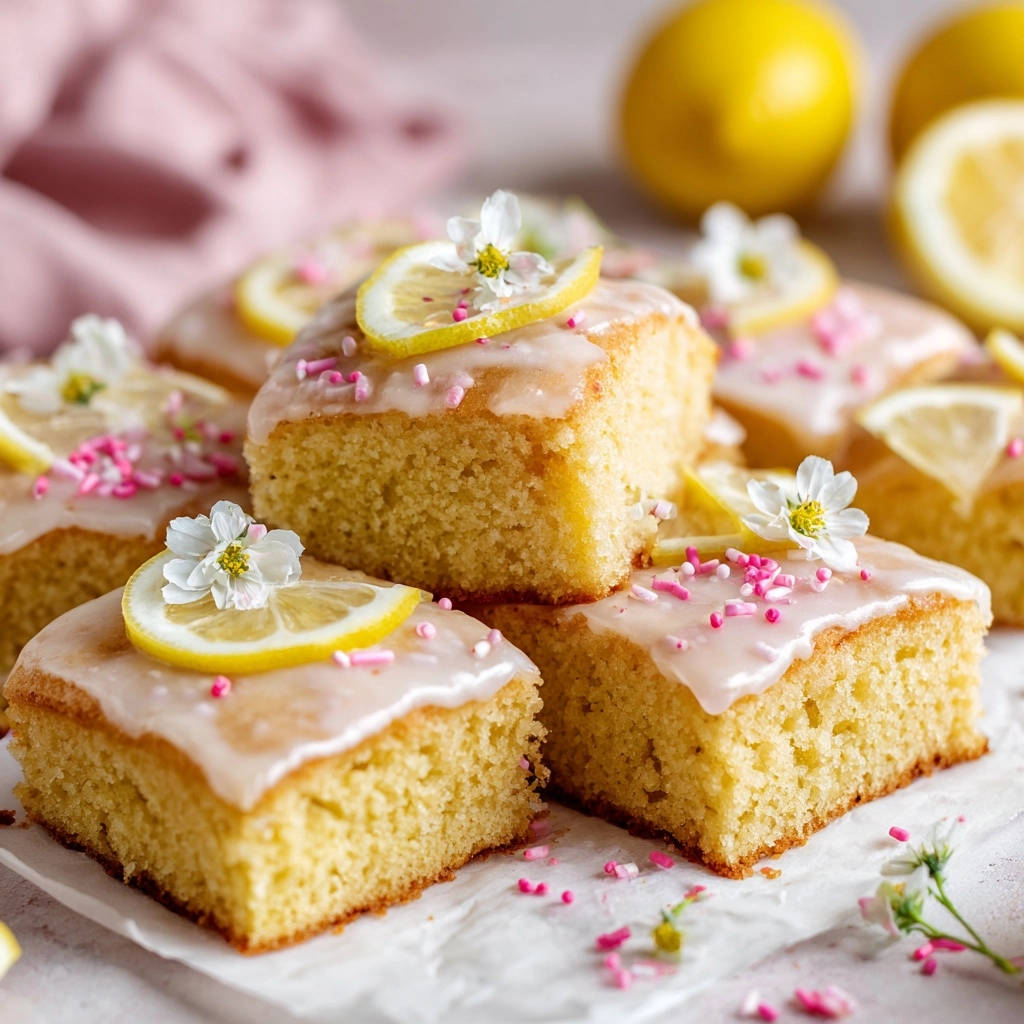
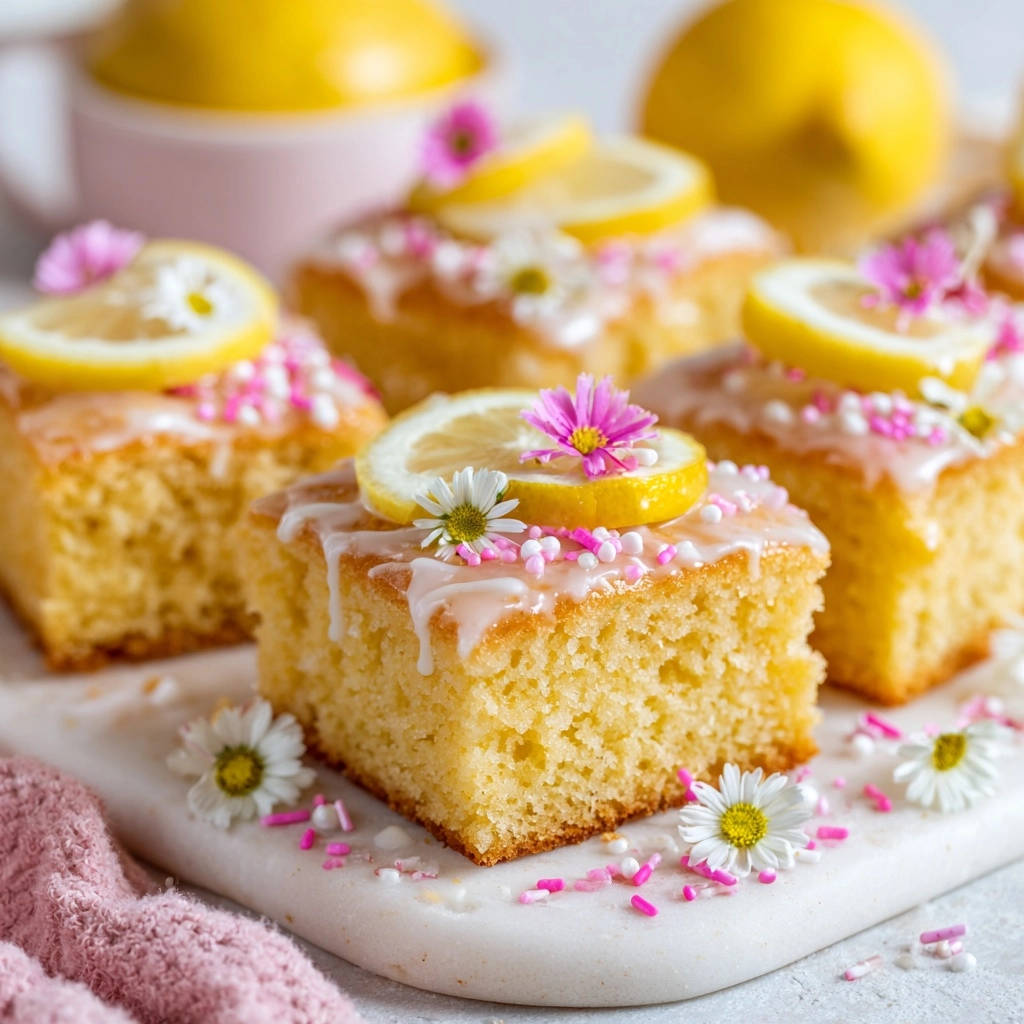
The lemon syrup soak adds another layer of tangy sweetness, permeating every bite of the warm cake. Finally, a vibrant lemon glaze provides a smooth, zesty finish, ensuring a true explosion of sunshine with each taste.
Beyond Basic: A Simple Yet Impressive Treat
Despite their sophisticated flavor and luxurious texture, these lemon squares are surprisingly straightforward to prepare. They look impressive on any dessert table, making them ideal for entertaining or gifting.
Whether you’re hosting a brunch, planning a potluck, or simply craving a delightful homemade treat, these squares are a versatile and rewarding bake for any occasion.
If bright citrus flavors are your thing, you’ll love the same zesty approach used in this golden cherry cobbler.
Gather Your Ingredients: Building Blocks of Zesty Flavor
For the Tender Cake Layer
All-purpose flour, baking powder, and salt form the foundational structure, ensuring a light and airy crumb. The baking powder provides the necessary lift, while salt balances the sweetness.
Granulated sugar contributes sweetness and moisture, crucial for the cake’s tender texture. Unsalted butter, softened, adds rich flavor and helps create a fine, delicate crumb.
Large eggs act as a binder and provide richness, contributing to the cake’s overall structure and moistness. Whole milk adds additional moisture and helps create a smooth batter.
Fresh lemon zest is essential for a potent, aromatic lemon flavor without adding excess acidity. Fresh lemon juice enhances the tanginess and reacts with the baking powder, contributing to the cake’s rise.
The Magic of the Lemon Syrup Soak
This simple yet transformative syrup consists of granulated sugar, fresh lemon juice, and water. When heated, the sugar dissolves, creating a sweet, tangy liquid.
This warm syrup is poured over the hot cake, allowing it to be fully absorbed, ensuring an unbelievably moist and flavorful result that lasts.
Finishing Touches: Glaze & Garnish
The bright white glaze is made from powdered sugar and more fresh lemon juice. This combination creates a smooth, pourable icing with a delightful tangy kick.
Pink sprinkles add a fun pop of color and texture, while thin lemon slices provide an elegant and fresh visual garnish, hinting at the delightful flavor within.
Essential Tools for Bright Lemon Square Success
Having the right tools at hand makes the baking process smoother and more enjoyable. Here are the essentials you’ll need for perfect Bright Lemon Squares:
8×8 inch baking pan: This size ensures the ideal thickness for your squares. Lining it with parchment paper offers effortless removal.
Electric mixer: Essential for creaming butter and sugar until light and fluffy, and for incorporating eggs smoothly into the batter.
Medium and large mixing bowls: Separate bowls for dry and wet ingredients streamline the mixing process and ensure even incorporation.
Whisk: Used for blending dry ingredients and for quickly preparing the smooth lemon glaze.
Small saucepan: Necessary for gently heating the lemon syrup soak until the sugar is fully dissolved.
Wooden skewer or fork: Crucial for poking holes in the warm cake, allowing the lemon syrup to penetrate deeply for maximum moisture.
Wire rack: Provides proper air circulation, allowing the cake to cool completely and evenly before glazing.
Offset spatula (or back of a spoon): Ideal for spreading the glaze smoothly and evenly over the cooled cake, creating a professional finish.
Your Journey to Bright Lemon Squares Perfection: A Detailed Guide
Prepping for Smooth Baking
Begin by preheating your oven to 350 degrees Fahrenheit (175 degrees Celsius). This ensures the oven is at the correct temperature for even baking from the start.
Prepare an 8×8 inch baking pan by greasing and flouring it, or for easy removal, line it with parchment paper, leaving an overhang on two sides. Parchment paper simplifies lifting the cooled cake from the pan.
Crafting the Cake Batter
In a medium bowl, whisk together the all-purpose flour, baking powder, and salt. This step evenly distributes the leavening agent and salt, ensuring consistent texture and flavor.
In a large bowl, use an electric mixer to cream together the softened unsalted butter and granulated sugar until the mixture is light and fluffy. This can take about 2-3 minutes and is crucial for a tender crumb.
Beat in the large eggs one at a time, mixing well after each addition until fully incorporated. Stir in the fresh lemon zest, allowing its vibrant oils to infuse into the batter.
Gradually add the whisked dry ingredients to the wet mixture, alternating with the whole milk and fresh lemon juice. Begin and end with the dry ingredients to maintain proper batter consistency.
Mix only until just combined, being careful not to overmix the batter. Overmixing can develop the gluten, leading to a tougher, less tender cake.
Baking the Golden Base
Pour the prepared cake batter evenly into your prepared baking pan, spreading it gently to the edges. Bake for 25-30 minutes, or until a wooden skewer inserted into the center comes out clean.
A clean skewer indicates the cake is fully cooked through and ready for the next vital step.
The Game-Changing Syrup Soak (Don’t Skip This Step!)
While the cake is baking, prepare your Lemon Syrup Soak. In a small saucepan, combine the 1/4 cup granulated sugar, 1/4 cup fresh lemon juice, and 2 tablespoons water.
Heat this mixture over medium heat, stirring constantly until the sugar dissolves completely. Once dissolved, remove the saucepan from the heat.
Immediately upon removing the warm cake from the oven, use a wooden skewer or a fork to poke holes all over its surface. These holes allow the syrup to penetrate deeply.
Slowly and evenly pour the warm Lemon Syrup Soak over the entire surface of the hot cake. This step is the absolute secret to achieving an incredibly moist, flavorful cake that stays tender for days!
Let the cake cool completely in the pan on a wire rack. This cooling period allows the syrup to fully absorb and the cake to firm up before glazing.
Glazing for a Professional Finish
Once the cake is completely cool to the touch, prepare the Lemon Glaze. In a small bowl, whisk together the 1 1/2 cups powdered sugar and 3-4 tablespoons fresh lemon juice until smooth.
Start with 3 tablespoons of juice and add more drop by drop if needed to reach a pourable yet thick consistency. If the glaze becomes too thin, whisk in a tiny bit more powdered sugar.
Pour the smooth glaze over the cooled cake and spread it evenly with an offset spatula or the back of a spoon, covering the entire surface.
The Art of Garnish and Serving
Before the glaze has a chance to set, sprinkle your desired amount of pink sprinkles over the top for a festive touch. Arrange thin lemon slices artistically on top for an elegant presentation.
Allow the glaze to set completely, which can take anywhere from 30 minutes to an hour, or longer in humid conditions. Once set, use a sharp, warm knife to cut the cake into perfect squares and serve your delightful Bright Lemon Squares.
Mastering Your Bright Lemon Squares: Expert Tips & Tricks
Lemon Zest vs. Juice: Getting it Right
For the most vibrant and aromatic lemon flavor, always use fresh lemons for both zest and juice. The zest carries the concentrated essential oils, providing a deep, fragrant citrus note.
For a perfect pairing, try our Mastering Glazed Lemon Poppy Seed Scones with the Double-Chill Method.
The juice provides the tartness and tang. For another fantastic lemon dessert, consider trying our Zesty Lemon Bundt Cake, which also highlights fresh citrus.
The Golden Rule: Don’t Overmix
Once you add the dry ingredients to the wet, mix only until just combined. Overmixing develops the gluten in the flour, which can lead to a tough, dense cake.
A light hand ensures a tender, melt-in-your-mouth crumb.
Perfecting Your Syrup Soak Application
Poke plenty of holes, evenly spaced, across the entire surface of the warm cake. This ensures the lemon syrup penetrates every part of the cake, not just concentrated areas.
Pour the warm syrup slowly and evenly over the cake, allowing it time to soak in rather than pooling on top. This leads to uniform moisture.
Achieving the Ideal Glaze Consistency
When making the glaze, always start with the minimum amount of lemon juice and add more very gradually, a teaspoon or even a few drops at a time. You want a glaze that’s pourable but still thick enough to coat the cake opaque.
If it’s too runny, it will soak into the cake; if too thick, it won’t spread smoothly.
Cooling Patience: A Virtue for Glazing
It’s absolutely essential that the cake is completely cooled before you apply the glaze. Glazing a warm or even slightly warm cake will cause the glaze to melt, become thin, and absorb into the cake, rather than forming a neat, set layer on top.
Troubleshooting Common Bright Lemon Square Challenges
Why Are My Squares Dry?
The most common culprit for dry lemon squares is skipping or skimping on the critical lemon syrup soak. This step is designed specifically to infuse the cake with moisture.
Overbaking can also lead to dryness. Always check for doneness with a skewer and remove the cake promptly once it comes out clean.
My Glaze is Too Thin/Thick
If your glaze is too thin, it means you’ve added too much liquid. Gradually whisk in small amounts of powdered sugar (a tablespoon at a time) until you reach the desired consistency.
If the glaze is too thick, it needs more liquid. Add fresh lemon juice a tiny bit at a time, perhaps half a teaspoon at a time, whisking well after each addition until it’s smooth and spreadable.
Preventing Crumbly or Dense Squares
Crumbly squares can result from overbaking or an imbalance in ingredients, often too much flour or not enough fat/liquid. Ensure accurate measurements.
Dense squares are typically caused by overmixing the batter, which develops the gluten. Mix only until the ingredients are just combined for a tender crumb.
Enjoying Your Bright Lemon Squares: Serving, Storage & More
Creative Serving Suggestions
These Bright Lemon Squares are delightful on their own, but can be elevated with simple additions. Serve them with a dollop of fresh whipped cream or a scoop of vanilla bean ice cream.
Perfect Pairings for Your Lemon Treats
If you have extra citrus flavor on your mind, these breakfast and brunch items share that bright tang with a softer texture.
- For mornings that echo the same sunny citrus notes, try Lemon Poppy Seed Pancakes — the poppy seeds add a gentle crunch that contrasts nicely with the tender crumb of your lemon squares.
- To round out a brunch spread, Coconut Dream Muffins bring a tropical sweetness that balances the lemon’s acidity, making each bite feel
A side of fresh berries, such as raspberries or blueberries, complements the lemon flavor beautifully. They are also perfect alongside a hot cup of tea or coffee for an afternoon treat.
Storing Your Delicious Squares for Freshness
Once the glaze is fully set, store your lemon squares in an airtight container at room temperature for up to 3 days. For longer freshness, refrigerate them for up to a week.
If refrigerating, bring them to room temperature before serving for the best flavor and texture.
Make-Ahead Tips for Easy Entertaining
You can bake the cake and apply the syrup soak a day in advance, allowing it to cool completely and then covering it tightly overnight. Prepare and apply the glaze on the day of serving for a fresh finish.
For convenience, much like our delicious raspberry crumb bars, the plain cake (without glaze) can also be frozen for up to a month, tightly wrapped, then thawed and glazed when ready to serve.
Bright Lemon Squares FAQ: Your Questions Answered
Can I make these gluten-free?
Yes, you can substitute the all-purpose flour with a 1:1 gluten-free baking flour blend. Be aware that the texture might be slightly different, but the flavor will remain fantastic.
Can I use bottled lemon juice?
While technically possible, I strongly recommend using fresh lemon juice for this recipe. Bottled lemon juice often lacks the vibrant, natural acidity and fresh flavor that is crucial for truly exceptional Bright Lemon Squares.
How do I cut clean squares?
For neat, clean cuts, ensure the glaze is completely set. Use a long, sharp knife. For even cleaner slices, dip the knife in hot water and wipe it clean between each cut.
Can I use a different pan size?
Yes, you can. If using a larger pan (e.g., 9×13 inch), the squares will be thinner, and the baking time will likely be reduced. For a smaller pan, the cake will be thicker, requiring a longer baking time.
Always adjust baking time as needed, checking for doneness with a skewer, as the original recipe is optimized for an 8×8 inch pan.
Share the Sunshine: Your Bright Lemon Squares Await!
These Bright Lemon Squares are more than just a dessert; they’re a little bite of sunshine that promises to brighten any day. With their irresistible moistness and vibrant lemon flavor, they’re sure to become a cherished recipe in your baking repertoire.
Don’t just take my word for it-try this recipe yourself and discover the simple secret to perfectly moist, zesty lemon bars. I can’t wait for you to experience the joy of baking and sharing these delightful treats!
Lemon Squares
Course: DessertCuisine: AmericanDifficulty: mediumServings12
squaresPrep time20
minutesCooking time30
minutesCalories120
kcalTotal time120
minutesTired of dry lemon squares? This recipe cracks the code to perfectly moist and flavorful lemon squares every time, thanks to one simple step. Get ready for a burst of sunshine in every bite of this classic treat.
Ingredients
For the Lemon Squares:
1 1/2 cups all-purpose flour
1 teaspoon baking powder
1/4 teaspoon salt
1 cup granulated sugar
1/2 cup unsalted butter, softened
2 large eggs
1/2 cup whole milk
1 tablespoon fresh lemon zest (from 1-2 lemons)
1 tablespoon fresh lemon juice
For the Lemon Syrup Soak:
1/4 cup granulated sugar
1/4 cup fresh lemon juice
2 tablespoons water
For the Lemon Glaze:
1 1/2 cups powdered sugar
3-4 tablespoons fresh lemon juice (start with 3 and add more if needed)
For Garnish:
Pink sprinkles
Thin lemon slices
Directions
- Preheat your oven to 350 degrees Fahrenheit (175 degrees Celsius). Grease and flour an 8×8 inch baking pan, or line with parchment paper leaving an overhang on two sides for easy removal.
- In a medium bowl, whisk together the flour, baking powder, and salt. Set aside.
- In a large bowl, cream together the softened butter and granulated sugar with an electric mixer until light and fluffy. Beat in the eggs one at a time, mixing well after each addition. Stir in the lemon zest.
- Gradually add the dry ingredients to the wet ingredients, alternating with the milk and lemon juice. Begin and end with the dry ingredients. Mix until just combined, being careful not to overmix.
- Pour the batter evenly into the prepared baking pan. Bake for 25-30 minutes, or until a wooden skewer inserted into the center comes out clean.
- While the cake is baking, prepare the Lemon Syrup Soak. In a small saucepan, combine the granulated sugar, fresh lemon juice, and water. Heat over medium heat, stirring until the sugar dissolves completely. Remove from heat.
- Immediately upon removing the cake from the oven, use the wooden skewer or a fork to poke holes all over the warm cake. Slowly and evenly pour the warm Lemon Syrup Soak over the entire surface of the cake. Let the cake cool completely in the pan on a wire rack. This step is the secret to a perfectly moist cake!
- Once the cake is completely cool, prepare the Lemon Glaze. In a small bowl, whisk together the powdered sugar and fresh lemon juice until smooth. If the glaze is too thick, add a tiny bit more lemon juice; if too thin, add a bit more powdered sugar.
- Pour the glaze over the cooled cake and spread evenly with an offset spatula or the back of a spoon.
- Before the glaze sets, sprinkle with pink sprinkles and arrange thin lemon slices on top for decoration. Let the glaze set before cutting the cake into squares and serving.
Notes
- The lemon syrup soak is the key to incredibly moist squares. Ensure cake cools completely before glazing.