Crispy Garlic Pepper Shrimp: Your Secret to Never-Soggy Perfection
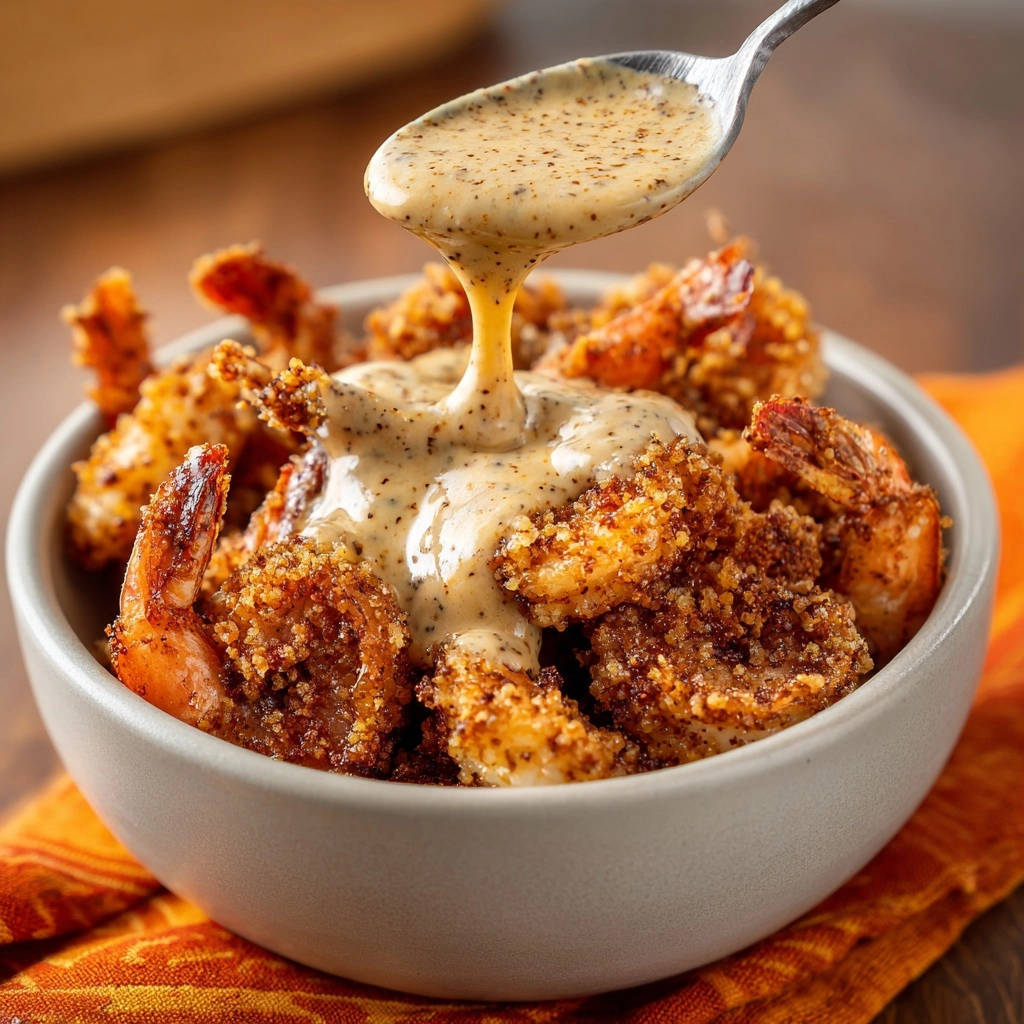
There’s nothing more disheartening than anticipating perfectly crispy shrimp, only to bite into a soggy breading. I’ve been there, struggling with coatings that slip off or turn soft, but I’ve finally mastered a simple trick that locks in that irresistible crunch every single time for this Crispy Garlic Pepper Shrimp recipe.
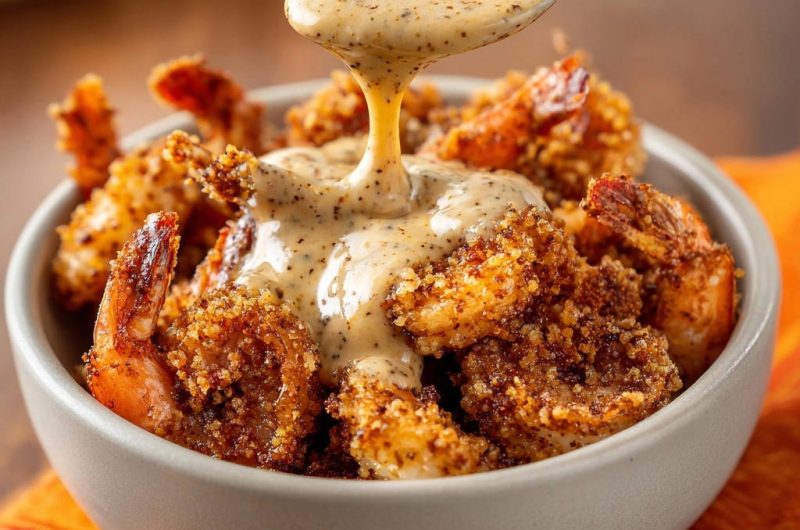
Get ready for a show-stopping dish where the shrimp stays beautifully crispy, even when bathed in a rich, flavorful garlic pepper sauce. This is a homemade shrimp recipe that truly delivers on its promise of unwavering crispiness and incredible flavor.
Why This Crispy Garlic Pepper Shrimp Recipe Stands Out
The Secret to Unwavering Crispiness, Every Time
The magic behind our perfectly crispy shrimp lies in a few critical steps. We focus on meticulously drying the shrimp, mastering the dredging process, and maintaining the ideal oil temperature.
These techniques ensure a golden brown crust that stays crunchy from the first bite to the last, addressing the common frustration of soggy breading.
A Sauce That Elevates, Not Compromises the Crunch
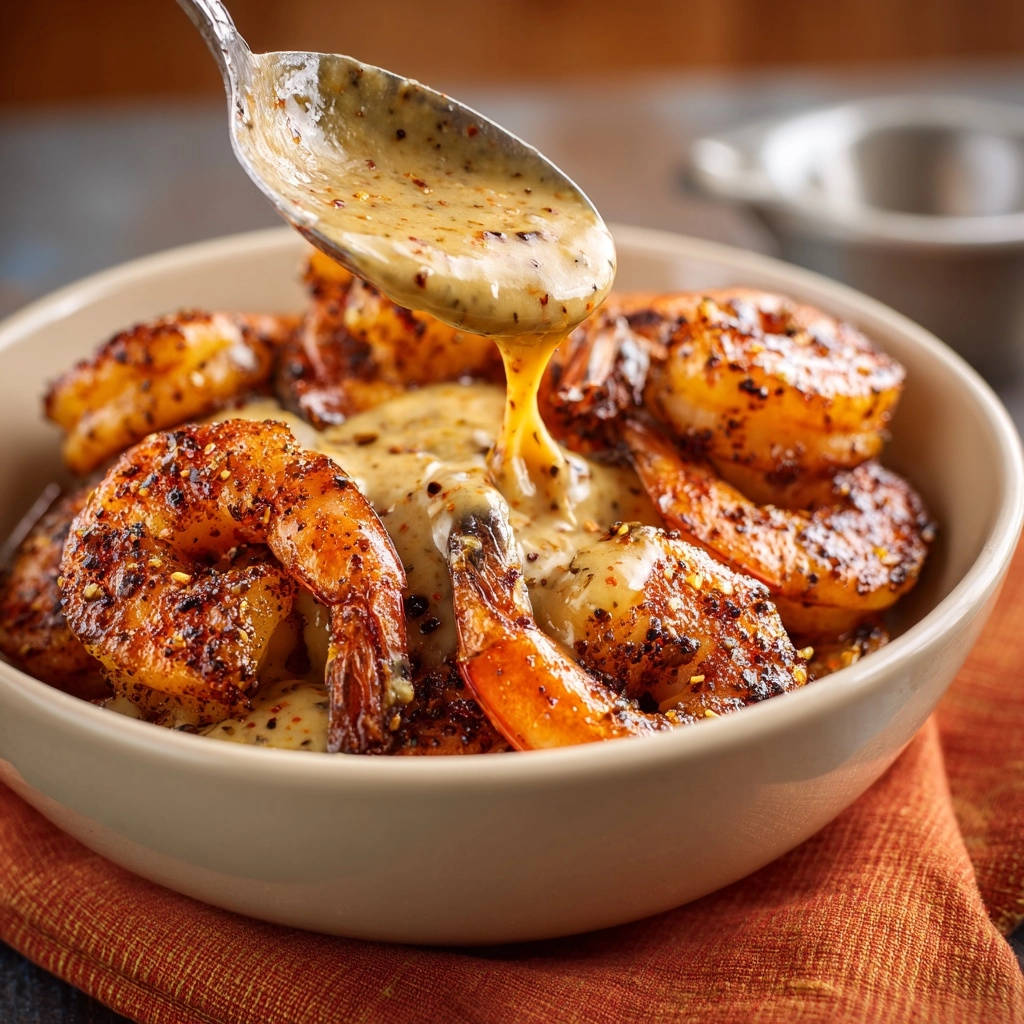
This recipe features a luscious garlic pepper sauce designed to complement, not conquer, the shrimp’s crispiness. Prepared and served warm over the already fried shrimp, it coats each piece beautifully without softening the exterior.
The sauce adds a creamy, peppery depth that elevates the entire dish, creating a balanced and harmonious flavor profile.
Quick Elegance for Weeknights and Special Occasions
Despite its impressive appearance and restaurant-quality taste, this Crispy Garlic Pepper Shrimp comes together surprisingly quickly. It’s perfect for adding a touch of elegance to a busy weeknight meal.
It’s equally suitable for special occasions, sure to impress guests with minimal stress, making it a versatile addition to your culinary repertoire.
The Building Blocks of Flavor: What You’ll Need
Choosing the Perfect Shrimp: Size and Freshness Matter
For the best results, opt for large shrimp, peeled and deveined. You can choose to leave the tails on for presentation and an easier handle, or remove them for effortless eating.
Fresh shrimp will always yield the best flavor and texture, but high-quality frozen shrimp, properly thawed, works beautifully too. Look for plump, firm shrimp with a mild, fresh scent.
Crafting the Irresistible Breading: From Flour to Panko
Our breading starts with all-purpose flour, creating a crucial dry base for adhesion. Beaten eggs act as the binder, allowing the next layer to stick firmly.
The real secret to that phenomenal, enduring crunch comes from using panko breadcrumbs. Their unique flaky, airy texture ensures an extra-crispy exterior that holds up wonderfully, even when sauced.
The Creamy, Peppery Sauce Essentials
Unsalted butter forms the rich base for our sauce, providing a luxurious foundation. Freshly minced garlic is added to infuse a beautiful aroma, but remember to cook it gently to avoid bitterness.
Heavy cream provides the velvety texture and richness that makes this garlic pepper sauce so decadent. Finally, freshly ground black pepper is essential, delivering a vibrant, aromatic kick that defines the flavor of this crispy seafood dish.
Kitchen Essentials for Your Crispy Shrimp Adventure
Frying Vessels: Skillets and Dutch Ovens
A large, deep skillet or a Dutch oven is ideal for frying this crispy garlic pepper shrimp. These types of pans offer ample space and excellent heat retention.
The depth ensures enough oil can be safely heated, while the heavy bottom distributes heat evenly for consistent frying results.
The Unsung Heroes: Thermometers and Draining Racks
An oil thermometer is a non-negotiable tool for achieving perfectly crispy, non-greasy shrimp. It allows you to precisely monitor and maintain the oil temperature between 350-375°F.
A wire rack set over paper towels is equally crucial; it allows excess oil to drain away and air to circulate, preventing the golden brown shrimp from steaming and losing its crispness.
Organizing Your Dredging Station
Set up three shallow dishes in an assembly line fashion: one for seasoned flour, one for beaten eggs, and one for seasoned panko breadcrumbs. This organized approach streamlines the breading process.
Having everything ready allows for efficient and clean breading, leading to perfectly coated, pan-fried shrimp.
Your Path to Crispy Garlic Pepper Shrimp Perfection
- Prepare the Shrimp for Crispiness:
Pat the shrimp exceptionally dry with paper towels. This is a critical step; any moisture prevents the breading from sticking properly and achieving true crispiness.
- Set Up Your Dredging Stations:
In three separate shallow dishes, prepare your flour mixture (with 1/4 tsp salt and 1/8 tsp black pepper), beaten eggs, and seasoned breadcrumbs (1 1/2 cups panko with 1/4 tsp salt and 1/8 tsp black pepper). This assembly line approach makes the process smooth and efficient.
- Dredge Each Shrimp Carefully:
First, coat each shrimp thoroughly in the seasoned flour, shaking off any excess. Next, dip into the beaten egg, allowing any excess to drip off completely.
Finally, coat generously in the seasoned breadcrumbs, pressing gently to ensure a good, even layer. Place the breaded shrimp on a clean plate or baking sheet, ensuring they don’t touch.
- Heat the Frying Oil:
In a large, deep skillet or Dutch oven, heat 3 to 4 cups of vegetable or canola oil over medium-high heat until it reaches 350-375°F. Using an oil thermometer is highly recommended for optimal results and safety, as maintaining the correct temperature is key.
- Fry the Shrimp in Batches:
Carefully add shrimp to the hot oil in small batches, without overcrowding the pan. Fry for 2-3 minutes per side, or until golden brown and cooked through. Overcrowding cools the oil drastically, leading to uneven cooking and soggy shrimp.
Remove cooked shrimp with a slotted spoon and place them on a wire rack set over paper towels to drain excess oil. Keep warm while frying remaining batches, always ensuring the oil returns to temperature.
- Prepare the Garlic Butter Base:
While the last batch of shrimp fries, melt 2 tablespoons of unsalted butter in a small saucepan over medium heat. Add 2 cloves of minced garlic and cook for about 30 seconds until fragrant, taking care not to brown it, which can impart a bitter flavor to your delicate sauce.
- Create the Creamy Pepper Sauce:
Pour in 1 cup of heavy cream and bring to a gentle simmer. Cook for 3-5 minutes, stirring occasionally, until the sauce thickens slightly to a pourable consistency.
Stir in the 1 teaspoon of fresh black pepper and season with salt to taste. Add more pepper if desired for an extra kick of flavor in this luscious garlic pepper sauce.
- Serve Immediately:
Plate the crispy shrimp immediately in a bowl, then generously spoon the warm garlic pepper sauce over the top. Enjoy the satisfying contrast of the crunchy exterior with the creamy sauce, a truly delectable crispy seafood dish!
Unlock Next-Level Crunch: Pro Tips and Tricks
The Golden Rule: Exceptionally Dry Shrimp. This cannot be overstated. Moisture is the enemy of crispiness. Pat your shrimp thoroughly dry, almost to the point of feeling tacky, before dredging, to ensure perfect breading adhesion and maximum crispness.
Why Panko is Your Best Friend for Crispiness. While regular breadcrumbs work, panko’s flaky, airy texture absorbs less oil and creates a significantly crispier crust that lasts longer, even under sauce. It’s the secret to truly outstanding Crispy Garlic Pepper Shrimp.
Temperature Control: The Key to Non-Greasy Frying. Maintain the oil temperature between 350-375°F. Too low, and your shrimp will absorb excess oil and become greasy; too high, and the breading will burn before the shrimp cooks through, preventing that beautiful golden brown finish.
Mastering the Dredging Process. Use one hand for dry ingredients (flour, breadcrumbs) and the other for wet (egg). This “two-hand” method keeps your hands cleaner, prevents clumps of breading from forming, and ensures each piece of pan-fried shrimp is perfectly coated.
Perfecting Your Garlic Sauce: No Burnt Bits Allowed! Cook the garlic just until fragrant, about 30 seconds, ensuring it doesn’t take on any color. Overcooked or browned garlic will impart a harsh, bitter flavor to your delicate cream sauce, ruining its intended richness.
Don’t Overcrowd the Pan. Fry shrimp in small batches to prevent the oil temperature from dropping drastically. A crowded pan leads to uneven cooking, lower oil temperatures, and ultimately, soggy breading that loses its desired crispiness.
Common Crispy Shrimp Quandaries and Their Solutions
“My Shrimp Isn’t Crispy Enough!”
This usually boils down to two factors: insufficient drying of the shrimp or incorrect oil temperature. Ensure your shrimp was thoroughly dry before breading, and your oil temperature was consistently within the 350-375°F range, monitored with a thermometer.
Frying in small batches also helps maintain a high oil temperature for maximum crispiness, preventing the shrimp from becoming greasy and soft.
“The Breading Keeps Falling Off!”
This is often due to wet shrimp, not pressing the breadcrumbs firmly enough onto the shrimp, or trying to move the shrimp too early while frying. Make sure each layer of breading adheres well before moving to the next step or the hot oil.
Gentle handling and ensuring the shrimp is completely coated and pressed will prevent the breading from separating.
“My Sauce is Too Thin/Thick/Lacks Flavor”
If the sauce is too thin, simmer it gently for a few more minutes to reduce and thicken to your desired consistency. If too thick, thin with a splash of warm milk or even a little water.
For flavor, ensure you’re using freshly minced garlic and freshly ground black pepper. Always taste and adjust salt to your preference, as proper seasoning is key to a vibrant garlic pepper sauce.
Elevate Your Meal: Inspired Serving Ideas
Classic Pairings: Rice, Pasta, and Potatoes
This Crispy Garlic Pepper Shrimp pairs beautifully with simple starches that can absorb its delicious sauce. Consider serving it alongside fluffy jasmine or basmati rice, delicate angel hair pasta, or creamy mashed potatoes.
These pairings make for a satisfying and comforting meal, letting the flavors of the shrimp and sauce truly shine.
This same technique for a lasting crunch works beautifully for my crispy fried shrimp recipe, too.
Light and Fresh Sides: Salads and Vegetables
To balance the richness of the crispy seafood and creamy sauce, add some light and fresh sides. A simple green salad with a bright vinaigrette provides a refreshing contrast.
Steamed asparagus or perfectly roasted broccoli also make excellent accompaniments. For another fantastic vegetable option, consider our recipe for crispy baked asparagus to complete your meal.
If you enjoy working with fresh garlic and butter, you’ll want to check out this creamy lemon garlic butter shrimp for a foolproof sauce.
Creative Twists: Tacos, Wraps, and Appetizers
Beyond traditional plates, these golden brown shrimp can be transformed into creative culinary delights. Use them as the star in soft tacos with a fresh slaw, or in light and healthy lettuce wraps.
They also make a fantastic standalone appetizer for parties, served with extra sauce for dipping. This versatility makes it a true homemade shrimp recipe standout.
What to Serve with Garlic Shrimp
Pair these crispy shrimp with something to soak up the garlic butter sauce or add a cheesy, sturdy side that won’t go mushy.
- Soften the bite with Soft Buttery Garlic Herb Dinner Rolls – the
Planning Smart: Make-Ahead and Storage Guidance
Can You Prepare Crispy Shrimp in Advance?
While best served fresh for optimal crispiness, you can bread the shrimp a few hours ahead of time. Keep it uncovered in the refrigerator to prevent moisture build-up.
Fry the breaded shrimp just before serving to achieve that desirable, fresh-fried crunch.
Storing Leftovers Safely
Store any leftover Crispy Garlic Pepper Shrimp and sauce separately in airtight containers. Keep them refrigerated for up to 2-3 days.
Separating the components helps maintain the shrimp’s texture and prevents the sauce from making it soggy during storage.
Reheating for Optimal Crispness
For best results, reheat the shrimp in an air fryer or oven at 350°F (175°C) until warmed through and re-crisped. This method helps restore the crunch.
Avoid the microwave, which can make the shrimp rubbery and soggy. Gently warm the garlic pepper sauce on the stovetop over low heat, stirring occasionally.
Your Crispy Garlic Pepper Shrimp Questions Answered
Can I Use Frozen Shrimp?
Yes, absolutely! Just ensure the frozen shrimp are fully thawed before you begin. Critically, pat them exceptionally dry with paper towels after thawing to remove any excess moisture.
This step is paramount for achieving a truly crispy breading that adheres well.
What About Air Frying or Baking Instead?
While frying yields the ultimate crispiness, you can air fry or bake the breaded shrimp for a lighter option. Air fry at 375°F (190°C) for 8-12 minutes, flipping halfway, until golden and cooked.
Bake at 400°F (200°C) for 15-20 minutes, flipping once. Be aware that the crispness may not be as intense as deep-frying, but it will still be delicious.
Are There Gluten-Free or Dairy-Free Options?
For a gluten-free version, substitute all-purpose flour with a gluten-free all-purpose blend and use gluten-free panko breadcrumbs. For a dairy-free sauce, you can experiment with full-fat coconut milk or a plant-based heavy cream alternative.
Keep in mind that while these substitutions work, they might slightly alter the flavor and texture of the sauce compared to traditional heavy cream.
How Do I Adjust Spice Levels?
The recipe calls for a generous amount of black pepper, providing a mild yet noticeable kick. For more heat, add a pinch of cayenne pepper to the flour mixture or a dash of your favorite hot sauce to the cream sauce.
For a milder flavor, simply reduce the amount of black pepper in both the breading and the sauce to suit your preference.
Ready to Impress? Share Your Culinary Creation!
Now that you’re armed with the secrets to perfectly crispy shrimp and a luscious garlic pepper sauce, it’s time to bring this show-stopping dish to your table. We’re confident this Crispy Garlic Pepper Shrimp recipe will become a treasured favorite, delivering restaurant-quality taste and texture right in your own kitchen.
Don’t forget to share your delicious creations with us on social media! Tag us and let us know how your family and friends devoured every last bite of this pan-fried shrimp masterpiece. Happy cooking!
Shrimp
Course: Main CourseCuisine: AmericanDifficulty: mediumServings4
servingsPrep time25
minutesCooking time20
minutesCalories750
kcalTotal time45
minutesDiscover the secret to irresistibly crispy shrimp that stays crunchy even with a rich sauce. This recipe guides you through preparing perfectly breaded shrimp and pairing it with a creamy, fragrant garlic pepper sauce. Enjoy a restaurant-quality meal made simple at home.
Ingredients
1 pound large shrimp, peeled and deveined, tails on or off
1/2 cup all-purpose flour
1/2 teaspoon salt, divided
1/4 teaspoon black pepper, divided
2 large eggs, beaten
1 1/2 cups plain breadcrumbs (preferably panko for extra crispiness)
3 to 4 cups vegetable oil or canola oil, for frying
2 tablespoons unsalted butter
2 cloves garlic, minced
1 cup heavy cream
1 teaspoon freshly ground black pepper (plus more to taste for sauce)
Directions
- Prepare the Shrimp for Crispiness: Pat the shrimp exceptionally dry with paper towels. Any moisture on the shrimp will prevent the breading from sticking and getting truly crispy.
- Set up your dredging stations. In a shallow dish, combine the flour with 1/4 teaspoon salt and 1/8 teaspoon black pepper. In a second shallow dish, place the beaten eggs. In a third shallow dish, add the breadcrumbs and another 1/4 teaspoon salt and 1/8 teaspoon black pepper, mixing well.
- Dredge each shrimp: first coat thoroughly in the seasoned flour, shaking off any excess. Then dip into the beaten egg, allowing any excess to drip off. Finally, coat generously in the seasoned breadcrumbs, pressing gently to ensure a good, even layer. Place the breaded shrimp on a clean plate or baking sheet.
- Heat the frying oil in a large, deep skillet or Dutch oven over medium-high heat until it reaches 350 to 375 degrees Fahrenheit. An oil thermometer is recommended for best results.
- Fry the shrimp in batches, without overcrowding the pan. Overcrowding will lower the oil temperature and lead to soggy shrimp. Fry for 2 to 3 minutes per side, or until golden brown and cooked through. The key is maintaining that hot oil! Remove the cooked shrimp with a slotted spoon and place them on a wire rack set over paper towels to drain excess oil. Keep warm while you cook the remaining shrimp.
- While the last batch of shrimp is frying, prepare the sauce. In a small saucepan, melt the butter over medium heat. Add the minced garlic and cook for about 30 seconds until fragrant, being careful not to brown it.
- Pour in the heavy cream and bring to a gentle simmer. Cook for 3 to 5 minutes, stirring occasionally, until the sauce thickens slightly. Stir in the 1 teaspoon of fresh black pepper and season with salt to taste. Add more pepper if desired for extra kick.
- Serve the crispy shrimp immediately in a bowl, then generously spoon the warm garlic pepper sauce over the top. Enjoy!
Notes
- An oil thermometer is recommended for best results when frying the shrimp.