Decadent Layered Chocolate Dream Pie: The Anti-Soggy Secret!
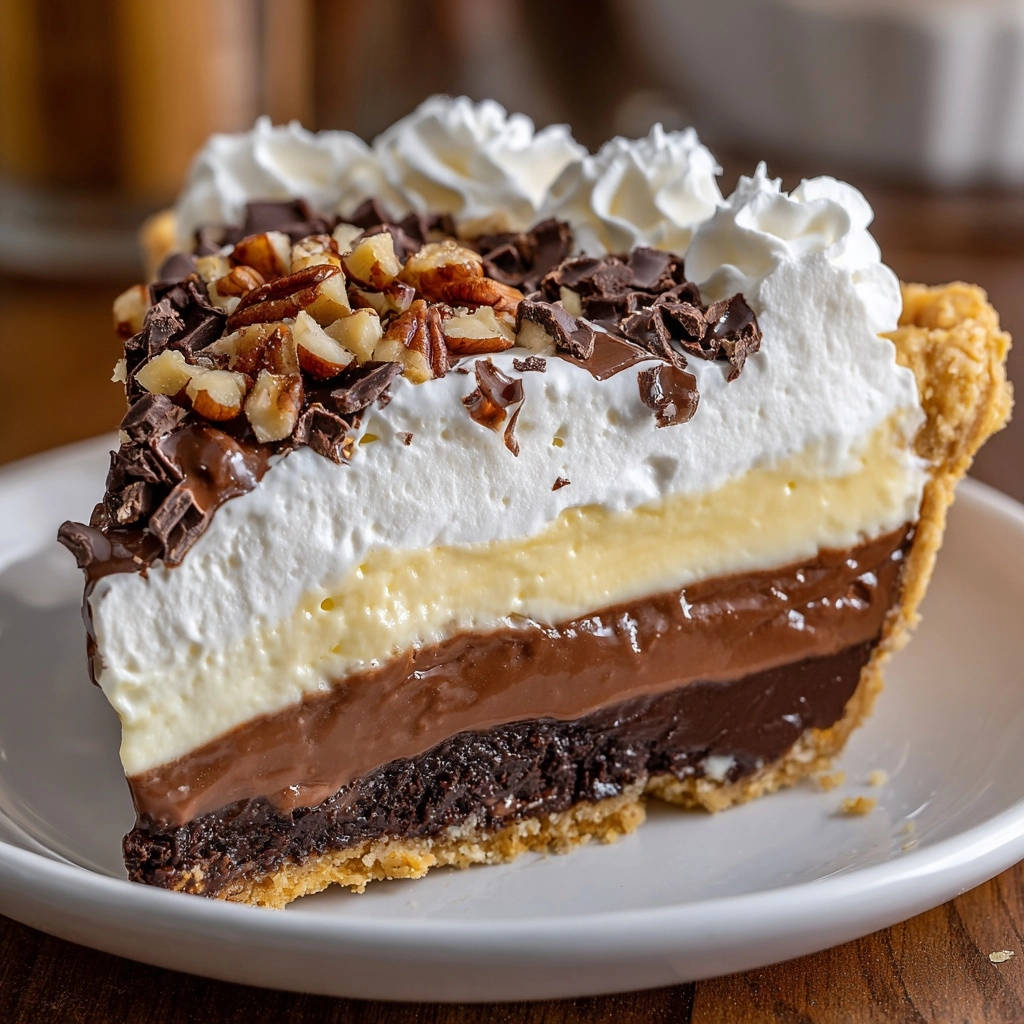
There’s nothing more frustrating than investing time into a beautiful cream pie, only for the crust to turn disappointingly soft and wet. I used to struggle with that too, but I finally cracked the code to keeping that bottom crust perfectly crisp, even under layers of creamy goodness. This specific recipe for Decadent Layered Chocolate Dream Pie isn’t just a dessert; it’s a reliable solution to a common pie challenge, ensuring every slice holds its pristine shape and delightful crunch.
Get ready to create a truly impressive dessert that brings together rich chocolate and creamy vanilla in perfect harmony, guaranteed to be a showstopper at any gathering.
The Secret to Crisp Crusts: Why This Chocolate Dream Pie is a Must-Make
This isn’t just any layered dessert; our Decadent Layered Chocolate Dream Pie boasts several unique advantages that make it a standout.
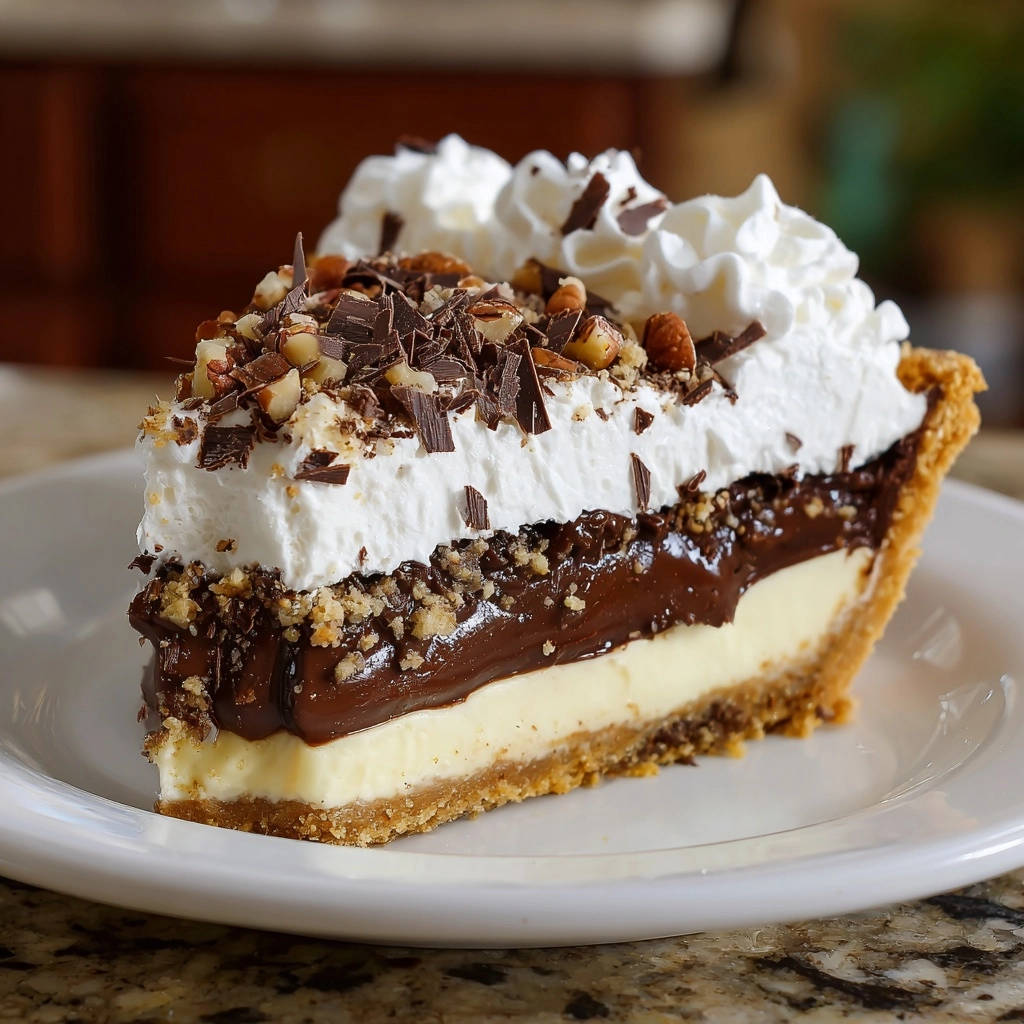
Unlike other recipes, this pie features a crucial “anti-soggy” dark chocolate fudge layer. This innovative barrier acts as a shield, ensuring your graham cracker crust stays perfectly crisp, slice after glorious slice.
The pie combines the best of both worlds: a rich, deep milk chocolate pudding layer perfectly complemented by a smooth, luscious vanilla cream pudding. This creates a balanced flavor profile that appeals to everyone.
Despite its luxurious appearance, this recipe is designed to be approachable for home bakers. With clear, step-by-step guidance, you’ll confidently create a dessert that looks and tastes like it came from a professional patisserie.
The Building Blocks of Bliss: Your Decadent Layered Chocolate Dream Pie Ingredients
Understanding the role of each ingredient is key to mastering this exceptional chocolate pie.
For the Irresistible Graham Cracker Crust
Graham cracker crumbs form the foundational base of our pie. Their subtle honey-vanilla notes provide a perfect counterpoint to the rich chocolate layers.
Granulated sugar contributes to the crispness and golden-brown hue of the baked crust, adding just the right touch of sweetness.
Unsalted butter, melted, binds the crumbs together, ensuring a sturdy and cohesive crust. Using unsalted butter allows you to control the overall saltiness of the pie.
The Anti-Soggy Bottom Solution: Dark Chocolate Fudge Layer
Dark chocolate chips or finely chopped dark chocolate are the stars of this crucial layer. Opt for a good quality dark chocolate (60-70% cocoa) for a rich, intense flavor that isn’t overly sweet.
Heavy cream provides the necessary fat and liquid to create a smooth, emulsified ganache-like consistency. It ensures the fudge layer is glossy and pliable when warm, yet firm when chilled.
A small amount of unsalted butter adds to the richness and contributes to the smooth, luxurious texture of the protective barrier. This entire layer is your secret weapon against a soggy crust, forming an impermeable seal.
Creamy Pudding Perfection: Milk Chocolate and Vanilla
Granulated sugar sweetens both pudding layers, balancing the richness of the chocolate and the creaminess of the vanilla.
Cornstarch is the primary thickening agent for both puddings. It ensures a smooth, stable, and perfectly set pudding texture without any starchy aftertaste. Proper activation is key for pudding success.
Unsweetened cocoa powder is essential for the milk chocolate pudding layer. Choose a high-quality natural cocoa powder for the best, deepest chocolate flavor.
Milk (whole or 2%) provides the liquid base for the puddings. Whole milk will yield a richer, creamier pudding, but 2% works beautifully too.
Unsalted butter stirred in at the end of cooking adds a velvety texture and a luxurious mouthfeel to both pudding layers.
Vanilla extract enhances the flavor profile of both puddings. Use pure vanilla extract for the most authentic and aromatic vanilla notes.
Light-as-Air Whipped Topping & Garnish
Cold heavy cream is non-negotiable for a stable and fluffy whipped topping. Its high-fat content allows it to whip into perfect stiff peaks.
Powdered sugar sweetens the whipped topping and aids in stabilization. Its fine texture dissolves easily, ensuring a smooth finish.
Another touch of vanilla extract in the whipped topping brightens its flavor and complements the pie’s other layers.
If you enjoy the rich chocolate flavor in this pie, try these dark chocolate chunk cookies for another indulgent treat.
For garnish, chopped pecans add a delightful crunch and nutty flavor, while chocolate shavings or finely chopped chocolate provide an elegant finish and extra chocolatey goodness.
Essential Kitchen Gear for Layered Pie Success
Having the right tools makes assembling your layered chocolate dream pie much smoother and more enjoyable.
9-inch Pie Plate: This is fundamental for shaping and baking your crust perfectly to size.
Medium and Small Saucepans: You’ll need these for heating cream for the fudge and cooking the two separate pudding layers. Non-stick is a bonus for easy whisking.
Heatproof Bowls: Essential for melting chocolate and butter for the fudge layer. Glass or stainless steel bowls work well.
Wire Rack: Crucial for cooling the baked crust completely, preventing condensation that could lead to sogginess.
Whisk: An indispensable tool for ensuring smooth, lump-free puddings and perfectly emulsified fudge.
Electric Mixer (Handheld or Stand): While strong arms can manage, an electric mixer is highly recommended for quickly and efficiently whipping the heavy cream to stiff peaks.
Rubber Spatula: Great for scraping bowls clean and gently spreading the pudding layers without disturbing the ones beneath.
Assembling Your Masterpiece: A Guided Tour to Layered Chocolate Pie Perfection
Follow these precise steps to create a flawless Decadent Layered Chocolate Dream Pie.
Crust Creation & Pre-Bake
Combine graham cracker crumbs, granulated sugar, and melted unsalted butter in a medium bowl. Mix thoroughly until the crumbs are uniformly moistened.
Press the mixture very firmly into the bottom and up the sides of a 9-inch pie plate. Use the bottom of a glass or a flat measuring cup to compact it tightly for a sturdy crust.
Bake in a preheated oven at 350 degrees F (175 degrees C) for 8-10 minutes, or until the edges are lightly golden. Baking the crust first adds flavor and helps it stay crisp.
Let the baked crust cool completely on a wire rack before proceeding. This is critical; a warm crust will melt the chocolate fudge layer and compromise its integrity.
The Crucial Anti-Soggy Chocolate Barrier
In a heatproof bowl, combine the dark chocolate chips and 2 tablespoons of unsalted butter. Set aside.
In a small saucepan, heat 1/2 cup of heavy cream over medium heat until it just begins to simmer, with small bubbles forming around the edges. Do not let it boil vigorously.
Pour the hot cream over the chocolate and butter in the heatproof bowl. Let it sit undisturbed for 5 minutes. This allows the hot cream to melt the chocolate and butter effectively.
After 5 minutes, whisk gently from the center outwards until the mixture is completely smooth, glossy, and emulsified. This rich, thick chocolate layer is your secret weapon against a soggy crust.
Once the baked crust is completely cooled, pour this warm chocolate fudge evenly over the bottom. Spread it gently with a rubber spatula, ensuring it covers the entire bottom and extends slightly up the sides, forming a protective barrier.
Refrigerate for at least 30 minutes, or until this chocolate layer is completely set and firm to the touch. This crucial chilling step solidifies the moisture barrier, preventing any liquids from seeping into the crust.
Crafting the Milk Chocolate Pudding Layer
In a medium saucepan, whisk together 1/2 cup granulated sugar, 3 tablespoons cornstarch, and 1/4 cup unsweetened cocoa powder. Whisk well to break up any lumps.
That same citrusy brightness makes these creamy lemon coconut bars a great alternative when you want a crisp crust
Gradually whisk in 2 cups of milk until the mixture is completely smooth and no dry streaks remain. This prevents lumps from forming when heated.
Cook over medium heat, whisking constantly. The mixture will begin to thicken as it heats. Bring it to a gentle boil and continue to boil for 1 minute, still whisking. This ensures the cornstarch is fully activated for proper thickening.
Remove the saucepan from the heat. Immediately stir in 2 tablespoons unsalted butter and 1 teaspoon vanilla extract until fully incorporated and melted.
Pour the warm milk chocolate pudding over the chilled dark chocolate fudge layer in the pie crust. Gently spread to an even layer, being careful not to disturb the fudge below.
Refrigerate for at least 1 hour, or until this layer is fully set and firm enough to support the next one. Patience here ensures clean, distinct layers.
Preparing the Vanilla Cream Pudding Layer
In a separate medium saucepan, whisk together 1/2 cup granulated sugar and 3 tablespoons cornstarch. Gradually whisk in 2 cups of milk until smooth.
Cook over medium heat, whisking constantly, until the mixture thickens and comes to a gentle boil. Boil for 1 minute, continuing to whisk.
Remove from heat and stir in 2 tablespoons unsalted butter and 1 and 1/2 teaspoons vanilla extract until completely smooth.
Pour the warm vanilla cream pudding over the chilled milk chocolate pudding layer in the pie. Gently spread for an even layer, ensuring it covers completely.
Refrigerate for at least 2 hours, or for best results and clean slices, chill the pie for at least 4 hours, or preferably overnight, before adding the whipped topping.
Whipping Up the Fluffy Topping
In a large, well-chilled bowl (stainless steel is ideal), combine 1 and 1/2 cups of very cold heavy cream, 1/4 cup powdered sugar, and 1 teaspoon vanilla extract.
Using an electric mixer, beat on high speed until stiff peaks form. The cream should hold its shape firmly when the beaters are lifted. Be careful not to overbeat, or it will become grainy.
Using a chilled bowl and very cold cream helps achieve stable, airy whipped topping much more quickly and prevents it from deflating.
Final Assembly and Garnish
Once the pie is fully chilled and set (after overnight chilling is truly ideal), gently spread the whipped topping evenly over the top, creating a smooth or swirled finish that reaches the edges of the pie.
Garnish the top generously with chopped pecans and delicate chocolate shavings. These not only add visual appeal but also provide delightful texture with every bite.
Slice the pie using a warm, sharp knife for clean, neat cuts. Wipe the knife clean between each slice for best results. Serve your Decadent Layered Chocolate Dream Pie immediately to enjoy its optimal texture and freshness.
Pro Tips for the Ultimate Decadent Layered Chocolate Dream Pie
Mastering this delicious layered dessert is all about attention to detail. Here are my top secrets for success:
Don’t Rush the Chill: Allowing each layer, especially the dark chocolate fudge, to fully chill and set is paramount for a clean, stable pie and to activate the “anti-soggy” magic. Rushing this step is the most common mistake leading to messy slices or a compromised crust.
Whisk Continuously: When making the pudding layers, constant, vigorous whisking prevents lumps and ensures a perfectly smooth, thick consistency. Don’t step away from the stove during this critical cooking time.
Quality Ingredients Matter: Using good quality chocolate (like a 60-70% cacao bar for melting) and fresh dairy products will significantly enhance the flavor and texture of your pie. Superior ingredients yield superior results.
Chill Your Whipping Bowl: For the best whipped topping, place your mixing bowl (preferably stainless steel) and beaters in the freezer for 10-15 minutes before whipping the cream. This helps the cream whip up faster and hold its shape longer.
What’s Next?
Try these delicious pairings:
For Clean Slices: To achieve perfectly neat portions of your chocolate cream pie, dip your sharp knife in hot water and wipe it clean between each slice. This warms the blade slightly, allowing it to glide through the layers without dragging.
Solving Your Chocolate Pie Conundrums: Quick Fixes
Even expert bakers encounter challenges. Here are solutions to common issues you might face with your homemade pie.
My Pudding Didn’t Set! What Went Wrong?
This often happens if the pudding wasn’t cooked long enough or if the cornstarch wasn’t properly activated. Ensure you bring the mixture to a full boil and boil gently for the specified 1 minute, whisking constantly, before removing from heat.
Also, double-check the freshness of your cornstarch, as it can lose potency over time. If your pudding still seems too thin after cooking, you can try whisking in a very small amount (1-2 teaspoons) of cornstarch mixed with a tablespoon of cold milk, then heating again briefly.
Why Is My Crust Still Soggy?
If your crust is still soggy, it’s likely the dark chocolate fudge layer wasn’t spread adequately, didn’t fully set, or the baked crust wasn’t completely cooled before the fudge was applied. The fudge layer needs to be a continuous, firm barrier right up to the edges of the crust.
Ensure thorough cooling and setting times for maximum protection. Any gap or unchilled spot in the fudge barrier can allow moisture to seep through.
My Chocolate Fudge Layer Seized! How Do I Fix It?
Chocolate seizing (becoming thick, clumpy, and grainy) often occurs from overheating or introducing even a tiny bit of water. If it seizes, don’t despair!
Try adding a very small amount (1 teaspoon at a time) of hot heavy cream or boiling water, stirring vigorously after each addition until it becomes smooth again. Be patient and add liquid very gradually; too much at once will make it thin.
Beyond Baking: Serving, Storing, and Enjoying Your Dream Pie
Now that your stunning Decadent Layered Chocolate Dream Pie is complete, here’s how to best enjoy and preserve it.
Optimal Serving Temperature & Presentation
For the cleanest slices and best texture, serve this pie well-chilled. Allow it to sit at room temperature for just 10-15 minutes before serving for optimal flavor release, but avoid letting it get too warm, which can soften the layers.
Presenting it on a decorative stand or with fresh raspberries or a dusting of cocoa powder alongside can significantly elevate its appeal, making it truly look like a dessert masterpiece.
Storing Leftovers for Maximum Freshness
Store any leftover pie tightly covered with plastic wrap in the refrigerator for up to 3-4 days. This ensures the layers remain firm, the crust stays crisp, and the whipped topping stays fresh and stable.
Can I Make This Decadent Chocolate Pie Ahead of Time?
Absolutely! This rich chocolate pie is an excellent make-ahead dessert, making it perfect for entertaining. You can prepare the entire pie (crust, fudge, and both pudding layers) a day or even two days in advance and chill it thoroughly overnight.
Add the whipped topping and garnish just before serving for the freshest look and texture. This allows you to spread out the prep work and enjoy your gathering.
For another delightful make-ahead dessert idea that’s perfect for a crowd, consider these Chocolate Crumb Cheesecake Bars.
Your Most Asked Questions About This Decadent Chocolate Pie, Answered
I often hear these questions from fellow chocolate pie enthusiasts:
Can I Use a Different Type of Crust?
While the graham cracker crust is traditional and holds up beautifully, you could experiment with an Oreo crust for an even more intense chocolate flavor, or even a shortbread crust for a buttery contrast. Just be sure to pre-bake and cool it completely, and still apply the dark chocolate fudge barrier to prevent sogginess.
Are There Dairy-Free Substitutions for This Pie?
Some components can be substituted to make this pie dairy-free. You can use plant-based milk (like almond, soy, or oat milk) for the pudding layers, though the texture might be slightly less rich. Dairy-free heavy cream substitutes are also available for the whipped topping.
Ensure your chocolate chips or chopped chocolate are certified dairy-free, and use a plant-based butter alternative for the crust and fudge layer. The resulting pie will still be delicious, though with subtle textural differences.
Can I Freeze Decadent Layered Chocolate Dream Pie?
While technically possible, freezing is generally not recommended for this creamy pie. Freezing can affect the texture of the pudding layers and the whipped topping, potentially making them watery or grainy upon thawing.
This pie is best enjoyed fresh and chilled from the refrigerator. If you’re looking for a dessert that freezes well, you might consider a different type of treat, perhaps like Decadent Pumpkin Pie Truffles which hold up beautifully in the freezer.
Ready to Impress? Share Your Decadent Layered Chocolate Dream Pie!
Now that you’re equipped with all the secrets to a perfectly crisp crust and luscious, distinct layers, it’s time to create your own Decadent Layered Chocolate Dream Pie masterpiece. This showstopper is guaranteed to earn rave reviews and become a treasured recipe in your collection, proving that a soggy crust is a thing of the past.
We’d love to see your creations! Share your photos and tag us on social media, or leave a comment below to tell us how your pie turned out. Happy baking and happy eating!
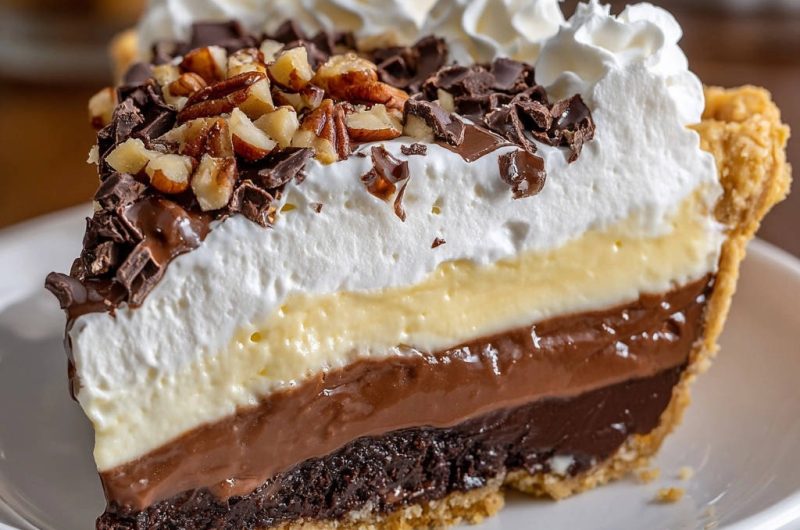
Chocolate Dream Pie
Course: DessertCuisine: AmericanDifficulty: medium8
servings45
minutes30
minutes550
kcal75
minutesThis Decadent Layered Chocolate Dream Pie features a genius ‘anti-soggy bottom’ dark chocolate fudge layer, ensuring a perfectly crisp crust. It’s layered with rich milk chocolate and smooth vanilla cream puddings, all crowned with fluffy whipped topping. A truly impressive and delicious dessert that holds up beautifully, perfect for any special occasion.
Ingredients
For the Graham Cracker Crust:
1 and 1/2 cups graham cracker crumbs (about 10-12 full sheets)
1/4 cup granulated sugar
6 tablespoons unsalted butter, melted
For the Dark Chocolate Fudge Layer (The Anti-Soggy Bottom Solution):
1 cup dark chocolate chips or finely chopped dark chocolate
1/2 cup heavy cream
2 tablespoons unsalted butter
For the Milk Chocolate Pudding Layer:
1/2 cup granulated sugar
3 tablespoons cornstarch
1/4 cup unsweetened cocoa powder
2 cups milk (whole or 2%)
2 tablespoons unsalted butter
1 teaspoon vanilla extract
For the Vanilla Cream Pudding Layer:
1/2 cup granulated sugar
3 tablespoons cornstarch
2 cups milk (whole or 2%)
2 tablespoons unsalted butter
1 and 1/2 teaspoons vanilla extract
For the Whipped Topping:
1 and 1/2 cups cold heavy cream
1/4 cup powdered sugar
1 teaspoon vanilla extract
For Garnish:
1/2 cup chopped pecans
1/4 cup chocolate shavings or finely chopped chocolate
Directions
- Prepare the Crust: In a medium bowl, combine the graham cracker crumbs, 1/4 cup granulated sugar, and 6 tablespoons melted butter. Press the mixture firmly into the bottom and up the sides of a 9-inch pie plate. Bake in a preheated oven at 350 degrees F (175 degrees C) for 8-10 minutes, or until lightly golden. Let cool completely on a wire rack.
- Make the Dark Chocolate Fudge Layer (The Anti-Soggy Bottom): In a heatproof bowl, combine the dark chocolate chips and 2 tablespoons butter. In a small saucepan, heat the 1/2 cup heavy cream over medium heat until it just begins to simmer. Pour the hot cream over the chocolate and butter. Let sit for 5 minutes, then whisk gently until smooth and glossy. This rich, thick chocolate layer is your secret weapon against a soggy crust. Once the crust is completely cooled, pour this warm chocolate fudge evenly over the bottom of the baked crust, spreading it right up to the edges. This forms a protective barrier. Refrigerate for at least 30 minutes, or until completely set and firm. This crucial step prevents moisture from the puddings from seeping into the crust.
- Prepare the Milk Chocolate Pudding Layer: In a medium saucepan, whisk together 1/2 cup granulated sugar, 3 tablespoons cornstarch, and 1/4 cup cocoa powder. Gradually whisk in 2 cups milk until smooth. Cook over medium heat, whisking constantly, until the mixture thickens and comes to a boil. Boil gently for 1 minute, continuing to whisk. Remove from heat and stir in 2 tablespoons butter and 1 teaspoon vanilla extract. Pour the milk chocolate pudding over the chilled dark chocolate fudge layer. Gently spread to an even layer. Refrigerate for at least 1 hour, or until set.
- Prepare the Vanilla Cream Pudding Layer: In a separate medium saucepan, whisk together 1/2 cup granulated sugar and 3 tablespoons cornstarch. Gradually whisk in 2 cups milk until smooth. Cook over medium heat, whisking constantly, until the mixture thickens and comes to a boil. Boil gently for 1 minute, continuing to whisk. Remove from heat and stir in 2 tablespoons butter and 1 and 1/2 teaspoons vanilla extract. Pour the vanilla cream pudding over the chilled milk chocolate pudding layer. Gently spread to an even layer. Refrigerate for at least 2 hours, or until fully set. For best results and clean slices, chill the pie for at least 4 hours, or preferably overnight, before adding the whipped topping.
- Make the Whipped Topping: In a large, chilled bowl, combine the cold heavy cream, powdered sugar, and vanilla extract. Beat with an electric mixer on high speed until stiff peaks form.
- Assemble and Garnish: Once the pie is fully chilled and set, spread the whipped topping evenly over the top. Garnish with chopped pecans and chocolate shavings. Slice and serve immediately. Store any leftover pie in the refrigerator.
Notes
- Ensure each layer is fully chilled before adding the next for optimal setting.