Mastering Glazed Cherry Cheesecake Bars with a Crisp Crust
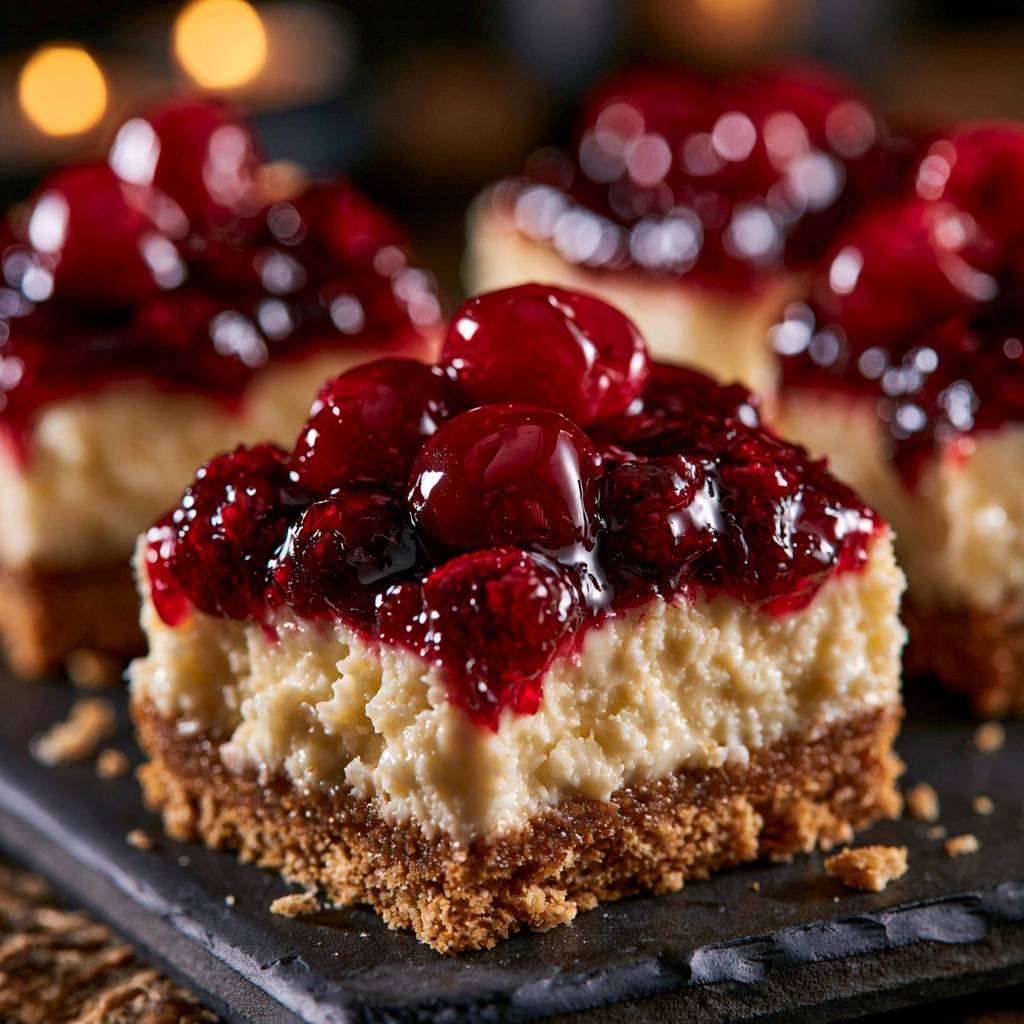
Imagine biting into a dessert where the first thing you notice is a distinct, buttery snap. That crunch immediately gives way to a silky, velvet-smooth cream cheese layer, followed by the bright, tangy burst of a glossy cherry glaze. Most people struggle with fruit-topped bars because the crust ends up as a soggy, weeping mess that can’t support the weight of the filling. These Glazed Cherry Cheesecake Bars solve that problem entirely by focusing on structural integrity and moisture control.
The secret to this recipe lies in the architecture of the base. We aren’t just tossing crumbs into a pan; we’re building a moisture-proof barrier that stays crisp for days. By using a specific ratio of graham cracker crumbs to butter and employing a double-bake technique, you ensure the crust remains the star of the show rather than a mushy afterthought. It’s the perfect balance of textures that makes these bars feel like they came from a high-end bakery.
To get that professional finish, you must ensure your cream cheese is truly soft before you start. If you feel even a slight chill or firmness when you press the wrapper, your filling will have tiny lumps that no amount of whisking can fix. I always leave my ingredients on the counter for at least two hours. This patience pays off with a filling so smooth it practically melts on your tongue.
The Architecture of a Non-Soggy Graham Base
A soggy bottom is the ultimate enemy of the cheesecake bar. Therefore, we use a generous two cups of graham cracker crumbs to create a thick, sturdy foundation. Many recipes skimp on the crust, but a thin base lacks the strength to resist the moisture migrating from the cheesecake layer above. By increasing the volume of crumbs, we create a dense mat that can handle the heavy cherry topping without buckling.
The “Double-Bake” method is your best friend here. Firstly, you bake the crust alone for 12 minutes. This step does more than just cook the dough; it toasts the crumbs and caramelizes the sugar, which effectively “seals” the surface. This toasted layer acts as a shield, preventing the wet cheesecake batter from soaking into the crackers during the second trip to the oven. Without this initial bake, the butter and sugar remain soft, allowing the filling to seep down and turn the base into a paste.
Furthermore, the ratio of half a cup of butter to two cups of crumbs is intentional. You want the mixture to feel like wet sand that holds its shape when squeezed in your palm. This amount of fat ensures that every single crumb is coated, creating a waterproof environment. When that butter hits the heat of the oven, it binds with the sugar to create a crisp, candy-like shell that maintains its “snap” even after 48 hours in the refrigerator.
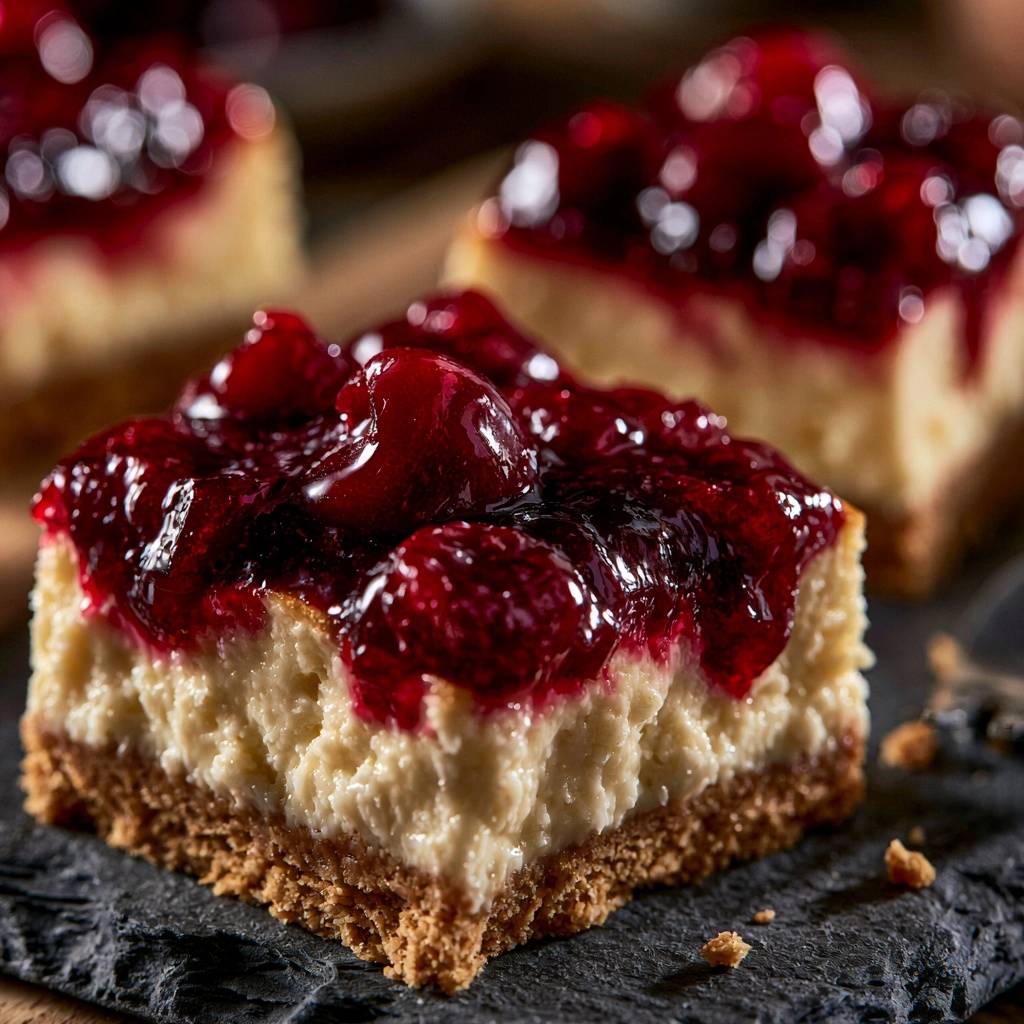
Selecting the Right Graham Cracker Crumbs
While pre-packaged crumbs are convenient, they are often ground into a very fine powder. This can lead to a crust that is too dense or sandy. If you have the time, pulsing whole graham crackers in a food processor allows you to keep a few slightly larger bits, which adds a rustic, homemade texture. However, if you use store-bought crumbs, just be sure to pack them down firmly to avoid a crumbly mess when slicing.
You can also play with the flavor profile by choosing different cracker varieties. Honey-flavored grahams provide a classic, mellow sweetness that complements the tart cherries perfectly. On the other hand, cinnamon grahams add a warm, spicy note that makes the whole dessert feel a bit more like a cozy autumn treat. Whichever you choose, consistency in the grind is key for an even bake.
The Role of Fat in Structural Integrity
Unsalted butter is the gold standard for this recipe because it allows you to control the salt content of the crust. When you melt the butter, let it cool slightly before mixing it with your crumbs. If the butter is boiling hot, it can dissolve the sugar too quickly, leading to a greasy base. You want the butter to act as a glue, not a liquid bath.
As the butter cools during the mixing process, it begins to coat the sugar granules. During the first bake, this mixture undergoes a mini-transformation where the sugar melts and then resets as it cools. This creates a structural lattice that holds the graham crumbs in place, ensuring your bars don’t fall apart the moment they are lifted from the pan.
Essential Components for the Creamy Filling
For a truly decadent filling, you must use 16 ounces of full-fat brick cream cheese. Avoid the whipped versions or the spreads sold in plastic tubs; these contain extra air and stabilizers that will ruin the density of your bars. The goal is a rich, New York-style consistency that stands tall against the cherry glaze. Full-fat cream cheese provides the necessary structure to ensure the bars are sliceable and firm.
Temperature is the most critical factor in the filling’s success. Your cream cheese, eggs, and sour cream must all be at room temperature. When ingredients are at the same temperature, they emulsify effortlessly. If you add cold eggs to warm cream cheese, the fat will seize up, creating those dreaded white lumps. A smooth emulsion is the only way to achieve that “melt-in-the-mouth” texture we’re after.
In addition to temperature, the way you handle the batter matters. You want to beat the cream cheese and sugar until they are aerated and fluffy, but once the eggs go in, you must slow down. Over-beating at the end introduces too much air, which causes the cheesecake to rise like a souffle and then collapse, leaving deep cracks on the surface.
Why Sour Cream Changes the Texture
Sour cream is the secret ingredient that elevates these bars from good to great. The high fat content adds a luxurious creaminess, while the natural acidity softens the proteins in the cream cheese. This results in a texture that is silky rather than rubbery. It also provides a subtle tang that balances the heavy sweetness of the sugar and the cherry topping.
If you find yourself without sour cream, full-fat Greek yogurt is a decent substitute. However, sour cream is preferred for its higher fat-to-water ratio. This ensures the filling remains stable and doesn’t release excess moisture into the crust as it sets. It’s that extra bit of fat that gives the bars their professional, decadent mouthfeel.
Egg Incorporation and Aeration Limits
When it’s time to add the eggs, do it one at a time. Use the lowest speed on your mixer or, better yet, whisk them in by hand. You are looking to incorporate them just until the yellow streaks disappear. This prevents excess air bubbles from forming in the batter. If you see bubbles on the surface after pouring the batter into the pan, gently tap the pan on the counter to pop them.
Limiting aeration is the best way to prevent the cheesecake from “doming” in the oven. A flat, level surface is essential because it provides a stable stage for the cherry glaze. If the center sinks or the edges rise too high, the cherries will pool in the middle rather than spreading evenly across the top.
Engineering the High-Gloss Cherry Glaze
To get that stunning, “bakery-window” shine, we don’t just pour the cherry filling straight from the can. Instead, we enhance a 21-ounce can of premium cherry pie filling with a little bit of lemon juice and cornstarch. The lemon juice provides a necessary hit of acid that cuts through the sugar, making the cherry flavor pop. It also helps to brighten the color of the fruit.
The cornstarch is the real hero of the glaze. By whisking a small amount into the filling, you ensure the sauce is thick enough to stay put. This prevents the red syrup from running down the sides of the white cheesecake when you cut into it. You want the cherries to look like they are suspended in a clear, ruby-red gel that holds its shape perfectly on every square.
Step-by-Step: Building the Layers
Building these bars is a three-phase process that requires patience. Firstly, you’ll tackle the crust. After pressing the graham mixture into your lined 8×8 pan, bake it at 325°F for 12 minutes. You’ll know it’s ready when the kitchen smells like toasted cookies and the edges are a shade darker than the center. Let this cool for at least 10 minutes before adding the filling.
Secondly, pour your smooth cream cheese batter over the par-baked crust. Return it to the oven for 30 to 35 minutes. This is where you need to watch for the “slight jiggle.” The edges should be puffed and set, but the very center should still wobble slightly when you gently shake the pan. Don’t worry; it will finish setting as it cools. Over-baking at this stage is the leading cause of dry, crumbly cheesecake.
The final phase is the cooling plateau, which is arguably the most important part of the entire recipe. Once the bars come out of the oven, they need to sit at room temperature for at least an hour. This slow cooling prevents the cheesecake from shrinking too quickly and cracking. Only after they are completely cool should you add the cherry glaze and move them to the fridge for the long chill.
Preparing the Pan for Easy Removal
Never rely on just greasing the pan for cheesecake bars. The fruit topping is heavy and sticky, making it nearly impossible to lift pieces out without a “sling.” Line your pan with parchment paper, leaving about two inches of overhang on two opposite sides. These “handles” allow you to lift the entire block of chilled cheesecake out of the pan in one go.
This method is the only way to get those perfectly clean, sharp edges. Once the block is on a flat cutting board, you have full control over your knife. It also prevents you from scratching your baking pans with a blade. Just make sure the bars are fully chilled before you attempt the lift, or the crust might crack.
The Critical Room-Temperature Cooling Phase
If you take one thing away from this guide, let it be this: never top a hot cheesecake with fruit. If the cheesecake is still warm, it is still releasing steam. Adding a layer of cherry glaze on top traps that steam, which has nowhere to go but down. This moisture will travel straight through the cheese and soak into your crust, undoing all the hard work of your par-bake.
Wait at least 60 minutes before applying the glaze. This allows the internal structure of the cheesecake to firm up and the surface temperature to drop. This patience ensures that the boundary between the white cheesecake and the red cherries remains sharp and distinct, rather than becoming a blurry, pink mess.
Troubleshooting Common Cheesecake Bar Failures
Even experienced bakers run into trouble sometimes. One common issue is the cheesecake sticking to the parchment paper on the sides. If this happens, simply run a thin, plastic spatula or a butter knife around the edge of the pan while the bars are still slightly warm. This releases the grip and prevents the cheesecake from pulling and cracking as it cools and shrinks.
Another frequent headache is a crust that crumbles when sliced. This usually happens if the crust wasn’t packed down firmly enough. When you are preparing the base, use the bottom of a flat measuring cup or a heavy glass to press the crumbs into the corners. You want a solid, compacted layer that feels like a single piece of wood rather than a pile of sand.
Preventing Surface Cracks and Sinkholes
Cracks are usually caused by two things: over-mixing or temperature shocks. To avoid temperature shock, never open the oven door during the first 25 minutes of baking. Every time you open the door, the temperature drops significantly, which can cause the cheesecake to fall. If you do see a small crack, don’t panic! The cherry glaze is the perfect “makeup” to hide any surface imperfections.
If your cheesecake sinks significantly in the middle, it likely means it was under-baked or had too much air beaten into it. Ensure your oven is calibrated correctly using an oven thermometer. Most home ovens are off by 10 to 25 degrees, which can make a huge difference in a delicate bake like this.
Fixing a Runny Fruit Topping
If your cherry filling looks particularly watery when you open the can, you can fix it on the stovetop. Mix the lemon juice and cornstarch into the filling in a small saucepan. Heat it over medium-low for about 3 minutes until it bubbles and thickens into a heavy syrup. Let this mixture cool completely before spreading it over your bars. This extra step ensures the topping stays on the bar and doesn’t end up on the plate.
Slicing Techniques for Professional Results
To get those stunning, clean layers, you need to use the “Hot Knife” method. Run a long, sharp chef’s knife under hot tap water for a few seconds, then wipe it completely dry with a clean towel. The heat from the blade will glide through the cold cream cheese like butter, preventing it from sticking and tearing.
Crucially, you must wipe the blade clean and re-heat it between every single cut. If you don’t, the red cherry syrup from the first cut will smear all over the white cheesecake of the second cut. It takes a little extra time, but the visual result is a tray of bars that look like they were prepared by a professional pastry chef.
Storage and Make-Ahead Logistics
These bars are actually better the second day, making them the ultimate make-ahead dessert. The flavors have time to meld, and the crust fully sets into its final, crisp form. You can store them in an airtight container in the refrigerator for 3 to 5 days. Just be sure to keep them covered so they don’t pick up any “fridge smells” from other foods.
If you want to freeze them, it is best to do so without the cherry glaze. Wrap the plain cheesecake bars tightly in plastic wrap and foil; they will stay fresh for up to a month. When you’re ready to serve, thaw them in the fridge overnight and add the fresh cherry topping just before slicing. Freezing the cherries can sometimes change their texture and make the glaze look cloudy once thawed.
Expert Tips for Recipe Success
- Use a flat-bottomed tool: When packing your crust, a flat measuring cup or the bottom of a straight-sided glass works much better than your fingers. It ensures an even thickness across the entire pan, which prevents hot spots and uneven baking.
- Premium vs. Standard Filling: Look for “Premium” pie filling on the label. These usually contain more whole fruit and less “gel” filler. The whole cherries provide a much better texture and a more impressive look for the final bars.
- The Room Temp Test: To check if your cream cheese is ready, press it with your finger while it’s still in the foil. It should give way easily with zero resistance. If it feels firm in the center, it needs more time.
- Lemon Juice is Essential: Don’t skip the lemon juice in the glaze. It provides a necessary brightness that cuts through the heavy fats of the cream cheese and the sugar of the cherries, making the whole dessert feel lighter.
- Pan Material Matters: If you are using a glass baking dish, you may need to reduce the oven temperature by 25 degrees or shorten the bake time by 5 minutes, as glass retains heat more intensely than metal.
How should I store these bars and can they be frozen?
You should store these bars in an airtight container in the refrigerator, where they will stay fresh and delicious for 3 to 5 days. Because of the dairy content, they should never be left at room temperature for more than two hours. If you want to freeze them, I recommend freezing the cheesecake bars without the cherry topping. Wrap the chilled bars tightly in plastic wrap and then a layer of aluminum foil. They will keep well for up to a month. When you are ready to eat, thaw them in the refrigerator overnight and add the cherry glaze just before serving to maintain the best texture and appearance.
Why did my cheesecake bars crack on top?
Cracking is usually caused by over-mixing the batter or over-baking the bars. When you beat the eggs into the cream cheese at a high speed, you incorporate too much air. That air expands in the oven, causing the bars to rise, and then they crack as they cool and shrink. To prevent this, always mix on low speed once the eggs are added. Additionally, make sure to pull the bars out of the oven while the center still has a slight jiggle. If the center is firm and puffed, they are likely over-baked, which leads to a dry texture and surface cracks.
Can I use a different fruit topping for this recipe?
Absolutely! While cherry is the classic choice, this stable cheesecake base works beautifully with almost any fruit topping. You can substitute the cherry pie filling with blueberry, raspberry, or even apple pie filling. If you want to use fresh fruit, you can make a quick compote by simmering 2 cups of fresh berries with 1/4 cup sugar, a splash of lemon juice, and a cornstarch slurry (1 teaspoon cornstarch mixed with 1 teaspoon water) until thickened. Just remember the golden rule: always let the fruit topping cool completely before spreading it over the cheesecake layer.
What can I use if I don’t have graham crackers?
If you can’t find graham crackers, you can easily substitute them with vanilla wafers, digestive biscuits, or even gingersnaps for a spicy twist. The key is to maintain the same volume of crumbs (2 cups). If you use a sweeter cookie like vanilla wafers, you might want to reduce the sugar in the crust by a tablespoon to keep it from becoming overly sweet. The butter ratio remains the same, as you still need that fat to bind the crumbs together and create the moisture-proof seal.
Why is my crust still crumbly after baking?
A crumbly crust usually happens for one of two reasons: either the crumbs weren’t packed down firmly enough or there wasn’t enough butter to bind them. When you press the mixture into the pan, you really need to put some muscle into it. Use a flat-bottomed object to compress the crumbs until they feel like a solid sheet. If you find your specific brand of crackers is very dry, you can add an extra tablespoon of melted butter to the mix. The final texture should resemble wet sand that clumps together easily when pressed.
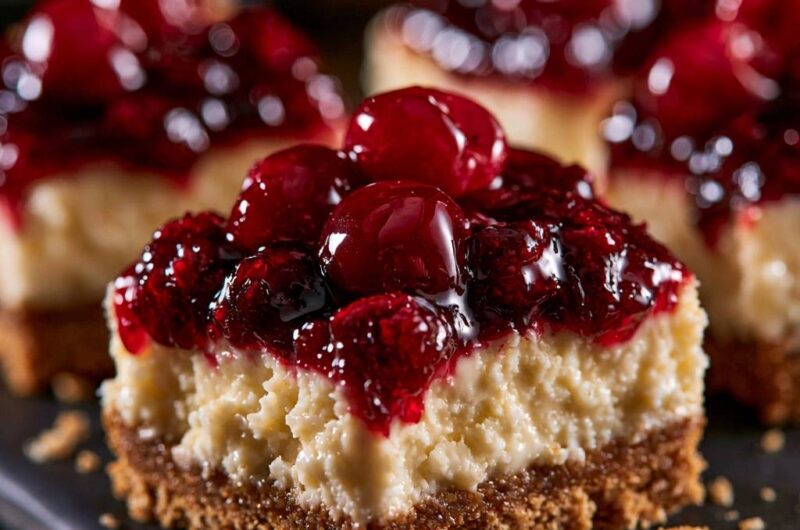
Glazed Cherry Cheesecake Bars
Course: DessertCuisine: AmericanDifficulty: easy12
bars20
minutes45
minutes65
Minutes310
kcalAmerican
Ingredients
2 cups graham cracker crumbs (increased for the thick, stable base pictured)
1/2 cup unsalted butter, melted
1/4 cup granulated sugar
16 ounces cream cheese, softened to room temperature
1/2 cup granulated sugar (for filling)
2 large eggs, room temperature
1 teaspoon vanilla extract
1/4 cup full-fat sour cream
21 ounces premium cherry pie filling (with whole cherries)
1 tablespoon lemon juice
1/2 teaspoon cornstarch (to thicken the glaze for that high-gloss, stable look)
Directions
- Preheat your oven to 325°F (165°C) and line an 8×8 inch baking pan with parchment paper, leaving an ample overhang on the sides for easy lifting.
- In a bowl, combine graham cracker crumbs, 1/4 cup sugar, and melted butter. Stir until it resembles wet sand. Press the mixture firmly and evenly into the bottom of the pan using the bottom of a flat measuring cup.
- The First Bake: Bake the crust alone for 12 minutes. This “toasts” the crumbs and creates a structural seal that prevents the cheesecake batter from soaking in. Remove from the oven and let it cool for 10 minutes.
- While the crust cools, beat the softened cream cheese and 1/2 cup sugar until completely smooth and aerated. Add eggs one at a time, beating on low speed just until incorporated. Fold in the vanilla and sour cream by hand to avoid over-mixing, which causes cracking.
- Pour the cheesecake batter over the pre-baked crust. Bake for 30 to 35 minutes until the edges are slightly puffed and set, but the center still has a slight jiggle.
- The Cooling Phase: Allow the bars to cool completely in the pan at room temperature for at least one hour. This is the second critical step to prevent sogginess; adding topping to a hot cheesecake creates steam that travels downward and softens the crust.
- In a small bowl, whisk the lemon juice and cornstarch into the cherry pie filling. This ensures the glaze is thick and glossy like the photo, rather than runny. Spread the mixture evenly over the cooled cheesecake layer.
- Refrigerate for at least 4 to 6 hours (overnight is best). Use the parchment overhang to lift the entire block onto a cutting board. Use a hot, sharp knife to slice into clean squares, wiping the blade between every cut to maintain the distinct layers shown in the image.
Notes
- To achieve the clean slices shown in the image, use a hot, sharp knife and wipe the blade between every cut. Cooling the cheesecake completely before adding the topping is essential to prevent steam from softening the crust.