Mastering Golden Sweet Corn Fritters: The Anti-Soggy Technique
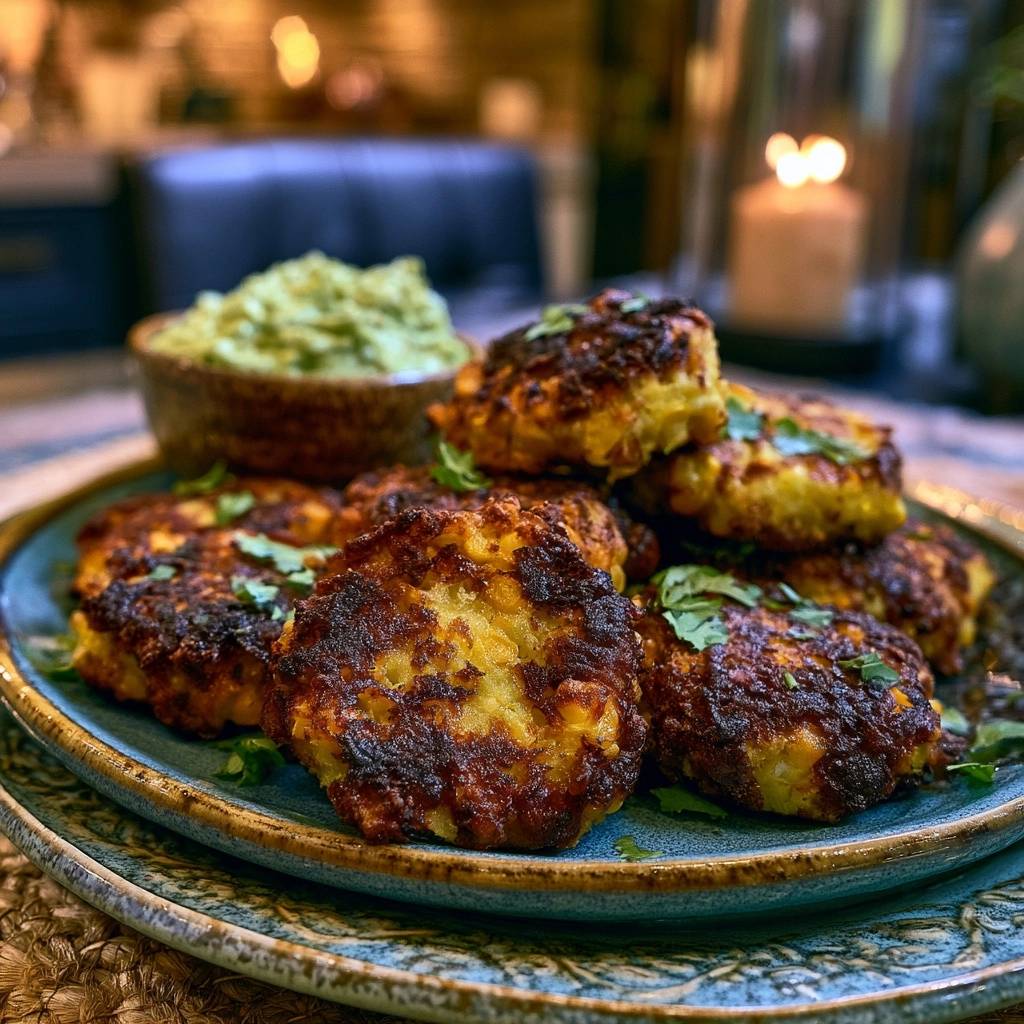
Few things in the culinary world are as disappointing as a soggy corn fritter. You expect a loud, satisfying crunch, but instead, you get a limp, oil-soaked sponge that falls apart before it hits the dipping sauce. It’s a common kitchen heartbreak, but it doesn’t have to be your reality. The perfect fritter relies on a beautiful contrast between a shatteringly crisp exterior and a center filled with sweet, popping kernels of corn.
Achieving that golden, structural perfection isn’t about luck; it’s about managing moisture and heat with precision. Most recipes fail because they treat the batter like a pancake, but we’re aiming for something much more substantial. By using the “Anti-Soggy” philosophy, you’ll create a snack that holds its shape and stays crispy long after it leaves the pan. It’s all about that first bite where the crust gives way to a light, airy interior that tastes like pure summer.
The secret to this recipe’s success lies in the moisture-squeeze technique. If you don’t aggressively dry your corn, that hidden water will turn into steam the moment it hits the oil. This steams the batter from the inside out, making it mushy. I’ve found that using a clean kitchen towel to wring out every drop of excess liquid is the single most important step for a professional-grade crunch.
The Physics of the Perfect Corn Fritter Crunch
To master the fritter, you have to understand the science of moisture migration. Corn kernels are naturally high in water, and as they heat up, they want to release that liquid. If your batter is too thin or your corn is too wet, that moisture gets trapped, preventing the batter from crisping up. Therefore, removing external moisture is your first line of defense against a greasy result.
When the batter hits the hot oil, a beautiful process called the Maillard reaction begins. This is the chemical reaction between amino acids and reducing sugars that gives browned food its distinctive flavor and deep golden hue. However, if the oil temperature is too low, the batter will simply absorb the fat instead of searing. You need the heat high enough to create an instant barrier, locking the moisture inside the kernels while the outside dehydrates into a crust.
The “Anti-Soggy” method ensures that the speed of crust formation stays ahead of oil absorption. By using a specific ratio of dry to wet ingredients, we create a stable environment for the corn. This allows the exterior to caramelize into a rigid, flavorful shell. When you get this balance right, the fritter feels light in your hand and makes a distinct sound when tapped with a fork.
Essential Components for Golden Sweet Corn Fritters
Quality ingredients are the foundation of any great dish, and here, the corn is the star. While fresh corn sliced straight off the cob provides the best “pop,” high-quality frozen corn is a fantastic year-round alternative. Just stay away from canned corn if possible; it’s often sitting in brine for too long, making it difficult to dry out properly. If you must use canned, rinse it thoroughly and dry it twice as long as you think you need to.
The flour-to-cornmeal ratio is another critical factor in the texture. We use a 2:1 ratio of all-purpose flour to yellow cornmeal. The flour provides the necessary gluten to bind everything together, while the cornmeal adds a gritty, rustic crunch that flour alone can’t replicate. This combination creates a “skillet-cornbread” style crust that stands up to the moisture of the corn kernels without becoming gummy.
For the lift, baking powder is essential. It reacts with the heat and the egg to create tiny air pockets within the batter. This ensures the fritter isn’t a dense brick but rather a light, airy morsel. We then layer in flavor with smoked paprika for a hint of woodsy depth and green onions for a sharp, fresh bite. Finally, always choose a high-smoke point oil like vegetable or grapeseed oil. Butter might taste great, but it will burn long before the fritter is cooked through.
Why Cornmeal is Non-Negotiable
Cornmeal does more than just add flavor; it’s a structural powerhouse. Because cornmeal is gluten-free, it interferes with the long gluten strands that flour creates. This keeps the interior of the fritter tender and prevents it from becoming “bready” or tough. Furthermore, the coarse texture of the meal creates more surface area on the outside of the patty, which means more little nooks and crannies to get crispy in the oil.
Step-by-Step: Preparing the Anti-Soggy Batter
The preparation starts with “The Squeeze.” If you’re using thawed frozen corn, place it in the center of a clean kitchen towel, gather the corners, and twist. You’ll be surprised at how much liquid comes out. Keep twisting until no more water drips through the fabric. This step ensures that your batter stays thick and tacky rather than turning into a runny mess.
Next, move to the dry mixing phase. Whisk your flour, cornmeal, baking powder, and spices in a large bowl before adding any liquids. This ensures the leavening agent is perfectly distributed so every fritter rises evenly. If you dump the baking powder into a wet mix, it can clump, leading to some fritters that are flat and others that have a bitter, metallic aftertaste.
Finally, we move to the binding. Stir the corn and onions into the dry mix first so they get a light coating of flour. Then, pour in your beaten egg and milk. The batter should be thick and chunky, clinging to the spoon like wet sand. If it pours like pancake batter, it’s too wet. Add a tablespoon of flour to tighten it up until it holds its shape when dropped onto a plate.
The Shallow-Fry: Temperature and Timing Mastery
Your choice of pan matters immensely here. A cast-iron skillet is the gold standard because it holds heat exceptionally well, meaning the oil temperature won’t plummet when you add the cold batter. However, a heavy-bottomed non-stick pan is a great choice for beginners because it makes flipping much easier. Whichever you choose, ensure you have about 1/4 inch of oil in the pan for a proper shallow fry.
Before you start cooking, perform the “Shimmer Test.” The oil should look like it’s vibrating or shimmering in the pan. Drop a tiny bit of batter into the center; if it sizzles and bubbles immediately, you’re ready. If it just sits there, wait another minute. Adding batter to cold oil is the fastest way to guarantee a greasy, soggy fritter that sticks to the bottom of the pan.
Once the batter is in, follow the “No-Touch” rule. It’s tempting to peek, but moving the fritters too early will break the delicate crust. Wait until you see the edges turning a deep, dark golden brown. When you shake the pan gently, the fritters should slide freely. This is the signal that the proteins have set and the crust is strong enough to survive the flip. Don’t crowd the pan; cook in batches to keep the oil hot and bubbly.
The Wire Rack Cooling Secret
Most people instinctively reach for paper towels to drain fried foods. However, paper towels trap steam between the hot fritter and the flat surface, which quickly softens that beautiful crust you just worked so hard to build. Instead, use a wire cooling rack set over a baking sheet. This allows air to circulate 360 degrees around the fritter, letting the steam escape while the excess oil drips away. This keeps the bottom just as crispy as the top.
Troubleshooting Common Fritter Failures
If your fritters are falling apart in the pan, you likely have a binding issue. This usually happens if the corn was too wet or if the egg was too small. You can fix this by adding another tablespoon of flour or cornmeal to the remaining batter. Ensure you are pressing the patties down firmly with the back of your spoon when they first hit the oil to help them knit together.
If you find the outside is burnt but the inside is still doughy, your heat is too high. The oil should be at a medium-high “sweet spot.” If it’s smoking, it’s too hot. Turn it down and let the oil cool for a minute before starting the next batch. Conversely, if they taste bland, you might have forgotten to salt the batter. You can save them by sprinkling a little flaky sea salt over them the second they come out of the oil.
Sometimes, corn kernels will “pop” or explode in the pan. This happens when steam builds up inside a kernel that hasn’t been pierced. It’s harmless but can be startling. To minimize this, ensure your corn is patted dry and try not to use extremely high heat. If it happens, just use a splatter screen to keep your stovetop clean and your skin safe from stray oil drops.
Flavor Variations and Ingredient Swaps
Once you master the base recipe, you can start playing with flavors. For a spicy kick, finely mince a jalapeño (remove the seeds for less heat) and stir it into the batter. You could also add a teaspoon of red chili flakes for a more consistent heat throughout. If you prefer herbs, swap the cilantro garnish for fresh chives or parsley mixed directly into the batter for an earthy, garden-fresh profile.
Zest is another great way to brighten the dish. Adding the zest of one lime directly into the batter provides a citrusy lift that cuts through the richness of the fried cornmeal. If you need to make these gluten-free, a standard 1:1 gluten-free flour blend works quite well. Just keep in mind that gluten-free flours can sometimes absorb more liquid, so you might need to add a tiny splash of extra milk to reach that “wet sand” consistency.
Regardless of what you add, always keep the moisture levels in mind. If you add “wet” ingredients like shredded zucchini or chopped tomatoes, you must squeeze the liquid out of them just like you did with the corn. If you don’t, the extra water will ruin the structural integrity of the batter and lead you right back to Soggy Town.
What to Serve with Golden Sweet Corn Fritters
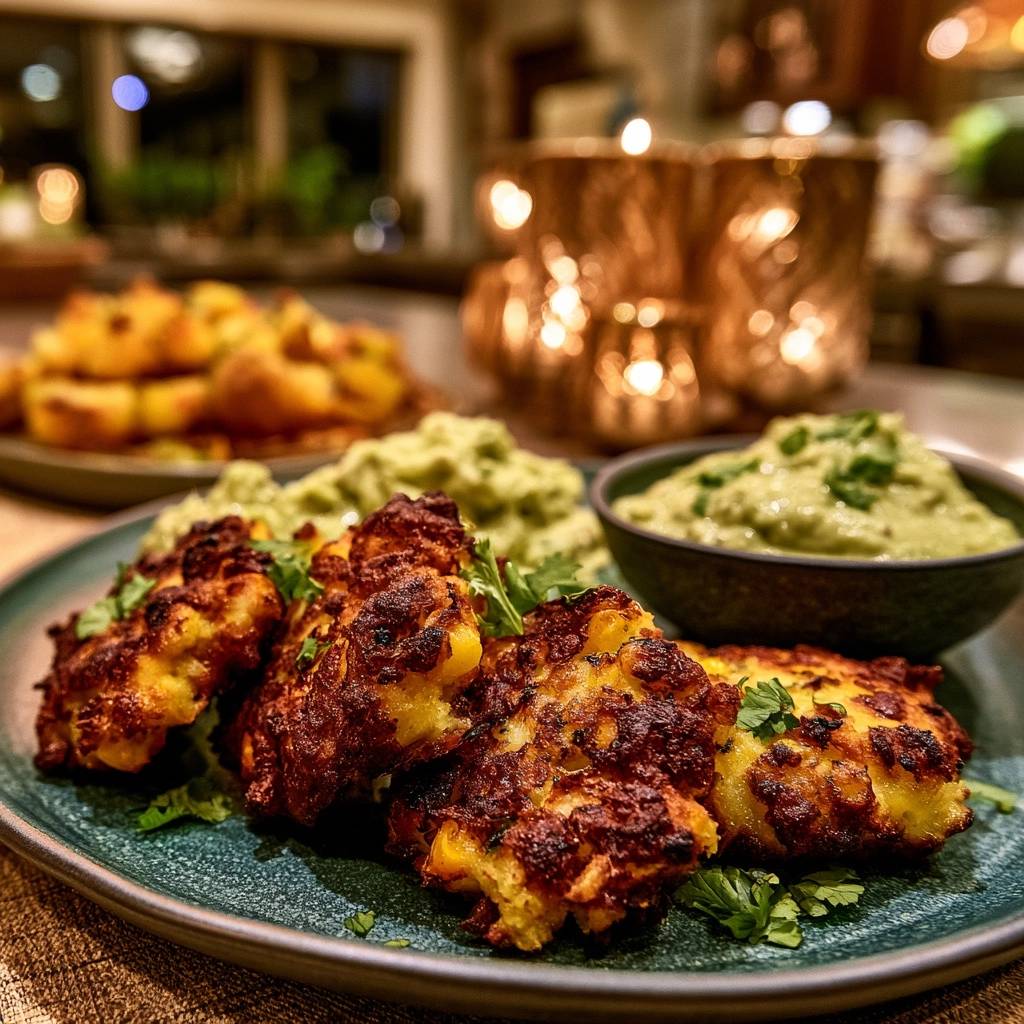
These fritters are rich and savory, so they pair perfectly with something bright and acidic. The mashed avocado dip mentioned in the recipe is a classic for a reason. The creaminess of the avocado acts as a cooling agent, while the lime juice provides the necessary acid to balance the fried batter. Just mash a ripe avocado with a squeeze of lime and a pinch of salt for a simple, effective side.
If you want to turn these into a full meal, they make an incredible base for brunch. Top a couple of fritters with a poached egg and a drizzle of hot sauce. The runny yolk creates a natural sauce that seeps into the cornmeal crust. You could also serve them alongside a zesty cabbage slaw dressed in a vinegar-based vinaigrette. The crunch of the raw cabbage complements the crunch of the fried corn perfectly.
For a cooling option, a yogurt-based dip is a winner. Mix some Greek yogurt with lemon juice, minced garlic, and a handful of fresh herbs. This provides a tangy, refreshing contrast that makes it easy to eat several fritters in one sitting. The key is to always have an element of acid on the plate to keep the palate refreshed.
Make-Ahead Strategy and Reheating Instructions
While these are best served fresh, you can certainly make them ahead of time. If you have leftovers, store them in an airtight container in the refrigerator for up to three days. However, you must avoid the microwave at all costs when reheating. The microwave will turn the cornmeal crust into a rubbery, chewy mess that loses all its charm.
To bring back the crunch, use your oven or an air fryer. Place the fritters on a baking sheet in a 400°F oven for about 5 to 8 minutes, flipping halfway through. This high heat re-activates the oils in the crust, crisping it back up to its original glory. An air fryer is even faster; 3 to 4 minutes at 375°F usually does the trick. They will come out tasting almost as good as they did the moment they left the frying pan.
You can also freeze these for long-term storage. Place the cooked and cooled fritters on a baking sheet in a single layer and freeze until solid. Then, transfer them to a freezer bag. This “flash-freezing” prevents them from sticking together. When you’re ready to eat, you can reheat them directly from frozen in the oven at 375°F for about 12 to 15 minutes. It’s a great way to have a quick, high-quality snack ready at a moment’s notice.
Expert Tips for Fritter Success
To get that restaurant-quality look, use a small ice cream scoop or a large cookie scoop to portion your batter. This ensures every fritter is the exact same size, which means they will all cook at the same rate. It also helps you maintain a nice, round shape that looks beautiful on the serving platter.
Let your batter rest for about 5 minutes before you start frying. This short break allows the flour and cornmeal to fully hydrate, which results in a more cohesive batter that is less likely to scatter in the oil. It also gives the baking powder a chance to start creating those tiny air bubbles that lead to a lighter texture.
Always pat your aromatics dry. If you wash your green onions or cilantro right before chopping, they will carry water into the mix. Use a paper towel to dry them thoroughly before slicing. Every gram of water you keep out of the batter is a victory for the final texture. Finally, if you’re cooking for a crowd, keep the finished fritters on their wire rack in a 200°F oven to stay warm while you finish the remaining batches.
How do I keep my corn fritters from being mushy?
The most common cause of mushy fritters is excess moisture. You must thaw frozen corn completely and squeeze it in a kitchen towel to remove all water. Additionally, ensure your oil is hot enough (shimmering) before adding the batter. If the oil is too cool, the batter will soak up the fat instead of searing into a crisp crust.
Can I use canned corn for this recipe?
Yes, you can use canned corn, but it requires extra preparation. Canned corn is stored in liquid and tends to be much wetter than fresh or frozen varieties. Rinse the corn thoroughly in a colander, then spread it out on paper towels and pat it dry multiple times. If the corn is still wet, the batter will become runny and the fritters will likely fall apart.
Why are my fritters falling apart in the pan?
Fritters usually fall apart because the batter is too thin or they were flipped too early. The batter should be thick and tacky, not pourable. If it seems loose, add a tablespoon of flour. When frying, do not attempt to flip the patty until the bottom is deeply browned and firm. The crust is what holds the fritter together, so you must let it form completely before moving it.
What is the best way to reheat leftover corn fritters?
Never use a microwave to reheat fritters, as it will make them soggy and rubbery. The best method is to use an oven or air fryer. Reheat them at 400°F for about 5-8 minutes until they are sizzling and the exterior has regained its crunch. This method helps the oil in the crust “re-fry” the surface, restoring the original texture.
Can I make these fritters gluten-free?
Absolutely. You can substitute the all-purpose flour with a high-quality 1:1 gluten-free flour blend. Since cornmeal is naturally gluten-free, the texture remains very similar. Just be aware that gluten-free flours can sometimes be more absorbent, so if the batter feels too dry or crumbly, add an extra teaspoon of milk until it reaches a tacky, scoopable consistency.
How long can I store the batter before frying?
It is best to fry the batter within 30 minutes of mixing. Because the recipe uses baking powder, the leavening action begins as soon as the wet and dry ingredients meet. If the batter sits for too long, the baking powder will lose its “lift,” resulting in fritters that are dense rather than light and airy. If you need to prep ahead, keep the wet and dry ingredients in separate bowls and combine them just before you are ready to fry.
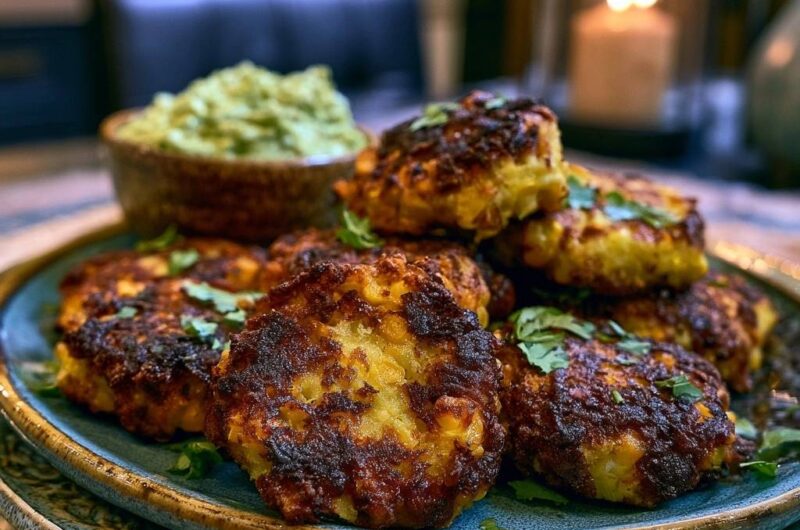
Golden Sweet Corn Fritters
Course: AppetizerCuisine: AmericanDifficulty: easy4
servings15
minutes10
minutes25
Minutes285
kcalAmerican
Ingredients
2 cups fresh or frozen corn kernels (thawed and patted dry)
1/2 cup all-purpose flour
1/4 cup yellow cornmeal
1/2 teaspoon baking powder
1 large egg, beaten
2 tablespoons whole milk or heavy cream
2 green onions, thinly sliced
1/2 teaspoon garlic powder
1/2 teaspoon smoked paprika
1/2 teaspoon salt
1/4 teaspoon black pepper
4-5 tablespoons vegetable oil for shallow frying
Fresh cilantro for garnish
1 ripe avocado, mashed with lime and salt (for dipping)
Directions
- The secret to avoiding sogginess starts with the corn. If using frozen corn, thaw it completely and wrap it in a clean kitchen towel. Squeeze firmly to remove every drop of excess water. If using fresh corn, ensure it is patted dry.
- In a large bowl, whisk together the flour, cornmeal, baking powder, garlic powder, paprika, salt, and pepper. The cornmeal and baking powder are the keys to that extra crunch and airy lift that flour alone cannot provide.
- In a separate small bowl, whisk the egg and milk together.
- Stir the corn kernels and green onions into the dry mix until they are coated. Pour in the egg mixture and stir until a thick, tacky batter forms. The batter should be chunky and hold its shape on a spoon; if it is too runny, add one extra tablespoon of flour.
- Heat the vegetable oil in a large non-stick or cast-iron skillet over medium-high heat. To achieve the deep golden-brown crust shown in the image, you need enough oil to shallow-fry the bottom of the patties. Wait until the oil shimmers and a small drop of batter sizzles instantly.
- Drop large spoonfuls of the mixture into the hot oil, pressing down slightly with the back of the spoon to flatten them into 1/2 inch thick patties. Do not crowd the pan, as this lowers the oil temperature and leads to grease absorption.
- Fry for 3 to 4 minutes per side. The “Anti-Soggy” trick: Do not flip them until the edges are visibly dark golden brown and the patty slides easily when the pan is shaken. The high heat creates the caramelized, crispy exterior seen in the photo.
- Transfer the fritters to a wire cooling rack rather than a paper towel. Air circulation around the bottom prevents steam from building up, which keeps them crispy.
- Garnish with fresh cilantro and serve immediately with the mashed avocado dip.
Notes
- To maintain maximum crunch, cool the fritters on a wire rack instead of paper towels to prevent steam from softening the bottom. Ensure the oil is shimmering hot before adding the batter to avoid grease absorption.