Mastering Loaded Chicken Club Baked Potatoes with Shatter-Crisp Skin
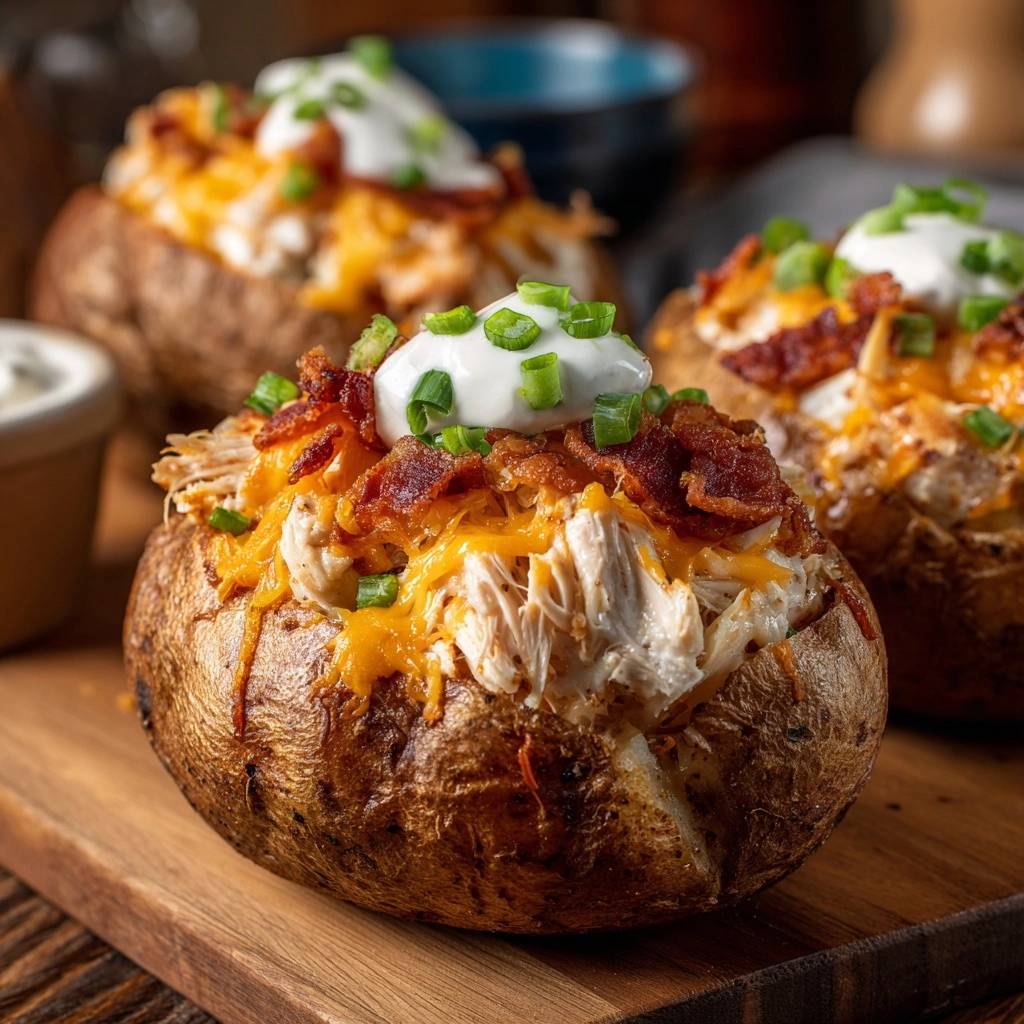
Forget everything you know about those limp, foil-wrapped potatoes served at steakhouse chains. You know the ones—the skins are wet, the insides are dense, and the whole thing feels like a chore to eat. A truly great baked potato should offer a violent crunch when your fork hits the skin, followed by an interior so light it practically dissolves.
The Loaded Chicken Club Baked Potato takes that perfect foundation and turns it into a full-blown meal. By combining the smoky crunch of beef bacon with juicy shredded chicken and sharp cheddar, we’re building a flavor profile that is both nostalgic and incredibly satisfying. However, a heavy topping load requires a structurally sound potato that won’t collapse into a mushy mess under the weight of the fixings.
The secret to this recipe lies in the high-heat salt rub and the total ban on aluminum foil. Most home cooks make the mistake of wrapping their spuds, which effectively steams the potato in its own juices. By roasting them naked at 425°F, we allow the moisture to escape, leaving behind a skin that is shatteringly crisp and an interior that stays fluffy and dry.
The Science of the Perfect Russet Foundation
When you’re making a loaded potato, the variety of potato you choose isn’t just a suggestion—it’s a requirement. You need a Russet potato because of its high starch content, specifically its high ratio of amylose. This starch structure ensures that once the heat hits the center, the granules swell and separate, creating that classic “snowy” texture.
If you try to use a waxy potato like a Yukon Gold or a Red Bliss, you’ll end up with a creamy, dense interior. While those are great for potato salad, they can’t absorb the butter and sour cream the way a Russet can. Furthermore, the thick, dusty skin of a Russet is the only type capable of transforming into a crispy, cracker-like shell during a long roast.
Why Foil is the Enemy of Texture
Wrapping a potato in foil is the fastest way to ruin your dinner. Foil acts as a thermal blanket that traps every drop of escaping steam against the skin of the potato. Instead of roasting, you are essentially boiling the potato inside a silver jacket, which leads to a rubbery, gray skin and a gummy interior.
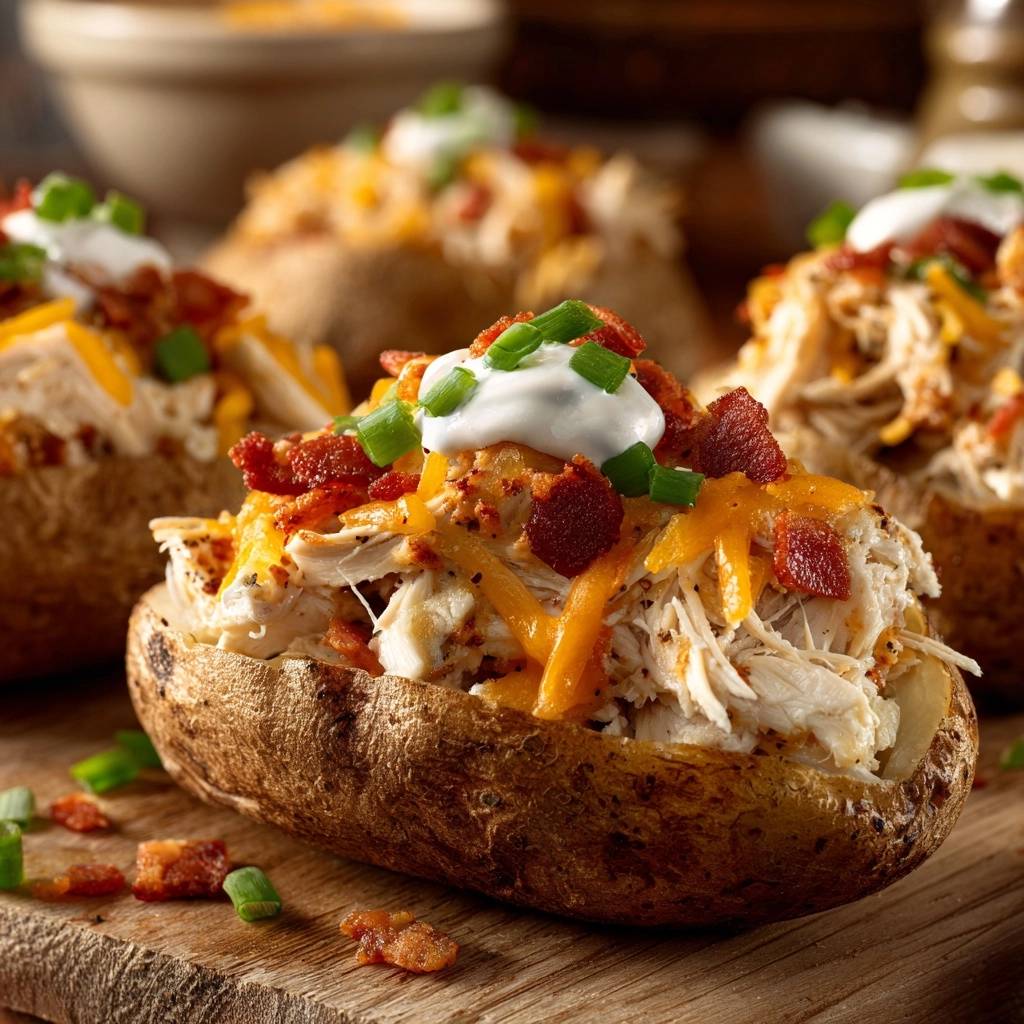
By leaving the potato exposed to the dry heat of the oven, you trigger the Maillard reaction. This chemical process browns the proteins and sugars in the skin, creating a complex, nutty flavor. Without foil, the skin becomes a delicious part of the meal rather than a discarded wrapper.
The Role of Coarse Salt and Osmosis
Before the potatoes hit the oven, you must rub them with olive oil and a generous coating of coarse sea salt. This isn’t just for seasoning; it’s a matter of physics. The salt draws out the surface moisture through osmosis, allowing the skin to dehydrate and crisp up much faster than it would on its own.
I always recommend coarse sea salt over fine table salt for this step. The larger grains provide a better textural contrast and don’t dissolve instantly into the oil. This creates a crust that stays crunchy even after you pile on the moist chicken and sour cream later on.
Essential Components for the Chicken Club Filling
A “Club” style potato is only as good as its toppings, and temperature management is key here. You want your shredded chicken to be moist and your cheese to be sharp enough to cut through the richness of the potato. Using room temperature chicken helps it integrate with the cheese more effectively during the final melt.
When it comes to the cheddar, please grate it yourself from a block. Pre-shredded cheese is coated in potato starch or cellulose to prevent clumping in the bag. These anti-caking agents prevent the cheese from melting into that smooth, gooey “lava” we want for a loaded potato. Freshly grated sharp cheddar has a higher fat-to-protein ratio, ensuring a perfect melt every time.
Selecting and Preparing the Chicken Breast
You’ll need about 2 cups of shredded chicken for four large potatoes. You can use a store-bought rotisserie chicken to save time, or poach a couple of breasts in seasoned water. The real trick, however, is tossing that chicken with a bit of mayonnaise before it goes into the potato.
The mayonnaise acts as a thermal insulator. Since the chicken is already cooked, putting it back in the oven can easily dry it out. The thin coating of mayo keeps the meat succulent and juicy while providing a “glue” that helps the cheese and bacon stick to every bite of chicken.
Beef Bacon: Achieving Maximum Crunch Without Pork
Beef bacon is a fantastic alternative that brings a deep, savory umami flavor to this dish. Because beef bacon has a different fat distribution than traditional lamb bacon, you need to cook it low and slow to render the fat properly. I like to start it in a cold pan and gradually increase the heat.
Once the beef bacon is dark mahogany and stiff, move it to a paper towel-lined plate. It will continue to crisp up as it cools. You want it to be brittle enough to crumble into small shards so that you get a bit of smoky crunch in every single forkful of the potato.
Step-by-Step: Engineering the Loaded Chicken Club Baked Potatoes
Timing is everything when you’re aiming for that professional-grade finish. You have about a 60-minute window from the time the potatoes enter the oven to the moment they hit the table. Let’s break down the process to ensure nothing gets soggy or cold.
Phase 1: The High-Heat Initial Roast
Preheat your oven to 425°F and make sure your potatoes are bone-dry before oiling them. Place the potatoes directly on the middle oven rack. This allows for 360-degree airflow, ensuring the bottom of the potato gets just as crispy as the top.
Place a baking sheet on the rack below to catch any salt or oil drips. You’ll know they’re done when the skin feels like a hard shell and a knife slides into the center with zero resistance. If you have a meat thermometer, look for an internal temperature between 205°F and 210°F for maximum fluffiness.
Phase 2: The “Blossom” Technique and Steam Release
As soon as those potatoes come out of the oven, you have to act fast. Use a sharp knife to cut a deep “X” into the top. Then, using a clean kitchen towel to protect your hands, grab the ends of the potato and squeeze them toward the center. This “blossoms” the potato open.
This step is vital because it allows the internal steam to escape immediately. If you leave the potato whole for even five minutes after cooking, that trapped steam will condense and turn your fluffy interior into a gummy, heavy paste. You want to see that big cloud of steam rise up—that’s the sound of success.
Phase 3: Layering and the Secondary Melt
Now, we build the architecture of the meal. Start with a pat of butter and a quick fluff with a fork to season the base. Next, pile in the chicken-mayo mixture. This goes in first so it can warm through and nestle into the potato’s nooks and crannies.
For a perfect pairing, try our Baked Potato with Creamy Sausage: Perfectly Fluffy & Flavorful.
Top the chicken with a generous mountain of shredded cheddar. Return the potatoes to the oven for just 3 to 5 minutes. You aren’t trying to cook the potato further; you just want the cheese to bubble and drape over the chicken like a blanket. Watch it closely so the cheese doesn’t break and become oily.
Troubleshooting Common Potato Pitfalls
If your skins come out soft despite skipping the foil, it’s almost always due to moisture. If you wash your potatoes right before oiling them, the water gets trapped under the oil and steams the skin. Always scrub your potatoes at least 30 minutes before cooking and pat them dry with a lint-free towel.
If you find your potatoes are taking much longer than 60 minutes, they might be exceptionally large. In this case, don’t raise the heat, or you’ll burn the skin. Just keep roasting until the internal temperature hits 205°F. If the skin tastes too salty, simply brush off the excess grains with a dry pastry brush before slicing.
Flavor Variations and Ingredient Swaps
Once you master the base technique, you can play with the flavors. For a “Spicy Club,” swap the sharp cheddar for pepper jack and mix a little chipotle paste into your mayonnaise. It adds a smoky heat that pairs beautifully with the beef bacon.
For a “Mediterranean Club,” you could use shredded rotisserie chicken tossed with lemon and oregano, then top it with crumbled feta and sun-dried tomatoes. Just remember to keep the “wet” ingredients balanced so you don’t lose that hard-earned crunch of the potato skin.
Optimal Equipment for Potato Success
While you don’t need fancy gadgets, a digital meat thermometer is a game-changer for baked potatoes. It takes the guesswork out of “doneness.” No more poking and prodding; once it hits 205°F, it’s perfect. It’s the difference between a good potato and a professional one.
I also highly recommend using a wire cooling rack if you aren’t comfortable placing the potatoes directly on the oven grates. A wire rack still allows for airflow underneath the potato, preventing the “flat spot” that happens when a potato sits on a solid baking sheet.
What to Serve with Loaded Potatoes
Since these potatoes are quite rich and calorie-dense, you want to pair them with something bright and acidic. A simple arugula salad with a sharp lemon vinaigrette is the perfect palate cleanser. The peppery greens cut right through the heavy cheddar and sour cream.
Alternatively, a chilled cucumber and radish slaw provides a refreshing crunch that contrasts with the soft, warm interior of the potato. Avoid serving other heavy starches like bread or pasta; the potato is the undisputed star of this show.
Make-Ahead Strategies and Storage Logistics
Baked potatoes are best enjoyed immediately, as the skin begins to soften the moment it starts to cool. However, you can prep your components in advance. Shred the chicken, cook and crumble the bacon, and grate the cheese up to two days ahead of time. Store them in separate airtight containers in the fridge.
If you have leftovers, do not use the microwave to reheat them, or the skin will become like wet cardboard. Instead, use an air fryer or a toaster oven at 350°F for about 10-15 minutes. This will help revive the crispness of the skin while warming the center through.
Expert Tips for Professional Presentation
To get that “restaurant look,” pay attention to the garnishes. Instead of just plopping the sour cream on top, use two spoons to create a neat “quenelle” or dollop. When cutting your green onions, slice them on a sharp bias (diagonal) to create long, elegant pieces rather than simple circles.
For a final touch of “chef’s flair,” you can use a microplane to grate a tiny bit of extra cheese over the very top right before serving. This creates a light, snowy effect that looks beautiful in photos and adds one last layer of flavor to the presentation.
Managing Internal Moisture in Large Batches
If you’re hosting a dinner party and cooking 10 or more potatoes at once, be aware that the oven humidity will rise significantly. All those potatoes are releasing steam at the same time. You may need to increase your bake time by 10 to 15 minutes to compensate for the extra moisture in the oven air.
The Importance of Fresh Green Onions
The green onions aren’t just for color; they provide a necessary aromatic bite. Use only the bright green stalks for the garnish, as they are milder and more visually appealing. Save the white bulbs for sautéing in other recipes. The fresh, sharp hit of the onion is what wakes up the heavy flavors of the chicken and bacon.
Frequently Asked Questions
How do I store leftover loaded potatoes?
Store any leftovers in an airtight container in the refrigerator for up to 3 days. Keep the sour cream and green onions separate if possible. When you’re ready to eat, reheat the potato in an oven or air fryer at 350°F until the skin is crisp again. I don’t recommend freezing these, as the texture of the potato becomes grainy and the sour cream will break.
Why is my potato skin still soft and not crispy?
This usually happens if the potato wasn’t completely dry before you applied the oil, or if your oven temperature was too low. Ensure your oven is fully preheated to 425°F. Also, make sure you aren’t crowding the oven; if the potatoes are too close together, they will steam each other rather than roasting.
Can I use a different type of oil for the skin?
Yes, you can use avocado oil or grapeseed oil, as both have high smoke points. However, olive oil provides a wonderful flavor that complements the salt. Avoid using butter on the outside of the skin before baking, as the milk solids will burn at 425°F before the potato is actually finished cooking.
What can I use instead of mayonnaise for the chicken?
If you aren’t a fan of mayo, you can use a tablespoon of Greek yogurt or even a little bit of chicken broth to moisten the meat. The goal is simply to prevent the shredded chicken from turning into “chicken jerky” during the second bake where we melt the cheese.
How do I know if my Russet potato is high quality?
Look for potatoes that are firm and heavy for their size. Avoid any with a green tint to the skin, as this indicates exposure to light and the presence of solanine, which can taste bitter. Also, steer clear of potatoes with sprouts or soft “eyes,” as these are older and will have a higher sugar content, leading to a less fluffy interior.

Chicken Baked Potatoes
Course: Main CourseCuisine: AmericanDifficulty: medium4
servings15
minutes1
hour580
kcal75
MinutesA hearty and satisfying meal that solves the problem of soggy potato skins. By using a high-heat salt rub and avoiding foil, these potatoes stay fluffy on the inside and crunchy on the outside, topped with a savory blend of chicken, cheese, and bacon.
Ingredients
4 large Russet potatoes, scrubbed and dried thoroughly
2 tablespoons olive oil
1 tablespoon coarse sea salt
2 cups cooked chicken breast, shredded
1/4 cup mayonnaise (to moisten the chicken)
1.5 cups sharp cheddar cheese, shredded
6 slices beef bacon, cooked until crispy and crumbled
1/2 cup sour cream
1/4 cup fresh green onions, sliced
2 tablespoons unsalted butter
Salt and black pepper to taste
Directions
- Preheat your oven to 425°F (218°C). This high temperature is non-negotiable for achieving the perfect skin texture shown in the image.
- To solve the soggy skin problem, do not use aluminum foil. Prick each dried potato several times with a fork. Rub the skins generously with olive oil and coat them thoroughly with the coarse sea salt. The salt draws out surface moisture to create that coveted crunch.
- Place the potatoes directly on the oven rack with a baking sheet on the rack below to catch any drips. Bake for 45 to 60 minutes until the skins are dark golden brown and the centers are tender when pierced.
- While potatoes bake, toss the shredded chicken with the mayonnaise and a pinch of black pepper. This ensures the chicken stays juicy and binds to the cheese during the final melt.
- Remove potatoes from the oven. Immediately slice a deep “X” into the top of each potato and push the four corners toward the center to blossom the potato open. This allows steam to escape instantly so the interior doesn’t become gummy.
- Add a pat of butter to each potato and fluff the insides with a fork. Season with a pinch of salt and pepper.
- Stuff each potato generously with the shredded chicken mixture and top with a heavy layer of shredded cheddar cheese.
- Return the potatoes to the oven for 3 to 5 minutes, or until the cheese is bubbling and partially melted into the chicken.
- Top each potato with a thick dollop of sour cream, the crumbled bacon, and a generous sprinkle of fresh green onions before serving immediately.
Notes
- Do not use aluminum foil as it steams the skin. Placing potatoes directly on the oven rack ensures even heat distribution for maximum crunch.