Mastering the Cheesy Garlic Spaghetti Squash Bake

Most home cooks approach spaghetti squash with high hopes, only to end up with a watery puddle on their plate. It’s a common frustration because this vegetable is naturally packed with moisture that releases the moment it hits the heat. However, you can transform this high-moisture gourd into a structural, pasta-like masterpiece that actually holds its shape under a blanket of melted cheese.
The goal of this recipe is to move away from the “mush” and toward a savory, casserole-style dish with a firm texture. We’re aiming for a flavor profile that’s heavily allium-forward, rich from the cream, and brightened by fresh herbs. By focusing on moisture management, you’ll create a dish that rivals any traditional pasta bake in both satisfaction and presentation.
The secret lies in treating the squash more like a protein that needs searing and less like a vegetable that needs steaming. I’ve found that a specific two-step drainage process is the only way to ensure those golden strands stay distinct. If you follow these steps, you’ll get a bite that has a slight snap to it, perfectly coated in a garlic-infused cream sauce.
The Science of Moisture in Spaghetti Squash
Understanding the cellular structure of Cucurbita pepo is the first step toward culinary success. Spaghetti squash is composed of roughly 92% water, held within delicate cell walls that provide the vegetable its raw crunch. When you introduce heat, those cell walls collapse and dump their internal liquid into the roasting pan, which essentially boils the squash in its own juices.
This is where the “Anti-Soggy Secret” comes into play to save your dinner. By applying kosher salt to the raw flesh before it ever sees the oven, you trigger osmosis. The salt draws the water out of the cells and onto the surface of the squash, allowing you to remove it manually before the cooking process begins.
Using paper towels is a non-negotiable part of this technique. You need a material that can physically wick away the beads of moisture that form during the 20-minute sweating period. If you skip this, that water simply re-absorbs or steams the squash from the inside out, leading to that limp, soggy texture we’re trying to avoid.
Essential Components for the Garlic Squash Bake
Quality ingredients make a massive difference when the list is this short and focused. I always reach for kosher salt because its larger grains are easier to distribute and wipe away than fine table salt. It does the job of sweating the squash without making the final dish taste like a salt lick.
Heavy cream acts as the essential binder here, but it isn’t meant to be a heavy Alfredo-style sauce. Instead, it creates a silky coating that helps the cheese and garlic cling to every individual strand. Without it, the squash can feel a bit dry and disconnected from the toppings.
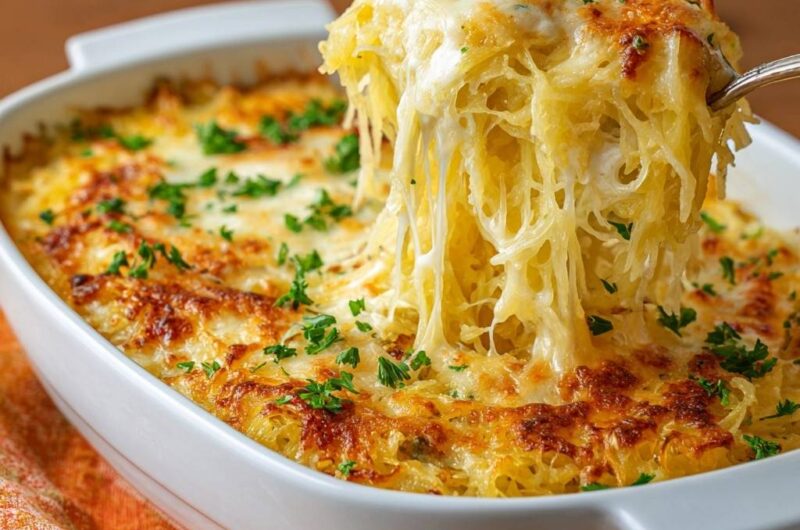
When it comes to the cheese, please grate your own mozzarella and parmesan. Pre-shredded bags are coated in potato starch or cellulose to prevent clumping, which also prevents them from melting into that glorious, stretchy cheese pull. Freshly grated cheese melts into a cohesive, bubbly crust that looks and tastes much more professional.
If you enjoy the creamy, cheesy textures here, you can find a similar richness in this creamy sun-dried tomato chicken penne.
Selecting the Right Squash for Roasting
Success starts at the grocery store or farmer’s market. Look for a spaghetti squash that feels heavy for its size, which indicates it hasn’t dried out too much in storage. The rind should be firm, blemish-free, and have a dull, matte finish rather than a shiny one.
Size matters because it dictates the length and thickness of your “noodles.” A larger squash, around 3 to 4 pounds, usually yields longer, more robust strands. If you pick one that’s too small, the strands tend to be thinner and more prone to overcooking into a mash.
The Allium Foundation: Fresh Garlic vs. Jarred
Freshly minced garlic cloves are vital for this recipe because they provide a punch that jarred garlic simply can’t match. Jarred garlic often has a metallic or acidic aftertaste from the preservatives that can ruin the delicate flavor of the squash. Fresh garlic contains allicin, which creates that signature pungent aroma we love.
As the bake finishes at 425°F, the garlic undergoes a beautiful transformation. It mellows out, losing its sharp bite and developing a sweet, nutty undertone. This creates a complex flavor base that permeates the entire dish without overpowering the herbs.
Step-by-Step: Preparing the Squash Strands
The initial roast is the technical core of this entire process. You want to roast the squash face down at 400°F to encourage browning on the edges while the interior softens. Keep a close eye on the clock, as every oven runs a little differently.
You’re looking for specific visual cues: the skin should be easily pierceable with a fork, but the flesh should still offer a bit of resistance. If the squash feels completely soft or “squishy” when you press the rind, you’ve gone too far. Over-roasting is the fastest way to guarantee mushy strands, regardless of how much you salted them earlier.
Once you pull it out, let it rest for just five minutes. This brief cooling period allows the steam to settle, making it easier to scrape the strands away from the skin. Use a sturdy metal fork and work from the outside in to get those long, beautiful ribbons.
The Salt-and-Drain Technique Explained
The 20-minute sweating process is your insurance policy against a watery bake. After you’ve salted the halves, place them cut-side down on a thick layer of paper towels. This positioning uses gravity to help pull the moisture out of the flesh and into the absorbent paper.
When you flip them over after 20 minutes, you’ll see visible beads of water on the surface. It’s quite satisfying to see how much liquid would have otherwise ended up in your casserole dish. Make sure to wipe the surface completely dry with a fresh towel before brushing with oil.
The Final Drain: Ensuring a Firm Texture
Even after roasting, spaghetti squash can hold onto internal steam that turns back into water as it sits. This is a “Skyscraper” detail that most recipes miss: the secondary drainage. Transfer your scraped strands into a colander set over a bowl or the sink.
Use the back of a large spoon to press down gently on the pile of squash strands. You aren’t trying to crush them, just encouraging any trapped liquid to release. You’ll be surprised at how much extra moisture comes out during this step, ensuring your final bake is tight and structural.
Assembling the Cheesy Garlic Filling
Mixing the ingredients in a separate bowl before transferring them to the baking dish is a crucial step. This ensures that the minced garlic, heavy cream, and spices are evenly distributed. You don’t want one person getting a mouthful of red pepper flakes while another gets none.
Toss the strands gently so you don’t break them. The goal is to coat every “noodle” in that light cream and cheese mixture. This creates a cohesive texture where the squash and cheese become one, rather than having a layer of squash sitting under a separate layer of cheese.
Achieving the Golden-Brown Cheese Crust
The final bake happens at a higher temperature of 425°F to jumpstart the Maillard reaction. This is the chemical process that turns cheese golden-brown and delicious. It only takes about 12 to 15 minutes to get the interior bubbly and the cheese melted.
If you enjoy this rich, creamy style, you’ll love the velvety texture of this creamy garlic chicken pasta bake too.
For that professional finish, switch the oven to the broiler for the last two minutes. Stay right there and watch it! The broiler can go from “perfectly golden” to “burnt” in seconds. This high-intensity heat crisps up the parmesan and creates those charred, flavorful spots that make the dish irresistible.
Flavor Variations and Ingredient Swaps
While the garlic and cheese version is a classic, you can easily modify this base. If you want more umami, try folding in some sautéed mushrooms or a handful of chopped sun-dried tomatoes. For a pop of color and extra nutrients, a few cups of fresh baby spinach can be stirred in right before the final bake.
If you need to avoid dairy, you can still use the “Anti-Soggy” principles. Substitute the heavy cream with a thick cashew cream and use nutritional yeast or a high-quality vegan cheese alternative. The moisture management steps remain exactly the same to ensure the texture stays firm.
What to Serve Alongside
This cheesy squash bake already brings plenty of garlic and melted cheese, but a couple of extra bites can round out the meal. The bread bites give you something to scoop up every last bit of sauce, while the shrimp dip adds a cool, creamy contrast.
- For a cold-weather starter that shares the same garlic-and-cheese comfort, try this Baked Shrimp Spinach Dip – the spinach keeps it fresh against all that richness.
- When you need a carb-heavy side to soak up the squash’s juices, these Cheesy Garlic Pull-Apart Bread B
What to Serve with Garlic Spaghetti Squash
This bake is quite rich, so it pairs beautifully with lean proteins. A simple lemon-herb roasted chicken breast or a piece of grilled fish provides a nice balance to the cheesy squash. The acidity in the lemon helps cut through the richness of the mozzarella and cream.
A crisp arugula salad is another fantastic side option. Use a sharp vinaigrette with plenty of Dijon mustard or red wine vinegar. The peppery bite of the arugula and the tang of the dressing provide a refreshing contrast to the savory, garlic-heavy squash.
Make-Ahead Strategies and Storage Tips
You can actually prep the squash strands up to 24 hours in advance. Roast, scrape, and drain them, then store them in an airtight container in the fridge. When you’re ready to eat, just mix with the cream and cheese and proceed with the final bake. This makes it a great option for busy weeknights.
If you have leftovers, store them in the refrigerator for up to three days. To reheat, I recommend using the oven or a toaster oven at 350°F rather than the microwave. The oven helps maintain the texture of the cheese crust, whereas the microwave can make the squash a bit rubbery.
I don’t recommend freezing the fully assembled bake. The cream and cheese can separate and become grainy when thawed. However, you can freeze the plain, roasted squash strands in a freezer bag for up to two months. Just be sure to drain them again after thawing, as they will release more water.
Troubleshooting Your Spaghetti Squash Bake
If your squash still ends up a bit watery, it usually means the salt sweat wasn’t long enough or the final press in the colander was too light. Don’t be afraid to really push that liquid out! If the strands are mushy, you likely over-roasted them in the first phase; try reducing the initial roast time by 5 minutes next time.
Sometimes people find the garlic tastes bitter. This happens if the garlic bits are sitting on top of the cheese and burn under the broiler. Make sure the garlic is thoroughly mixed into the cream and squash strands so it stays protected and poaches in the cream while it bakes.
Why did my squash turn into a puree?
This is almost always a result of over-cooking during the first roasting phase. If the squash is too soft when you scrape it, the strands will disintegrate into a mash. If this happens, don’t throw it out! Just lean into it, mix in the cheese and garlic, and serve it as a “cheesy squash mash” instead of a structured bake.
How to fix an oversalted squash?
Since we use a fair amount of salt to sweat the vegetable, it’s easy to over-season the final dish. The key is to thoroughly wipe away the salt beads and the moisture with a paper towel before roasting. If you forget this step and the dish tastes too salty, you can try adding a little extra splash of cream or a squeeze of lemon juice to balance the flavors.
How should I store and reheat leftovers?
Store any leftovers in an airtight container in the refrigerator for up to 3 days. For the best results, reheat in a 350°F oven until the cheese is bubbly again. This helps preserve the texture of the squash strands. Avoid the microwave if possible, as it can make the vegetable fibers feel tough or rubbery.
Why is my spaghetti squash bake still watery?
Wateriness usually stems from skipping the “Anti-Soggy Secret” steps. If you don’t let the squash sweat with salt for at least 20 minutes, that internal moisture has nowhere to go but into your pan. Additionally, make sure you are using the colander to press out the final bits of liquid after roasting but before mixing with the cream.
Can I make this without heavy cream?
Yes, you can substitute the heavy cream with whole milk or a dairy-free alternative like unsweetened cashew milk. However, keep in mind that heavy cream provides a specific thickness that helps bind the strands together. If using a thinner liquid, you might want to add an extra sprinkle of parmesan cheese to help thicken the “sauce” as it bakes.
What if I don’t have a broiler?
If your oven doesn’t have a broiler setting, you can still achieve a golden crust. Simply leave the bake in the oven at 425°F for an extra 5 to 10 minutes. Keep a close eye on it; the high heat will eventually brown the cheese, though it may not have the same charred spots as a broiler would provide.
Can I use pre-minced garlic from a jar?
While you can use it in a pinch, fresh garlic is highly recommended for this dish. Jarred garlic is often stored in citric acid, which can give the bake a sour or metallic note. Freshly minced cloves provide a much sweeter, more aromatic flavor that complements the squash and mozzarella perfectly.
Spaghetti Squash Bake
Course: Main CourseCuisine: AmericanDifficulty: mediumYields4
servingsPrep Time20
minutesCook Time55
minutesCalories310
kcalTotal Time75
MinutesA delicious and healthy alternative to pasta that avoids the common pitfall of watery squash. This recipe features a specific moisture extraction method, garlic, heavy cream, and a blend of mozzarella and parmesan for a rich, bubbly finish.
Ingredients
1 large spaghetti squash (about 3-4 pounds)
2 tablespoons olive oil
1 teaspoon kosher salt (for sweating)
4 cloves garlic, minced
1.5 cups shredded mozzarella cheese (divided)
1/2 cup grated parmesan cheese (divided)
1/4 cup heavy cream (to bind the strands)
1/4 cup fresh parsley, chopped
1/2 teaspoon black pepper
1/2 teaspoon dried oregano
1/4 teaspoon red pepper flakes (optional)
Directions
- Preheat your oven to 400°F (200°C). Slice the spaghetti squash in half lengthwise and scoop out the seeds.
- The Anti-Soggy Secret: Sprinkle the cut sides of the squash generously with the kosher salt. Let them sit face down on paper towels for 20 minutes. This draws out the excess water that usually ruins the texture.
- Wipe away the moisture and salt beads with a fresh paper towel. Brush the inside with olive oil and roast face down on a parchment-lined baking sheet for 35 to 45 minutes. The squash is ready when the skin pierces easily with a fork but the flesh still has a slight resistance.
- Remove from the oven and let cool for 5 minutes. Use a fork to scrape the squash into long, noodle-like strands.
- The Final Drain: Place the strands into a colander and press gently with the back of a spoon to remove any final lingering liquid.
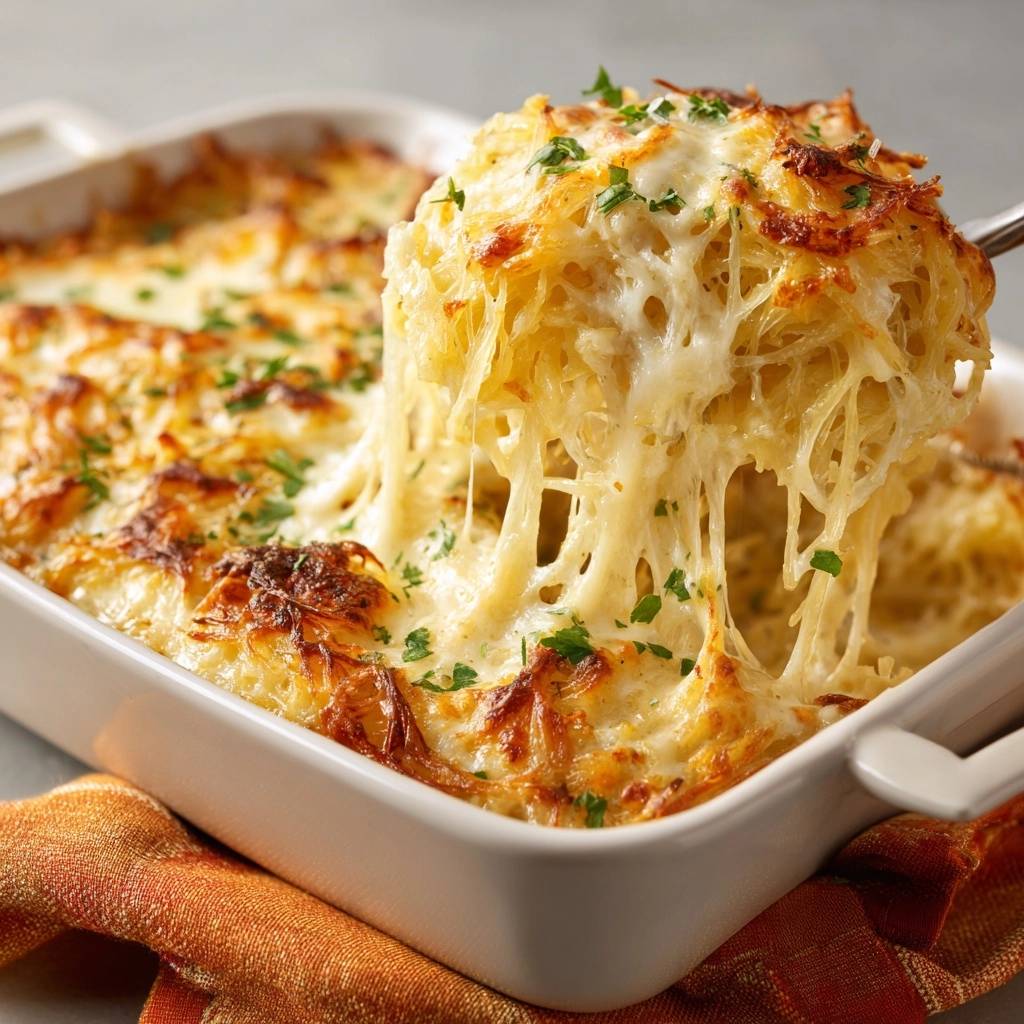
- In a large mixing bowl, toss the squash strands with the minced garlic, heavy cream, pepper, oregano, red pepper flakes, 1 cup of the mozzarella, and 1/4 cup of the parmesan. The cream and cheese will create the silky, cohesive texture seen in the image.
- Transfer the mixture into a greased 9×13 inch baking dish. Spread evenly and top with the remaining 1/2 cup mozzarella and 1/4 cup parmesan.
- Increase oven heat to 425°F (220°C). Bake for 12-15 minutes, then switch to the broiler for the last 2 minutes to achieve the deep golden-brown crust shown in the photo.
- Garnish heavily with fresh chopped parsley and serve immediately to maintain the perfect cheese pull.
Notes
- The key to success is the 20-minute salt-sweating process and the final drain in a colander to ensure the squash strands remain firm and not mushy.