Mastering the Golden Phyllo Feta Pie
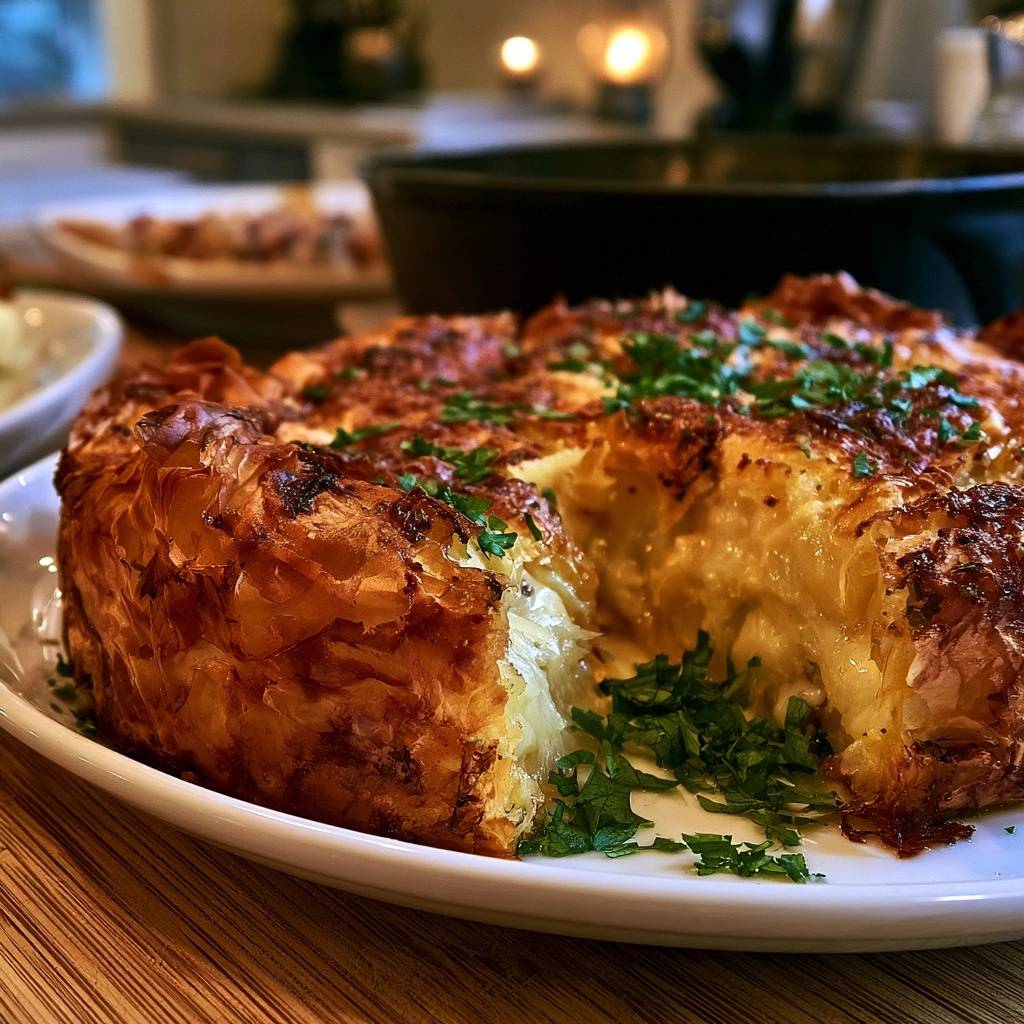
Nothing ruins a beautiful phyllo pie faster than a mushy, wet base that falls apart when you serve it. You know the disappointment of seeing a gorgeous, golden crust on top, only to find a soggy, pale mess underneath. Most recipes fail because the moisture from the cheese and eggs soaks into the bottom layers before they can crisp up.
This Golden Phyllo Feta Pie solves that problem with a specific layering technique and a thermal shock method that ensures every single bite is shatteringly crisp. We are aiming for a contrast between the craggy, brittle exterior and a creamy, tangy interior that holds its shape perfectly. This guide provides the definitive resource for mastering this Greek-style classic at home.
The secret to success lies in the moisture barrier. By using a simple pantry staple between the pastry and the filling, we protect the delicate dough from the heavy cheese mixture. When you combine that with a pre-heated baking surface, you get a professional-grade result that sounds like a crunch with every forkful. Oh man, the sound of that first slice is pure joy!
The Physics of a Crisp Phyllo Crust
Phyllo dough is a marvel of culinary engineering, consisting of paper-thin sheets of flour and water. Unlike puff pastry, which has fat folded into the dough, phyllo relies on the fat you apply between the layers. When you brush melted butter onto these sheets, you are creating a laminated structure. As the pie hits the heat, the tiny amount of water in the butter and dough turns to steam, puffing the layers apart to create those iconic air pockets.
However, moisture is the ultimate enemy of this process. If the filling leaks liquid into the bottom layers before they set, the starch in the flour turns into a gummy paste instead of a crisp flake. This is why we use the “Anti-Soggy Bottom” technique. By pre-heating a heavy baking sheet in the oven, we create a “pizza stone” effect. The moment your pan touches that hot metal, the bottom layers of phyllo begin to fry and set instantly, sealing the pastry before the filling can migrate downward.
This thermal shock is non-negotiable for a perfect result. It forces the bottom of the pie to cook at the same rate as the top. Without this step, the top often browns beautifully while the bottom remains undercooked and saturated with butter and cheese whey. By managing the heat from both the top and bottom, you ensure a uniform, golden-brown finish throughout the entire structure.
Essential Components for the Feta Filling
The quality of your ingredients directly impacts the final flavor profile. For the feta, I highly recommend seeking out traditional sheep’s milk feta stored in brine. It has a sharp, tangy bite and a creamy texture that cow’s milk versions often lack. Sheep’s milk feta also holds its shape better during the bake, giving you those lovely little pockets of salty cheese throughout the slice.
To balance the saltiness of the feta, we use ricotta and Greek yogurt. These two ingredients provide structural creaminess and a subtle acidity. The ricotta acts as a binder, ensuring the pie doesn’t crumble into a mess when sliced. Meanwhile, the Greek yogurt adds a refreshing tang that cuts through the richness of the butter. It’s all about that balance of fats and acids.
Don’t overlook the aromatics. Freshly chopped parsley adds a grassy brightness, but the real secret is the nutmeg. Just a quarter teaspoon of nutmeg acts as a savory enhancer, bringing out the earthy notes of the cheese without making the dish taste like dessert. Finally, the two tablespoons of dry breadcrumbs are your insurance policy. They sit at the base of the filling, acting as a sponge to catch any stray moisture before it hits the pastry.
Selecting the Right Phyllo Thickness
Phyllo dough usually comes in different thicknesses, often labeled by number. For this specific pie, a No. 4 (standard) or No. 7 (slightly thicker) works best. The standard No. 4 is ideal because it is thin enough to “scrunch” into delicate, crispy peaks on top without becoming too heavy or doughy. If you use a very thick phyllo, the crinkled top might stay chewy in the center rather than becoming brittle and light.
Step-by-Step: Building the Golden Phyllo Feta Pie
Building this pie is a tactile experience that requires a bit of patience but yields a massive payoff. You want to work relatively quickly so the phyllo doesn’t dry out and become brittle before it hits the pan. Keep a damp kitchen towel over your stack of dough as you work to maintain its flexibility.
The process moves through three distinct phases. First, we build a strong foundation that can support the weight of the cheese. Second, we install our moisture barrier to protect that foundation. Finally, we create the “crinkle top,” which is designed to maximize the surface area exposed to the oven’s heat for the ultimate crunch.
Phase 1: The Radial Layering Technique
Start by brushing your pan generously with butter. Lay your first sheet of phyllo across the pan, letting the excess hang over the sides. Brush it with butter, then rotate the pan about 45 degrees before laying the next sheet. This radial pattern ensures that the overhanging dough is even all the way around the rim.
By overlapping the sheets in this starburst pattern, you create a reinforced “nest.” This is much stronger than simply stacking sheets in one direction. Make sure you brush the butter all the way to the very edges of the overhanging dough. These edges will eventually be folded back over the filling, and they need that fat to stay crisp and golden.
Phase 2: Implementing the Moisture Barrier
Once you have used about two-thirds of your phyllo, it is time for the secret weapon. Sprinkle your dry breadcrumbs evenly over the bottom of the phyllo nest. You aren’t looking for a thick layer; just a light, even dusting will do the trick. This creates a “sandwich” effect where the breadcrumbs sit between the pastry and the filling.
Pour your cheese mixture over the breadcrumbs and spread it gently toward the edges. The breadcrumbs will absorb any liquid released by the eggs or cheese during the first few minutes of baking. This prevents the egg mixture from migrating into the bottom pastry layers, keeping them dry enough to crisp up against the hot pan.
Phase 3: The “Scrunch” Method for Maximum Surface Area
After folding the overhanging edges back over the filling, take your remaining phyllo sheets one by one. Instead of laying them flat, “scrunch” or crinkle them into loose, airy balls. Place these on top of the pie until the entire surface is covered. Brush each crinkle generously with melted butter as you go.
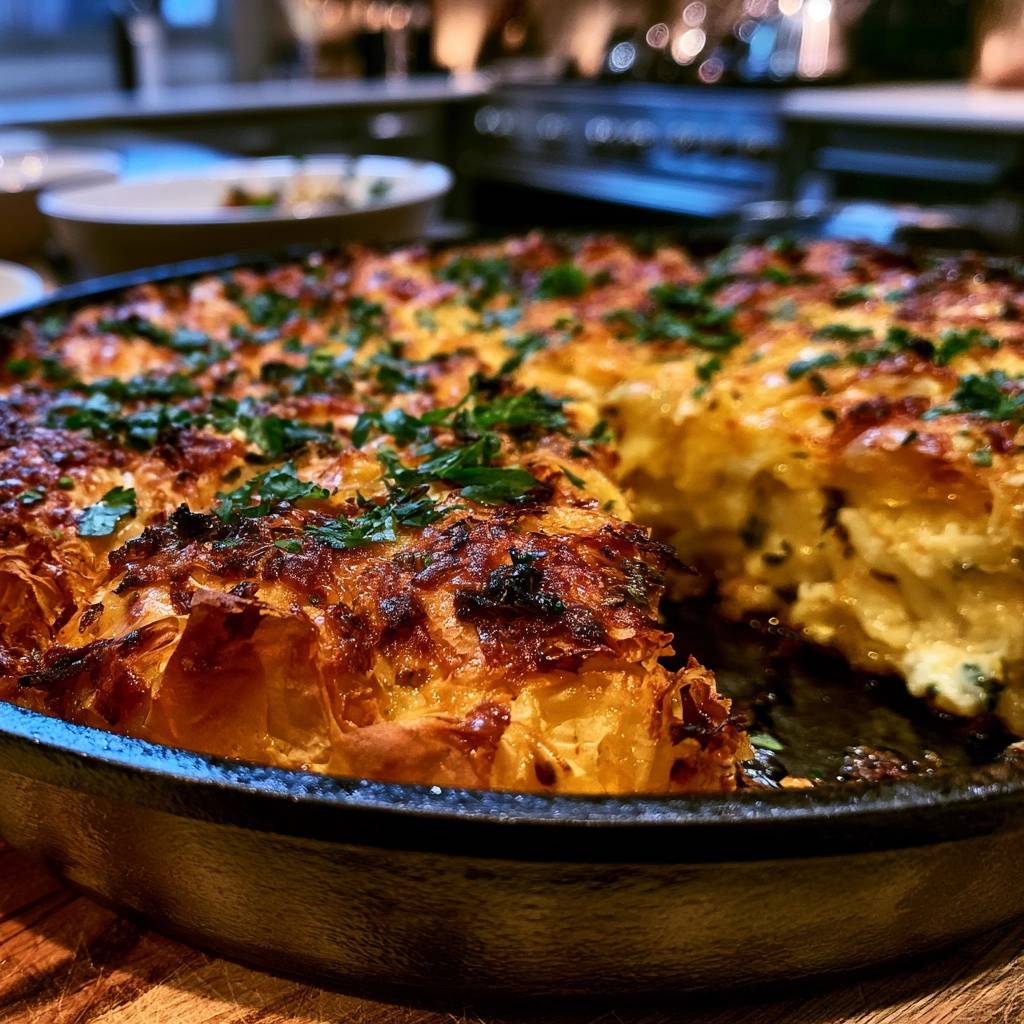
This “scrunch” technique is a game-changer. By creating all those ridges and valleys, you are vastly increasing the surface area of the dough. More surface area means more contact with the dry heat of the oven, which results in significantly more “crunch” per bite. It also looks stunningly rustic and professional once it emerges from the oven.
Thermal Management: The Pre-Heated Sheet Secret
Think of your pre-heated baking sheet as a professional deck oven. When you place your room-temperature pan onto that scorching hot surface, the heat transfer is immediate. This is crucial because the bottom of the pie needs a head start. The filling is dense and cold, which naturally draws heat away from the bottom crust.
By using this method, you counteract that cooling effect. The bottom phyllo layers begin to sizzle and brown the moment they enter the oven. This ensures that by the time the top is a deep, dark golden brown, the bottom is equally firm and toasted. It is the simplest way to upgrade your home baking results without any fancy equipment.
Troubleshooting Common Pastry Pitfalls
If your phyllo cracks while you are unrolling it, don’t panic! Phyllo is very forgiving once it is layered and buttered. Just piece the torn bits together in the pan; the butter acts as a glue, and once it bakes, no one will ever know. The only thing to avoid is letting the dough sit out uncovered for more than a few minutes.
If your filling looks a bit too liquid before you pour it in, you can add an extra tablespoon of Greek yogurt or a handful of extra feta to thicken it up. However, the breadcrumb barrier should handle most minor moisture issues. The most important thing is to score the top crinkled layers with a sharp knife before baking. This allows steam to escape from the interior, preventing the crust from “ballooning” and keeping the filling fluffy rather than gummy.
Lastly, if you notice the top browning too quickly before the 45-minute mark, simply tent a piece of foil loosely over the top. This protects the delicate peaks of the “scrunch” while allowing the heat to continue penetrating the center of the pie. You want a deep mahogany color, but you don’t want it to char.
Optimal Pairings for Savory Cheese Pies
Because this pie is rich with butter and cheese, you want to serve it with something high in acid to cleanse the palate. A simple arugula salad with a heavy squeeze of lemon and a drizzle of olive oil is the perfect companion. The peppery bite of the greens cuts right through the creamy feta filling.
Roasted cherry tomatoes with a splash of balsamic vinegar also work beautifully. The sweetness of the tomatoes and the sharp vinegar provide a great contrast to the salty pie. For a more traditional Greek vibe, a cold cucumber and dill salad with a light vinegar dressing offers a refreshing, crunchy side that keeps the meal feeling light despite the richness of the pastry.
Make-Ahead Strategies and Storage
You can absolutely prepare this pie in advance. If you want to bake it later, assemble the entire pie but do not brush the final layer of butter on the very top until you are ready to bake. Wrap it tightly in plastic wrap and freeze it. When you’re ready, bake it directly from frozen, adding about 10 to 15 minutes to the total cook time.
For leftovers, avoid the microwave at all costs! Microwaves will turn that glorious, crispy phyllo into a limp, chewy mess in seconds. Instead, reheat slices in a 350°F oven for about 10 minutes. This will recrisp the butter in the layers and restore that signature crunch. Stored in an airtight container, the pie will stay fresh in the refrigerator for up to three days.
Expert Tips for Professional Results
The most important tip I can give you is the “Resting Rule.” You must let the pie rest in the pan for at least 15 minutes after taking it out of the oven. I know it smells incredible and you want to dive in, but the proteins in the eggs and feta need time to set. If you cut it too early, the filling will slump. Waiting ensures a clean, vertical slice.
When it comes to the butter, make sure it is melted but not piping hot. If the butter is too hot, it can actually start to “cook” or soften the thin phyllo sheets before they even get to the oven, making them harder to handle. Aim for a warm, fluid consistency that glides easily over the pastry with a soft brush.
Finally, use a serrated knife (like a bread knife) to cut the pie. Phyllo is incredibly delicate once baked. A standard chef’s knife tends to crush the layers, whereas a serrated knife saws through the “scrunch” top without shattering it into a million pieces. Use a gentle sawing motion for the cleanest presentation.
Frequently Asked Questions
Can I use frozen spinach to make this a Spanakopita?
Yes, you can add spinach, but you must be extremely careful with moisture. Thaw the spinach completely and squeeze it in a kitchen towel until it is bone-dry. If you skip this, the extra water will overwhelm the breadcrumb barrier and lead to a soggy bottom. Mix the dry spinach into the cheese mixture before filling the pie.
What is the best substitute for Ricotta?
If you don’t have ricotta, small-curd cottage cheese is an excellent substitute. It provides a similar moisture content and structural support. For an even richer version, you could use mascarpone, though it will make the pie much heavier. Always ensure whatever substitute you use is relatively thick and not watery.
Why did my pie leak butter?
A little butter leakage is normal, especially if you are using a springform pan which isn’t perfectly airtight. However, if it’s a lot, you may have over-saturated the layers. Use a light hand when brushing; you want a thin, even coat, not a puddle. Also, ensure your pan is placed on the baking sheet to catch any drips and prevent smoke in your oven.
Can I use olive oil instead of butter?
You can use olive oil for a more traditional Mediterranean flavor, but the texture will be slightly different. Butter contains milk solids that help with browning and provide a distinct “shatter” to the crust. Olive oil will make the crust crunchier and harder, but less flaky. A 50/50 mix of butter and olive oil is a great middle-ground option.
How do I prevent the top from browning too fast?
The “scrunch” method creates high peaks that are prone to browning quickly. If the top looks dark golden but the center still feels jiggly, loosely cover the pan with aluminum foil. This reflects the direct radiant heat while allowing the ambient heat of the oven to finish cooking the egg and cheese filling through to the center.
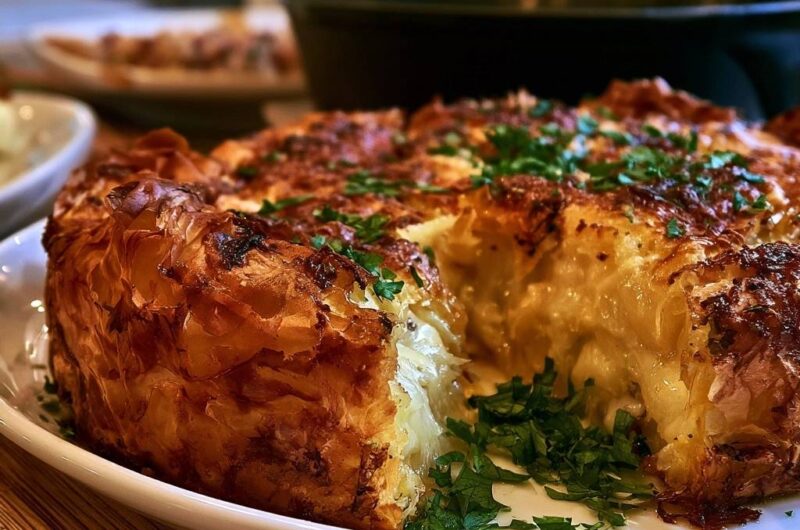
Golden Phyllo Feta Pie
Course: Main CourseCuisine: Greek InspiredDifficulty: easy8
servings25
minutes50
minutes75
Minutes340
kcalGreek Inspired
Ingredients
1 package (16 oz) phyllo dough, thawed
1 cup unsalted butter, melted
1 pound feta cheese, crumbled
1 cup ricotta cheese (for structural creaminess)
3 large eggs, beaten
1/2 cup Greek yogurt
1/4 cup fresh parsley, finely chopped (plus extra for garnish)
1/2 teaspoon black pepper
1/4 teaspoon nutmeg
2 tablespoons dry breadcrumbs (the moisture barrier)
Directions
- Place a heavy, flat baking sheet on the middle rack of the oven and preheat to 375°F (190°C). Heating the pan first is the key to sealing the bottom layers instantly upon contact.
- In a large bowl, combine the crumbled feta, ricotta, eggs, Greek yogurt, parsley, pepper, and nutmeg. Mix until well combined but still slightly chunky.
- Brush a 9-inch springform pan or deep-dish round cake pan generously with melted butter.
- Lay one sheet of phyllo across the pan, letting the edges hang over the sides. Brush with butter. Rotate the pan 45 degrees and add another sheet. Repeat this process until you have used 2/3 of the phyllo package.
- To prevent a soggy bottom, sprinkle the 2 tablespoons of dry breadcrumbs evenly over the base phyllo layer before adding the filling. This acts as a moisture barrier.
- Pour the cheese mixture into the center and spread evenly.
- Fold the overhanging phyllo edges back over the filling toward the center.
- Take the remaining phyllo sheets and “scrunch” or crinkle them individually into loose balls. Place them on top of the pie, brushing each with butter as you go. This creates the high-surface-area, craggy texture seen in the image which maximizes crunch.
- Use a sharp knife to gently score through the top crinkled layers. This allows steam to escape so the interior stays fluffy rather than gummy.
- Carefully place the pan directly onto the pre-heated baking sheet in the oven.
- Bake for 45 to 50 minutes until the crust is a deep, dark golden brown and the center has puffed slightly.
- Let the pie rest in the pan for 15 minutes. This is crucial for the cheese to set so you get the clean, vertical slice shown in the photo. Remove the springform ring, garnish with fresh parsley, and serve.
Notes
- Pre-heating the baking sheet is essential for sealing the bottom layers. Letting the pie rest for 15 minutes after baking ensures clean slices and allows the cheese to set.