Mastering the Salted Caramel S’mores Stack
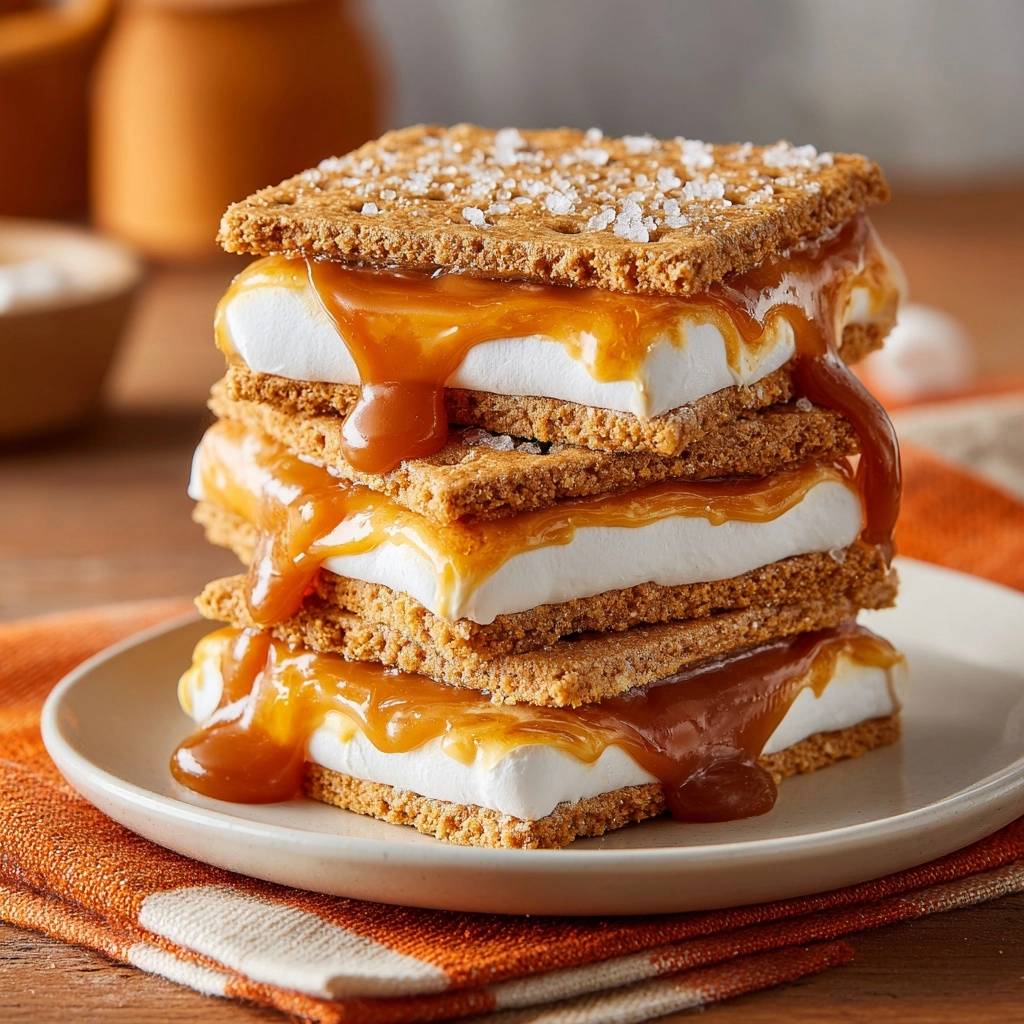
Imagine biting into a towering dessert where the graham cracker actually snaps instead of crumbling into a soggy mess. Most people struggle with s’mores because the heat from the marshmallow turns the cracker into a sponge, especially when you add heavy sauces. This Salted Caramel S’mores Stack solves that architectural nightmare by using a specific temperature-contrast method.
We aren’t just melting sugar here; we’re engineering a dessert that maintains its structural integrity while delivering a molten, gooey center. By controlling the viscosity of the caramel and the “skin” of the marshmallow, you can build a triple-stack that looks like it belongs in a high-end bistro. It’s all about managing the battle between liquid sugar and crispy wheat.
The secret to this professional result is the “Anti-Soggy Cracker Hack.” Instead of using room-temperature ingredients, we use chilled caramel to create a thermal barrier. This prevents the sauce from soaking into the cracker’s pores, ensuring every bite has that satisfying, loud crunch you crave. Therefore, your stack stays upright and crisp until the very last bite.
The Physics of the Anti-Soggy Cracker Hack
Graham crackers are naturally hygroscopic, which means they act like tiny magnets for moisture. When you layer warm marshmallow and room-temperature caramel, the water content in those ingredients migrates directly into the cracker. Within minutes, the cracker loses its snap and becomes chewy. This is why traditional “loaded” s’mores often fall apart before you can finish them.
However, we can defeat this process using the “Barrier Method.” By manipulating the temperature of the caramel, we change how it interacts with the cracker’s surface. Cold caramel has a much higher viscosity, meaning its molecules move slowly and don’t penetrate the porous surface of the graham cracker as easily. It sits on top of the cracker rather than soaking through it.
In addition, the chilled caramel acts as a heat sink for the toasted marshmallow. When the two meet, the caramel “seizes” slightly, creating a thick, tacky layer that bonds the stack together. This temperature control preserves the cracker’s structural snap while providing that signature molten pull. It’s a simple application of physics that completely changes the eating experience.
Viscosity and Thermal Mass in Dessert Assembly
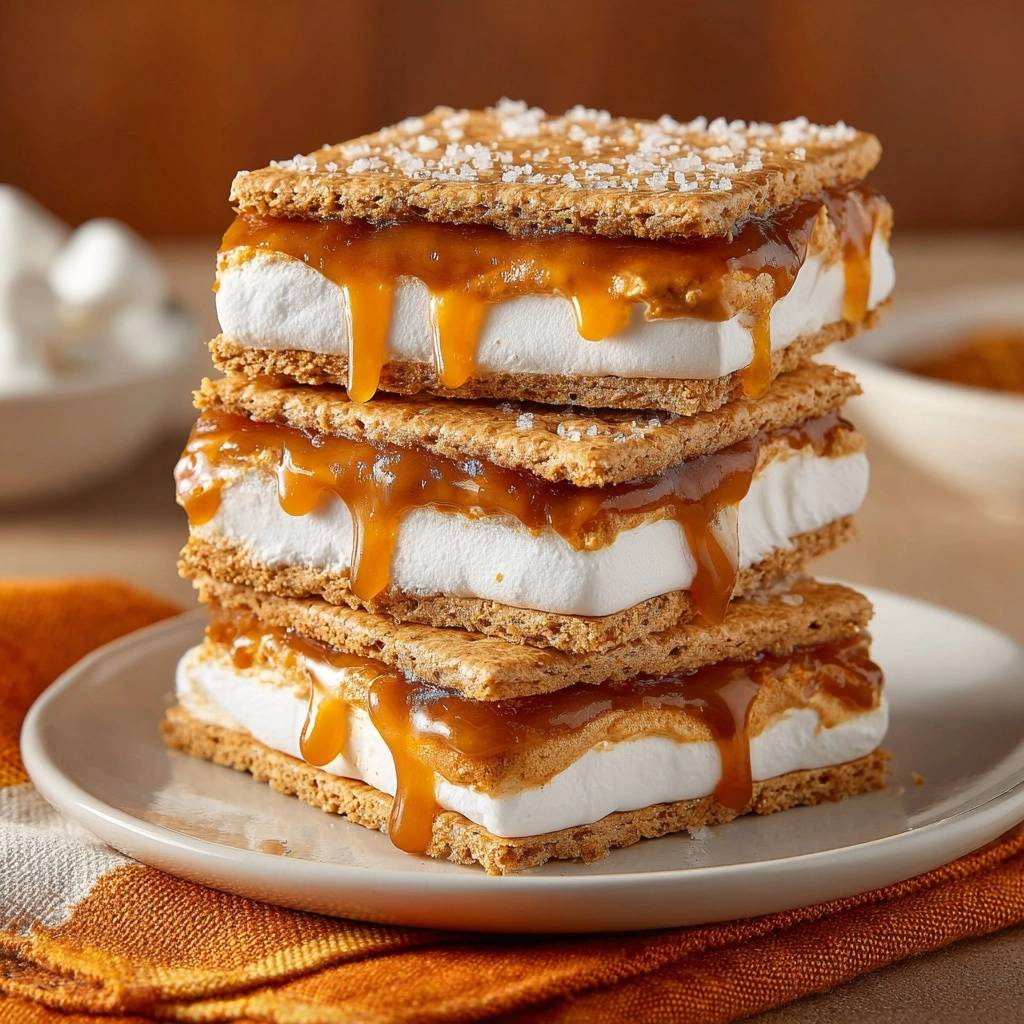
Chilling the caramel is the most important step in this entire process. When you put the sauce in the freezer, you’re increasing its internal friction. This thickness is what allows the caramel to support the weight of the upper layers without squishing out the sides. If the caramel is too thin, the triple-stack will slide like a leaning tower.
Furthermore, the thermal mass of the cold caramel helps stabilize the marshmallow’s interior. As the hot marshmallow meets the cold sauce, the outer layer of the marshmallow firms up. This creates a “skin” that holds the gooey center in place. Without this temperature contrast, the entire stack would liquefy into a puddle on your plate.
Essential Components for a Salted Caramel S’mores Stack
You only need four ingredients, but the quality of each one determines your success. Firstly, look for “stacker-style” marshmallows. These are flat and rectangular rather than cylindrical. This shape provides a larger, flatter surface area, which is vital for supporting the weight of a triple-stack. They act as the sturdy bricks in your dessert skyscraper.
Secondly, the caramel sauce must be a premium, thick variety. Avoid thin ice cream toppings that come in squeeze bottles; they contain too much water and will ruin the cracker. You want a sauce that stays on a spoon when turned upside down. This thickness ensures the “culinary glue” effect works perfectly during assembly.
Lastly, the salt choice is non-negotiable. Use Maldon-style sea salt flakes rather than standard table salt. Table salt is too fine and will simply dissolve into the caramel, making it taste overly salty. Flake salt provides a crystalline crunch and a burst of clean salinity that cuts through the intense sweetness of the sugar. It also adds a beautiful, professional visual finish.
Selecting the Right Graham Cracker Foundation
While honey graham crackers are the classic choice, you need to ensure they are fresh and crisp. Store-brand crackers are often thinner and more prone to snapping under pressure. Premium brands usually have a denser crumb that handles the weight of the caramel better. If you prefer a deeper flavor, cinnamon grahams add a lovely spice that complements the burnt sugar notes of the caramel.
Always use the square perforated lines to break your crackers cleanly. A jagged edge will make the stack unstable. For a triple-stack, you need six perfect squares. Any cracks in the foundation will cause the caramel to leak through, so discard any broken pieces before you start the broiling process.
The Viscosity Hack: Preparing the Caramel Base
Before you even turn on the oven, you must prep the caramel. Start by whisking your caramel sauce in a small bowl for about 30 seconds. This aeration process introduces tiny micro-bubbles that lighten the texture and make the sauce feel more luxurious on the tongue. It also ensures the salt and sugar are perfectly distributed.
Next, place the bowl in the freezer for exactly 5 to 8 minutes. You aren’t trying to freeze it solid; you want it to reach a “slow-moving” state. When you tilt the bowl, the caramel should flow like heavy lava. This specific texture is what prevents the sauce from running off the marshmallow and soaking into the cracker foundation.
Precision Broiling for Structural Marshmallow Integrity
Preheat your broiler to high and line a baking sheet with parchment paper. This is a crucial step because marshmallows become incredibly sticky once heated. If they stick to the pan, you’ll tear the “skin” of the marshmallow while trying to remove them, which ruins the structural integrity of your stack.
Place three crackers on the tray with a marshmallow centered on each. Slide them under the broiler and do not walk away. In about 45 to 90 seconds, the marshmallows will puff up and turn a beautiful white-gold color. You must pull them out before they reach the “liquefaction point.” If they start to melt into a flat puddle, they won’t be able to support the weight of the stack.
Look for a firm, toasted exterior with a soft, pillowy center. This toasted skin acts as a container for the gooey insides. Therefore, the marshmallow stays tall and proud even after you add the heavy caramel and the additional cracker layers. Precision is the difference between a masterpiece and a mess.
Building the Architecture: The Triple-Stack Assembly
Once the tray is out of the oven, you have to move quickly but gently. The marshmallows are at their most fragile state right now. Use a small spoon to place a dollop of that chilled caramel directly onto the center of each hot marshmallow. You will see the caramel “seize” and thicken as it hits the heat, which is exactly what you want.
Place a plain graham cracker square on top of the first caramel-topped marshmallow. Press down with the lightest touch imaginable. You want the layers to bond, but you don’t want to squeeze the filling out. Repeat this process for the second and third layers. The tacky caramel and warm marshmallow work together as a culinary glue to hold the tower upright.
As you stack, ensure each layer is perfectly centered. If one cracker is slightly off-balance, the weight of the 640-calorie stack will cause it to tip over. If you feel the stack shifting, hold it in place for five seconds to let the caramel set. This brief pause allows the temperatures to equalize and creates a stable bond between the layers.
Applying the Moisture Barrier Layer
The transition from the oven to the assembly board must be immediate. If the marshmallow cools too much, the caramel won’t “seize” and bond correctly. By spooning the cold sauce onto the hot sugar, you create a localized cooling effect. This creates a thick barrier that protects the top cracker from the steam rising out of the toasted marshmallow center.
Troubleshooting Your Salted Caramel S’mores Stack
If your caramel is running down the sides of the stack, it likely wasn’t chilled long enough. You can quickly fix this by popping the assembled stack into the fridge for 60 seconds to set the sauce. However, if the marshmallows catch fire in the oven, don’t panic. Just blow them out and use them anyway; the charred flavor actually pairs beautifully with the salty caramel.
Sometimes a stack might start to lean because the marshmallow is too soft. If this happens, you can use a wooden skewer to stabilize the center while it sets. Just remember to remove the skewer before serving. Most structural failures happen because of too much pressure during assembly, so always remember to be gentle with your layers.
Managing Heat and Humidity in the Kitchen
Ambient temperature plays a huge role in how this dessert sets. If your kitchen is very hot or humid, the graham crackers will soften much faster. In these conditions, you should serve the stack immediately after assembly. You might also need to leave the caramel in the freezer for an extra two minutes to ensure it stays thick during the building process.
Flavor Variations and Texture Swaps
Once you master the basic architecture, you can start experimenting with flavors. Try using a dark chocolate-infused caramel for a richer, more bitter profile that balances the sugar. You could also swap the standard sea salt for smoked sea salt to mimic the flavor of a real campfire. These small changes add a sophisticated edge to the classic treat.
Artisanal marshmallows are another great way to change the experience. Vanilla bean or espresso-flavored marshmallows add a layer of complexity that pairs perfectly with salted caramel. Just ensure any flavored marshmallows you buy are thick enough to support the stack. Avoid “mini” marshmallows, as they lack the surface area needed for this specific triple-stack design.
Expert Tips for High-Impact Visual Presentation
To get that professional look, pay attention to the “Visual Finish.” When you sprinkle the Maldon salt, hold your hand about 12 inches above the stack. This height allows the flakes to distribute evenly across the top cracker rather than clumping in one spot. The crystalline salt should catch the light and look like tiny diamonds on top of the dessert.
If you are taking photos, wait about 30 seconds after assembly before breaking the stack. This gives the caramel just enough time to reach a “molten” state without being too runny. When you pull the crackers apart, you’ll get that perfect, stretchy sugar pull that everyone loves. Serve it on a dark plate to make the golden colors of the cracker and caramel really pop.
Frequently Asked Questions
Can I use homemade caramel sauce for this stack?
Yes, you can use homemade sauce, but it must be cooked to a thick consistency. If your homemade caramel is too thin (like a syrup), it will soak into the crackers instantly. Ensure your recipe reaches the “firm ball” stage or is specifically designed as a thick dipping caramel. Store-bought premium sauces are often more stable for this specific architectural build.
How do I prevent the marshmallows from catching fire?
The key is rack positioning. Keep your oven rack in the middle position rather than the top one. This provides a more even “soak” of heat rather than an intense “sear.” Watch the marshmallows through the oven window the entire time. If they start to turn dark brown or black, pull them out immediately. A broiler can go from golden to burnt in less than five seconds.
Is there a dairy-free alternative that maintains the structure?
You can use coconut-based caramel alternatives, but they require more precision. Coconut oil has a lower melting point than butter, so dairy-free caramels tend to liquefy faster. You must keep the dairy-free caramel in the freezer until the very second you are ready to apply it. This ensures it stays thick enough to act as a barrier before it warms up.
Can these be made in advance for a party?
This is an “immediate serve” dessert. Because the graham crackers are so sensitive to moisture, they will begin to soften within 15 to 20 minutes of assembly. Additionally, the magic of this dish lies in the temperature contrast between the cold caramel and the warm marshmallow. If you make them ahead of time, you lose that sensory experience and the crackers will become chewy.
What is the best way to scale this for a large group?
To serve a crowd, use an assembly-line workflow. Toast all the marshmallows on one large sheet pan. While they are in the oven, have your crackers laid out on a serving platter. Have one person handle the “chilled caramel” rotation, bringing a fresh bowl out of the freezer every few minutes to ensure the viscosity remains consistent for every single stack you build.
If you like this toasted marshmallow technique, try these crunchy s’mores balls for a freezer-friendly twist.
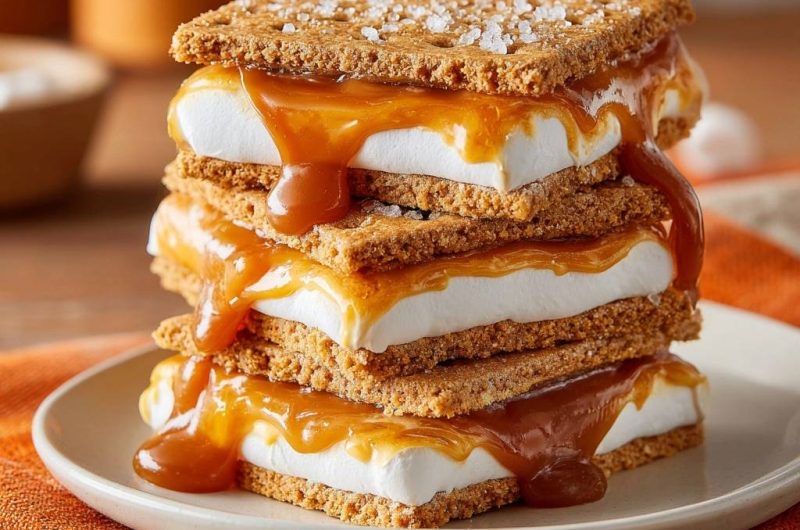
S’mores Stack
Course: DessertCuisine: AmericanDifficulty: easy1
serving10
minutes5
minutes640
kcal15
MinutesA towering triple-stack s’more that solves the problem of soggy crackers. By using chilled caramel and precision broiling, this recipe creates a stable, crunchy, and molten dessert experience with a perfect balance of sweet and salty flavors.
Ingredients
6 graham cracker squares (for a triple stack)
3 large marshmallows (flat/stacker style preferred)
1/2 cup premium thick sea salt caramel sauce (cold)
1 tablespoon coarse flake sea salt (Maldon style)
Directions
- The Viscosity Hack: Place your caramel sauce in a small bowl and whisk it for 30 seconds to aerate it slightly, then place it in the freezer for 5-8 minutes. You want the caramel to be very thick and “slow-moving.” This prevents it from immediately soaking into the cracker pores upon contact.
- The Toast: Preheat your oven broiler to high. Arrange 3 graham cracker squares on a parchment-lined baking sheet. Place one marshmallow in the center of each cracker.
- Precision Broiling: Slide the tray under the broiler for 45-90 seconds. Watch constantly; you want the marshmallows to puff and turn white-gold, but not liquefy. The goal is a soft interior with a firm outer “skin” to support the stack.
- The Moisture Barrier: Remove from the oven. Immediately spoon a generous dollop (about 1.5 tablespoons) of the chilled caramel onto the center of each hot marshmallow. The cold caramel will “seize” slightly against the heat, creating a thick, gooey layer that stays put rather than running off instantly.
- Assembly: Place a plain graham cracker square on top of the first caramel-topped marshmallow. Press down very gently. Repeat this process, stacking the three sandwiches on top of each other. The tacky nature of the warm marshmallow and thick caramel will act as a culinary “glue.”
- The Visual Finish: As shown in the image, sprinkle a generous pinch of coarse flake sea salt over the very top cracker. The salt should be visible and crystalline.
- Serve: Serve immediately. The temperature contrast between the chilled caramel and the toasted marshmallow creates the perfect “molten” pull while the cracker remains 100% crunchy.
Notes
- The secret is the barrier method: chilling the caramel prevents it from soaking into the cracker pores, ensuring the stack remains 100% crunchy.