Sticky Glazed Chicken Thighs: Perfect Glaze, No Scorching!
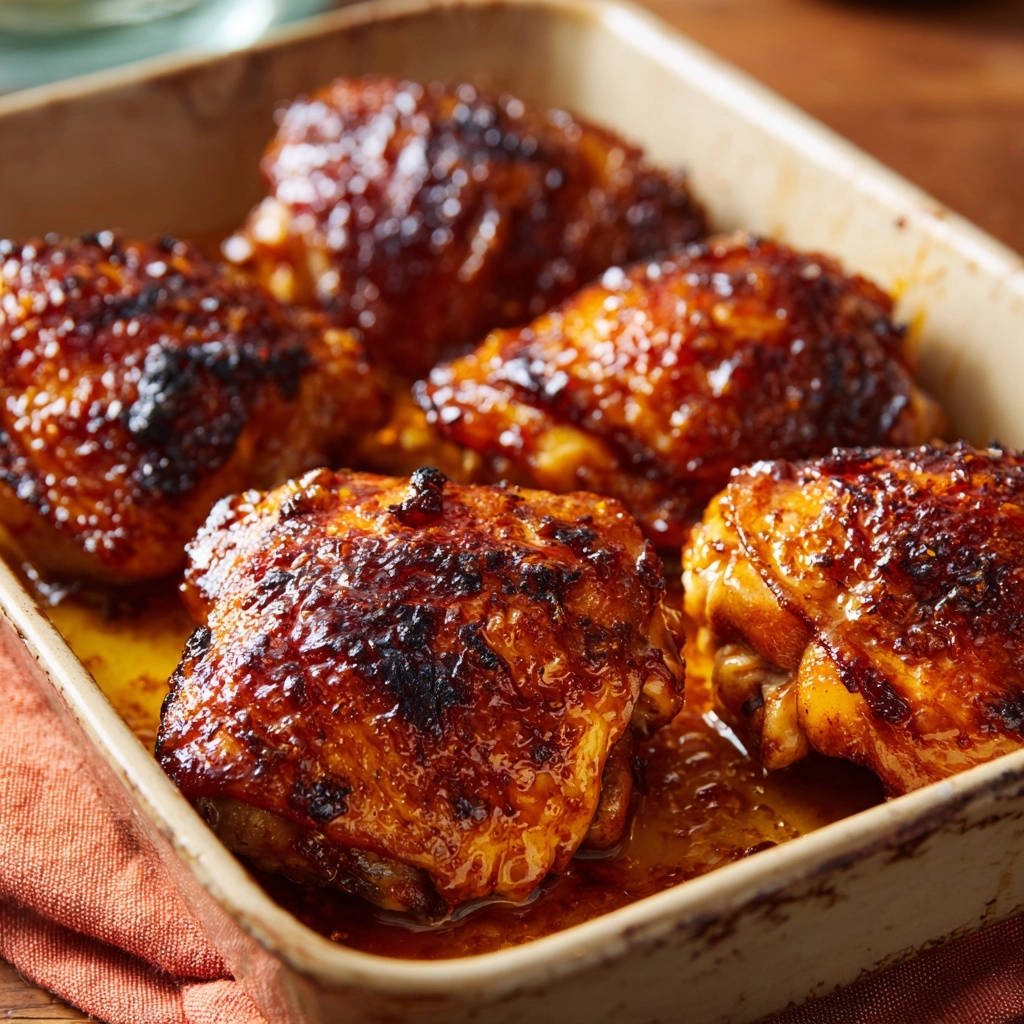
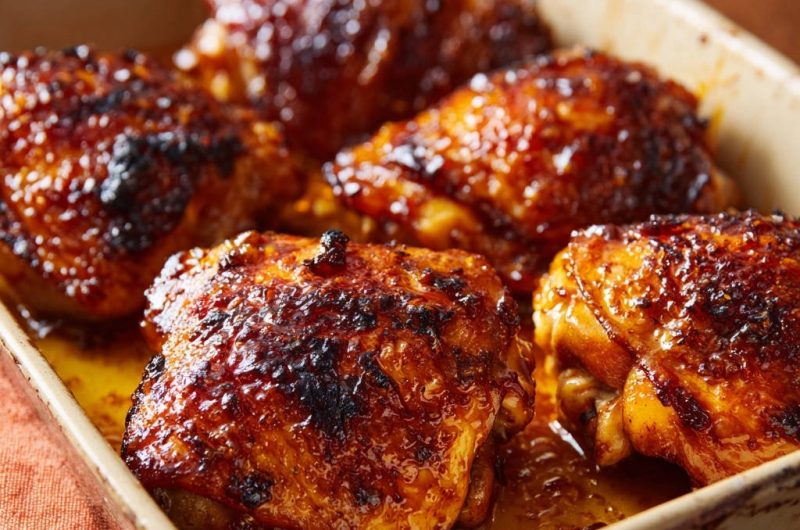
There’s nothing more frustrating than wanting that beautiful, sticky, caramelized glaze on your chicken, only to pull it out of the oven looking scorched. After countless attempts, I finally cracked the code to achieve that perfect, irresistible sweet and savory crust every single time, transforming weeknight dinners forever.
If you’re after that same sticky glaze with extra crunch, try the baked chicken thighs with crispy skin version.
Unlocking the Perfect Glaze: Why This Recipe Stands Out
This recipe for sticky glazed chicken thighs is truly a game-changer, designed to deliver that coveted deeply caramelized, sticky-sweet crust without any of the usual guesswork or risk of burning. It’s a method born from experience, perfected to be foolproof for any home cook.
The “No Burn” Secret: A Flawless Caramelized Crust
The magic of this recipe lies in its ingenious two-stage glaze application and the careful balance of ingredients, especially the crucial addition of water. This specific combination ensures the sugars caramelize beautifully and deeply, developing incredible flavor and stickiness without ever scorching or turning bitter.
Effortless Weeknight Dinner Perfection
Despite its gourmet results, this sticky glazed chicken thighs recipe is remarkably simple and quick to prepare, making it an absolute champion for busy weeknights. Minimal active time in the kitchen yields maximum flavor impact, proving that extraordinary meals don’t require hours of effort.
Beyond Basic: A Symphony of Sweet and Savory
Prepare for a taste experience that hits all the right notes: a rich, savory chicken complemented by a perfectly balanced sweet, umami-rich glaze. The resulting sticky glazed chicken thighs boast a complex flavor profile that is both comforting and exciting, making it an instant family favorite.
If the glossy finish and tender meat appeal to you, this sticky herb glazed chicken follows a similar approach.
The Essential Building Blocks for Irresistible Glazed Chicken Thighs
Chicken Thighs: The Flavorful Foundation
Bone-in, skin-on chicken thighs are the undisputed star of this dish, offering unparalleled flavor and a naturally moist texture that holds up beautifully to baking. The skin, when properly prepped, crisps wonderfully and becomes an integral part of the sticky, glazed exterior.
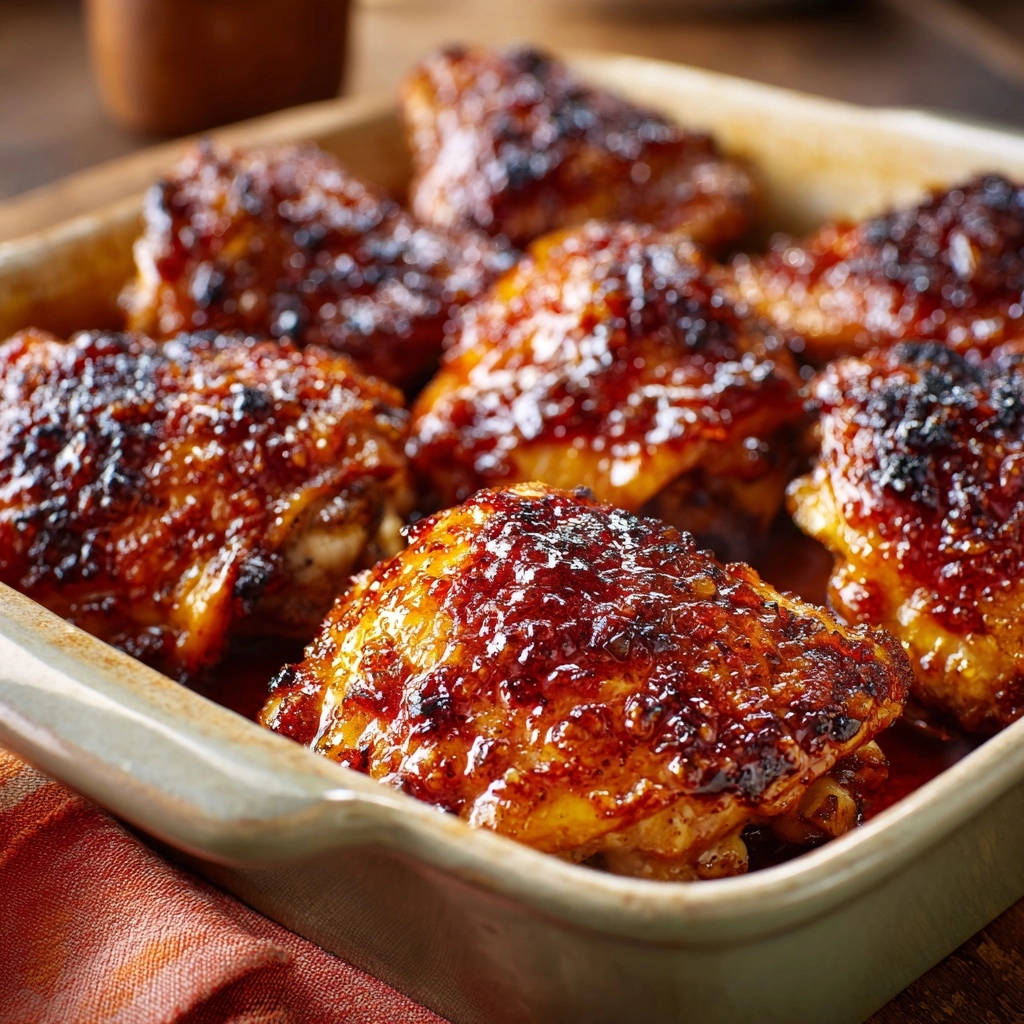
Crafting the Signature Sticky Glaze: Key Ingredients
- Brown Sugar:
Provides the essential sweetness and caramelizes beautifully, forming the sticky, golden crust that is the hallmark of these sticky glazed chicken thighs.
- Soy Sauce:
Adds a crucial umami depth and savory balance, enhancing the overall flavor profile of the chicken and glaze.
- Garlic Powder & Onion Powder:
Infuse a foundational aromatic flavor that complements the chicken and glaze, creating a rich base.
- Smoked Paprika:
Contributes a subtle smoky complexity and a lovely reddish hue to the glaze, adding another layer of flavor dimension.
- Water:
This is the secret weapon! It helps control the sugar’s caramelization, preventing it from burning too quickly and ensuring a tender, non-scorched glaze.
- Salt & Black Pepper:
Basic seasonings that bring out and balance all the other flavors in the dish, ensuring a well-rounded taste.
Your Kitchen Arsenal for Perfect Glazed Chicken Thighs Success
- Baking Dish:
A ceramic or glass baking dish ensures even heat distribution and allows the chicken to cook in a single layer for optimal browning and consistent results.
- Whisk:
Essential for thoroughly combining the glaze ingredients, ensuring the brown sugar dissolves completely for a smooth, consistent sauce that adheres perfectly.
- Pastry Brush:
Crucial for even and consistent application of the glaze in two stages, ensuring every bite is flavorful and perfectly coated with that irresistible sticky finish.
- Meat Thermometer:
The most reliable way to ensure your chicken is cooked to a safe 165°F (74°C) without the risk of overcooking and drying out, guaranteeing juicy results.
- Paper Towels:
Absolutely necessary for thoroughly patting the chicken dry, which is key for crispy skin and for the glaze to adhere properly, preventing a soggy texture.
Mastering the Method: Your Path to Sticky, Never-Burnt Glazed Chicken Thighs
- Preheat Oven:
Set your oven to 375°F (190°C). Proper preheating is crucial for even cooking and glaze development, ensuring the chicken starts cooking immediately upon entering the oven for optimal results.
- Whisk the Glaze:
In a small bowl, combine the brown sugar, soy sauce, garlic powder, onion powder, smoked paprika, salt, black pepper, and water. Whisk vigorously until the sugar is mostly dissolved and the mixture is well combined. This unique glaze, with its controlled sugar and water content, is engineered to caramelize without scorching, creating truly irresistible sticky glazed chicken thighs.
- Prepare Chicken:
Pat the chicken thighs completely dry with paper towels. This step is vital for achieving crispy skin and ensuring the glaze adheres properly rather than creating a soggy surface. Place them skin-side up in a single layer in your chosen baking dish, ensuring they are not crowded.
- First Glaze Application:
Brush about half of the prepared glaze generously over the chicken thighs. Ensure an even coating on all visible surfaces of the chicken skin to build the initial layer of flavor.
- Initial Bake:
Bake for 30 minutes. During this stage, the chicken will begin to cook through, and the glaze will start to thicken and develop initial caramelization. The added water in the glaze helps regulate this process, preventing premature burning and setting the stage for perfectly sticky glazed chicken thighs.
- Second Glaze Application:
Remove the baking dish from the oven. Carefully brush the remaining glaze over the chicken thighs, ensuring a fresh, even coat for the final phase of cooking. This two-stage method is key to building deep flavor and a resilient, sticky crust without burning.
- Final Bake & Monitor:
Return the chicken to the oven and continue baking for another 15 to 20 minutes, or until the internal temperature of the chicken reaches 165°F (74°C) when measured with a meat thermometer. During this final stage, the deep, rich caramelization truly develops. Keep a close eye on the glaze; if you notice it getting too dark too quickly, you can loosely tent the dish with aluminum foil to slow browning and protect your perfect sticky glazed chicken thighs.
- Rest Before Serving:
Allow the chicken to rest for 5 minutes after removing it from the oven. This crucial step allows the juices to redistribute throughout the meat, resulting in exceptionally tender and moist chicken, enhancing your dining experience.
Chef’s Secrets: Elevate Your Glazed Chicken Thighs to Perfection
Don’t Skip Patting Dry: This cannot be emphasized enough! Excess moisture on the chicken skin inhibits browning and prevents the glaze from adhering properly. A truly dry surface is the foundation for crispy skin and a perfectly sticky glaze.
Monitor Glaze in Final Stage: The last 15-20 minutes are critical for caramelization. While our recipe is designed to prevent burning, all ovens vary. If you see the glaze darkening rapidly, loosely tenting with foil is a quick and effective safeguard for your sticky glazed chicken thighs.
Use a Meat Thermometer: For perfectly cooked, juicy chicken every single time, an instant-read thermometer is your most reliable tool. Aim for 165°F (74°C) to ensure safety without overcooking and drying out the meat.
Resting is Essential: Even a short 5-minute rest allows the meat fibers to relax and reabsorb juices. Skipping this step can lead to drier chicken, as the precious juices would run out when cut, compromising the tenderness.
Don’t Crowd the Pan: Give your chicken thighs adequate space in the baking dish. Crowding causes steam, which prevents the skin from crisping and the glaze from caramelizing evenly, leading to an inferior crust.
Consider a Wire Rack: For even crisper skin all around, place the chicken on a wire rack set inside your baking dish. This allows air to circulate underneath, promoting uniform crispness and glaze development.
What to Serve With the Chicken
The sticky glaze on these chicken thighs pairs well with a cool, crunchy side to balance the sweetness.
- Try the Creamy Poppy Seed Coleslaw
What to Serve with Your Irresistible Sticky Glazed Chicken Thighs
Classic Pairings for a Balanced Meal
- Steamed Rice or Quinoa:
Perfect for soaking up every delicious drop of that glorious sticky glaze, making each bite incredibly flavorful and satisfying.
- Roasted Vegetables:
Simple roasted broccoli, asparagus, or green beans tossed with a little olive oil and garlic make a fresh, vibrant counterpoint to the rich chicken.
- Simple Green Salad:
A light, crisp green salad with a bright vinaigrette dressing provides a refreshing contrast, cutting through the richness of the chicken and balancing the meal.
Creative Twists for an Elevated Experience
- Creamy Mashed Potatoes:
The smooth, comforting texture of mashed potatoes perfectly complements the tender chicken and sweet-savory glaze, creating a hearty and delicious pairing.
- Asian-Inspired Slaw:
A crunchy cabbage slaw with a sesame-ginger dressing adds a vibrant texture and zesty flavor, echoing the Asian notes in the glaze and offering a refreshing bite.
- Corn on the Cob:
Especially in summer, grilled or boiled corn on the cob is a simple, naturally sweet addition that pairs wonderfully with sticky chicken, adding a touch of seasonal charm.
Planning Ahead: Make-Ahead and Storage Solutions for Glazed Chicken Thighs
Can I Prepare the Glaze in Advance?
Yes, absolutely! The glaze mixture can be whisked together and stored in an airtight container in the refrigerator for up to 3-4 days. This makes weeknight cooking even faster and more convenient, streamlining your meal prep.
Storing Leftover Chicken
Store any leftover sticky glazed chicken thighs in an airtight container in the refrigerator for up to 3-4 days. For longer storage, freeze them in a freezer-safe container for up to 2-3 months. Thaw overnight in the refrigerator before reheating.
Reheating for Best Results
For best results, reheat leftover chicken in a preheated oven at 350°F (175°C) for about 10-15 minutes, or until heated through. You can add a splash of water or broth to the baking dish and cover it loosely with foil to help maintain moisture and prevent drying out.
Glazed Chicken Thighs Troubleshooting: Solving Common Challenges
Why is My Glaze Burning?
This often happens if the oven is too hot, or if the glaze doesn’t have enough moisture to slow caramelization. Ensure your glaze contains the specified amount of water, and critically, don’t hesitate to tent the chicken loosely with foil in the final baking stage if it’s browning too quickly.
My Chicken Skin Isn’t Crispy
The most common culprit is not thoroughly patting the chicken dry before applying the glaze. Moisture on the skin prevents it from crisping. Additionally, ensure chicken thighs are placed in a single layer without crowding the baking dish, allowing air to circulate for optimal crispness.
Chicken is Dry
Overcooking is the primary reason for dry chicken. Always use a reliable meat thermometer and remove the chicken once it reaches an internal temperature of 165°F (74°C). The essential resting period after baking also significantly contributes to juiciness by allowing juices to redistribute.
Your Top Sticky Glazed Chicken Thighs Questions, Answered!
Can I Use Boneless, Skinless Chicken Thighs?
Yes, you can substitute boneless, skinless chicken thighs, but be aware that the cooking time will be shorter (around 20-25 minutes total). The glaze might also adhere differently without the skin. Adjust baking time accordingly and monitor closely to prevent overcooking.
Is This Recipe Spicy?
No, this recipe is savory and sweet with a pleasant hint of smokiness from the paprika. If you prefer a little heat, you can easily add a pinch of cayenne pepper, a dash of sriracha, or some red pepper flakes to the glaze mixture for a kick.
Can I Grill This Recipe?
While designed for the oven, you could adapt it for the grill. Cook over medium-high heat, brushing with glaze in stages as per the recipe, but be extra vigilant about burning due to direct heat. Consider par-baking the chicken briefly in the oven first to set the glaze before finishing on the grill for the best sticky glazed chicken thighs.
What if I don’t have smoked paprika?
You can substitute regular sweet paprika, but you will miss the subtle smoky depth that smoked paprika provides. For a closer approximation, you could add a tiny pinch of liquid smoke (use sparingly!) or a dash of chipotle powder if available for a similar flavor profile.
Can I use chicken breasts instead?
Yes, but chicken breasts are leaner and cook faster. Use bone-in, skin-on breasts if possible for best flavor and moisture. Adjust cooking time and rely on a meat thermometer to prevent drying them out, removing them promptly at 165°F (74°C) to ensure juicy results.
Ready to Impress? Share Your Glazed Chicken Thighs Masterpiece!
With this foolproof recipe, you’re now equipped to create truly spectacular sticky glazed chicken thighs that boast a perfect, never-burnt caramelized crust every single time. Say goodbye to scorched messes and hello to rave reviews from your family and friends!
We absolutely love seeing your culinary creations! Once you’ve mastered these irresistible chicken thighs, we encourage you to share your photos and experiences in the comments below or tag us on social media. Your feedback helps our community of home cooks grow and thrive, and we can’t wait to see your delicious results.
Happy cooking, and get ready to add a new, undeniably delicious weeknight champion to your recipe rotation with these perfect sticky glazed chicken thighs!
Sticky Glazed Chicken Thighs
Course: Main CourseCuisine: AmericanDifficulty: easyServings6
servingsPrep time15
minutesCooking time50
minutesCalories350
kcalTotal time60
minutesTired of burnt chicken? This easy recipe reveals the secret to perfectly sticky, caramelized chicken thighs with a sweet and savory crust, without any scorching. Achieve a flawless, irresistible finish every single time for your weeknight dinners!
Ingredients
6 bone-in, skin-on chicken thighs
1/2 cup packed light brown sugar
1/4 cup soy sauce
1 tablespoon garlic powder
1 tablespoon onion powder
1 tablespoon smoked paprika
1/2 teaspoon salt
1/4 teaspoon black pepper
1/4 cup water
Directions
- Preheat your oven to 375 degrees Fahrenheit (190 degrees Celsius).
- In a small bowl, whisk together the brown sugar, soy sauce, garlic powder, onion powder, smoked paprika, salt, black pepper, and water until well combined and the sugar is mostly dissolved. This liquid glaze mixture is key to preventing scorching.
- Pat the chicken thighs completely dry with paper towels. Place them skin-side up in a single layer in a baking dish.
- Brush about half of the prepared glaze generously over the chicken thighs, ensuring an even coating.
- Bake for 30 minutes. The chicken will begin to cook and the glaze will start to thicken, but the added water helps keep it from burning too quickly.
- Remove the baking dish from the oven. Carefully brush the remaining glaze over the chicken thighs.
- Return the chicken to the oven and continue baking for another 15 to 20 minutes, or until the internal temperature of the chicken reaches 165 degrees Fahrenheit (74 degrees Celsius). During this final stage, keep a close eye on the glaze. The goal is a deep, rich caramelization, not charring. If you notice it getting too dark too quickly, you can loosely tent the dish with foil. The controlled sugar content and two-stage application help create that perfect sticky, sweet, and savory crust without the common problem of a burnt surface.
- Let the chicken rest for 5 minutes before serving to allow the juices to redistribute.
Notes
- Keep a close eye on the glaze during the final baking stage to prevent charring; tent with foil if needed.