Lemon Crumble Bars: Perfectly Zesty & Never Runny
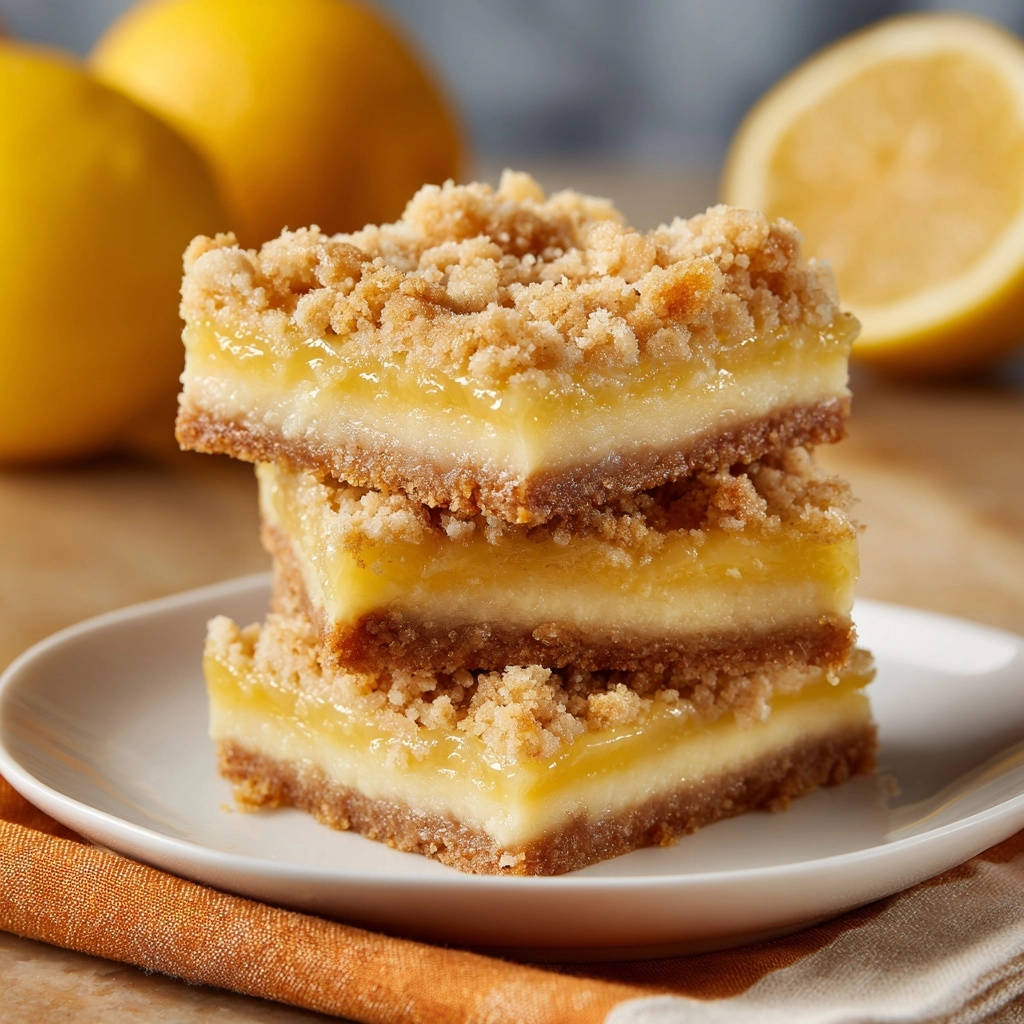
If you’ve ever struggled with a runny lemon bar filling, you know the frustration. My secret to consistently perfect Lemon Crumble Bars lies in a simple yet effective technique that guarantees a beautifully set, vibrantly zesty lemon layer every single time.
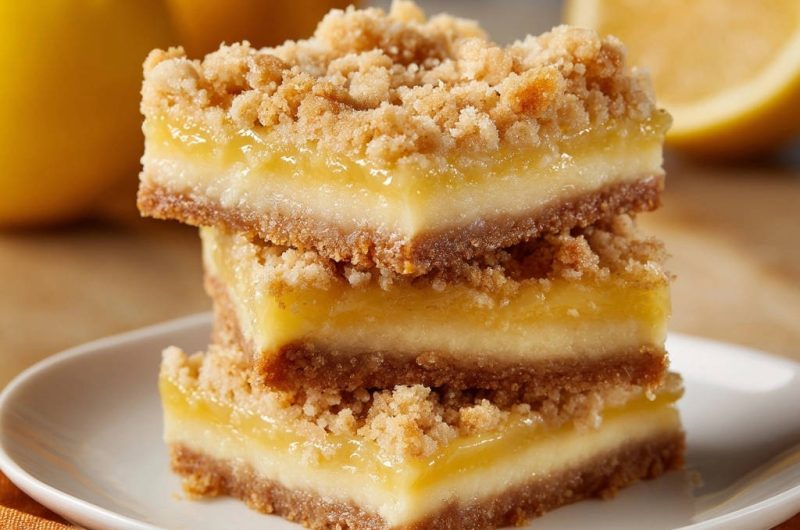
These bars aren’t just easy to make; they deliver an irresistible balance of tart lemon and sweet, buttery crumble, making them an ideal treat for any occasion.
If you enjoy working with fruit fillings, this same technique helps create a non-runny texture in a golden cherry cobbler.
Why These Lemon Crumble Bars Will Be Your New Go-To Recipe
Effortless Perfection: The “No More Runny Centers” Guarantee
The core innovation of this recipe is a clever trick for the lemon filling. By incorporating a small amount of flour, we ensure the filling sets beautifully and consistently.
This simple addition eliminates the common problem of watery or unset lemon bars, guaranteeing a firm yet tender slice every time you cut into them.
A Burst of Zesty Flavor, Every Time
We prioritize fresh lemon juice and zest, which truly brings out the bright, tangy essence of the fruit. This commitment to quality ingredients ensures a vibrant, refreshing lemon flavor in every bite.
The balance of tartness from the lemon and sweetness from the sugar creates a harmonious profile that is both invigorating and satisfying.
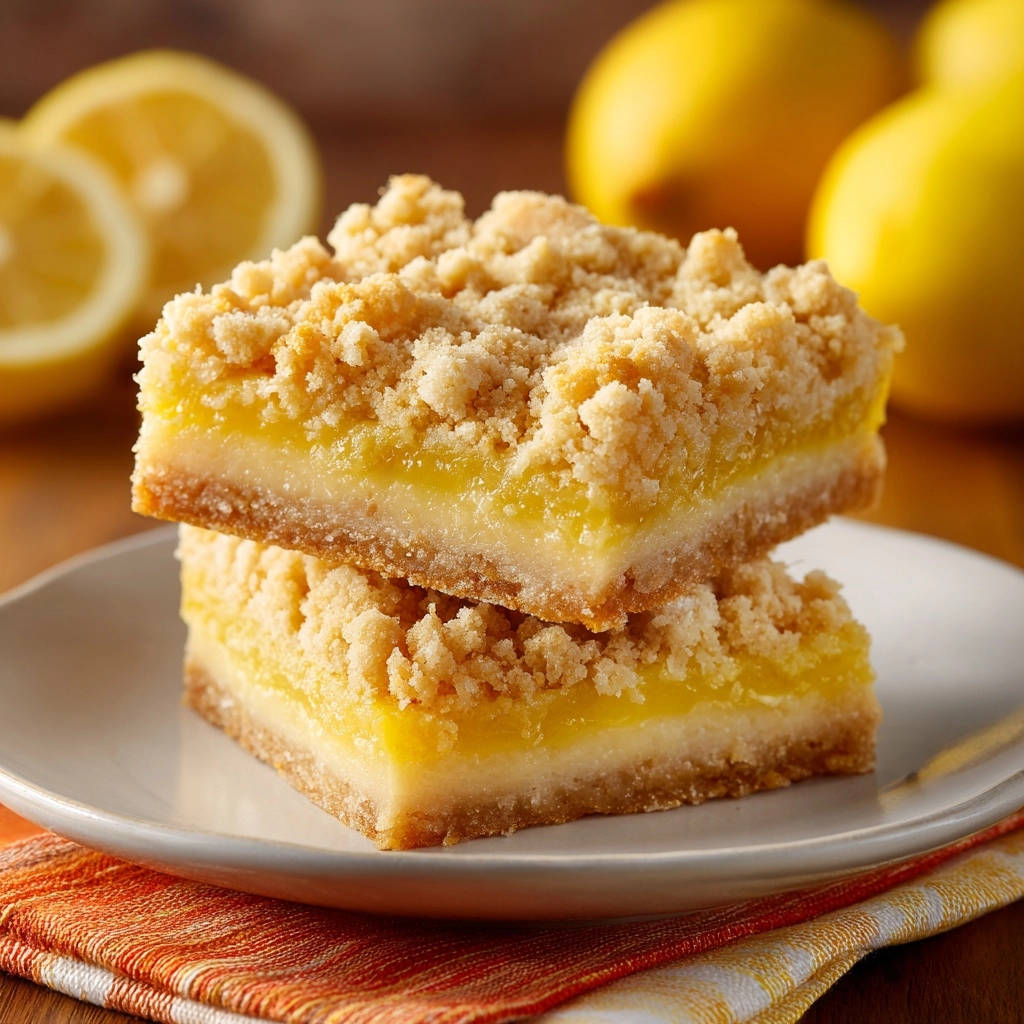
Simplicity Meets Irresistible Taste
Despite their sophisticated flavor and perfect texture, these Lemon Crumble Bars are surprisingly straightforward to prepare. The steps are intuitive, making this recipe accessible for bakers of all skill levels.
You’ll achieve gourmet-level results with minimal fuss, making them perfect for weeknight desserts or special gatherings.
Tools of the Trade: Equipping Your Lemon Crumble Bar Kitchen
Essential Baking Equipment
Having the right tools simplifies the baking process and contributes to perfect results. Here are the essentials for creating these delightful bars:
Baking Pan: An 8×8 or 9×9 inch square pan is ideal for the specified yield. A lighter colored pan helps prevent overbrowning.
Parchment Paper: Crucial for easy removal, especially with the recommended overhang. It also helps with cleanup.
Mixing Bowls: You’ll need several for preparing the crust, filling, and crumble separately.
Whisk: Essential for combining dry ingredients and smoothly incorporating the flour into the lemon filling.
Pastry Blender or Fingertips: For cutting cold butter into the flour mixtures, ensuring a crumbly texture.
Wire Rack: Necessary for cooling the bars completely, which is a critical step for proper setting.
Crafting Culinary Magic: The Essential Lemon Crumble Bar Ingredients
For the Golden, Buttery Crust
The foundation of these Lemon Crumble Bars is a rich, shortbread-like crust. All-purpose flour provides the structure, while granulated sugar adds sweetness.
A touch of salt balances the flavors. Crucially, cold unsalted butter cut into cubes is key to achieving that perfectly crumbly, tender texture that melts in your mouth.
The Zesty Heart: Lemon Filling Components
Large eggs create the custardy base for the filling, and granulated sugar sweetens the vibrant lemon flavor. Fresh lemon juice, ideally from about 3-4 lemons, delivers the essential tang and brightness.
Lemon zest amplifies that citrus aroma and intensity. The small amount of all-purpose flour is the “secret weapon,” providing just enough thickening power to ensure a perfectly set, non-runny filling.
The Perfect Crumble Topping Foundation
The crumble topping mirrors the crust’s simplicity, using all-purpose flour, granulated sugar, and a touch of salt. Cold unsalted butter is again essential for creating the signature crumbly texture.
This topping bakes into a golden, slightly crisp layer that contrasts beautifully with the smooth lemon filling.
From Scratch to Slice: Your Step-by-Step Lemon Crumble Bar Journey
Preparing Your Pan & Preheat
Start by preheating your oven to 350°F (175°C). This ensures the oven is at the correct temperature for even baking from the start.
Line an 8×8 or 9×9 inch baking pan with parchment paper, leaving an overhang on two sides. This simple trick allows you to easily lift the cooled bars out later, preventing sticking and making clean-up a breeze. Lightly grease the parchment paper for extra insurance.
Building the Buttery Crust
In a medium bowl, whisk together the 1 1/2 cups all-purpose flour, 1/2 cup granulated sugar, and 1/2 teaspoon salt. This evenly distributes the dry ingredients.
Cut in the 1/2 cup cold butter cubes using a pastry blender or your fingertips until the mixture resembles coarse crumbs. The cold butter prevents overmixing and ensures a tender, flaky crust.
Press this mixture evenly into the bottom of the prepared baking pan. Bake for 15 minutes, or until lightly golden. This initial bake sets the crust, creating a barrier that prevents the lemon filling from making it soggy.
Whipping Up the Crumble Topping
While the crust is baking, prepare your crumble topping. In a separate medium bowl, whisk together the 1 cup all-purpose flour, 1/2 cup granulated sugar, and 1/4 teaspoon salt.
Cut in the 1/4 cup cold butter cubes until the mixture forms coarse, pea-sized crumbs. Just like the crust, cold butter is vital here for a perfectly crumbly texture. Set this mixture aside for later assembly.
The Secret to Success: Crafting the Lemon Filling
In a large bowl, whisk together the 4 large eggs and 1 1/2 cups granulated sugar until well combined and slightly pale. This ensures the sugar dissolves for a smooth filling.
Gradually whisk in the 1/4 cup all-purpose flour until no lumps remain. This small but mighty amount of flour is the secret to a perfectly set filling, preventing any runniness without altering the bright lemon flavor.
Finally, stir in the 1/2 cup fresh lemon juice and 1 tablespoon lemon zest until just combined. Avoid overmixing once the liquid is added.
Assembling Your Layers of Delight
Carefully pour the vibrant lemon filling evenly over the warm, pre-baked crust. The warmth of the crust helps the filling distribute smoothly.
Evenly sprinkle the prepared crumble topping over the lemon filling. Ensure a good, even layer for that satisfying crunch in every bite.
Baking to Golden Perfection
Bake for 30-35 minutes, or until the edges are lightly golden and the crumble topping is a rich golden brown. These visual cues indicate the bars are almost ready.
The center of the lemon filling should be set with only a slight jiggle. This specific visual cue is key; it ensures the filling is cooked through but remains tender, avoiding a rubbery texture. It will continue to set as it cools.
The Crucial Cooling & Chilling Phase
This step is paramount for perfectly set Lemon Crumble Bars. Let the bars cool completely at room temperature in the pan on a wire rack. This allows the initial setting to occur.
Once at room temperature, transfer the pan to the refrigerator and chill for at least 2-3 hours, or even better, overnight. Do not skip this step! Full chilling is absolutely critical for the filling to firm up completely, ensuring clean, beautiful slices and no runny mess.
Slicing and Serving Your Masterpiece
Once thoroughly chilled, use the parchment paper overhang to lift the entire slab of bars out of the pan. This makes removal effortless.
Place on a cutting board and use a sharp knife to slice into your desired squares or bars. For the cleanest cuts, wipe your knife clean between each slice. Enjoy the fruits of your labor!
Beyond the Recipe: Expert Tips for Unforgettable Lemon Crumble Bars
Ingredient Temperature Matters
Always use cold butter for both the crust and crumble topping. This helps create those desirable flaky, crumbly textures by preventing the butter from melting too quickly during mixing. Warm butter leads to a greasy, dense result.
Don’t Skimp on the Chill Time
The chilling phase is not optional! It allows the lemon filling to fully set, ensuring clean, perfect slices and a delightful texture. Rushing this step often leads to a runny or messy result.
Achieving the Perfect Lemon Zest
When zesting your lemons, be careful to only get the bright yellow part, avoiding the bitter white pith underneath. Freshly zested lemon provides the most potent and aromatic flavor, truly elevating your Lemon Crumble Bars.
Baking for Optimal Texture
Keep an eye on the edges for a golden hue and a slight jiggle in the center. Overbaking can lead to a rubbery filling, while underbaking results in a runny one. Trust the visual cues described in the recipe for perfection.
Troubleshooting Common Lemon Crumble Bar Hiccups
Why is My Filling Still Runny?
A runny filling is often due to insufficient baking time or not allowing enough chilling. Ensure the center has only a slight jiggle when removing from the oven, and always chill completely, ideally overnight, for a perfectly set result. The flour in the filling needs time and cold to firm up properly.
Crust or Crumble Too Hard/Soft?
A hard crust or crumble can be caused by overmixing the butter and flour, which develops too much gluten. Conversely, a soft, greasy texture might mean the butter was too warm or baked at too low a temperature. Always use cold butter and mix just until combined.
My Bars are Sticky/Difficult to Cut
This almost always points to insufficient chilling. The lemon filling needs to be fully firm before slicing. Also, use a sharp, warm knife (wiped clean between cuts) for the cleanest edges, as this helps prevent sticking to the filling.
Enjoying Your Lemon Crumble Bars: Serving, Storage, & Make-Ahead Tips
Creative Serving Ideas
These Lemon Crumble Bars are delightful on their own, perhaps with a light dusting of powdered sugar for an elegant finish. For an extra treat, serve alongside fresh berries, a dollop of whipped cream, or a scoop of vanilla bean ice cream.
For a perfect pairing, try our Mastering Glazed Lemon Poppy Seed Scones with the Double-Chill Method.
They also pair wonderfully with a cup of tea or coffee, making them a perfect afternoon indulgence.
Storing for Freshness
Store your Lemon Crumble Bars in an airtight container in the refrigerator for up to 5-7 days. The cool temperature helps maintain the filling’s perfect set and keeps the flavors vibrant.
Proper storage ensures the buttery crust and crumble remain fresh and delicious.
Can I Make Them Ahead?
Absolutely! These bars are perfect for making ahead. In fact, they benefit significantly from being fully chilled overnight, allowing the flavors to meld and the filling to achieve its ideal texture.
This makes them an ideal dessert to prepare a day before serving for entertaining or a special treat, reducing stress on the day of your event.
Your Lemon Crumble Bar Questions Answered
Can I Use Bottled Lemon Juice?
While fresh lemon juice offers the best flavor and brightest zest, good quality bottled lemon juice can be used in a pinch. Just ensure it’s 100% lemon juice without added sugars or preservatives to maintain the zesty profile of your Lemon Crumble Bars.
What About Gluten-Free Flour?
For a gluten-free option, you can substitute a 1:1 gluten-free all-purpose baking blend for the flour in the crust, filling, and crumble. Results may vary slightly in texture, but many blends work well for these types of bar recipes.
Can I Freeze Lemon Crumble Bars?
Yes, Lemon Crumble Bars freeze beautifully! Once completely cooled and chilled, slice them and arrange in a single layer in an airtight freezer-safe container, separated by parchment paper. They can be frozen for up to 2-3 months. Thaw in the refrigerator before serving for the best texture.
How Do I Know When They’re Done?
Look for lightly golden edges on both the crust and the crumble topping. The center of the lemon filling should be set with only a very slight jiggle when gently shaken. It will continue to firm up considerably as it cools and chills, so avoid overbaking.
Ready to Bake Your Best Lemon Crumble Bars Yet?
Armed with these expert tips and our fail-proof recipe, you’re now ready to create Lemon Crumble Bars that are consistently perfect, delightfully zesty, and never runny. Say goodbye to soggy centers and hello to your new favorite dessert!
If you enjoy this recipe, you might also love our Raspberry Crumb Bars for another fruity twist, or even our delightful Perfect Apple Crumble Bars. Don’t forget to share your baking triumphs with us!
Pair These with Your Lemon Crumble Bars
If you’re in a citrusy mood after baking those lemon bars, here are two more recipes that lean into bright, sunny flavors.
- Start the day with a stack of Lemon Poppy Seed Pancakes – the same zesty kick works just as well in a breakfast format.
- For a soft, tropical contrast, try Coconut Dream Muffins; the mild coconut sweetness balances the lemon’s tart
Lemon Bars
Course: DessertCuisine: AmericanDifficulty: mediumServings9
barsPrep time25
minutesCooking time45
minutesCalories350
kcalTotal time240
minutesSay goodbye to runny lemon bar fillings! This recipe provides a simple trick for a perfectly set, deliciously zesty lemon layer every single time. Topped with a buttery crumble, these bars are a delightful sweet treat.
Ingredients
For the Crust:
1 1/2 cups all-purpose flour
1/2 cup granulated sugar
1/2 teaspoon salt
1/2 cup (1 stick) cold unsalted butter, cut into cubes
For the Lemon Filling:
4 large eggs
1 1/2 cups granulated sugar
1/4 cup all-purpose flour
1/2 cup fresh lemon juice (from about 3-4 lemons)
1 tablespoon lemon zest
For the Crumble Topping:
1 cup all-purpose flour
1/2 cup granulated sugar
1/4 teaspoon salt
1/4 cup (1/2 stick) cold unsalted butter, cut into cubes
Directions
- Preheat your oven to 350°F (175°C). Line an 8×8 or 9×9 inch baking pan with parchment paper, leaving an overhang on two sides to easily lift the bars out later. Lightly grease the parchment paper.
- Make the Crust: In a medium bowl, whisk together the 1 1/2 cups all-purpose flour, 1/2 cup granulated sugar, and 1/2 teaspoon salt. Cut in the 1/2 cup cold butter cubes using a pastry blender or your fingertips until the mixture resembles coarse crumbs. Press this mixture evenly into the bottom of the prepared baking pan. Bake for 15 minutes, or until lightly golden.
- Prepare the Crumble Topping: While the crust is baking, in a separate medium bowl, whisk together the 1 cup all-purpose flour, 1/2 cup granulated sugar, and 1/4 teaspoon salt. Cut in the 1/4 cup cold butter cubes until the mixture forms coarse, pea-sized crumbs. Set aside.
- Prepare the Lemon Filling (The Secret to No More Runny Centers!): In a large bowl, whisk together the 4 large eggs and 1 1/2 cups granulated sugar until well combined. Gradually whisk in the 1/4 cup all-purpose flour until no lumps remain. This small but mighty amount of flour is key to a perfectly set filling. Stir in the 1/2 cup fresh lemon juice and 1 tablespoon lemon zest until just combined.
- Assemble and Bake: Pour the lemon filling evenly over the warm, pre-baked crust. Sprinkle the prepared crumble topping evenly over the lemon filling.
- Bake for 30-35 minutes, or until the edges are lightly golden, the crumble topping is golden brown, and the center is set with only a slight jiggle. This specific bake time and the visual cue of a slight jiggle ensures the filling cooks through without becoming rubbery or remaining runny.
- Cooling is Crucial: Let the bars cool completely at room temperature in the pan on a wire rack. This allows the filling to continue setting as it cools. Once at room temperature, transfer the pan to the refrigerator and chill for at least 2-3 hours, or even better, overnight. Do not skip this step! Chilling fully is paramount for the filling to firm up perfectly, ensuring clean slices and no runny mess.
- Once thoroughly chilled, use the parchment paper overhang to lift the bars out of the pan. Place on a cutting board and slice into squares or bars. Enjoy!
Notes
- Cooling completely at room temperature followed by thorough chilling in the refrigerator for at least 2-3 hours (or overnight) is crucial for the filling to firm up perfectly.