Cheesy Garlic Bread: Ultimate Gooey Stretch & Flavor
There’s nothing quite like the irresistible allure of perfect cheesy garlic bread, yet I’ve often seen it fall short-dry, stiff, and utterly disappointing. My journey to achieve that glorious, gooey cheese pull, without a soggy bottom or hard crust, led to this very recipe. This method ensures absolute perfection every single time, transforming simple ingredients into a side dish or appetizer that truly shines.
Why This Cheesy Garlic Bread Recipe Is a Game-Changer
This isn’t just another garlic bread recipe; it’s a meticulously crafted guide designed to deliver unparalleled results. Forget past disappointments; prepare for a culinary revelation that makes everyone rave.
The Secret to That Perfect Gooey Cheese Pull
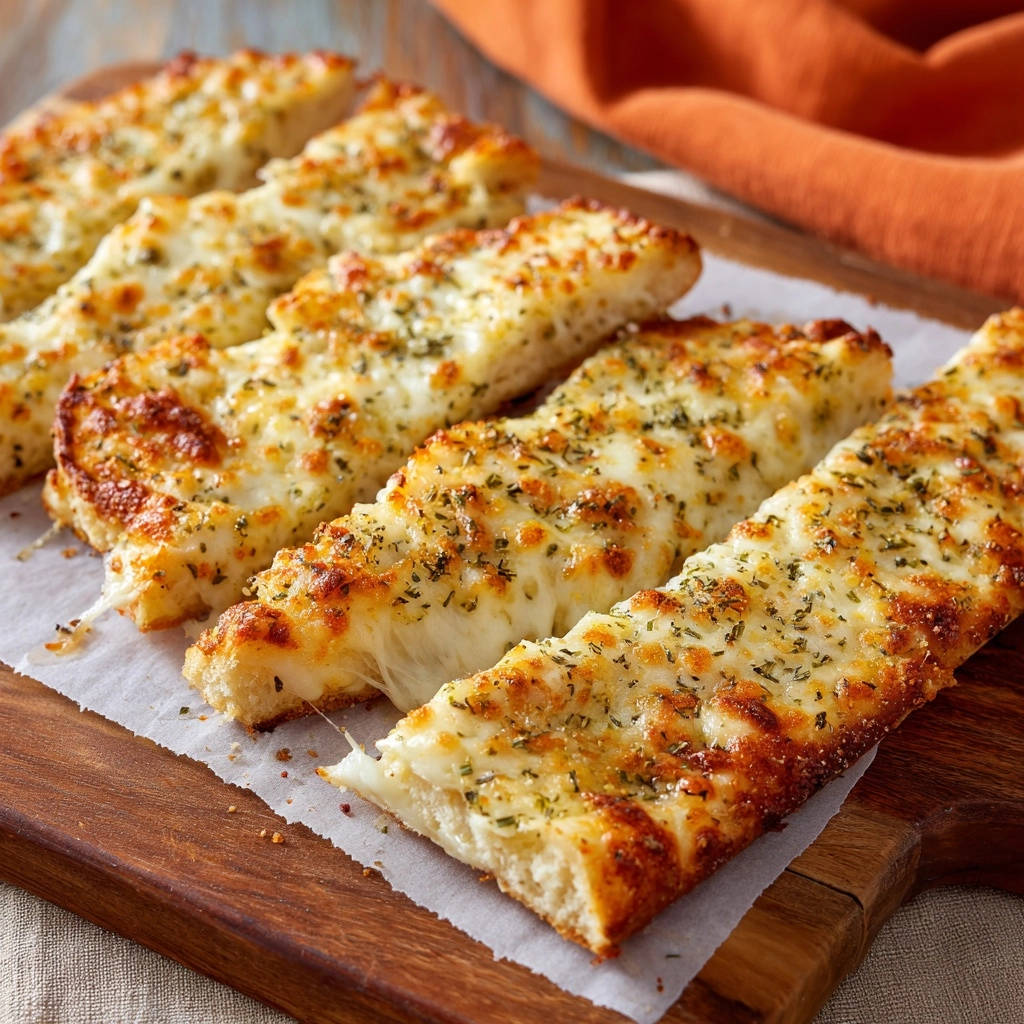
The key to our signature gooey, stretchy cheese pull lies in using low-moisture mozzarella and a specific baking sequence. This prevents the cheese from becoming hard or stiff, ensuring it melts into a bubbling, golden blanket that stretches beautifully with every bite.
Say Goodbye to Soggy Bottoms and Dry Bread!
A crucial pre-bake step prevents the bread from becoming soggy by toasting it lightly before adding the cheese. Furthermore, a strategic, optional broiler finish ensures the cheese is perfectly golden and bubbly without drying out the bread itself, maintaining a tender interior and crisp exterior.
Effortless Perfection: Simplicity Meets Deliciousness
Despite its superior results, this recipe remains remarkably simple to follow. With clear steps and essential tips, even novice home cooks can achieve restaurant-quality cheesy garlic bread with ease and confidence.
Building Blocks of Flavor: What You’ll Need
Every exceptional dish starts with quality ingredients. Here’s what makes our cheesy garlic bread truly special.
The Foundation: Choosing Your French Bread or Baguette
Opt for a fresh, crusty loaf of French bread or a baguette, about 16 inches long, halved lengthwise. Its sturdy structure provides the ideal canvas, offering a satisfying crispness on the outside and a soft interior.
Crafting the Aromatic Garlic Butter Blend
Softened unsalted butter forms the rich base, while freshly minced garlic infuses intense aroma and flavor. Grated Parmesan cheese, dried parsley, dried oregano, salt, and black pepper complete this vibrant, savory blend, ensuring a deeply fragrant and delicious crust.
The Star of the Show: Melty Mozzarella & Parmesan
Low-moisture shredded mozzarella is non-negotiable for the best melt and incredible stretch without excess oiliness. A sprinkle of extra Parmesan adds a sharper, savory note and helps achieve a beautiful golden crust, balancing the rich mozzarella.
Essential Kitchen Companions for Your Garlic Bread Adventure
Having the right tools makes the process smoother and ensures perfect results every time.
Baking Sheet & Parchment Paper: Essential for even heat distribution, preventing sticking, and simplifying cleanup.
If garlic bread is on your table, these soft garlic herb dinner rolls make a perfect companion.
Small Mixing Bowl & Spatula: To easily combine the garlic butter ingredients and spread the mixture evenly.
Measuring Cups & Spoons: For accurate ingredient proportions, ensuring consistent flavor and texture.
Sharp Serrated Knife: Perfect for cleanly halving your bread and slicing the finished garlic bread without crushing it.
Your Step-by-Step Guide to Cheesy Garlic Bread Bliss
Follow these precise steps for cheesy garlic bread that delivers on every promise.
Prepare Your Oven and Baking Sheet: Preheat your oven to 375°F (190°C) and line a large baking sheet with parchment paper. This precise temperature ensures the bread toasts perfectly without burning, and the parchment paper guarantees no sticking and easy handling.
Create the Flavorful Garlic Butter: In a small bowl, combine the softened unsalted butter, freshly minced garlic, 1/4 cup finely grated Parmesan cheese, dried parsley, dried oregano, salt, and black pepper. Mix thoroughly until all ingredients are well incorporated and the mixture is uniformly spreadable.
Ensuring your butter is genuinely softened allows for effortless blending and a smooth, even application, which is crucial for flavor distribution.
Spread the Garlic Butter Generously: Evenly spread the prepared garlic butter mixture over the cut sides of both French bread halves. Don’t be shy; a generous, consistent coating ensures every bite is packed with incredible flavor and a rich, buttery texture.
The Crucial Pre-Bake Step: Place the buttered bread halves cut-side up on the prepared baking sheet. Bake for 5 minutes, just until the edges are slightly golden and the butter is melted and absorbed into the bread. This step is pivotal; it toasts the bread, preventing a soggy bottom, and prepares it for that glorious cheese pull later by ensuring the butter doesn’t create a barrier between the bread and cheese.
Add the Mozzarella Magic: Remove the bread from the oven. Evenly sprinkle the shredded low-moisture mozzarella cheese over both halves, ensuring generous coverage. For an extra layer of savory depth and a crispier top, you can add a little additional Parmesan cheese on top, if desired.
If you enjoy the bold cheese pull from this garlic bread, you will love the same stretchy texture in these cheese jalapeno poppers.
Final Bake for Melty Perfection: Return the bread to the oven and continue baking for another 7 to 10 minutes, or until the cheese is completely melted and bubbling with golden spots. Watch closely during this stage; you’re looking for that perfect bubbling melt that signals maximum gooeyness and the beginning of those irresistible golden patches.
The Broiler Boost for Ultimate Golden Patches: If your cheese isn’t quite as golden as you like, carefully turn on your broiler to low. Broil for 30 to 60 seconds, watching constantly to prevent burning, until the cheese has beautiful golden patches. This quick blast of intense heat creates that desirable crisp-tender surface on the cheese, optimizing it for a maximum cheese pull without drying out the bread.
Slice and Serve Immediately: Remove from the oven, slice into serving pieces using a sharp serrated knife, and serve immediately for the best melty, gooey experience. The fresh-from-the-oven warmth ensures optimal stretch and flavor, so gather your eager eaters quickly!
Unlock Next-Level Cheesy Garlic Bread: Expert Tips
Elevate your cheesy garlic bread from great to extraordinary with these actionable tips.
Don’t Skip the Pre-Bake: This seemingly small step is the recipe’s secret weapon against soggy bread. It ensures the bread is perfectly toasted and the butter is absorbed, setting the stage for the ultimate crispy-chewy texture and preventing a greasy base.
Watch the Broiler Like a Hawk: Broilers are powerful and can quickly turn golden perfection into char. Always stand by the oven and pull the bread out the very moment you achieve your desired color to prevent burning the cheese.
Use Low-Moisture Mozzarella: High-moisture cheeses release too much water during baking, which can make your bread soggy and dilute the flavor. Sticking to low-moisture options guarantees the best melt, stretch, and a crisp, clean finish.
Fresh Garlic Makes a Difference: While garlic powder offers convenience, fresh minced garlic provides a much more potent, aromatic, and nuanced flavor profile. The difference is truly noticeable in the final taste of your garlic bread.
Serve Hot for the Best Experience: Cheesy garlic bread is at its absolute peak when served straight from the oven. The warmth ensures maximum gooeyness, melt, and the most satisfying cheese pull. Don’t let it cool too much before enjoying!
Common Queries & Troubleshooting Your Garlic Bread
Address common challenges and master your cheesy garlic bread with these solutions.
What Goes With Cheesy Garlic Bread?
Once you have that warm, cheesy loaf on the table, these recipes round out the meal with creamy textures and flaky richness.
- Cool, creamy bites balance the garlicky heat – try this Loaded Creamy Potato Salad for a tangy contrast.
- For more bread to tear and share, the Flaky Buttermilk Biscuits offer tall, buttery layers that soak up any extra cheese or sauce.
Why Isn’t My Cheese Melting Properly or Getting Stiff?
If your cheese isn’t melting properly, first ensure your oven temperature is accurate and that you are using low-moisture mozzarella. Overbaking can also cause cheese to become stiff, so watch for bubbling and light golden edges, then use the broiler for a quick, controlled browning without overcooking.
My Bread is Too Hard or Soggy! What Went Wrong?
Soggy bread usually indicates you skipped or didn’t fully execute the initial pre-bake step, which is crucial for toasting the bread and preventing it from absorbing too much moisture from the butter and cheese. Hard bread, conversely, could be a sign of overbaking the bread itself or using too little butter in your spread.
Can I Use Different Cheeses or Breads?
While low-moisture mozzarella is recommended for its superior melt and stretch, you can certainly experiment with other meltable cheeses. Consider provolone for a sharper flavor, or a blend of Gruyère and fontina for a more complex, nutty profile. For the bread, a crusty Italian loaf or ciabatta can also work wonderfully, just ensure it’s firm enough to hold up to the rich butter and cheese topping.
Can I Make This Cheesy Garlic Bread Ahead of Time?
You can prepare the garlic butter mixture ahead of time and store it in an airtight container in the refrigerator for up to a week. For maximum freshness, it’s best to assemble and bake the cheesy garlic bread just before serving, though you can spread the garlic butter on the bread, wrap it tightly, and refrigerate it for a few hours before the first bake.
How Do I Store Leftover Cheesy Garlic Bread?
Store any leftover cheesy garlic bread in an airtight container or tightly wrapped in foil in the refrigerator for up to 3 days. For the best possible texture and re-melted cheese, reheat it in a preheated oven at 350°F (175°C) for 5-10 minutes, or until it’s warmed through and the cheese is beautifully re-melted and bubbly.
Pairing & Enjoying Your Cheesy Garlic Bread Masterpiece
This cheesy garlic bread is incredibly versatile, fitting seamlessly into various meal settings.
Classic Companions: Soups, Salads, and Pasta
Cheesy garlic bread is the quintessential companion to virtually any pasta dish, from a rich, meaty lasagna to a simple yet elegant spaghetti with marinara. It also serves as a delightful sidekick to hearty soups and crisp, refreshing salads, adding a comforting and satisfying crunch to your meal. Consider serving it alongside our delicious Skillet Meatballs with Melty Mozzarella for an ultimate comfort food experience.
Creative Culinary Combinations for Any Occasion
Beyond traditional pairings, individual slices of this cheesy garlic bread make a fantastic, crowd-pleasing appetizer when served with your favorite warm marinara or a creamy spinach dip. For a unique side that pairs perfectly with this savory bread, try our crisp and flavorful Crispy Baked Asparagus. You can even use it as a robust base for open-faced sandwiches or mini pizzas, transforming leftovers into a fun, new meal!
Share Your Cheesy Garlic Bread Success Story!
There you have it – the ultimate guide to making cheesy garlic bread that promises glorious melt, incredible stretch, and never a dry bite! We’re confident this recipe will become a cherished favorite in your home, bringing smiles and satisfied sighs with every gooey, cheesy bite.
We’d love to see your creations! Share your cheesy garlic bread masterpieces on social media and tag us, or leave a comment below with your experience or any unique twists you tried. Happy baking, and enjoy your perfectly gooey, cheesy triumph!

Cheesy Garlic Bread
Course: AppetizerCuisine: AmericanDifficulty: easy6
servings10
minutes12
minutes300
kcal25
minutesAchieve the ultimate gooey, stretchy cheese pull with this Cheesy Garlic Bread recipe! Learn the simple trick to prevent dry, stiff cheese and get a glorious melt that everyone will rave about. This recipe ensures perfect results every time.
Ingredients
1 loaf French bread or baguette, about 16 inches, halved lengthwise
1/2 cup unsalted butter, softened
3 cloves garlic, minced
1/4 cup finely grated Parmesan cheese, plus more for sprinkling
1 teaspoon dried parsley
1/2 teaspoon dried oregano
1/4 teaspoon salt
1/8 teaspoon black pepper
2 cups shredded low-moisture mozzarella cheese
Directions
- Preheat your oven to 375 degrees Fahrenheit. Line a large baking sheet with parchment paper.
- In a small bowl, combine the softened butter, minced garlic, 1/4 cup Parmesan cheese, dried parsley, dried oregano, salt, and black pepper. Mix until well combined.
- Spread the garlic butter mixture evenly over the cut sides of the French bread halves.
- Place the bread halves cut-side up on the prepared baking sheet. Bake for 5 minutes, just until the edges of the bread are slightly golden and the butter is melted. This crucial step helps toast the bread first, preventing a soggy bottom and preparing it for that ultimate cheese pull.
- Remove the bread from the oven. Evenly sprinkle the shredded mozzarella cheese over both halves. You can add a little extra Parmesan on top if desired.
- Return the bread to the oven and continue baking for another 7 to 10 minutes, or until the cheese is completely melted and bubbly. For those perfectly golden brown spots and that irresistible pull, watch closely and be ready to move quickly for the next step.
- If your cheese isn’t as golden as you like, you can carefully turn on your broiler to low. Broil for 30 to 60 seconds, watching constantly to prevent burning, until the cheese has beautiful golden patches. This quick blast creates the perfect texture for a maximum cheese pull without drying it out.
- Remove from the oven, slice into serving pieces, and serve immediately for the best melty, gooey experience.
Notes
- This recipe includes a crucial pre-bake step for toasting the bread and a quick broil option for a perfect golden cheese pull.