Creamy Layered Pumpkin Pie: The Secret to Silky Slices

For years, crafting the perfect pumpkin pie felt like chasing a culinary unicorn – delightful in theory, but often ending in frustrating cracks or a too-runny filling. That all changed when I perfected this incredible Creamy Layered Pumpkin Pie recipe.
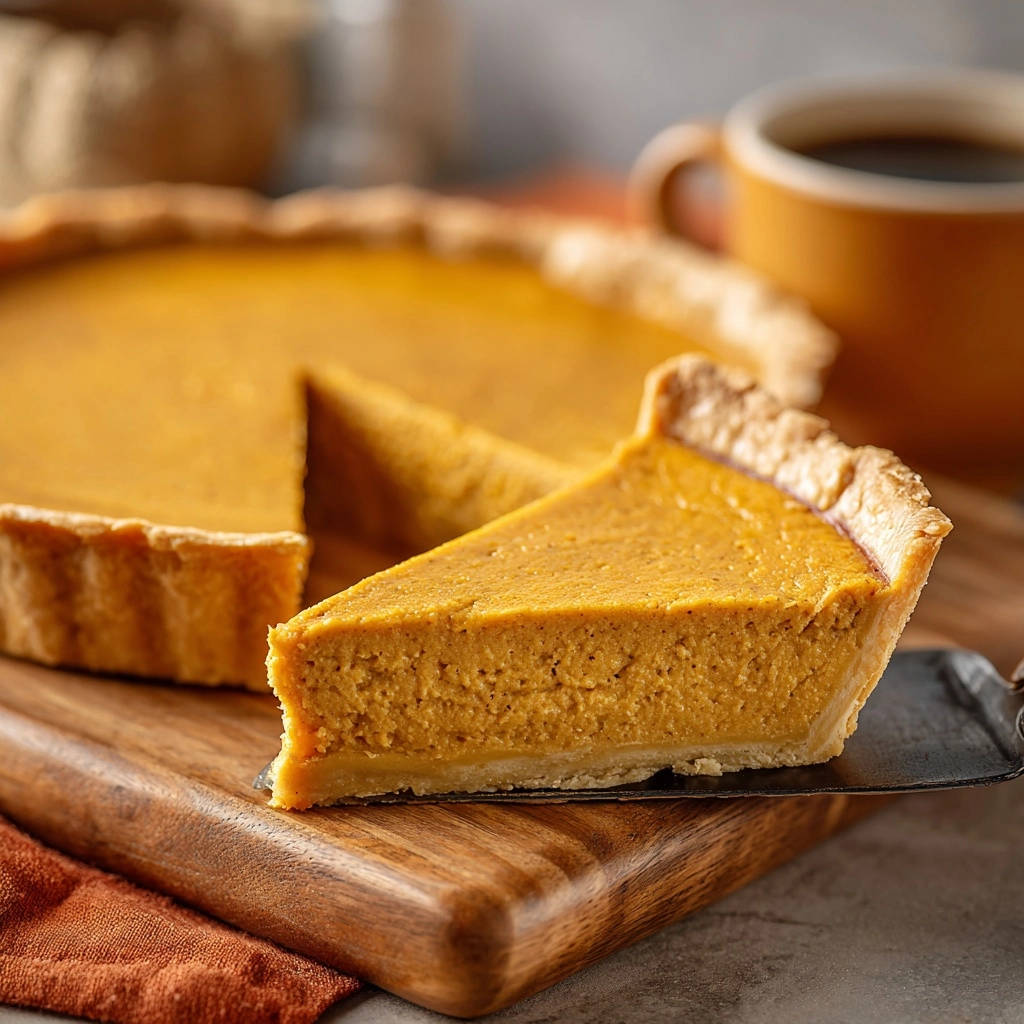
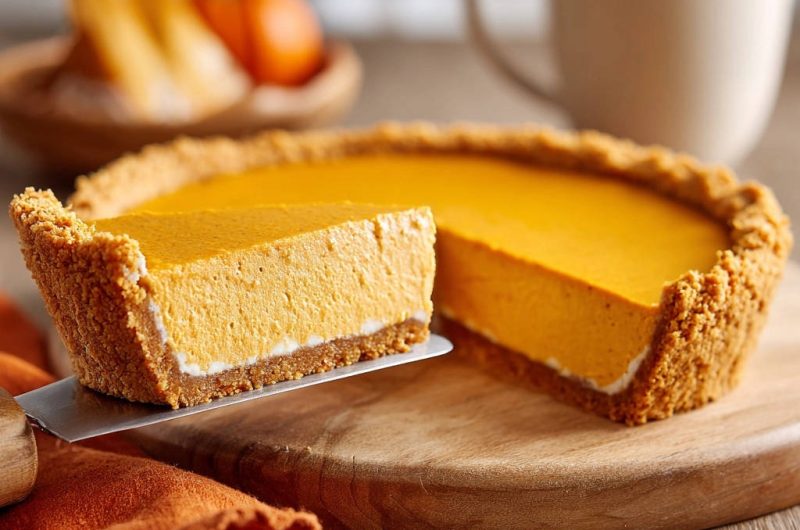
This isn’t just another pumpkin pie; it’s a showstopper featuring an unbelievably silky pumpkin layer atop a rich, tangy cream cheese base, all nestled in a crisp graham cracker crust. Prepare to impress everyone with perfectly firm, crack-free slices that taste as amazing as they look, making this your go-to fall pie recipe.
Why This Creamy Layered Pumpkin Pie Will Become Your Signature Dessert
The Unmistakable Silky Smooth Texture (No More Cracks!)
This recipe directly tackles the most common pumpkin pie frustrations: cracks and a grainy texture. Our secret lies in a specific straining technique and precise baking cues that guarantee a consistently smooth, velvety filling every single time.
Say goodbye to disappointing imperfections; your pie will emerge from the oven with a flawless surface, ready to be adorned.
A Decadent Cream Cheese Layer: The Ultimate Twist
What truly sets this Creamy Layered Pumpkin Pie apart is its luxurious cream cheese layer. This tangy, sweet base adds a delightful richness and a creamy counterpoint to the traditional pumpkin, elevating the flavor profile significantly.
It transforms a classic holiday dessert into an unexpectedly sophisticated treat, making each bite more interesting and decadent.
Impressive Results, Surprisingly Simple Process
Despite its gourmet appearance and complex layers, this layered pumpkin pie recipe is incredibly straightforward. My clear, step-by-step instructions ensure that even novice bakers can achieve stunning, bakery-quality results.
You’ll gain confidence in the kitchen and earn rave reviews, proving that impressive doesn’t have to mean complicated.
Gather Your Gear: Essential Tools for Perfect Pie Making
Standard Baking Utensils
Having the right basic tools makes the baking process smooth and enjoyable.
Mixing Bowls (various sizes): Essential for combining different components without cross-contamination.
Whisk: Crucial for blending ingredients thoroughly, especially in the pumpkin layer, to prevent lumps.
Measuring Cups and Spoons: Accuracy is key in baking, ensuring correct ingredient ratios for optimal texture and flavor.
Electric Mixer: Highly recommended for achieving a truly smooth and airy cream cheese layer with minimal effort.
Specialty Items for Flawless Finish
These specific tools are critical for replicating the signature texture and appearance of this delicious pumpkin dessert.
9-inch Pie Plate: The standard size ensures proper baking time and portioning for your layered dessert.
Fine-Mesh Sieve: Absolutely non-negotiable for achieving that unparalleled silky smooth pumpkin filling. It removes any fibrous pumpkin bits or tiny lumps, making a dramatic difference in texture.
Wire Rack: Necessary for cooling the pie evenly and gradually after baking, which is vital for preventing cracks.
Building Blocks of Flavor: Inside Your Creamy Layered Pumpkin Pie
For the Buttery Graham Cracker Crust
This simple crust provides a delightful crisp texture and a sweet, slightly spiced base.
Graham Cracker Crumbs: Forms the foundation, offering a complementary sweetness and sturdy structure.
Granulated Sugar: Enhances the sweetness and helps with caramelization during baking, adding depth of flavor.
If the layered texture and creamy filling appeal to you, you’ll love this layered chocolate vanilla dream pie.
Melted Unsalted Butter: Binds the crumbs together, ensuring a firm, rich, and flavorful crust that holds its shape beautifully.
The Luscious Cream Cheese Filling
This tangy, rich layer is the secret star of our layered pumpkin pie, providing a fantastic contrast.
Cream Cheese, softened: The star, providing a smooth, tangy, and rich creaminess. Softening is crucial for a lump-free blend.
Granulated Sugar: Balances the tanginess of the cream cheese, creating a perfectly sweet harmony.
Large Egg Yolk: Acts as an emulsifier and thickener, ensuring the cream cheese layer sets beautifully and adds richness.
Vanilla Extract: Enhances the overall flavor profile, adding a warm, aromatic note that complements both cream cheese and pumpkin.
The Hearty Pumpkin Base
The soul of the pie, this layer is robustly flavored and perfectly smooth thanks to thoughtful ingredient choices.
Canned Pumpkin Puree: The essential ingredient for authentic pumpkin flavor and color. Make sure it’s 100% pumpkin, not pie filling.
Light Brown Sugar & Granulated Sugar: A combination that offers both deep molasses notes from brown sugar and clean sweetness from granulated, creating a balanced flavor.
Large Eggs: Bind and set the pumpkin filling, providing structure and contributing to its creamy texture.
Evaporated Milk: A game-changer for texture, evaporated milk provides richness and creaminess without adding excess moisture, preventing a runny pumpkin pie filling.
Vanilla Extract: Sweetens and rounds out the spicy pumpkin notes.
Aromatic Spices: The Soul of Pumpkin Pie
The classic blend that evokes warmth and holiday cheer, perfectly balancing the sweetness.
Ground Cinnamon: The dominant, comforting spice that defines pumpkin pie flavor.
Ground Ginger: Adds a warm, slightly peppery kick that brightens the overall spice profile.
Ground Nutmeg: Offers a sweet, woody, and slightly piquant note, integral to traditional pumpkin flavor.
Pinch of Ground Cloves: Provides a strong, aromatic depth, used sparingly to avoid overpowering the other spices.
Step-by-Step Mastery: Crafting Your Layered Pumpkin Pie to Perfection
- Preheat Oven and Prepare Crust:
Set your oven to 350°F (175°C).
In a medium bowl, combine graham cracker crumbs and 1/4 cup granulated sugar. Pour in the melted butter and mix until the crumbs are evenly moistened.
The same technique for achieving silky layers works beautifully in this creamy New York cheesecake.
Press the mixture firmly into the bottom and up the sides of a 9-inch pie plate. Bake for 8 minutes, then remove from oven and let cool slightly. This initial bake helps create a firm, sturdy base that prevents sogginess once the fillings are added.
- Prepare Cream Cheese Layer:
In a clean bowl, beat the softened cream cheese with 1/4 cup granulated sugar until smooth and creamy. Ensure the cream cheese is truly softened to room temperature for the best, lump-free texture; cold cream cheese will leave unmixed chunks.
Beat in the egg yolk and vanilla extract until just combined. Overmixing at this stage can incorporate too much air, which might affect the layer’s density and potentially cause separation.
Spread this mixture evenly over the bottom of the cooled graham cracker crust, taking care to create an even foundation for the pumpkin layer.
- Prepare Pumpkin Layer:
In another large bowl, whisk together the canned pumpkin puree, brown sugar, and granulated sugar until well combined, ensuring no sugar clumps remain.
Whisk in the eggs, evaporated milk, vanilla extract, cinnamon, ginger, nutmeg, and cloves. Continue whisking until the mixture is uniform and smooth, with all the spices fully incorporated.
- Strain for Guaranteed Smoothness:
For that guaranteed silky smooth texture, pass the pumpkin mixture through a fine-mesh sieve into a separate, clean bowl. This crucial step removes any fibrous bits or lumps from the pumpkin, ensuring a truly velvety filling that melts in your mouth.
Gently press the mixture through the sieve with a spatula, scraping the bottom of the sieve to collect all the smooth puree. Do not skip this; it’s the secret to a professional-grade texture.
- Assemble and Bake the Pie:
Pour the strained pumpkin mixture gently over the cream cheese layer in the pie crust. Pour slowly and steadily to avoid disturbing the perfectly spread cream cheese layer underneath.
Bake for 50 to 60 minutes, or until the edges of the pie are set and the center still has a slight, delicate jiggle when lightly shaken. This “delicate jiggle” indicates it’s perfectly cooked without being overbaked, which can lead to cracks or a grainy texture.
- Cool and Refrigerate:
Carefully remove the pie from the oven and let it cool completely on a wire rack at room temperature for at least 2 hours. This gradual cooling process is critical for preventing cracks and allowing the pie to set properly, as rapid temperature changes can cause the filling to contract unevenly.
Once cooled to room temperature, cover the pie loosely and refrigerate for at least 4 hours, or preferably overnight, before slicing and serving. This extended chill time locks in the texture, ensuring every slice is perfectly firm and smooth, enhancing the layered dessert experience.
Crust Foundation: Press, Bake, & Cool
The Cream Cheese Spread: Smooth & Even
Whisking the Pumpkin Mixture
Unlock Silky Texture: The Sieve Technique
Gentle Pouring & The Bake
The Patient Chill: Setting for Success
Elevate Your Baking: Expert Tips for a Flawless Creamy Layered Pumpkin Pie
Understanding the “Jiggle Test”: The perfect pumpkin pie is set but still delicate. Look for edges that are firm and a center that wiggles like firm gelatin, not liquid. If it’s too jiggly, it’s underbaked; if there’s no jiggle, it’s overbaked, risking cracks and a dry texture.
The Art of Gradual Cooling: Resisting the urge to rush your pie into the refrigerator immediately after baking is key to preventing cracks. The slow, even cooling on a wire rack allows the filling to gently settle and solidify, minimizing stress on the delicate surface.
Preventing a Soggy Crust: A properly pre-baked crust is your best defense. Ensure your graham cracker crust is thoroughly cooled before adding the moist cream cheese and pumpkin fillings. You can also brush a thin layer of egg white onto the cooled crust before adding fillings to create a moisture barrier.
Perfecting Your Pie Slices: For clean, beautiful slices, ensure your Creamy Layered Pumpkin Pie is thoroughly chilled (preferably overnight). Before each cut, dip a sharp knife in hot water and wipe it clean. This warm, clean blade will glide through the layers effortlessly.
Don’t Skimp on the Sieve: The fine-mesh sieve is your most powerful tool for achieving that unparalleled silky consistency. If you absolutely don’t have one, a blender can break down fibers, but it won’t be quite as effective at removing them as a sieve for the smoothest pumpkin filling.
Your Top Questions About This Layered Pumpkin Pie, Answered!
Can I Prepare This Pie in Advance?
Absolutely! This Creamy Layered Pumpkin Pie is an ideal make-ahead dessert. It needs at least 4 hours to chill, but its flavor and texture actually improve overnight, making it perfect for holiday entertaining.
You can prepare it up to 2-3 days in advance and store it covered loosely in the refrigerator.
What to Serve with Creamy Pumpkin Pie
That silky pumpkin pie calls for something savory to round out the meal. These two cheesy dishes share the same seasonal squash and bring a warm, comforting contrast to your dessert.
- For a baked pasta that mirrors the pie’s creamy texture, try this Pumpkin Sage Mac and Cheese with Crunchy Topping — the sage and crispy breadcrumb finish add a savory crunch against the smooth pie.
- If you prefer a stovetop version with a foolproof sauce, the Pumpkin Mac and Cheese with Foolproof Creamy Sauce delivers the same rich pumpkin flavor in a faster, no-bake format that pairs neatly with a slice of pie.
What’s the Best Way to Store Leftovers?
Store any leftover slices of your layered pumpkin pie in an airtight container in the refrigerator for up to 3-4 days. While it can be left covered at room temperature for a few hours, chilling maintains its optimal texture and freshness.
Can I Use Different Spices or Add-ins?
You can certainly customize the spice blend to your preference! Feel free to adjust the ratios or add a pinch of allspice or cardamom for extra warmth. For a fun twist, consider adding a whisper of maple extract to the pumpkin layer or a hint of orange zest to the cream cheese layer.
Is a Fine-Mesh Sieve Truly Necessary?
Yes, for the truly silky texture that makes this recipe exceptional, a fine-mesh sieve is highly recommended. It meticulously removes fibrous strands from the pumpkin puree and any tiny lumps, resulting in an incredibly smooth mouthfeel.
Omitting this step will still yield a tasty pie, but it won’t have that signature velvety finish. If you love pumpkin desserts, you might also enjoy making decadent pumpkin pie truffles for another silky treat.
Dietary Adaptations: Gluten-Free or Dairy-Free?
Yes, with a few substitutions, you can adapt this recipe. For a gluten-free option, simply use gluten-free graham cracker crumbs for the crust. For a dairy-free version, look for dairy-free cream cheese alternatives and a plant-based evaporated milk substitute, ensuring they are suitable for baking to achieve proper setting.
Troubleshooting Your Pie: Common Challenges & Quick Fixes
Pie Top Cracked: What Went Wrong?
Cracks typically occur from either overbaking or too rapid cooling. Overbaking dries out the filling, causing it to shrink and pull apart. Cooling it too quickly (e.g., placing a hot pie directly into the fridge) also creates thermal shock, leading to cracks.
To avoid this, stick to the delicate jiggle test for doneness and ensure a slow, gradual cool-down on a wire rack at room temperature.
Pumpkin Filling Too Runny or Weeping?
A runny or weeping filling often indicates underbaking or insufficient chilling. The pie needs adequate time in the oven for the eggs to set the custard, and then significant refrigeration time for the layers to fully firm up.
Ensure the “delicate jiggle” is present but not liquid, and don’t skimp on the overnight refrigeration. Also, make sure to use 100% pumpkin puree, not pie filling, which can be too watery.
My Crust Shrank or Became Brittle!
Crust shrinkage can happen if the dough isn’t pressed firmly enough into the pie plate before baking. A brittle crust might be due to overbaking the crust initially, making it too dry, or not having enough butter to bind the crumbs effectively.
Always press the crumbs tightly into the pan, and monitor the pre-bake time to ensure it’s golden but not overly browned.
Presentation & Palate: Serving Your Creamy Layered Pumpkin Pie
Classic Whipped Cream & Beyond
A generous dollop of freshly whipped cream is the quintessential topping for any pumpkin pie, its lightness providing a perfect contrast to the rich filling. For an extra touch of indulgence, consider a swirl of salted caramel drizzle or a sprinkle of candied pecans.
A dusting of cinnamon or freshly grated nutmeg adds an aromatic flourish that enhances the traditional flavors.
Garnish Ideas for a Stunning Display
Elevate your presentation with simple, elegant garnishes. A few chocolate shavings, artfully placed fresh mint leaves, or a stencil-dusted design using cocoa powder can transform your pie into a true visual masterpiece.
For a festive touch, small cut-out pie crust shapes or a few toasted pumpkin seeds can also be arranged on top.
Beverage Pairings
The rich, spiced flavors of this Creamy Layered Pumpkin Pie pair beautifully with a variety of beverages. A strong cup of freshly brewed coffee or a spiced chai latte complements its warmth perfectly.
For a non-alcoholic option, a crisp apple cider is a delightful choice. If you prefer a lighter dessert, you might also enjoy exploring options like chewy pumpkin chocolate chip blondies or other seasonal delights on our site.
Ready to Create Your Masterpiece? Share Your Layered Pumpkin Pie!
Now that you’re armed with the secrets to the silkiest, most delicious Creamy Layered Pumpkin Pie, it’s time to gather your ingredients and get baking! This recipe is more than just a dessert; it’s an experience, a tradition in the making.
We can’t wait to see your stunning creations. Be sure to share your layered pumpkin pie masterpieces with us!
Pumpkin Pie
Course: DessertCuisine: AmericanDifficulty: medium8
servings20
minutes1
hour350
kcal480
minutesMaster the art of homemade pumpkin pie with this foolproof recipe. Featuring a crispy graham cracker crust, a luscious cream cheese layer, and a perfectly smooth pumpkin filling, this pie is designed for impressive results every time.
Ingredients
For the Graham Cracker Crust:
1 and 1/2 cups graham cracker crumbs
1/4 cup granulated sugar
6 tablespoons unsalted butter, melted
For the Cream Cheese Layer:
8 ounces cream cheese, softened
1/4 cup granulated sugar
1 large egg yolk
1/2 teaspoon vanilla extract
For the Pumpkin Layer:
15 ounces canned pumpkin puree
1/2 cup packed light brown sugar
1/4 cup granulated sugar
2 large eggs
1 cup evaporated milk
1 teaspoon vanilla extract
1 teaspoon ground cinnamon
1/2 teaspoon ground ginger
1/4 teaspoon ground nutmeg
Pinch of ground cloves
Directions
- Preheat your oven to 350°F (175°C).
- Prepare the crust: In a medium bowl, combine graham cracker crumbs and 1/4 cup granulated sugar. Pour in the melted butter and mix until the crumbs are evenly moistened. Press the mixture firmly into the bottom and up the sides of a 9-inch pie plate. Bake for 8 minutes, then remove from oven and let cool slightly.
- Prepare the cream cheese layer: In a clean bowl, beat the softened cream cheese with 1/4 cup granulated sugar until smooth and creamy. Beat in the egg yolk and vanilla extract until just combined. Spread this mixture evenly over the bottom of the cooled graham cracker crust.
- Prepare the pumpkin layer: In another large bowl, whisk together the pumpkin puree, brown sugar, and granulated sugar. Whisk in the eggs, evaporated milk, vanilla extract, cinnamon, ginger, nutmeg, and cloves until well combined.
- For that guaranteed smooth texture, pass the pumpkin mixture through a fine-mesh sieve into a separate bowl. This step is key to achieving a truly silky filling without any lumps or fibers.
- Pour the strained pumpkin mixture gently over the cream cheese layer in the pie crust.
- Bake for 50 to 60 minutes, or until the edges of the pie are set and the center still has a slight, delicate jiggle when lightly shaken. This specific jiggle means it’s perfectly cooked through without being overbaked, which can cause cracking or graininess.
- Carefully remove the pie from the oven and let it cool completely on a wire rack at room temperature for at least 2 hours. This gradual cooling process is crucial for preventing cracks and allowing the pie to set properly.
- Once cooled to room temperature, cover the pie loosely and refrigerate for at least 4 hours, or preferably overnight, before slicing and serving. This extended chill time locks in the texture, ensuring every slice is perfectly firm and smooth.