Decadent Chocolate Caramel Peanut Butter Bars: Slice Perfection
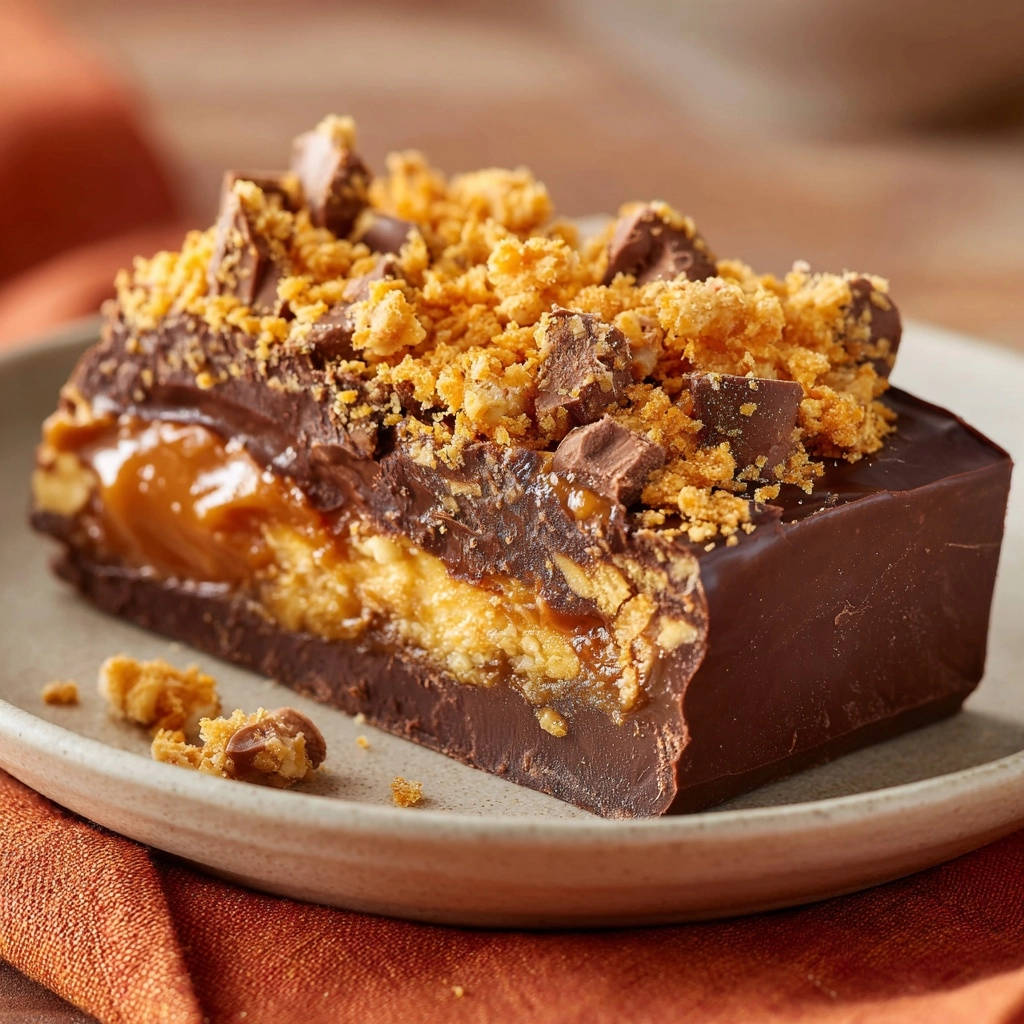
There’s a common frustration many home bakers face: achieving those perfectly neat, layered slices when making dessert bars. I’ve been there, with bars that look incredible until the knife goes in, turning layers into a squishy mess. That’s precisely why this recipe for Decadent Chocolate Caramel Peanut Butter Bars is designed for flawless results, promising stunning, defined layers and effortless slicing every single time.
Get ready to impress with bars that look as professional as they taste, thanks to simple, crucial techniques that guarantee slice perfection.
The Secret to Slicing Perfection: Why This Recipe Shines
This recipe isn’t just about combining delicious flavors; it’s about the method. We focus on strategic chilling and precise handling to ensure each layer sets beautifully, making frustrating, messy cuts a thing of the past.
Achieving Clean, Defined Layers Every Time
The core of our success lies in giving each layer ample time to firm up before the next is added. This methodical chilling process prevents colors from bleeding and textures from blending undesirably.
The result is a stunning presentation with clearly separated chocolate, peanut butter, and caramel layers that hold their shape.
Irresistible Flavor, Effortless Creation
Beyond the perfect slice, these Decadent Chocolate Caramel Peanut Butter Bars deliver an incredible symphony of flavors. The rich chocolate, creamy peanut butter, and gooey caramel create a harmonious balance of sweet and savory notes.
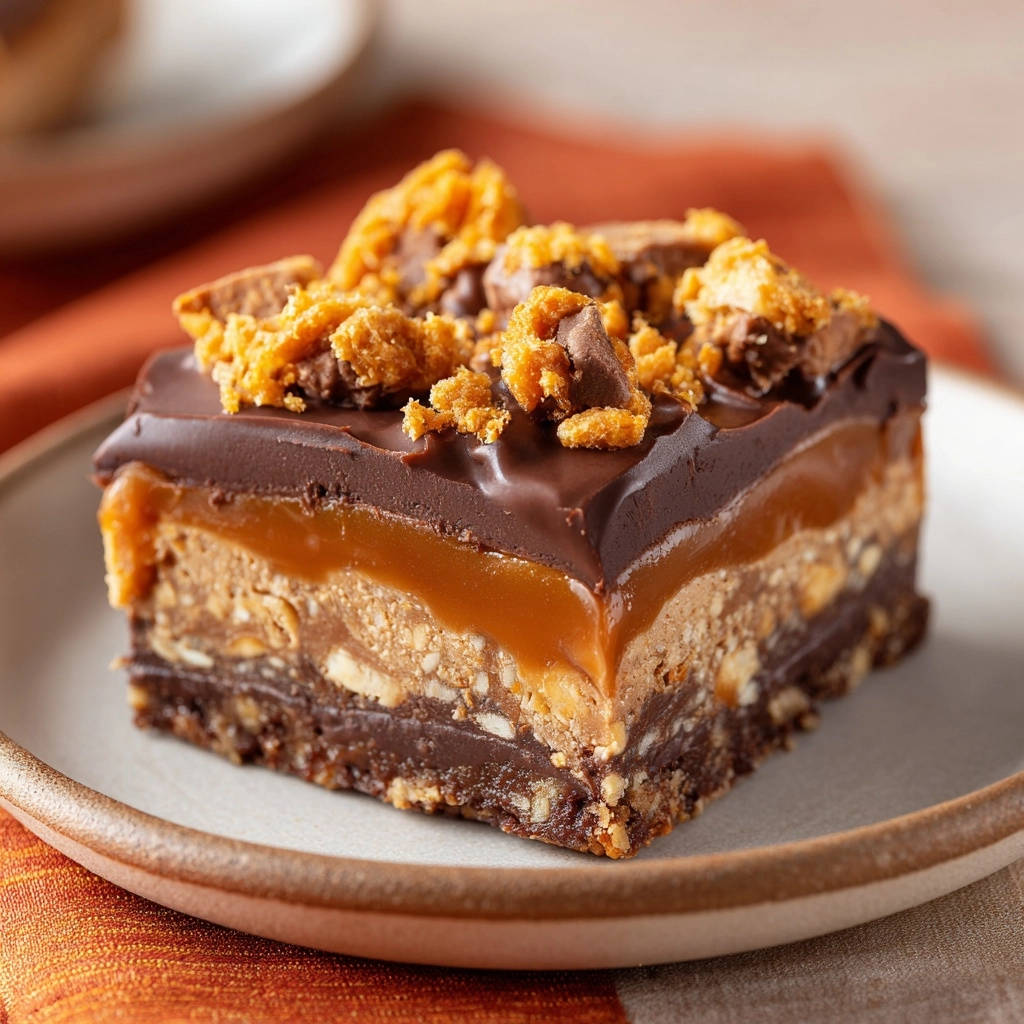
Despite their elaborate appearance, the steps are straightforward and designed for home bakers of all levels.
The Perfect Treat for Any Occasion
Whether you’re hosting a party, preparing a thoughtful gift, or simply indulging your sweet tooth, these bars are a fantastic choice. Their impressive look and irresistible taste make them a guaranteed crowd-pleaser.
They’re substantial enough for a dessert table yet easy to portion for individual enjoyment.
Crafting Each Layer: Essential Ingredients for Unforgettable Bars
Quality ingredients are the foundation of any great dessert. For these Decadent Chocolate Caramel Peanut Butter Bars, choosing the right type and consistency of each component is key to achieving that perfect texture and slice.
For the Sturdy Chocolate Foundation
Semi-sweet chocolate chips provide a balanced sweetness for the base layer. Opt for good quality chocolate that melts smoothly.
Unsalted butter adds richness and ensures a stable, firm base once chilled, crucial for holding the subsequent layers.
Building the Creamy Peanut Butter Core
Creamy peanut butter is essential here for a smooth, uniform layer. Avoid natural peanut butter with oil separation, as it can make the layer too oily or difficult to bind.
Powdered sugar sweetens the peanut butter layer and helps achieve a firm, pliable consistency. Crushed graham cracker crumbs add a subtle crunch and act as a binder, contributing to the layer’s stability.
The Luscious Caramel Heart
The success of the caramel layer hinges on using a thick caramel sauce. Store-bought or homemade dulce de leche works best.
A runny caramel sauce will make your bars messy and impossible to slice cleanly, so avoid thin ice cream toppings.
If you enjoy working with this chocolate base, you might also like these soft chocolate topped peanut butter crispy bars.
The Glossy Chocolate Crown & Crumbly Finish
Semi-sweet chocolate chips for the topping mirror the base, tying the flavors together. A small amount of coconut oil is added to the chocolate topping.
This creates a smooth, glossy finish and helps the chocolate topping set with a cleaner, less brittle texture, making it easier to slice without cracking.
For the crumb topping, crushed chocolate candy pieces add texture and extra chocolatey goodness. Crushed roasted peanuts offer a contrasting savory note and satisfying crunch, though extra graham cracker crumbs can be used for a consistent flavor profile.
Your Blueprint for Bar Bliss: A Step-by-Step Guide
Setting the Stage: The Foundation Layer
Prepare your 8×8-inch baking pan by lining it with parchment paper, leaving generous overhangs on the sides. This simple step is the first secret to effortless removal and clean, intact bars.
Gently melt 1 cup of semi-sweet chocolate chips with 1/4 cup of unsalted butter in a microwave-safe bowl. Stir in 30-second intervals until the mixture is completely smooth and uniform.
Pour this melted chocolate into the prepared pan and spread it evenly to form the base. Work quickly before it begins to set.
Chill for 15 minutes: This initial chill time is absolutely vital. It ensures your chocolate base sets firm enough to support the subsequent layers without becoming a crumbly mess.
Building the Heart: Peanut Butter Perfection
In a medium bowl, combine 1 1/2 cups of creamy peanut butter, 1 cup of powdered sugar, and 1 cup of crushed graham cracker crumbs. Mix thoroughly until the ingredients are well combined and the mixture forms a crumbly, yet cohesive texture.
If the mixture appears too dry to bind, incorporate an additional tablespoon of melted butter to help it come together. Carefully press this peanut butter mixture evenly over the chilled chocolate base.
Chill for 20-30 minutes: Return the pan to the refrigerator. Allowing this peanut butter layer to set fully is critical for creating a distinct, stable middle and prevents it from squishing out during cutting.
The Sticky Sweet Center: Mastering the Caramel
Gently pour 1 cup of thick caramel sauce over the chilled peanut butter layer. Spread it carefully and evenly across the entire surface.
Ensure your caramel sauce is thick, not runny; if it’s too thin, a brief chill in the refrigerator beforehand can improve its consistency. This step significantly impacts the final texture and ease of slicing.
Chill for 45-60 minutes: This extended chill time for the caramel is arguably the most important for achieving clean slices. The caramel must be quite firm and no longer sticky to the touch to prevent oozing when the bars are cut.
The Glossy Crown: Adding the Chocolate Topping
Melt 1 cup of semi-sweet chocolate chips with 1 tablespoon of coconut oil using the same gentle method as the base. Stir until the mixture is completely smooth and beautifully glossy.
Pour this melted chocolate mixture over the chilled caramel layer. Work quickly to spread it evenly across the surface before it begins to set.
That same hot knife trick makes slicing these layered turtle cheesecake bars just as clean.
The Finishing Flourish: Crumbly Delights
Immediately after spreading the chocolate topping, sprinkle your 1/2 cup of crushed chocolate candy pieces and 1/4 cup of crushed roasted peanuts (or extra graham cracker crumbs) evenly over the wet chocolate.
Gently press the crumb topping down slightly to ensure it adheres firmly to the chocolate, preventing it from falling off when sliced.
The Ultimate Chill: Unlocking Clean Cuts
Final Chill (Minimum 3-4 hours, ideally overnight): This long, patient chill is your ultimate secret weapon for perfectly clean, non-sticky slices. The longer the chill, the firmer and more stable all layers will be.
The Hot Knife Trick: When ready to cut, remove the pan from the refrigerator and let it sit at room temperature for about 5-10 minutes. This slight softening prevents the chocolate from cracking. Use a very sharp, long knife for cutting.
For the absolute cleanest cuts, run your knife under hot water for a few seconds and wipe it completely dry before each cut. Press down firmly and steadily without sawing, and wipe the knife clean between every slice for the neatest edges.
Elevate Your Decadent Bars: Expert Tips for Success
Don’t Rush the Chill: Patience is your best friend when making layered bars. Each chilling step, especially the longer ones for the caramel and final set, is vital for distinct, non-oozy layers and ultimately, flawlessly clean slices.
Choosing the Right Caramel: Always opt for a thick, jarred caramel sauce or even a homemade dulce de leche. Avoid thin ice cream toppings, as their runny consistency will make the bars impossible to slice cleanly and result in a messy final product.
The Hot Knife Advantage: This is a game-changer for clean cuts. Dipping your sharp knife in hot water and wiping it dry before each cut slightly warms the blade, allowing it to glide through all layers smoothly without dragging or cracking the chocolate.
Precision Pressing: When pressing the peanut butter layer, apply even pressure across the entire surface. This ensures a uniform thickness, which contributes to both the aesthetic appeal and the consistent texture of each bar.
Vary Your Crumb Topping: Feel free to experiment with your favorite crushed candies, different toasted nuts (like pecans or walnuts), or even crushed pretzels for a delightful salty-sweet crunch that complements the other layers beautifully.
Navigating Sticky Situations: Common Bar Problems Solved
“Why are my layers oozing or falling apart when I cut them?”
This is almost always due to insufficient chilling time, especially for the caramel layer. Ensure each layer is completely firm before adding the next, and prioritize the overnight final chill.
Also, make sure you’re using the hot knife trick, as a cold knife can drag and cause layers to shift.
“My bars are too soft or crumbly.”
If the peanut butter layer is crumbly, it might have been over-mixed, or it needed that extra tablespoon of melted butter to bind it properly. If the overall bars are too soft, they simply need more chilling time in the refrigerator.
A firm chocolate base also contributes to overall stability; ensure it’s fully set before adding the peanut butter layer.
“The chocolate topping cracked when I cut the bars!”
This usually happens if the bars are too cold directly out of the refrigerator. Allowing them to sit at room temperature for 5-10 minutes before cutting helps the chocolate topping soften just enough to prevent cracking, while keeping the rest of the bar firm.
What to Serve with These Bars
If you are making those chocolate caramel peanut butter bars, you might want a couple of other treats that lean into the same nutty, creamy flavors.
- For a scoopable snack with the same rich peanut butter base, try this Loaded Peanut Butter Toffee Dip for dipping pretzels or fruit.
- To balance the sweetness with something fruitier, start your morning with this Creamy Blackberry Peanut Butter Oatmeal that avoids that gummy texture.
Unleash Your Creativity: Customizing Your Decadent Bars
These Decadent Chocolate Caramel Peanut Butter Bars are delicious as is, but they also offer a fantastic canvas for customization. Feel free to adapt them to your taste or dietary needs.
Exploring Alternative Nut Butters
While peanut butter is classic, you can experiment with other creamy nut butters like almond butter or cashew butter. Be aware that their natural oil content and consistency might slightly alter the texture of the peanut butter layer, potentially requiring minor adjustments to the powdered sugar or binder.
For another delicious no-bake treat with a nutty twist, consider trying a No-Bake Peanut Butter Fudge Pie.
Gluten-Free & Dairy-Free Adaptations
To make these bars gluten-free, simply substitute regular graham cracker crumbs with certified gluten-free graham cracker crumbs. For a dairy-free version, use dairy-free chocolate chips, a plant-based butter alternative, and a dairy-free caramel sauce (many brands are available or make your own).
Elevating the Toppings & Mix-Ins
Beyond chocolate candy pieces and peanuts, consider adding mini chocolate chips, toffee bits, a sprinkle of flaky sea salt (which beautifully enhances the chocolate and caramel), or even a drizzle of white chocolate or dark chocolate over the top once the bars have set.
Preserving Perfection: Storage and Make-Ahead Strategies
Proper storage ensures your Decadent Chocolate Caramel Peanut Butter Bars remain fresh and delicious for days, and they are excellent for making in advance!
Optimal Short-Term Storage
Store these bars in an airtight container in the refrigerator for up to 5-7 days. Keeping them chilled helps maintain their firm layers and clean cuts. You can also store them at cool room temperature for up to 2-3 days, but refrigeration is recommended for optimal texture and longevity, especially in warmer climates.
Freezing for Extended Freshness
For longer storage, these bars freeze beautifully. Cut them into individual portions, then wrap each bar tightly in plastic wrap, followed by aluminum foil. Place the wrapped bars in a freezer-safe container or bag for up to 2-3 months.
When ready to enjoy, thaw frozen bars in the refrigerator overnight or at room temperature for about 30-60 minutes before serving. This gradual thawing helps preserve their texture.
Make-Ahead Tips for Stress-Free Entertaining
These Decadent Chocolate Caramel Peanut Butter Bars are the ultimate make-ahead dessert. You can prepare them entirely up to 2-3 days in advance and keep them chilled in the refrigerator, covered. This allows plenty of time for all the layers to set perfectly, making them ideal for parties or gifts without last-minute stress.
Your Decadent Bar Queries Answered
“Do I have to use parchment paper?”
Yes, using parchment paper with an overhang is critically important. It allows you to lift the entire slab of bars out of the pan easily once chilled, making clean cutting much simpler and preventing any sticking.
“What kind of caramel sauce is best for this recipe?”
A thick, pourable caramel sauce is ideal. Look for jars labeled “caramel dessert topping” or “caramel sundae syrup” that have a thicker consistency. Avoid very thin, watery varieties typically used for coffee or thinner drizzles, as they will not set properly.
“Can I use natural peanut butter?”
While possible, it’s generally not recommended for this recipe. Natural peanut butter tends to be more oily and less stable, which can lead to a greasier or less firm peanut butter layer. If you must use it, you might need to blot excess oil and potentially increase the graham cracker crumbs slightly to help with binding.
“How many bars does this recipe make?”
When cut into typical square sizes from an 8×8-inch pan, this recipe generally yields 16 delicious bars (a 4×4 grid). You can cut them smaller for bite-sized treats (e.g., 32 mini bars) or larger for a more substantial dessert, depending on your preference.
Indulge and Share: Your Decadent Bar Journey Begins!
You now possess the secrets to creating truly Decadent Chocolate Caramel Peanut Butter Bars that not only taste incredible but also boast beautifully defined, sliceable layers. Gone are the days of messy, frustrating cuts!
We encourage you to embark on this delightful baking adventure. Share your creations with friends and family, or simply savor them yourself. Don’t forget to share your photos and experiences with us!
Looking for more dessert inspiration that delivers impressive results? Explore our collection, including our popular Chocolate Crumb Cheesecake Bars, designed for bakers of all skill levels.
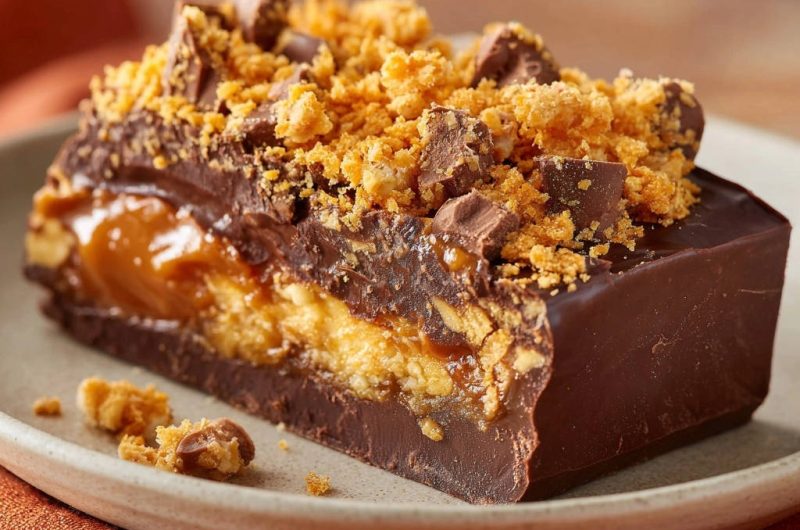
Chocolate Caramel Peanut Butter Bars
Course: DessertCuisine: AmericanDifficulty: easy16
bars20
minutes350
kcal240
minutesDiscover the secret to perfectly neat and layered dessert bars with this Decadent Chocolate Caramel Peanut Butter Bars recipe. Enjoy a rich combination of chocolate, peanut butter, and caramel, crafted for impressive, clean slices every time.
Ingredients
For the Chocolate Base:
1 cup semi-sweet chocolate chips
1/4 cup unsalted butter
For the Peanut Butter Layer:
1 1/2 cups creamy peanut butter
1 cup powdered sugar
1 cup crushed graham cracker crumbs
For the Caramel Layer:
1 cup thick caramel sauce
For the Chocolate Topping:
1 cup semi-sweet chocolate chips
1 tablespoon coconut oil
For the Crumb Topping:
1/2 cup crushed chocolate candy pieces
1/4 cup crushed roasted peanuts or extra graham cracker crumbs
Directions
- Prepare Pan and Base: Line an 8×8 inch square baking pan with parchment paper, leaving an overhang on the sides. This is key for easy removal later. For the chocolate base, melt 1 cup semi-sweet chocolate chips and 1/4 cup unsalted butter in a microwave-safe bowl in 30-second intervals, stirring until smooth. Pour into the prepared pan and spread evenly. Refrigerate for at least 15 minutes, or until firm to the touch. This firm base is critical for a stable foundation.
- Make Peanut Butter Layer: In a medium bowl, combine 1 1/2 cups creamy peanut butter, 1 cup powdered sugar, and 1 cup crushed graham cracker crumbs. Mix until well combined and crumbly. If it seems too dry, you can add a tablespoon of melted butter to help bind it. Carefully press this mixture evenly over the chilled chocolate base. Return to the refrigerator for another 20-30 minutes, or until this layer is also firm. Allowing each layer to set fully before adding the next is vital for clean cuts.
- Add Caramel Layer: Gently pour 1 cup of thick caramel sauce over the chilled peanut butter layer. Spread it carefully and evenly. For best results, use a caramel sauce that is thick and not too runny. If your caramel is very runny, chill it slightly first. Return the pan to the refrigerator and chill for at least 45 minutes to 1 hour, or until the caramel is quite firm and no longer sticky to the touch. This step is the most important for ensuring the caramel doesn’t ooze when cut.
- Create Chocolate Topping: Melt 1 cup semi-sweet chocolate chips and 1 tablespoon coconut oil together using the same method as the base. Stir until smooth and glossy. Pour this melted chocolate mixture over the chilled caramel layer, spreading it quickly and evenly.
- Add Crumb Topping: Immediately sprinkle the crushed chocolate candy pieces and crushed roasted peanuts (or extra graham cracker crumbs) over the wet chocolate topping. Gently press them down slightly so they adhere.
- Final Chill and Cut: Place the pan back into the refrigerator for a minimum of 3-4 hours, or ideally, overnight. This extended chill time is the secret weapon for perfectly clean cuts. When ready to cut, remove the pan from the refrigerator. Let it sit at room temperature for about 5-10 minutes (no longer!) to slightly soften the chocolate for easier cutting. Use a very sharp, long knife. For the cleanest cuts, run the knife under hot water for a few seconds and wipe it dry before each cut. Press down firmly and steadily without sawing. Wipe the knife clean between each slice for the neatest edges. Lift the bars out using the parchment paper overhang and slice into desired sizes.
Notes
- For best results, allow ample chill time between layers and for the final set.