Festive Pumpkin Deviled Eggs: The Secret to Silky Smooth
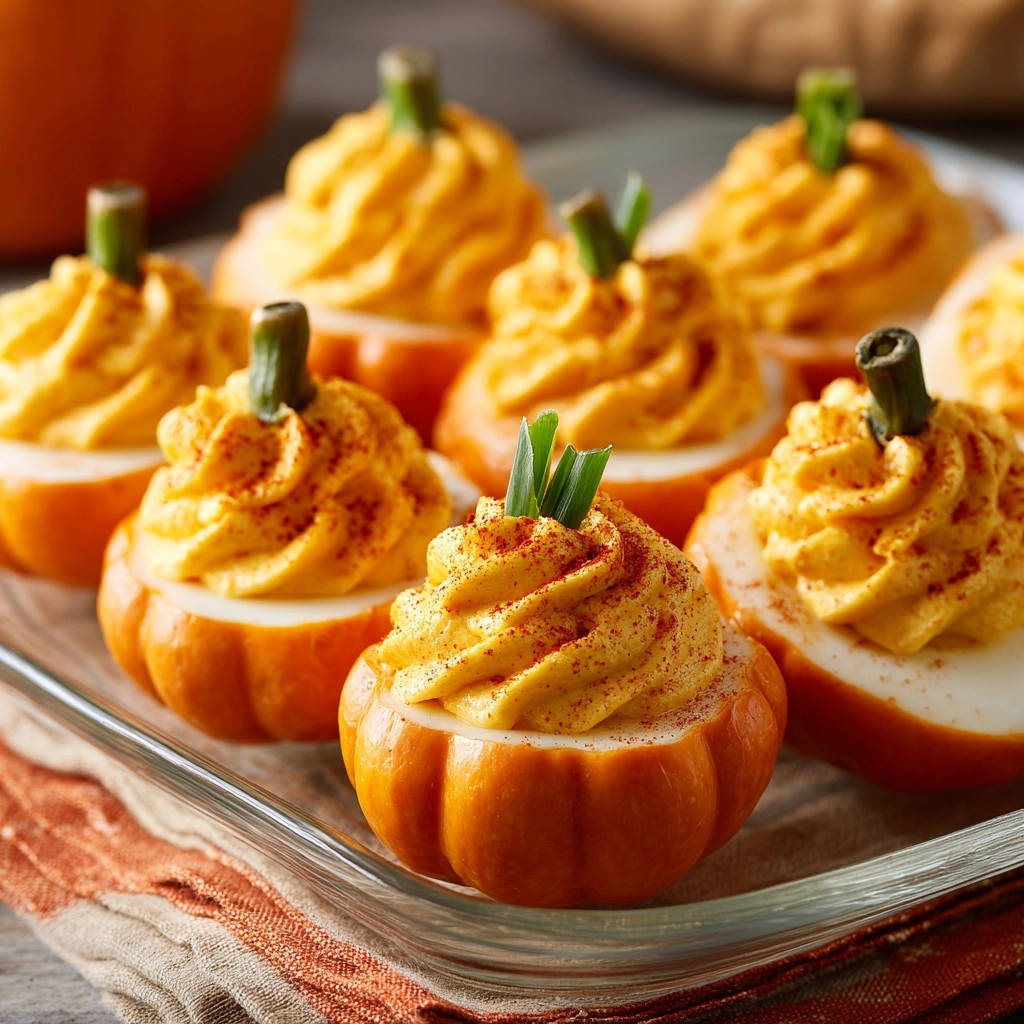
I vividly remember the frustration of deviled eggs with a lumpy, unappealing filling – a common kitchen woe. But with my secret for incredibly silky smooth yolk filling and a charming pumpkin aesthetic, these Festive Pumpkin Deviled Eggs are set to become your new favorite holiday appetizer.
This recipe transforms a classic into a show-stopping dish, offering both irresistible flavor and a visually stunning presentation perfect for any autumn or winter gathering.
What to Serve Alongside
These pumpkin deviled eggs have a creamy, spiced filling that pairs well with a cool, sturdy side. Potato salad brings a contrasting texture and a mild tang that balances the richness of the eggs.
- For a classic, hearty side that echoes the creamy texture of the eggs, try this Creamy Southern Style Potato Salad with its mustard-and-mayo dressing.
- If you prefer a firmer bite with no mush, this Perfect Creamy Potato Salad keeps each cube intact and adds a gentle crunch from celery and onion.
Why You’ll Adore These Festive Pumpkin Deviled Eggs (and So Will Your Guests!)
Imagine the delight on your guests’ faces as they encounter these adorable, perfectly crafted deviled eggs. Our unique technique ensures an unbelievably smooth, melt-in-your-mouth filling every single time, banishing lumpy disappointments forever.
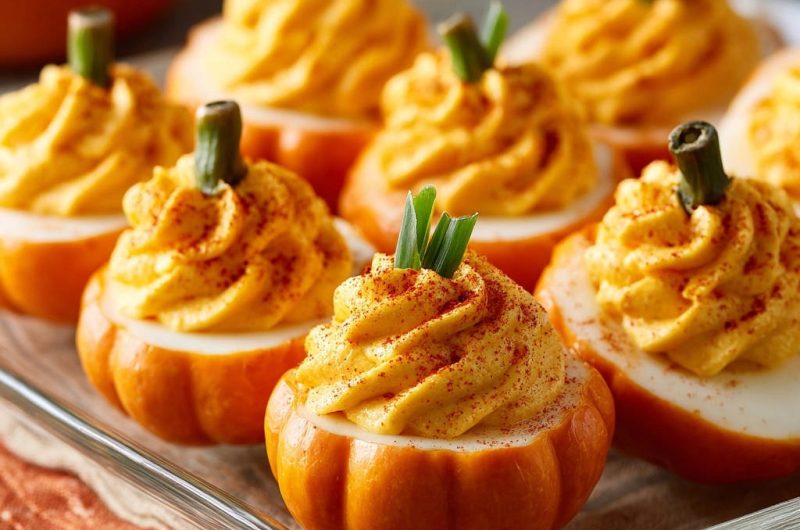
Beyond the flawless texture, the optional festive pumpkin appearance elevates these deviled eggs from a simple snack to a true culinary centerpiece. It’s an effortless way to infuse your holiday table with whimsical charm and seasonal cheer.
This recipe provides a reliable solution to common deviled egg challenges, making you a confident and praised host. Prepare for compliments on both the taste and the charming presentation of these Festive Pumpkin Deviled Eggs.
Gathering Your Culinary Tools: Essential Equipment for Perfect Deviled Eggs
- Large Pot & Ice Bath Bowl:
Crucial for perfectly cooked, easy-to-peel eggs, ensuring a vibrant yellow yolk without the green ring.
- Fine Mesh Sieve:
This is your secret weapon for achieving an unbelievably smooth yolk filling, separating any lumps for a truly creamy texture.
- Rubber Spatula:
Ideal for pressing yolks through the sieve and thoroughly mixing the filling ingredients.
- Piping Bag with Star Tip (or Ziploc Bag):
For elegantly piping the filling, creating a professional and appealing presentation. A simple Ziploc bag can be used as a substitute by snipping a corner.
- Small Sharp Knife & Pastry Brush (Optional):
Needed for shaping egg whites and applying food coloring to create the festive pumpkin effect.
The Core Ingredients for Festive Pumpkin Deviled Eggs Brilliance
The Foundation: Fresh Large Eggs
Twelve large eggs form the canvas for our festive creation. Freshness is key for flavor, but slightly older eggs (about a week old) often peel more easily, making your prep smoother.
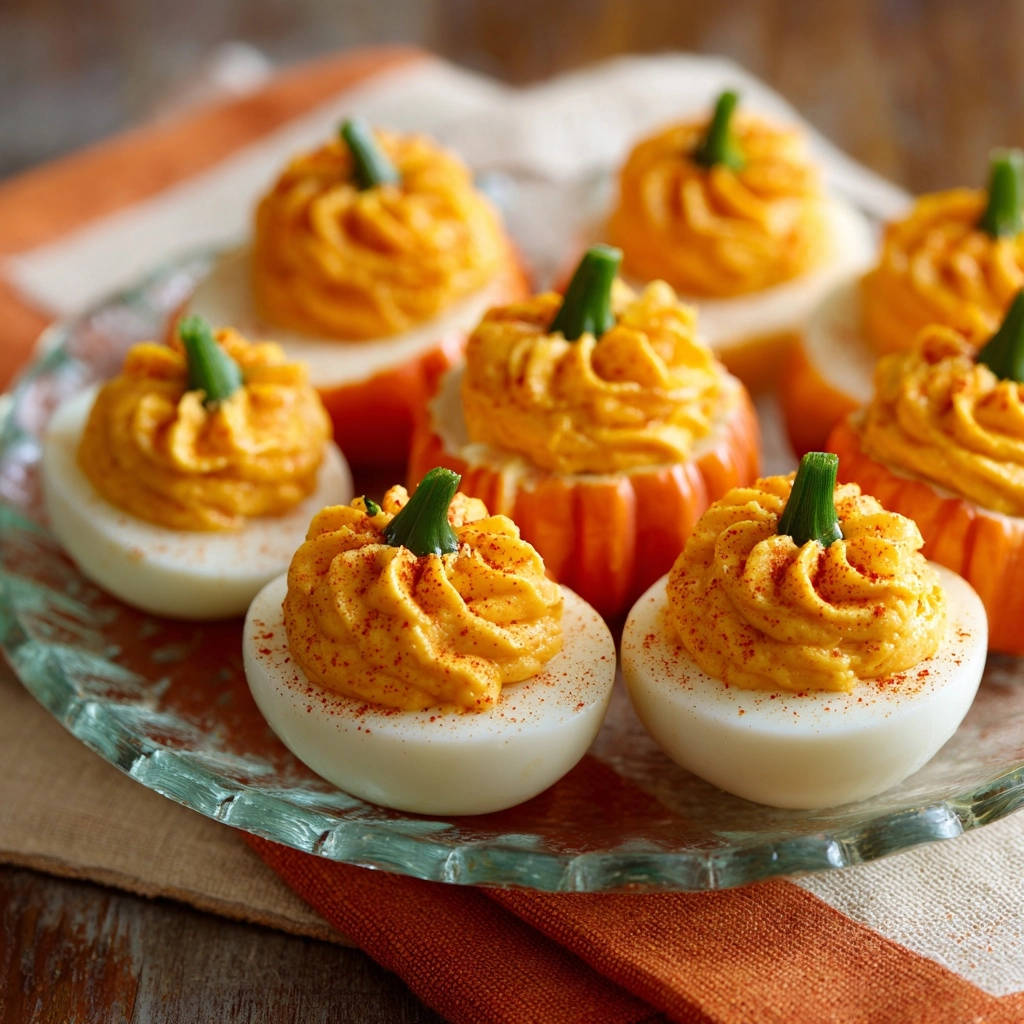
The Creamy & Tangy Trio: Mayonnaise, Dijon, and Vinegar
Half a cup of mayonnaise provides the essential creamy binder, delivering richness and a smooth base for the filling.
One tablespoon of Dijon mustard introduces a subtle tangy kick that balances the richness of the yolks and mayonnaise.
A teaspoon of white vinegar brightens the overall flavor profile, cutting through the creaminess and adding a refreshing zest without overpowering.
Seasoning for Depth: Salt, Pepper, & Smoked Paprika
Precise amounts of salt and black pepper enhance the natural flavors, ensuring the deviled eggs are perfectly seasoned and never bland.
Smoked paprika isn’t just a garnish; its smoky notes add a layer of complexity and a beautiful reddish hue, completing the festive look.
The Festive Flair: Chives, Green Onion Tops & Optional Food Coloring
Finely chopped fresh chives or green onion tops are essential for their fresh, oniony bite and, more importantly, to act as the “pumpkin stem” garnish.
A few drops of orange food coloring are purely optional but transformative, turning your egg whites into charming, vibrant pumpkins, perfect for holiday tables.
Crafting Your Festive Pumpkin Deviled Eggs: A Step-by-Step Journey to Perfection
- Prepare the Hard-Boiled Eggs:
Place your 12 large eggs in a large pot and cover with cold water by about an inch. Bring the water to a rolling boil over high heat. Once boiling, immediately remove the pot from the heat, cover tightly, and let sit for exactly 12 minutes. This method ensures perfectly cooked yolks without overcooking.
- Cool and Peel with an Ice Bath:
Immediately transfer the hot eggs to an ice bath (a bowl of ice water) and let them cool completely for at least 10 minutes. This rapid cooling halts the cooking process, prevents the unsightly green ring around the yolk, and makes peeling significantly easier.
Gently tap and roll each egg on a hard surface to crack the shell all over, then peel carefully under cool running water. This helps to wash away small shell fragments.
- Halve, Scoop, and Arrange:
Once peeled, slice each egg cleanly in half lengthwise using a sharp knife. Carefully scoop out the bright yellow yolks and place them into a medium bowl. Arrange the empty egg white halves cavity-side up on your chosen serving platter.
- Achieve Silky Smooth Filling (The Secret!):
This is the pivotal step for that signature creamy texture. Using the back of a fork, thoroughly mash the egg yolks until they are completely crumbled and powdery, ensuring no large lumps remain.
For the ultimate, unbelievably silky smooth texture, press all the mashed yolks through a fine mesh sieve into a clean bowl using a rubber spatula. This crucial step removes any last bits of grit or unmashed yolk, guaranteeing an incredibly smooth and airy filling.
- Mix the Flavorful Filling:
To the sieved (or very finely mashed) yolks, add the 1/2 cup mayonnaise, 1 tablespoon Dijon mustard, 1 teaspoon white vinegar, 1/4 teaspoon salt, and 1/8 teaspoon black pepper. Stir well with the rubber spatula until all ingredients are fully combined and the mixture is consistently smooth, creamy, and lump-free.
- Optional Pumpkin Appearance Transformation:
If you desire the festive pumpkin look, now is the time to transform your egg whites. In a small bowl, mix a few drops of orange food coloring with a tablespoon of water.
Using a pastry brush or a clean paper towel, gently dab the orange liquid onto the cut edges and outer surfaces of the egg white halves, creating a soft, pumpkin-like hue. For an extra touch, you can use a small sharp knife to carefully trim the top edge of some egg whites into a slight scallop before adding color, mimicking a pumpkin’s shape.
- Pipe the Filling:
Transfer the smooth, creamy yolk mixture to a piping bag fitted with a star tip for a decorative flourish (or a clean Ziploc bag with one corner snipped off for a simpler presentation). Generously pipe the filling into the center of each egg white half, creating an appealing swirl or mound.
- Garnish and Serve:
Lightly dust the top of each piped deviled egg with smoked paprika for color and an added layer of flavor. To complete the pumpkin illusion, place a small piece of chopped chive or green onion top into the center of each piped filling to resemble a pumpkin stem.
- The Essential Chill Time:
Cover your platter loosely with plastic wrap or foil and chill the Festive Pumpkin Deviled Eggs in the refrigerator for at least 30 minutes before serving. Chilling allows the flavors to meld and the filling to firm up slightly, making them even more delicious.
Master Your Deviled Eggs: Expert Tips & Tricks for Success
Achieving Effortless Egg Peeling Every Time
Start Cold, Finish Fast: Always start your eggs in cold water and rapidly transfer them to an ice bath. This temperature shock causes the egg white to contract from the shell, making peeling much easier and preventing the shell from clinging.
Aged Eggs are Your Friend: While fresh eggs are great for taste, eggs that are about a week old tend to peel more easily than very fresh ones. Plan ahead if you struggle with peeling!
The Science Behind the Sieve: Why it Matters for Texture
Beyond Mashing: While thorough mashing is a good start, the fine mesh sieve truly transforms your filling. It breaks down any remaining tiny yolk particles, ensuring an unparalleled, airy, and grit-free consistency that melts in your mouth.
Don’t Skip This Step: If you’re aiming for that bakery-quality smoothness, do not skip the sieving. It takes an extra minute but makes all the difference in the final mouthfeel of your Festive Pumpkin Deviled Eggs.
Flavor Boosters & Creative Variations
A Hint of Heat: For those who like a little spice, add a tiny pinch of cayenne pepper to your yolk mixture. It provides a subtle warmth without overwhelming the pumpkin theme.
Herbaceous Swaps: Experiment with finely chopped fresh dill or parsley instead of chives for a different flavor profile, though chives best mimic a pumpkin stem.
Mustard Medley: While Dijon is classic, a touch of spicy brown mustard or even a tiny amount of horseradish can add an exciting twist to the filling.
If you enjoy working with mustard for smooth textures, you might like these broccoli spinach tomato frittata muffins for another gentle, creamy bite.
And if you can’t get enough of pumpkin flavors, you might also enjoy our decadent pumpkin pie truffles for a sweet treat.
Perfect Piping Techniques
Fill Smartly: When loading your piping bag, fold the top down to create a cuff, making it easier to fill without getting mixture all over the outside. Twist the top securely to prevent back-flow.
Steady Pressure: Apply even, steady pressure on the piping bag as you fill each egg. This creates a consistent and attractive swirl or mound of filling.
Troubleshooting Common Deviled Egg Dilemmas
“Why Are My Eggs Hard to Peel?”
This is often due to using very fresh eggs or not shocking them quickly enough in an ice bath. Always use eggs that are at least a week old if possible, and ensure they go directly from boiling water to an ample ice bath for 10 minutes or more.
“My Filling Isn’t Smooth Enough!”
The number one culprit here is skipping or not thoroughly performing the sieving step. Mash your yolks until absolutely powdery, then press them through a fine-mesh sieve with a rubber spatula to eliminate all lumps and achieve that desired silky texture.
“The Yolks Have a Green Ring!”
A green ring around the yolk indicates overcooked eggs. Our method of removing the pot from heat immediately after boiling helps prevent this. The instant ice bath also stops the cooking process, ensuring bright yellow yolks every time.
“My Deviled Eggs Look Sloppy!”
Sloppy presentation can result from overfilling the whites, using a filling that’s too warm, or uneven piping. Make sure your filling is chilled, pipe with steady pressure, and don’t try to cram too much filling into each half. Trimming the bottom of the egg whites slightly for stability can also help.
Serving, Storing, and Making Ahead: Your Festive Pumpkin Deviled Eggs Guide
Elegant Serving Suggestions
Serve your Festive Pumpkin Deviled Eggs on a beautiful platter, perhaps nestled among some autumn leaves or small decorative gourds to enhance the seasonal theme. A sprinkle of extra chives or a tiny sprig of fresh thyme can further elevate their visual appeal.
For a perfect pairing, try our Crustless Spinach Feta Quiche: Fluffy Texture Mastery.
How to Store Deviled Eggs for Freshness
Deviled eggs are best enjoyed fresh, but they can be stored. Place them in an airtight container in a single layer to prevent shifting and crushing. If you have a specific deviled egg carrier, even better!
Refrigerate promptly and consume within 2-3 days for optimal freshness and safety. The filling can dry out, and the whites can firm up slightly over time.
Can You Make Festive Pumpkin Deviled Eggs in Advance?
Yes, with a few strategic steps! You can hard-boil and peel the eggs up to 2 days in advance, storing them in the refrigerator in a sealed container or submerged in cold water.
The yolk filling can also be prepared a day ahead and stored in an airtight container in the fridge. On the day of serving, simply mix the filling to refresh it, pipe into the egg whites, garnish, and chill briefly.
Frequently Asked Questions About Festive Pumpkin Deviled Eggs
“Can I use store-bought hard-boiled eggs for this recipe?”
While convenient, store-bought hard-boiled eggs often have a firmer texture and can be less flavorful than freshly boiled eggs. They also don’t guarantee the perfectly peelable quality our method provides. For the best results, we recommend boiling your own, but if time is critical, ensure you still mash and sieve the yolks for smoothness.
“Are there substitutions for mayonnaise to make it lighter or dairy-free?”
Yes! For a lighter option, you can substitute part or all of the mayonnaise with plain Greek yogurt or sour cream, though this will slightly alter the tanginess and richness. For a dairy-free version, a good quality avocado oil mayonnaise works wonderfully.
“How long do deviled eggs typically last in the refrigerator?”
For food safety and optimal taste, Festive Pumpkin Deviled Eggs should be consumed within 2-3 days when stored properly in an airtight container in the refrigerator. After this time, the texture and flavor may begin to decline.
“Can I make these less spicy or more flavorful with other seasonings?”
Absolutely! Adjust the black pepper to your preference for less spice. To add more flavor, consider a tiny dash of garlic powder or onion powder to the yolk mixture, or even a very small amount of finely chopped pickle relish for a different kind of tang.
“What if I don’t have a piping bag with a star tip?”
No problem! A sturdy Ziploc bag makes an excellent substitute. Simply spoon the filling into one corner of the bag, twist the top to secure, and then snip off a small piece of the corner to create an opening. You won’t get the star tip’s decorative effect, but the filling will still look neat and appealing.
The Final Flourish: A Festive Pumpkin Deviled Eggs Tradition Begins!
With our foolproof method for unbelievably silky smooth filling and charming pumpkin aesthetics, your Festive Pumpkin Deviled Eggs are poised to be the star appetizer of any gathering. Beyond being a delightful treat for the taste buds, they are a conversation starter, a visual feast, and a testament to culinary creativity.
We encourage you to make these a new tradition in your home. Share your creations, inspire others, and let the compliments roll in! Don’t forget to explore our other delightful appetizer recipes for more culinary inspiration.
Deviled Eggs
Course: AppetizerCuisine: AmericanDifficulty: easy24
deviled egg halves25
minutes12
minutes75
kcal60
minutesAchieve unbelievably smooth and creamy deviled eggs every time with this simple trick. This recipe also offers a fun, festive pumpkin appearance, perfect for impressing guests at any gathering. Enjoy perfectly garnished and chilled treats.
Ingredients
12 large eggs
1/2 cup mayonnaise
1 tablespoon Dijon mustard
1 teaspoon white vinegar
1/4 teaspoon salt
1/8 teaspoon black pepper
1/2 teaspoon smoked paprika for dusting
2 tablespoons fresh chives or green onion tops finely chopped for garnish
Optional: Orange food coloring
Directions
- Prepare the Hard-Boiled Eggs: Place eggs in a large pot and cover with cold water by about an inch. Bring the water to a rolling boil over high heat. Once boiling immediately remove the pot from the heat cover tightly and let sit for 12 minutes.
- Cool and Peel: Immediately transfer the eggs to an ice bath (a bowl of ice water) and let them cool completely for at least 10 minutes. This helps prevent the green ring around the yolk. Gently tap and roll each egg on a hard surface to crack the shell then peel carefully under cool running water.
- Halve and Scoop: Slice each peeled egg in half lengthwise. Carefully scoop out the yolks and place them in a medium bowl. Place the egg white halves on a serving platter.
- Achieve Silky Smooth Filling (The Secret!): This is where the magic happens for that perfect texture. Using the back of a fork thoroughly mash the egg yolks until they are completely crumbled and powdery with no large lumps remaining. For the ultimate silky smooth texture press the mashed yolks through a fine mesh sieve into a clean bowl using a rubber spatula. This step removes any last bits of grit ensuring an incredibly creamy filling.
- Mix the Filling: To the sieved or finely mashed yolks add the mayonnaise Dijon mustard white vinegar salt and black pepper. Stir well until all ingredients are fully combined and the mixture is consistently smooth and creamy.
- Optional Pumpkin Appearance: If you want the festive pumpkin look for your egg whites you can do this step now. In a small bowl mix a few drops of orange food coloring with a tablespoon of water. Using a pastry brush or clean paper towel gently dab the orange liquid onto the cut edges and outer surfaces of the egg white halves. For a pumpkin shape you can use a small sharp knife to carefully trim the top edge of some egg whites into a slight scallop before adding color.
- Pipe the Filling: Transfer the yolk mixture to a piping bag fitted with a star tip (or a Ziploc bag with a corner snipped off). Pipe the smooth creamy filling generously into the center of each egg white half creating a decorative swirl.
- Garnish and Serve: Lightly dust the top of each deviled egg with smoked paprika. Place a small piece of chopped chive or green onion top into the center of each piped filling to resemble a pumpkin stem.
- Chill: Cover the platter loosely and chill in the refrigerator for at least 30 minutes before serving. Enjoy your perfectly smooth and festive deviled eggs!
Notes
- Sieving the yolks ensures an incredibly smooth and creamy filling. Use orange food coloring and chives for a festive pumpkin appearance.